background image

20 • 

Preparations

Changing the Time Zone

Change the time zone to match your 
location. The default setting is New 
York or Singapore, depending on the 
region of purchase. 


[


MENU] 


[

 DATE/TIME SETUP] 


[T.ZONE/DST]  
Desired time zone* 

* To adjust for daylight saving time, select the 

area name marked with a 

.

Setting the Date and Time

1

Open the date and time setup 
screen.


[

 MENU] 


[

 DATE/TIME SETUP] 


[DATE/TIME]
Blinking arrows will be displayed 
around the first field of the date.

2

Change each field of the date and 
time with the joystick (

) and 

move (

) to the next field.

3

Press 

 to start the clock.

4

Press 

 to close the menu.

NOTES

You can also change the date format 
(

49).

Getting Ready to Start Recording

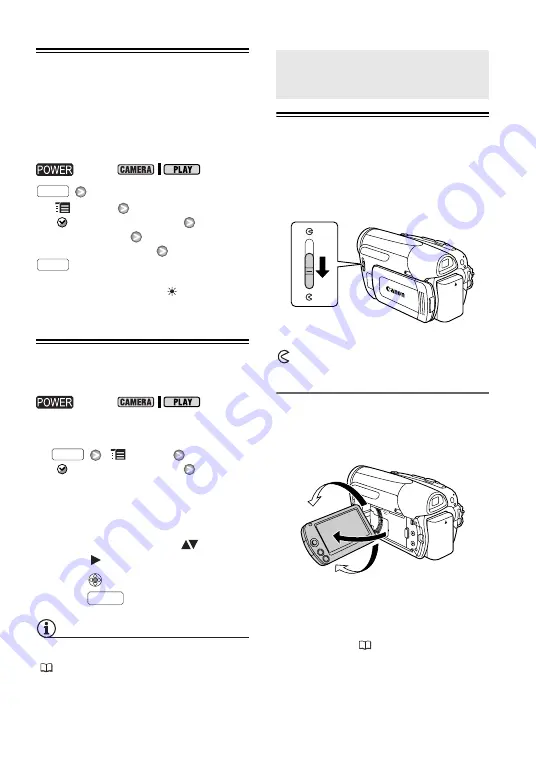
Opening the Lens Cover and Adjusting 
the LCD Screen 

Before you start recording, open the 
lens cover.

Move the lens cover switch down to 

 to open the lens cover. 

Rotating the LCD Panel

Open the LCD panel 90 degrees.

You can rotate the panel 90 degrees 
downward.

You can rotate the panel 180 degrees 
toward the lens (allowing the subject to 
monitor the LCD screen while you use 
the viewfinder (

23)). Rotating the 

LCD panel 180 degrees can be useful 
also when you wish to include yourself 
in the picture when recording with the 
self timer.

switch:

switch:

FUNC.

FUNC.

FUNC.

FUNC.

Getting Ready to Start 
Recording

180°

90°

Summary of Contents for 3543B001

Page 1: ...PUB DIM 0915 000 Digital Video Camcorder Instruction Manual Caméscope numérique Manuel d instruction English Français Español Videocámara digital Manual de Instrucciones NTSC Mini Digital Video Cassette ...

Page 2: ...dry cleaning cassette If the symptoms reappear shortly after cleaning the videocassette may be defective Stop using it Availability differs from area to area Video heads may become dirty under the following conditions Using the camcorder in humid or hot places Using cassettes with damaged or dirty tapes Using the camcorder in dusty places Using the video heads for a long time without cleaning them...

Page 3: ...which can be determined by turning the equipment off and on the user is encouraged to try to correct the interference by one or more of the following measures Reorient or relocate the receiving antenna Increase the separation between the equipment and receiver Connect the equipment into an outlet on a circuit different from that to which the receiver is connected Consult the dealer or an experienc...

Page 4: ...e operated only from the type of power source indicated on the marking label If you are not sure of the type of power supply to your home consult your product dealer or local power company Regarding other power sources such as battery power refer to instructions in this manual 19 Overloading Do not overload wall outlets and extension cords as this can result in a risk of fire or electric shock 20 ...

Page 5: ...product ask the service technician to perform safety checks to determine that the product is in safe operating order When replacement of the power supply is required please return it to the responsible nearest Canon Service Center and please replace it with the same type number CA 590 The adapter can be used with a power supply between 100 and 240 V AC For areas where 120 V AC power is not used yo...

Page 6: ...tick Guide 18 Using the Menus 19 First Time Settings 19 Changing the Language 20 Changing the Time Zone 20 Setting the Date and Time 20 Getting Ready to Start Recording 20 Opening the Lens Cover and Adjusting the LCD Screen 21 Inserting and Removing a Tape Video _________________________________________ 23 Basic Recording 23 Shooting Video 24 Changing the Aspect Ratio of the Recordings Widescreen ...

Page 7: ...0 Copying your Recordings to an External Video Recorder 41 Digital Video Dubbing 43 Connecting to a Computer 43 PC Connection Diagram 44 Transferring Video Recordings Additional Information ____________________________ 45 Appendix Menu Options Lists 45 FUNC Menu 46 Setup menus 46 Camera Setup Advanced Zoom Image Stabilizer etc 46 VCR Setup Recording Mode TV Type etc 47 Audio Setup Wind Screen Outp...

Page 8: ...8 Table of contents 58 General Information 58 System Diagram 59 Optional Accessories 62 Product Codes 63 Specifications 65 Index ...

Page 9: ...camera About this Manual Special Scene Recording Programs Recording in a very bright ski resort or capturing the full colors of a sunset or a fireworks display becomes as easy as selecting a Special Scene recording program For details about the available options refer to the sidebar on page 33 POINTS TO CHECK Mode switch OGRAM AE Desired recording program NOTES Do not set the mode switch to during...

Page 10: ...our new Canon product on file to help you refer to this information in the event of an insurance claim such as loss or theft 9 Receive information on new products and promotions Upon your request we will send you information on Canon new products and promotions The serial number of this product can be found at the battery attachment unit of the camcorder Write down the number and other information...

Page 11: ... view Right side view Lens cover switch 23 open closed Speaker 27 CHG charge indicator 15 DV terminal 39 43 MIC microphone terminal red 36 AV terminal 39 Lock button switch Mode switch 24 Easy recording Recording programs Grip belt 17 Stereo microphone ...

Page 12: ...adjustment lever 23 STANDBY indicator 25 VIEWFINDER button 23 Start Stop button 23 DC IN terminal 15 LCD screen 20 Serial number Battery attachment unit 15 Backup battery compartment 17 Cassette compartment 21 OPEN EJECT switch 21 Cassette compartment cover 21 Zoom lever 25 Tripod socket 53 BATT battery release switch 16 ...

Page 13: ...ual focus 32 Image stabilizer 46 Recording mode 46 Tape operation 14 Time code hours minutes seconds Remaining tape 14 Remaining battery charge 14 Wind screen off 47 Backup battery warning 17 Level marker 48 Recording reminder 14 Operating mode mode Recording movies 23 mode Playing back movies 27 Audio playback mode 37 Speaker volume 27 Searching for the end of the last scene 28 Playback time hour...

Page 14: ...ed may not be accurate In any case you will be able to record on the tape the number of minutes that appears on the cassette s label for example 85 minutes Remaining battery charge When starts flashing in red replace the battery pack with a fully charged one When you attach an empty battery pack the power may turn off without displaying the icon Depending on the conditions under which the camcorde...

Page 15: ... adapter into a power outlet Depending on the region of purchase a power cord for the compact power adapter may have been supplied as well In that case connect the power cord to the compact power adapter before plugging it into the power outlet 2 Connect the compact power adapter to the camcorder s DC IN terminal 3 Attach the battery pack to the camcorder Press the battery pack lightly and slide i...

Page 16: ... be charged only when the camcorder is off If remaining battery time is an issue you can power the camcorder using the compact power adapter so the battery pack will not be consumed The CHG charge indicator also serves as a rough estimate of the battery charge status Two quick flashes at 1 second intervals Battery pack at least 50 charged If the indicator flashes quickly but not exactly in this pa...

Page 17: ...ackup battery cover 3 Insert the backup battery with the side facing out 4 Close the cover NOTES The battery life of the backup battery is about one year flashes in red when the lithium button battery is not installed or when it needs to be replaced Preparing the Accessories Fasten the grip belt Adjust the grip belt so that you can reach the zoom lever with your index finger and the button with yo...

Page 18: ...nu 1 Press 2 Select the icon of the function you want to change from the left side column Menu items not available will appear grayed out 3 Select the desired setting from the available options at the bottom bar The selected option will be highlighted in light blue With some settings you will need to make further selections and or press Follow the additional operation guides that will appear on th...

Page 19: ...ess to save the setting 6 Press You can press to close the menu at any time First Time Settings Changing the Language The language for on screen and menu displays can be changed The list of available languages depends on the region where you purchased the camcorder Default value MENU DISPLAY SETUP LANGUAGE Desired language NOTES If you changed the language by mistake follow the mark next to the me...

Page 20: ...ld 3 Press to start the clock 4 Press to close the menu NOTES You can also change the date format 49 Getting Ready to Start Recording Opening the Lens Cover and Adjusting the LCD Screen Before you start recording open the lens cover Move the lens cover switch down to to open the lens cover Rotating the LCD Panel Open the LCD panel 90 degrees You can rotate the panel 90 degrees downward You can rot...

Page 21: ...reen to normal or bright MENU DISPLAY SETUP BACKLIGHT Desired option NOTES This setting does not affect the brightness of the recordings or the viewfinder screen Using the BRIGHT setting will shorten the effective usage time of the battery pack Inserting and Removing a Tape Use only videocassettes marked with the logo 1 Slide fully in the direction of the arrow and open the cassette compartment co...

Page 22: ...IMPORTANT Do not interfere with the cassette compartment while it is opening or closing automatically or attempt to close the cover before the cassette compartment has fully retracted Be careful not to get your fingers caught in the cassette compartment cover NOTES If the camcorder is connected to a power source cassettes can be inserted removed even if the switch is set to CHG ...

Page 23: ...ove the tape 4 Disconnect the power source and remove the battery pack Basic Recording Before You Begin Recording Make a test recording first to check if the camcorder operates correctly If necessary clean the video heads 2 switch WHEN YOU HAVE FINISHED RECORDING Using the Viewfinder When recording in bright places it may be difficult to use the LCD screen In such case change the brightness of the...

Page 24: ... levels This is not a malfunction Changing the Aspect Ratio of the Recordings Widescreen 4 3 The default aspect ratio of movies is 16 9 widescreen Follow the procedure below to change it to 4 3 MENU CAMERA SETUP WIDESCREEN OFF NOTES Playing back a widescreen recording TV sets compatible with the Video ID 1 system will switch automatically to 16 9 mode Otherwise change the aspect ratio of the TV ma...

Page 25: ...you close the LCD panel in mode the camcorder enters the standby mode In standby mode the camcorder consumes only about half the power used when recording saving energy when you are using a battery pack Additionally when you open the LCD panel the camcorder is ready to start recording in approximately 1 switch OPTICAL 37x The zoom range is limited to the optical magnification ratio of the lens ADV...

Page 26: ...isplayed the camcorder may not enter standby mode Check that the orange STANDBY indicator turns on The camcorder will shut off if left in standby mode for 10 minutes regardless of the POWER SAVE setting 49 To restore the power if the camcorder shut off turn the camcorder off and then on again You can select the length of time until shut off or turn off the Quick Start function altogether with the ...

Page 27: ...s to display the joystick guide Push the joystick toward or toward and hold it pressed down to play back while rewinding or fast forwarding the tape respectively During fast playback you may notice some anomalies blocky video artifacts banding etc in the playback picture NOTES You can display the date and time of the recording 28 To protect the tape and video heads the camcorder will enter the sto...

Page 28: ... tape To cancel the end search push the joystick toward NOTES End search cannot be used once you remove the cassette If there are blank sections between recordings the end search may not work correctly On Screen Displays Data Code The camcorder keeps a data code containing the date and time of recording You can select the data to be displayed Options Default value MENU DISPLAY SETUP DATA CODE Desi...

Page 29: ...he picture may change abruptly PORTRAIT SPORTS BEACH SNOW The picture may not appear smooth during playback PORTRAIT The blur effect of the background increases the more you zoom in T NIGHT Moving subjects may leave a trailing afterimage Picture quality may not be as good as in other modes White points may appear on the screen Autofocus may not work as well as in other modes In such case adjust th...

Page 30: ... scenes such as tennis or golf NIGHT Use this mode to record in low light conditions SNOW Use this mode to record in bright ski resorts It prevents the subject from being underexposed BEACH Use this mode to record on a sunny beach It prevents the subject from being underexposed SUNSET Use this mode to record sunsets in vibrant colors SPOTLIGHT Use this mode to record spotlit scenes FIREWORKS Use t...

Page 31: ...he actual recording of a scene the brightness of the picture may change abruptly PROGRAM AE When setting the shutter speed the number displayed will flash if the value selected is not appropriate for the recording conditions In such case select a different value If you use a slow shutter speed in dark places you can obtain a brighter image but the image quality may be lower and the autofocus may n...

Page 32: ... video light 2 Press to turn off the viewfinder s display Self Timer 1 Activate the self timer MENU CAMERA SETUP SELF TIMER ON 2 Press to close the menu appears 3 Press to start recording The camcorder starts recording after a 10 second countdown The countdown appears on the screen NOTES Once the countdown has begun you can press again or turn off the camcorder to cancel the self timer Manual Focu...

Page 33: ...oward FOCUS for more than 2 seconds MF changes to Pushing the joystick toward FOCUS again will return the camcorder to autofocus If you operate the zoom or the joystick changes back to MF and the camcorder returns to manual focusing mode 2 Push the joystick toward BACK to save the focus adjustment NOTES The camcorder will automatically return to autofocus when you set the mode switch to Manual Exp...

Page 34: ...stead with the procedure below 1 Point the camcorder at a white object zoom in until it fills the whole screen and press When the adjustment is completed stops flashing and stays on 2 Press to save the setting and close the menu The camcorder retains the custom setting even if you turn off the camcorder NOTES When you select the custom white balance Set the custom white balance in a sufficiently i...

Page 35: ...FFECT OFF Desired option While making the selection you can preview the effect on the screen The icon of the selected effect appears switch IMAGE EFFECT OFF Records with no image enhancing effects VIVID Emphasizes the contrast and color saturation NEUTRAL Tones down the contrast and color saturation SOFT SKIN DETAIL Softens the details in the skin tone area for a more complimentary appearance FUNC...

Page 36: ...e in or out When you apply an effect the sound will be recorded normally The camcorder retains the last setting used even if you turn off the digital effects or change the recording program The digital effects are not available when TV TYPE is set to NORMAL TV and the stereo video cable is connected to the AV terminal Using an External Microphone You can use a commercially available microphone for...

Page 37: ... a tape that has a dubbed audio track Stereo 2 in addition to the original recorded audio Stereo 1 Options Default value MENU AUDIO SETUP 12bit AUDIO Desired option When you select MIX VAR adjust the mix balance with the MIX BALANCE setting 47 switch L R Left and right channels stereo Main and sub signals bilingual L L Left channel only stereo Main signal only bilingual R R Right channel only ster...

Page 38: ... as a TV VCR or computer Connecting to a TV or VCR Connecting to a TV or VCR AV Terminal Sound from the built in speaker will be muted while the STV 250N Stereo Video Cable is connected to the camcorder DV Terminal Check the type and orientation of the terminal and make sure you connect the DV cable properly Open the LCD panel to access ...

Page 39: ...ow to a TV or VCR with AV Terminals VIDEO AUDIO R L STV 250N Stereo Video Cable supplied Yellow White Red 2 Output connection signal flow to a high definition TV with a DV IEEE1394 terminal Input connection signal flow from a TV or other digital video source with a DV IEEE1394 output DV cable commercially available 4 pin 6 pin Be careful to correctly insert the 6 pin plug into the DV terminal Inse...

Page 40: ...to an External Video Recorder You can copy your recordings by connecting the camcorder to a VCR or a digital video device When recording to a digital video recorder using the DV terminal you can copy recordings with virtually no generation loss in video and sound quality Connecting Connect the camcorder to a VCR or other analog device using connection type or to a DVD recorder or other digital rec...

Page 41: ...grams Dubbing 1 Load a blank tape in the camcorder and load the recorded source tape or disc in the connected device 2 Set the camcorder in record pause mode REC PAUSE EXECUTE 3 Connected device Start the playback In record pause mode and while recording you can check the picture on the camcorder s screen 4 When the scene you wish to record appears push the joystick toward to begin recording Recor...

Page 42: ... are copyright protected If you attempt to play back such tape COPYRIGHT PROTECTED PLAYBACK IS RESTRICTED appears and you will not be able to view the contents of the tape If you attempt to record from such tape via the DV terminal COPYRIGHT PROTECTED DUBBING RESTRICTED appears and you will not be able to record the contents of the tape ...

Page 43: ... properly Open the LCD panel to access Terminal on the Camcorder Connecting Cable Terminal on the Connected Device Output connection signal flow to a computer with a DV IEEE1394 terminal or a DV capture board DV cable commercially available 4 pin 6 pin Be careful to correctly insert the 6 pin plug into the DV terminal Inserting it in the wrong direction can result in damage to the camcorder 1 ...

Page 44: ...rt the video editing software Refer to the instruction manual of the editing software IMPORTANT The video transfer may not work correctly depending on the software and the specifications settings of your computer If the computer freezes while the camcorder is connected to it disconnect the DV cable and turn off the camcorder and the computer After a short while turn them on again set the camcorder...

Page 45: ...ained after the tables FUNC Menu FUNC Menu 1 Option available only when the mode switch is set to Appendix Menu Options Lists Menu item Setting options CAMERA PLAY Recording programs1 PROGRAM AE PORTRAIT SPORTS NIGHT SNOW BEACH SUNSET SPOTLIGHT FIREWORKS z 29 31 White balance1 AUTO DAYLIGHT TUNGSTEN SET z 34 Image effects1 IMAGE EFFECT OFF VIVID NEUTRAL SOFT SKIN DETAIL z 35 LCD video light LCD LI...

Page 46: ...L SHUTTER set to ON or using the NIGHT recording program The image stabilizer may not work well on subjects with low contrast with a recurring repetitive pattern or without vertical lines The image stabilizer cannot be turned off when the mode switch is set to We recommend setting the image stabilizer to OFF when using a tripod VCR Setup Recording Mode TV Type etc VCR SETUP REC MODE Select the vid...

Page 47: ...IO SETUP1 1 Menu available only when the mode switch is set to WIND SCREEN The camcorder automatically reduces the background sound of wind when recording outdoors only while using the built in microphone The wind screen cannot be turned off when the mode switch is set to MIX BALANCE When 12bit AUDIO is set to MIX VAR adjust the sound balance with the joystick The camcorder will retain the audio b...

Page 48: ...rtically and or horizontally Using the markers will not affect the recordings on the tape DISPLAYS You can hide the on screen displays to show only the playback picture on the full screen Tape operation displays appear for 2 seconds Warning messages and the data code if activated will appear even when set to OFF PLAYBK All on screen displays will appear while a digital effect is activated 6SEC DAT...

Page 49: ...ssage AUTO POWER OFF will appear QUICK START Select whether to activate the Quick Start function when you close the LCD panel in mode 25 and the length of time after which the camcorder will end the standby mode and shut off automatically Date Time Setup DATE TIME SETUP DATE FORMAT Changes the date format for on screen displays Menu item Setting options CAMERA PLAY BEEP HIGH VOLUME LOW VOLUME OFF ...

Page 50: ...ry pack If you connect a faulty power adapter or battery pack the CHG charge indicator flashes approx twice per second and charging stops Check that the compact power adapter is correctly connected to the camcorder Recording Playback Buttons will not work Turn on the camcorder Load a cassette 21 Abnormal characters appear on the screen The camcorder does not operate properly Disconnect the power s...

Page 51: ...ed When recording near loud sounds such as fireworks or concerts sound may become distorted Viewfinder picture is blurred Adjust the viewfinder with the dioptric adjustment lever 23 Playback During playback there is video noise Video heads are dirty Clean the video heads 2 Playback does not start Load a cassette 21 Set the camcorder to mode 27 Tape reached the end END appears on the screen Rewind ...

Page 52: ...play back a copyright protected tape 42 HEADS DIRTY USE CLEANING CASSETTE Video heads are dirty Clean the video heads 2 INCORRECT TAPE SPECIFICATION PLAYBACK IS RESTRICTED You attempted to play back a tape recorded in a different television system PAL or SECAM or in a recording standard not supported by this camcorder INPUT SIGNAL NOT SUPPORTED The digital device connected with the DV cable is inc...

Page 53: ...uipment Do not disassemble the camcorder If the camcorder does not function properly consult qualified service personnel Handle the camcorder with care Do not subject the camcorder to shocks or vibration as this may cause damage When mounting the camcorder on a tripod make sure that the tripod s fastening screw is shorter than 5 5 mm 0 2 in Using other tripods may damage the camcorder When recordi...

Page 54: ...ached Cassette Rewind tapes after use A slack or damaged tape may cause video problems and or audio distortions during playback Return cassettes to the case and store them upright Rewind tapes from time to time if they are stored for a long time Do not leave the cassette in the camcorder after use Do not use spliced tapes or nonstandard cassettes as they may damage the camcorder Do not use tapes t...

Page 55: ...d lithium battery contains Perchlorate Material special handling may apply For details see www dtsc ca gov hazardouswaste perchlorate WARNING The battery used in this device may present a fire or chemical burn hazard if mishandled Do not disassemble modify immerse in water heat above 100 C 212 F or incinerate the battery Replace with a CR1616 battery made by Panasonic Hitachi Maxell Sony Toshiba V...

Page 56: ...n the following cases When the camcorder is moved quickly from cold to warm places When the camcorder is left in a humid room When a cold room is heated rapidly Do not expose the camcorder to sudden or extreme changes in temperature Remove the cassette place the camcorder in an airtight plastic bag and let it adjust to temperature changes slowly before removing it from the bag The camcorder automa...

Page 57: ...most Caribbean islands except in French territories like Guadeloupe and Martinique most of South America except in Argentina Brazil and Uruguay Asia Only in Japan the Philippines South Korea Taiwan and Myanmar Oceania US territories Guam American Samoa etc and some Pacific islands like Micronesia Samoa and Tonga Trademark Acknowledgements is a trademark Microsoft Windows and Windows Vista are trad...

Page 58: ...a to area CBC NB2 Car Battery Charger STV 250N Stereo Video Cable CA 590 Compact Power Adapter Commercially available DV cable SC 2000 Soft Carrying Case SS 600 SS 650 Shoulder Strap NB 2LH BP 2L5 BP 2L13 BP 2L14 Battery Pack TV VCR DVD recorder digital device with DV terminal CB 2LW Battery Charger TL H30 5 Tele converter WD H30 5 Wide converter FS 30 5U Filter Set MiniDV videocassette ...

Page 59: ...initial charge of the battery pack Optional Accessories Use of genuine Canon accessories is recommended This product is designed to achieve excellent performance when used with genuine Canon accessories Canon shall not be liable for any damage to this product and or accidents such as fire etc caused by the malfunction of non genuine Canon accessories e g a leakage and or explosion of a battery pac...

Page 60: ...and runs off a 12 24 V DC negative ground battery TL H30 5 Tele converter This Tele converter lens increases the focal length of the camcorder lens by a factor of 1 7 The image stabilizer is not as effective when the Tele converter is attached The minimum focusing distance with the TL H30 5 attached is 3 m 9 8 ft at full telephoto 3 cm 1 2 in at full wide angle WD H30 5 Wide converter This lens de...

Page 61: ...trap for more security and portability Pass the ends through the strap mount and adjust the length of the strap SC 2000 Soft Carrying Case A handy camcorder bag with padded compartments and plenty of space for accessories This mark identifies genuine Canon video accessories When you use Canon video equipment we recommend Canon brand accessories or products bearing the same mark ...

Page 62: ...Optional Accessories NB 2LH Battery Pack 9612A001AA BP 2L13 Battery Pack 2069B002AA BP 2L14 Battery Pack 9582A002AA CB 2LW Battery Charger 0763B001AA CBC NB2 Car Battery Charger 7873A002AA WD H30 5 Wide converter 9065A001AA TL H30 5 Tele converter 9064A001AA FS 30 5U Filter Set 6738A002AA SC 2000 Soft Carrying Case 9389A001AA DVM CL DV Cleaning Cassette 3134A002AA D36 0032 201 ...

Page 63: ... LP 12 56 mm s 0 49 ips Maximum Recording Time 60 min tape SP 60 minutes LP 90 minutes LCD Screen 2 7 in wide TFT color approx 112 000 pixels Viewfinder 0 27 in wide TFT color approx 123 000 pixels Microphone Stereo electret condenser microphone Lens f 2 6 96 2 mm F 2 0 5 2 37x optical zoom 35 mm equivalent all figures are approximate values 16 9 Movies advanced zoom 41 3 1 695 mm optical zoom 45 ...

Page 64: ...r Others Power supply rated 7 4 V DC battery pack 8 4 V DC compact power adapter Power consumption 2 1 W viewfinder 2 2 W LCD screen normal brightness Operating Temperature 0 40 C 32 104 F Dimensions W x H x D 68 x 83 x 123 mm 2 7 x 3 3 x 4 8 in excluding the grip belt Weight camcorder body only 390 g 13 8 oz Power input 100 240 V AC 50 60 Hz 0 14 0 08 A Rated output 8 4 V DC 0 6 A Operating tempe...

Page 65: ...t saving time 20 Time zone 20 Digital effects 35 Digital video input DV dubbing 41 DV terminal 39 E EASY recording program 24 End search 28 Error messages 52 Exposure 33 F Fireworks recording program 30 FUNC menu 18 45 G Grip belt 17 I Image effects 35 Image stabilizer 46 J Joystick 18 Joystick guide 18 L Language 19 LCD screen 20 LCD video light 32 LP mode 46 M Maintenance 56 Manual exposure adju...

Page 66: ...ter speed 31 Snow recording program 30 SP mode 46 Special scene recording programs 29 Sports recording program 30 Spotlight recording program 30 Sunset recording program 30 T Telephoto 25 Transferring movies to a computer 44 Tripod 53 Troubleshooting 50 V Video heads cleaning 2 Videocassettes 21 54 Viewfinder 23 Volume 27 W White balance 34 Wide angle 25 Widescreen 16 9 24 Wind screen 47 Z Zoom Ad...

Page 67: ...buse mishandling accident improper maintenance or failure to follow operating instructions B If the Equipment is defective as a result of leaking batteries sand dirt or water damage C If defects or damages are caused by the use of unauthorized parts or by service other than by Canon USA s factory service centers or authorized service facilities D If the Equipment is used for commercial or industri...

Page 68: ...terior finish of the Equipment media nor does it apply to Equipment purchased outside Canada If the Equipment contains a hard disk drive Canon Canada recommends that data stored on that drive be duplicated or backed up to prevent its loss in the event of a failure or other malfunction of such drive TO OBTAIN WARRANTY SERVICE Ship your Equipment in its original carton box or equivalent properly pac...

Page 69: ... T2E 7K7 CANON CANADA INC MONTREAL 8801 Route Transcanadienne Saint Laurent QC H4S 1Z6 If you have any questions call the Canon Canada Information Center toll free in Canada only at 1 800 OK CANON 1 800 652 2666 Si vous avez des questions veuillez téléphoner 1 800 OK CANON 1 800 652 2666 sans frais au Canada seulement MÉXICO CANON MEXICANA S DE RL DE CV Blvd Manuel Ávila Camacho No 138 Piso 17 Col...

Reviews: