background image

90

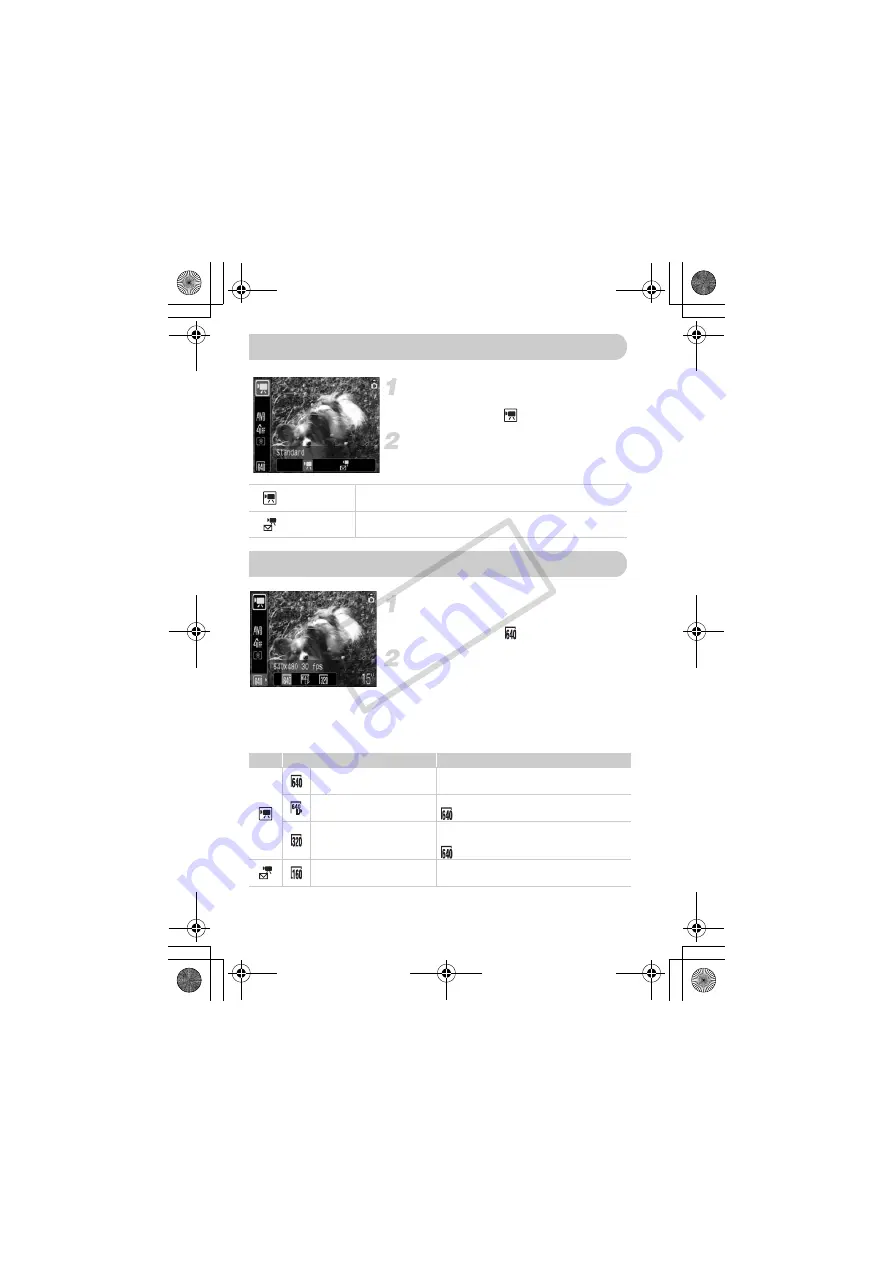
Select a shooting mode.

Press the 

m

 button, then use the 

op


buttons to select 

.

Select a menu item.

Press the 

qr

 buttons to select a menu 

item, then press the 

m

 button.

Select the image quality.

Press the 

m

 button, then use the 

op


buttons to select 

.

Select a menu item.

Press the 

qr

 buttons to select a menu 

item, then press the 

m

 button.

X

The settings you made will be displayed 
on the screen.

Modes and Image Quality Table

Changing the Movie Mode

Standard

This is the Standard mode. You can use the digital zoom 
during shooting (p. 61).

Compact

Shooting with reduced recording pixels. You cannot use the 
zoom during shooting.

Changing the Image Quality in 

X

Mode

Recording Pixels/Frame Rate

Content

640 x 480 pixels, 
30 frames/sec.

For shooting standard quality movies.

640 x 480 pixels, 
30 frames/sec. LP

The image quality will be lower than with 

, but you can record twice the length.

320 x 240 pixels, 
30 frames/sec.

Since the number of the recording pixels is 
smaller, the image quality will be lower than with 

, but you can record three times the length.

160 x 120 pixels, 
15 frames/sec.

Suitable for attaching to e-mails, due to the 
small file size.

(EC251) CDI-E388_Guide_E.book  Page 90  Monday, June 23, 2008  10:51 AM

CO

PY

Summary of Contents for 2667b001

Page 1: ...Camera User Guide DIGITAL CAMERA Camera User Guide ENGLISH CDI E388 010 CANON INC 2008 PRINTED IN CHINA EC251 CDI E388_Guide_E book Page 1 Monday June 23 2008 10 51 AM COPY ...

Page 2: ...ser Guide Read when you want to connect the camera to a printer and print Software Starter Guide Read when you want to connect the camera to a computer Explains how to install and use the software on the Canon Digital Camera Solution Disk Download ZoomBrowser EX ImageBrower Software Guide PDF from http web canon jp imaging information e htm You can use the included memory card to try out your new ...

Page 3: ...tal explanation p xx xx stands for reference page number This guide assumes all functions are at their default settings unless otherwise noted This camera can use various types of memory cards These are collectively referred to as memory cards in this guide Conventions Used in this Guide button button button button FUNC SET Function Set button MENU button DISP Display button EC251 CDI E388_Guide_E...

Page 4: ...or other device may contravene copyright or other legal rights even if the image was shot for personal use Warranty Limitations This camera s warranty is only effective in the country of sale If there is a problem with the camera while abroad please return it back to the country of sale before proceeding with a warranty claim to a Canon Customer Support Help Desk For Canon Customer Support contact...

Page 5: ...5 Capture Your Best Memories EC251 CDI E388_Guide_E book Page 5 Monday June 23 2008 10 51 AM COPY ...

Page 6: ...e close up pictures of subjects macro shooting 64 Take sepia toned or black and white pictures 75 Change the size of picture I want to take recording pixels 70 Take pictures continuously 69 Shoot without camera shake image stabilization 124 Shoot without camera shake even in low light conditions high ISO speed 58 72 I F w P At night p 55 At the beach p 57 Snowscapes p 57 C Kids and pets p 55 Portr...

Page 7: ... Quickly search pictures 94 Erase pictures 25 101 Protect pictures from accidental erasure 102 View E Shoot movies 28 Watch my movies 30 Shoot View Movies 2 Easily print my pictures 26 Print Save images to a computer 31 108 109 Save 3 Turn off sound 51 Other EC251 CDI E388_Guide_E book Page 7 Monday June 23 2008 10 51 AM COPY ...

Page 8: ...play 45 FUNC Menu Basic Operations 46 MENU Functions Basic Operations 47 Resetting the Camera 48 Formatting Memory Cards 49 Changing Sounds 51 Changing the Image Display Time 52 9 Just Taking Pictures Easy Mode 54 Shooting Various Scenes 55 K Shooting Special Scenes 56 Turning the Flash Off 59 h Turning the Flash On 59 Q Using the Self Timer 60 Zooming in on Far Away Subjects 61 Inserting the Date...

Page 9: ...ows 98 Checking the Focus and People s Expressions Focus Check Display 99 Viewing Images on a TV 100 Changing Image Transitions 101 Erasing All Images 101 Protecting Images 102 Resizing Images 103 Rotating Images 104 Correcting Red Eye Effect 105 Attaching Sound Memos 107 Transferring Images to a Computer 108 Designating Images for Transfer DPOF 109 Designating Images for Printing DPOF 111 Changin...

Page 10: ...er the flash in close proximity to human eyes Exposure to the intense light produced by the flash may damage eyesight In particular remain at least one meter 39 inches away from infants when using the flash Do not attempt to disassemble or alter any part of the equipment that is not expressly described in this guide To avoid the risk of injury do not touch the interior of the camera if it has been...

Page 11: ...ful not to bang the camera or subject it to strong impacts or shocks when hanging it by the strap Be careful not to bump or push strongly on the lens This could lead to injury or damage the camera When using the camera on a beach or at a windy location be careful not to allow dust or sand to enter the camera This may cause the camera to malfunction Avoid using placing or storing the camera in the ...

Page 12: ...in your bag ensure that hard objects do not come into contact with the LCD monitor If this occurs it may cause malfunction or damage the LCD monitor Do not attach accessories to the strap Doing so may cause malfunction or damage the LCD monitor LCD Monitor Precautions EC251 CDI E388_Guide_E book Page 12 Monday June 23 2008 10 51 AM COPY ...

Page 13: ...nt images Attaching the Wrist Strap Holding the Camera Use the included strap to avoid dropping the camera during use Keep your arms tight against your body while holding the camera firmly by the sides Be sure that your fingers do not touch the flash 1 Wrist strap EC251 CDI E388_Guide_E book Page 13 Monday June 23 2008 10 51 AM COPY ...

Page 14: ...ide and hold the cover lock then slide and open the cover as shown Insert the batteries Insert the batteries with and sides oriented correctly Insert the memory card Insert the memory card with the label in the direction shown until it clicks into place Be sure the card is oriented correctly Inserting the card in the wrong direction could damage the camera Inserting the Batteries and Memory Card L...

Page 15: ...over Close the cover and press downward as you slide it until it clicks into place Removing the Memory Card Push the memory card until you hear a click then release and pull out the card EC251 CDI E388_Guide_E book Page 15 Monday June 23 2008 10 51 AM COPY ...

Page 16: ...arately p 36 We cannot recommend the use of any other batteries than those listed above because performance varies widely They last much longer than alkaline batteries especially in cold weather Battery Charge Indicator When battery charge is low an icon or message will appear on the screen If the batteries are charged the icon or message will not display Power Source Alkaline Batteries Supplied N...

Page 17: ...g Mode p 22 Compatible Memory Cards SD memory cards SDHC memory cards MultiMediaCards MMCplus memory cards HC MMCplus memory cards SD and SDHC memory cards have a write protect tab If this tab is in the locked position Card Locked will appear on the screen and you will not be able to take or erase images Memory Card 32 MB supplied 2 GB 8 GB Number of Shots 11 749 2994 How do you check the number o...

Page 18: ...Turn on the camera Press the power button X The Date Time menu will appear Set the Date and Time Press the qr buttons to select a setting Press the op buttons to set a value Make the setting Press the m button X Once the date and time have been set the Date Time menu will close Setting the Date and Time EC251 CDI E388_Guide_E book Page 18 Monday June 23 2008 10 51 AM COPY ...

Page 19: ...date and time the Date Time menu will appear each time you turn on the camera If you removed the batteries from the camera it is possible that the Date Time settings are deleted after approximately 3 weeks If this occurs set the date and time again Reappearing Date Time Menu This camera is equipped with a built in rechargeable lithium ion battery to save the Date Time settings You can recharge the...

Page 20: ...hen press the button Set the display language Press the opqr buttons to select a language then press the m button X Once the display language has been set the language menu will close Setting the Display Language You can also change the language by pressing the button in the 3 tab selecting Language EC251 CDI E388_Guide_E book Page 20 Monday June 23 2008 10 51 AM COPY ...

Page 21: ...tically makes necessary settings for shooting such as adjusting brightness and color X When the camera focuses it will beep twice and the indicator will light green Press fully to the second stop X The camera takes the shot Pressing the Shutter Button If you just press the shutter button fully without pausing halfway the images you take may not be in focus EC251 CDI E388_Guide_E book Page 21 Monda...

Page 22: ...A Compose the shot of your subject Moving the zoom lever towards i will zoom in on your subject making it appear larger Moving the lever towards j will zoom out from your subject making it appear smaller Focus Press the shutter button lightly halfway to focus X When the camera focuses it will beep twice and the indicator will light green orange when the flash will fire X Green AF frames appear whe...

Page 23: ...in the effective flash range of approximately 30 cm 3 5 m 1 0 11 ft at maximum wide angle j side and approximately 50 cm 2 0 m 1 6 6 6 ft at maximum telephoto i side the indicator blinks orange and the camera only beeps once when the shutter button is pressed halfway Your subject is too close Move about 50 cm 1 6 ft or more away from your subject Press the shutter button again halfway making sure ...

Page 24: ...t they will appear coarse Just setting the mode dial to 9 Easy mode allows you to shoot and playback images This mode is recommended for beginners who are not familiar using cameras Set the mode dial to 9 Shoot Press the shutter button lightly halfway to focus X A green AF frame displays where the subject is in focus Press the shutter button fully to shoot Viewing Images Press the 1 button Press t...

Page 25: ...ge you shoot will appear Select an image to erase Press the qr buttons to select an image to erase Erase the image Press the p button Press the qr buttons to select Erase then press the m button X The displayed image will be erased To exit instead of erasing press the qr buttons to select Cancel then press the m button Erasing Images EC251 CDI E388_Guide_E book Page 25 Monday June 23 2008 10 51 AM...

Page 26: ...ct the camera to the printer Open the camera s terminal cover and insert the smaller plug of the interface cable in the direction shown Insert the cable s larger plug into the printer For connection details refer to the user guide provided with the printer Turn on the printer Turn on the camera Press the 1 button to turn on the camera X will appear on the screen and the c button will light blue Pr...

Page 27: ...ace cable Canon Brand PictBridge Compliant Printers Sold Separately By connecting your camera to one of the Canon brand PictBridge compliant printers below you can print your images just like photos without having to use a computer For more information visit your nearest Canon retailer Refer to the Direct Print User Guide for details on printing including printing with direct print compatible prin...

Page 28: ... towards i will zoom in on your subject making it appear larger Moving the lever towards j will zoom out from your subject making it appear smaller Focus Press the shutter button lightly halfway to focus X When the camera focuses it will beep twice and the indicator will light green Shooting Movies Recordable Time Indicator EC251 CDI E388_Guide_E book Page 28 Monday June 23 2008 10 51 AM COPY ...

Page 29: ...top shooting Press the shutter button fully again X The camera will beep once and stop shooting the movie X The indicator will blink green while the movie is recorded to the memory card X Shooting will automatically stop when the memory card fills Approximate Recording Time Recording times are based on a camera at default settings Remaining time can be checked on the screen in Step 1 Elapsed Time ...

Page 30: ...to select a movie then press the m button appears on movies X The movie control panel will appear Play the movie Press the qr buttons to select then press the m button Pressing the m button will pause resume the movie Press the op buttons to adjust the volume X After the movie finishes appears Viewing Movies EC251 CDI E388_Guide_E book Page 30 Monday June 23 2008 10 51 AM COPY ...

Page 31: ...1 3 GHz or higher Pentium 500 MHz or higher RAM Windows Vista Windows XP 512 MB or more 256 MB or more Interface USB Free Hard Disk Space Canon Utilities ZoomBrowser EX PhotoStitch 200 MB or more 40 MB or more Display 1 024 x 768 pixels High Color 16 bit or better OS Mac OS X v10 4 v10 5 Computer model The above OS should be pre installed on computers with built in USB ports CPU PowerPC G4 G5 or I...

Page 32: ...or Finish When you click Restart the computer will restart Remove the CD ROM Remove the CD ROM when your desktop screen appears Macintosh Place the CD ROM in the computer s CD ROM drive and double click the X The screen on the left displays Click Install and follow the onscreen instructions to proceed with the installation Windows XP and Mac OS X v10 4 are used for these explanations EC251 CDI E38...

Page 33: ...urn on the camera Press the 1 button to turn on the camera X The connection between the camera and computer is now established Open CameraWindow Windows Select Canon CameraWindow and click OK X CameraWindow will appear If CameraWindow does not appear click the Start menu and select All Programs or Programs followed by Canon Utilities CameraWindow CameraWindow CameraWindow X The Direct Transfer men...

Page 34: ...d the c button will light blue Transferring Images with a Computer Transfer images Click Transfer Untransferred Images X All images not previously transferred will be transferred to the computer After the transfer finishes turn off the camera and unplug the cable For further operations refer to the Software Starter Guide You cannot shoot while the Direct Transfer menu displays EC251 CDI E388_Guide...

Page 35: ...tton X All images not previously transferred will be transferred to the computer After the transfer finishes turn off the camera and unplug the cable For further operations refer to the Software Starter Guide Transferred images will be sorted by date and saved in separate folders in the My Picture folder for Windows or the Picture folder for Macintosh EC251 CDI E388_Guide_E book Page 35 Monday Jun...

Page 36: ...ger Kit CBK4 300 3 AC Adapter kit ACK800 Battery Charger CB 5AH Compact Power Adapter CA PS800 1 Also available for purchase separately 2 See the user guide supplied with the printer for more information on the printer and interface cables 3 Battery and Charger Kit CBK4 200 may also be used AA size NiMH batteries NB 3AH x4 Power Cord EC251 CDI E388_Guide_E book Page 36 Monday June 23 2008 10 51 AM...

Page 37: ...enuine Canon accessories Canon shall not be liable for any damage to this product and or accidents such as fire etc caused by the malfunction of non genuine Canon accessories e g a leakage and or explosion of a battery pack Please note that this warranty does not apply to repairs arising out of the malfunction of non genuine Canon accessories although you may request such repairs on a chargeable b...

Page 38: ...ng the camera for an extended period of time or when connecting to a computer Cannot be used to charge the batteries inside the camera Other Accessories High Power Flash HF DC1 This attachable supplementary flash can illuminate subjects that are too distant for the built in flash When connecting to and using a household power outlet use only AC Adapter Kit ACK800 rated input 100 240 V AC 50 60 Hz ...

Page 39: ...39 Learning More This chapter explains the camera parts and basic operations 2 EC251 CDI E388_Guide_E book Page 39 Monday June 23 2008 10 51 AM COPY ...

Page 40: ...Power Button p 21 h Flash p 59 i Tripod Socket j Memory Card Slot Battery Cover p 14 k Memory Card Slot Battery Cover Lock p 14 l Wrist Strap Mount p 13 Program AE mode p 67 You can set various functions in order to take the picture you want Auto mode p 22 The camera makes settings automatically for shooting Movie mode pp 28 89 Various Scenes mode p 53 You can shoot with optimal settings for the s...

Page 41: ...erminal f A V OUT Audio Video output DIGITAL Terminal pp 26 33 100 g 0 Face Select Button p 83 h c Print Share Button pp 26 124 i MENU Button p 47 j DISP Button pp 43 45 k ISO p 72 d Jump p 95 o Button l e Macro p 64 u Infinity p 65 q Button m m Function Set Button n h Flash p 59 r Button o W Continuous p 69 Q Self timer p 60 a Single Image Erase p 25 p Button Shooting mode Lens is extended Lens i...

Page 42: ...us Operation Status Green Lights Shooting preparation complete p 22 when connected to a computer display turned off Blinks Camera starting up image recording reading erasing transferring when connected to a computer Orange Lights Shooting preparation complete flash on p 22 Blinks Camera shake warning flash charging p 59 When the indicator blinks green data is being recorded read erased or various ...

Page 43: ...0 h Digital Tele Converter p 62 i Zoom Factor p 61 j Macro Infinity Mode pp 64 65 k ISO Speed p 72 l Flash p 59 m Red Eye Correction p 122 n Drive Mode pp 60 69 78 o Auto Rotate p 120 p Battery Charge Indicator p 16 q Grid Lines p 123 r AF Frame p 80 Spot AE Point Frame p 85 s AE Lock FE Lock pp 86 87 t AF Lock p 76 u Create Folder p 120 v Still Images Recordable Shots p 17 Movies Remaining Time E...

Page 44: ...utter Speed e Exposure Compensation p 74 f White Balance p 73 g Histogram h Sound Memo p 107 i Compression Ratio p 70 j Recording Pixels p 70 k Metering Mode p 85 l Battery Charge Indicator p 16 m Folder Number File Number p 119 n Displayed image number and total number of images o ISO Speed p 72 p Aperture Value q Flash p 59 r Macro Infinity Mode pp 64 65 s File Size p 71 t Still Images Recording...

Page 45: ...d This has no effect on the recorded image Overexposure Warning during Playback In Detailed Information Display overexposed areas of the image flash on the screen Switching the Display No Information Display Information Display You can also switch the display by pressing the button while the image displays shortly after shooting However the Simple Information will not display You can set the displ...

Page 46: ... settings for the menu item appear at the lower part of the screen Select a setting Press the qr buttons to select a setting Some option settings are only available by pressing the button after selecting a setting Make the setting Press the m button X Returns you to the shooting screen and the setting you made will display FUNC Menu Basic Operations Menu Items For more information on the various s...

Page 47: ...o move the zoom lever p 40 left or right to select a tab Select a menu item Press the op buttons to select a menu item Some settings can only be set after switching the screen using the m button Select a setting Press the qr buttons to select a setting Make the settings Press the button X Returns you to the standard screen MENU Functions Basic Operations For more information on the tabs and menu i...

Page 48: ... All then press the m button Reset settings Press the qr buttons to select OK then press the m button X The camera will reset to the default settings FUNC menu White balance data recorded with the Custom White Balance function p 73 The 3 tab Date Time p 18 Language p 20 Video System p 100 Resetting the Camera Are there functions that cannot be reset EC251 CDI E388_Guide_E book Page 48 Monday June ...

Page 49: ...ormatting a memory card Display the menu Press the button Select Format Press the qr buttons to select the 3 tab Press the op buttons to select Format then press the m button Format the memory card Press the qr buttons to select OK then press the m button X The memory card will be formatted X When formatting has finished the screen will return to the menu display Formatting Memory Cards EC251 CDI ...

Page 50: ...vice before formatting About Formatting Formatting or erasing data on a memory card merely changes the file management information on the card and does not ensure its contents are completely deleted Be careful when transferring or disposing of a memory card When disposing of a memory card take precautions such as physically destroying the card to prevent personal information leaks The total capaci...

Page 51: ...e qr buttons to select the 3 tab Press the op buttons to select Mute then use the qr buttons to select On Adjusting the Volume Display the menu Press the button Select Volume Press the qr buttons to select the 3 tab Press the op buttons to select Volume then press the m button Changing Sounds EC251 CDI E388_Guide_E book Page 51 Monday June 23 2008 10 51 AM COPY ...

Page 52: ...me the images display Display the menu Press the button Select Review Press the qr buttons to select the 4 tab Press the op buttons to select Review then press the qr buttons to select the display time If you select Off the image will not display If you select Hold the image displays until you press the shutter button halfway Changing the Image Display Time EC251 CDI E388_Guide_E book Page 52 Mond...

Page 53: ... various scenes with optimal settings Other common functions such as the flash and the self timer are also explained This chapter assumes the shooting mode is set to A For other shooting modes refer to the Functions Available in Each Shooting Mode section p 134 3 EC251 CDI E388_Guide_E book Page 53 Monday June 23 2008 10 51 AM COPY ...

Page 54: ...not need to worry about the focus Viewing images Pressing the 1 button allows you to view the images you took A guidance will display on the screen so that you can securely check your images In the Easy mode you can use the following operations Other buttons cannot be used Therefore you do not need to worry about wrong operations 9 Just Taking Pictures Easy Mode What you can do in the Easy mode Ta...

Page 55: ...oting expansive landscapes Night Snapshot Take snapshots at night Lets you take beautifully lit snapshots of people against beautiful city nightscapes or night backgrounds If you hold the camera firmly you can take pictures with reduced camera shake even without a tripod Kids Pets Take shots of kids and pets Lets you capture subjects that move around such as children and pets without missing photo...

Page 56: ...a matching mode Select a shooting mode Set the mode dial to K then press the m button Press the op buttons to select then use the qr buttons to select a shooting mode Press the m button Shoot In F C or H images may appear rough because the ISO speed p 72 was increased to match the shooting conditions K Shooting Special Scenes EC251 CDI E388_Guide_E book Page 56 Monday June 23 2008 10 51 AM COPY ...

Page 57: ...e Lets you shoot trees and leaves such as new growth autumn leaves or blossoms in vivid colors Snow Take shots of people and snow Lets you take shots of properly lit people against snowy backgrounds with natural colors Beach Take shots of people at the beach Lets you take shots of properly lit people at the beach where reflected sunlight is strong EC251 CDI E388_Guide_E book Page 57 Monday June 23...

Page 58: ...duces subject blur and camera shake during shooting Recording pixels are set to 1600 x 1200 pixels In images may appear rough if the ISO speed p 72 was increased depending on the scene In or attach the camera to a tripod so that the camera does not move and blur the image When you attach the camera to a tripod you are recommended to set IS Mode to Off to shoot p 124 In make sure the subject does n...

Page 59: ...the screen Attach the camera to a tripod so that the camera does not move Select any shooting mode other than A and the flash will fire every time you shoot Choose h as in Step 2 in the above section Turning the Flash Off The range of the flash for shooting is approximately 30 cm 3 5 m 1 0 11 ft at maximum wide angle and approximately 50 cm 2 0 m 1 6 6 6 ft at maximum telephoto After taking the sh...

Page 60: ...er you set displays on the screen Shoot Press the shutter button halfway to focus on the subject then press fully X The lamp blinks and the self timer sound plays X 2 seconds before the shutter releases the lamp and sound speed up After the shot is taken return to Step 2 and select Q Using the Self Timer You can change the delay time and number of shots to take p 78 EC251 CDI E388_Guide_E book Pag...

Page 61: ...ubject Image Deterioration Zones with Digital Zoom To turn off the digital zoom press the button select the 4 tab and then select the Digital Zoom menu item and Off option Zooming in on Far Away Subjects Turning Off the Digital Zoom The focal length when using digital zoom is 36 864 mm 35mm film equivalent Recording Pixels Optical Zoom Digital Zoom No image deterioration zoom factor appears white ...

Page 62: ...select 1 4x or 2 3x Pressing the button will return you to the shooting screen X The view will be enlarged and and the zoom factor will display on the screen After taking the shot select Standard in Digital Zoom Combinations that Cause Image Deterioration Using 1 4x at a recording pixel setting of or will cause image deterioration the zoom factor will display in blue Using 2 3x at a recording pixe...

Page 63: ...sure your subject is within the printable area when you shoot Use the DPOF print settings p 111 to print Use the included software to print Refer to the Software Starter Guide for details Connect the camera to a printer to print Refer to the Direct Print User Guide for details Inserting the Date and Time Inserting and Printing the Date and Time in Images Not Shot in Images shot in are shot with a ...

Page 64: ... select When you move the zoom lever the zoom bar appears on the screen When shooting in Macro mode the camera cannot focus in the range of the yellow bar When zooming within the range of the yellow bar e will be grayed out and shooting will be done in When shooting with the camera attached to a tripod set the self timer to to avoid camera shake e Shooting Close ups Macro About the Zoom Bar Using ...

Page 65: ...of the lens Select any shooting mode other than A and follow Step 2 as described in Shooting Close ups Macro on the previous page Then select u u displays on the screen After taking the shot repeat Step 2 of the previous page and select u Shooting Far Away Subjects EC251 CDI E388_Guide_E book Page 65 Monday June 23 2008 10 51 AM COPY ...

Page 66: ...66 EC251 CDI E388_Guide_E book Page 66 Monday June 23 2008 10 51 AM COPY ...

Page 67: ...to use G Program AE mode and various camera functions This chapter assumes the shooting mode is set to G For other shooting modes refer to the Functions Available in Each Shooting Mode section p 134 4 EC251 CDI E388_Guide_E book Page 67 Monday June 23 2008 10 51 AM COPY ...

Page 68: ...oot If a correct exposure cannot be obtained when pressing the shutter button halfway shutter speed and aperture value are shown in red Try the following settings to obtain the correct exposure Turn on the flash p 59 Choose a higher ISO speed p 72 Change the metering mode p 85 G Shooting in Program AE What if shutter speed and aperture value are displayed in red EC251 CDI E388_Guide_E book Page 68...

Page 69: ...a will shoot successive images If you use a low level formatted p 50 memory card you can continuously shoot until the memory card is full W Continuous Shooting Shooting until the memory card becomes full As the number of images increases the shooting intervals may take longer If the flash fires shooting intervals may take longer EC251 CDI E388_Guide_E book Page 69 Monday June 23 2008 10 51 AM COPY...

Page 70: ...ect the compression ratio Press the m button then use the op buttons to select Select a menu item Press the qr buttons to select a menu item then press the m button Changing the Recording Pixels Image Size If you select or you cannot use the Digital Zoom p 61 or Digital Tele Converter p 62 The gray areas in will not be printed however the entire image displayed will be recorded Changing the Image ...

Page 71: ... Card 32 MB supplied 2 GB 8 GB Large 10 M 3648 x 2736 4332 6 448 1792 2565 11 749 2994 1226 23 1536 6140 Medium 1 6 M 2816 x 2112 2720 10 714 2855 1620 17 1181 4723 780 37 2363 9446 Medium 2 4 M 2272 x 1704 2002 14 960 3837 1116 26 1707 6822 556 52 3235 12927 Medium 3 2 M 1600 x 1200 1002 29 1862 7442 558 52 3235 12927 278 99 6146 24562 Small 0 3 M 640 x 480 249 111 6830 27291 150 171 10245 40937 ...

Page 72: ...de and shooting condition Automatically sets the optimal speed not only for shooting mode and shooting condition but also for subject or camera motion Depending on the scene the speed may be set higher than in ISO Auto resulting in less subject blur and camera shake Low High Fine weather condition outdoor shooting Cloudy Twilight Night view Dark indoor Setting the optimal ISO Speed When the camera...

Page 73: ...select Make sure the entire screen is filled with the white subject then press the button X The tint on the screen will change when the white balance data is set After shooting return the setting to Adjusting the Tone White Balance Auto Automatically sets the optimal white balance for the location Daylight Fine weather condition outdoor shooting Cloudy Cloudy shady twilight conditions Tungsten Tun...

Page 74: ...s the m button then use the op buttons to select Adjust the Brightness While watching the screen press the qr buttons to adjust the brightness then press the m button After the picture has been taken return the setting to zero Adjusting the Brightness Exposure Compensation EC251 CDI E388_Guide_E book Page 74 Monday June 23 2008 10 51 AM COPY ...

Page 75: ...ons to select an item then use the qr buttons to choose a value then press the m button The more to the right the value gets stronger deeper the more to the left the value gets weaker lighter Changing the Tone of an Image My Colors My Colors Off Vivid Emphasizes the contrast and color saturation for a vivid impression Neutral Tones down the contrast and color saturation for neutral hues Sepia Sepi...

Page 76: ... subject at the same focal distance in the screen and press the shutter button halfway Confirm that the AF Frame on the subject is green Recompose Hold the shutter button pressed halfway and recompose the scene Shoot Press the shutter button fully Changing the Composition to Shoot Focus Lock EC251 CDI E388_Guide_E book Page 76 Monday June 23 2008 10 51 AM COPY ...

Page 77: ...the camera to a TV as described in Viewing Images on a TV p 100 and set the shooting mode to shoot Operations for shooting are the same as when using the camera s screen Shooting Using a TV EC251 CDI E388_Guide_E book Page 77 Monday June 23 2008 10 51 AM COPY ...

Page 78: ...ce settings are fixed to the first shot When you set the time delay to more than 2 seconds the self timer lamp and sound speed up 2 seconds before the shutter releases Customizing the Self Timer What if the number of shots is set to more than 2 shots If the flash fires the shooting interval may take longer If you set a high number of shots the shooting interval may take longer If the memory card b...

Page 79: ...Chapter 4 and explains how to take pictures using various functions This chapter assumes the shooting mode is set to G For other shooting modes refer to the Functions Available in Each Shooting Mode section p 134 5 EC251 CDI E388_Guide_E book Page 79 Monday June 23 2008 10 51 AM COPY ...

Page 80: ...2 will appear on other faces When the shutter button is pressed halfway up to 9 green frames will appear on faces the camera focuses on Changing the AF Frame If a face is not detected and only gray frames no white frame appear the setting will change to AiAF Examples of faces that cannot be detected The camera may mistakenly identify non human subjects as a face If the camera cannot focus when you...

Page 81: ... the AF Frame Size menu item and the Small option The setting is configured to Normal when the digital zoom or digital tele converter is used If the camera cannot focus when you press the shutter button halfway the AF frame will not appear You can reduce the AF frame size If the camera cannot focus when you press the shutter button halfway the AF frame will turn yellow EC251 CDI E388_Guide_E book ...

Page 82: ... focus If the AF frame is set to Face Detect the face that the camera determined as the main subject is displayed enlarged If the AF frame is set to Center the center of the image is displayed enlarged Shoot Press the shutter button fully Checking the Focus and People s Expressions AF Point Zoom In the following cases the focus point will not display magnified AF frame is set to AiAF When Face Det...

Page 83: ...led Holding down the 0 button will display face frames up to 35 of all the detected faces green the face the camera will focus on white detected faces Shoot Press the shutter button halfway The face frame of the focused face will change into and appears in green Press the shutter button all the way to shoot 0 Selecting the Face to Focus On Face Select and Track Face Frame In the following cases th...

Page 84: ...ht displays the content of the orange frame Checking the focus If multiple white frames display press the m or 0 button to switch the display on the bottom right of the screen for checking the focus of each frame You can enlarge the display of the orange frame content by moving the zoom lever towards k Pressing the shutter button halfway will return you to the shooting screen Checking the Focus Im...

Page 85: ...ck the focus Keep the shutter button pressed halfway and press the q button X The focus is locked and displays on the screen Compose the scene and shoot After shooting press q to cancel AF lock Changing the Metering Mode Evaluative Suitable for standard shooting conditions including back lit shots Automatically adjusts the exposure so that the subject is always properly lit for the shooting condit...

Page 86: ...a at the subject on which you wish to lock the exposure While pressing the shutter button halfway press the o button X displays and the exposure is locked Compose the scene and shoot After shooting press the o button to cancel AE lock Shooting with AE Lock EC251 CDI E388_Guide_E book Page 86 Monday June 23 2008 10 51 AM COPY ...

Page 87: ...the subject on which you wish to lock the exposure While pressing the shutter button halfway press the o button X The flash fires and displays The flash output is retained Compose the scene and shoot After shooting press the o button to cancel FE lock Shooting with FE Lock EC251 CDI E388_Guide_E book Page 87 Monday June 23 2008 10 51 AM COPY ...

Page 88: ...elect Press the button Change the shutter speed Use the qr buttons to change the shutter speed then press the m button The higher the value the slower the shutter speed and the brighter the recorded image becomes Slowing Down the Shutter Speed Long Shutter Mode When you attach the camera to a tripod you are recommended to set IS Mode to Off to shoot p 124 EC251 CDI E388_Guide_E book Page 88 Monday...

Page 89: ...Functions for Movies This chapter explains how to shoot and view movies using various functions Set the mode dial to E before operating the camera 6 EC251 CDI E388_Guide_E book Page 89 Monday June 23 2008 10 51 AM COPY ...

Page 90: ...al zoom during shooting p 61 Compact Shooting with reduced recording pixels You cannot use the zoom during shooting Changing the Image Quality in X Mode Recording Pixels Frame Rate Content 640 x 480 pixels 30 frames sec For shooting standard quality movies 640 x 480 pixels 30 frames sec LP The image quality will be lower than with but you can record twice the length 320 x 240 pixels 30 frames sec ...

Page 91: ...s recording time Before shooting you can lock AE Lock or change the exposure Exposure Shift Lock the exposure Pressing the o button will lock the exposure and the exposure shift bar will appear Adjust the exposure Adjust the exposure with the qr buttons After shooting press the o button to cancel Mode Image Quality Frame Rate Shooting Time 32 MB supplied 2 GB 8 GB 15 sec 16 min 47 sec 1 hr 7 min 6...

Page 92: ...used in the same way as for still images Erasing Images p 25 Quickly Finding Images p 94 Organizing Images by Category My Category p 96 Viewing Slideshows p 98 Viewing Images on a TV p 100 Erasing All Images p 101 Protecting Images p 102 Summary for Viewing Movies p 30 Exit playback and return to single image playback Print Refer to the Direct Print User Guide Playback Slow Motion Playback you can...

Page 93: ...w to transfer images to a computer and how to make settings for printing Press the 1 button to set the Playback mode before operating the camera Images edited on a computer changed file names or taken with a different camera may not display correctly 7 EC251 CDI E388_Guide_E book Page 93 Monday June 23 2008 10 51 AM COPY ...

Page 94: ...toward k X The image in the green frame will display in Single Image Playback Searching 9 Images at a Time Select Index Playback Move the zoom lever toward g Display the Jump bar Move the zoom lever toward g X The jump bar appears Change the displayed images Press the qr buttons to switch between displays of 9 images To return to Index Playback move the zoom lever toward k Quickly Finding Images J...

Page 95: ...ss the button Position of the Currently Displayed Image Jump Shot Date Jumps to the first image of each shooting date People Jumps to the images of each category sorted with My Category p 96 Scenery Events Category 1 3 To Do Jump to Folder Jumps to the first image of each folder Jump to Movie Jumps to a movie Jump 10 Images Jumps over 10 images at a time Jump 100 Images Jumps over 100 images at a ...

Page 96: ... the setting Auto Category during Shooting Images are automatically sorted when shot as shown in the following table If you do not wish to categorize the images automatically select the 4 tab choose Auto Category and set it to Off People Category 1 3 Scenery To Do Events Organizing Images by Category My Category People For images shot in or mode or images with faces detected when AF Frame p 80 is ...

Page 97: ...tion of the displayed area Move the zoom lever toward g to reduce the magnification or return to Single Image Playback If you press the m button will display Press the qr buttons to switch between images at the same level of magnification Press the m button again to return to normal k Magnifying Images Approximate Location of Displayed Area EC251 CDI E388_Guide_E book Page 97 Monday June 23 2008 1...

Page 98: ...Loading image displays the slideshow will start You can pause restart a slideshow by pressing the m button again Press the button to stop the slideshow Viewing Slideshows Images display without transition effect The next image displays gradually The image slides out to the left and the next image appears If you press the qr buttons during a slideshow the image will change if you hold the buttons p...

Page 99: ...g the focus Move the zoom lever toward k X The content of the orange frame displays magnified at the bottom right of the screen Use the zoom lever to change the display size and the opqr buttons to change the display position while checking the focus Press the button to close the magnified display When multiple frames display When multiple frames display press the m or 0 button to switch frames Ea...

Page 100: ...witch it to video mode Turn on the camera Press the 1 button to turn on the camera X The image will appear on the TV nothing will appear on the screen of the camera After you finish viewing turn off the camera and TV and unplug the AV cable If the camera s video output system NTSC PAL does not match the TV s images will not display correctly If this happens press the button select the 3 tab and th...

Page 101: ...ate caution before erasing images However protected images cannot be erased Select Erase all Press the button select the 1 tab Press the op buttons to select Erase All then press the m button Erase all images Press the qr buttons to select OK then press the m button X All images on the memory card will be erased Changing Image Transitions Immediately switches between images without transition effe...

Page 102: ... button again to cancel protection and the will disappear To protect additional images repeat the above procedure Protecting Images If you format the memory card p 49 protected images will also be erased Protected images cannot be erased with the camera s erase function To erase an image cancel protection first If you select Erase all p 101 after protecting necessary images all other images will b...

Page 103: ...n press the m button Select an image size Press the qr buttons to select a setting then press the m button Save the new image Press the qr buttons to select OK then press the m button X The image will be saved as a new file Display the new image When you press the button Display new image displays Press the qr buttons to select Yes then press the m button X The saved image will display Resizing Im...

Page 104: ...ton Rotate the image Press the qr buttons to select an image then press the m button X Cycle through the 90 270 original orientations with each press of the m button You cannot resize an image if there is not enough free space on the memory card Movies and images shot in cannot be resized You cannot resize an image to a larger size Rotating Images EC251 CDI E388_Guide_E book Page 104 Monday June 2...

Page 105: ...A frame will appear on red eye detected by the camera Correct the image Press the qr buttons to select Start then press the m button Save the new image Press the qr buttons to select New File then press the m button X The image will be saved as a new file Display the new image When you press the button Display new image displays Press the qr buttons to select Yes then press the m button X The save...

Page 106: ...frame positions and sizes press the button then follow Steps 3 and 4 on the previous page You can add up to 35 correction frames Removing Frames In Step 3 on the previous page select Remove Frame and then press the m button Press the qr buttons to select a frame then press the m button Press the button then follow Steps 3 and 4 on the previous page Some images may not be properly corrected If ther...

Page 107: ...ss the m button Record the memo Press the qr buttons to select then press the m button X Recording starts You can pause restart recording by pressing the m button If you want to stop recording press the qr buttons to select then press the m button Sound Memo Operation Panel Attaching Sound Memos Exit Record Pause Play Delete The sound attached to an image can also be played with the supplied softw...

Page 108: ...tton again X Images matching the selected setting will be transferred Press the button to return to the Direct Transfer menu Direct Transfer Settings Transferring Images to a Computer All Images Transfers all images from the memory card to the computer New Images Transfers all new images that have not been transferred to the computer before p 35 DPOF Trans Images Transfers all images designated fo...

Page 109: ...ss the qr buttons to select Order then press the m button Select an image Press the qr buttons to select an image then press the m button X After designating an image displays Press the m button again to cancel designation the will disappear Repeat the above procedure to designate other images Up to 998 images can be designated Pressing the button twice will save the settings to the memory card an...

Page 110: ...ted together Reset All Select Transfer Order Press the button select the 1 tab Press the op buttons to select Transfer Order then press the m button Select Reset Press the qr buttons to select Reset then press the m button Press the qr buttons to select OK then press the m button X All transfer orders are removed may display when using a memory card with transfer settings set by a different camera...

Page 111: ...DPOF Select an image Press the qr buttons to select an image then press the c button Set the number of prints Press the op buttons to set the number of prints Add to Print List Press the qr buttons to select Add then press the m button X The icon and the number of prints display If you want to remove an image from the Print List display the image you wish to remove Press the c button use the qr bu...

Page 112: ...a and printer Open the cover and insert the smaller plug of the cable into the camera s terminal as shown Insert the bigger plug into the printer s terminal Refer to the printer s user guide about how to connect the printer Turn on the printer Turn on the camera Printing Press the op buttons to select Print now then press the m button X Printing starts Press the qr buttons to check the images in t...

Page 113: ...of print copies If you select Index appears on the screen Set the number of prints Press the op buttons to set the number of prints maximum 99 Repeat Steps 2 and 3 to set other images and the number of prints For Index you cannot set the number of prints Only select images Set All Images to Print One Each Select Select All Images Press the button select the 2 tab Press the op buttons to select Sel...

Page 114: ...the m button Press the qr buttons to select OK then press the m button X All selections will be cleared Print Settings You can make settings for the print type date and file number These settings apply to all selected images and cannot be set individually Select Print Settings Press the button select the 2 tab Press the op buttons to select Print Settings then press the m button Make the settings ...

Page 115: ...not be reflected may display when using a memory card with transfer settings set by a different camera If you change settings with this camera the previously made settings may be overwritten Images with the date embedded using p 63 always print with the date regardless of the Date setting As a result some printers may print the date twice on these images if Date is also set to On When set to Index...

Page 116: ...116 EC251 CDI E388_Guide_E book Page 116 Monday June 23 2008 10 51 AM COPY ...

Page 117: ...g the Camera This chapter expands on the normal usage of the camera by explaining how to set useful functions and change shooting mode settings 8 EC251 CDI E388_Guide_E book Page 117 Monday June 23 2008 10 51 AM COPY ...

Page 118: ...he brightness while checking the brightness of an image Select LCD Brightness then press the qr buttons to adjust the brightness Turning off the Power Saving Function You can set the power saving function p 42 to Off However setting to On is recommended to save battery power Choose Power Saving then press the m button Press the op buttons to select Auto Power Down then use the qr buttons to select...

Page 119: ...an change the file number assignment Select File Numbering then press the qr buttons to select a setting Continuous Even if you shoot using a new memory card the file numbers are assigned consecutively until an image with the number 9999 is taken saved Auto Reset If you replace the memory card with a new one file numbers are assigned starting with 0001 consecutively For either setting Continuous o...

Page 120: ...n press the m button Press the op buttons to select Auto Create then press the qr buttons to select an interval Press the op buttons to select Time then press the qr buttons to set a time X The new folder will be created on the set day and time Images shot after the creation date are saved to the new folder Turning off Auto Rotate When you play back images on the camera images shot in vertical ori...

Page 121: ...ection p 136 Using the Slow Synchro Shoot with the flash and a slow shutter speed Lightens dark backgrounds when shooting night sceneries or indoors using a flash You can use Slow Synchro to get the same results as with p 57 Select Flash Settings then press the m button Press the op buttons to select Slow Synchro then press the qr buttons to select On Changing Shooting Functions In order to reduce...

Page 122: ...s when shooting in dark conditions using the flash You can turn off this function Select Flash Settings then press the m button Press the op buttons to select Red Eye Lamp then press the qr buttons to select Off Red eye correction may be applied to other red parts than red eyes For example when red make up has been used around eyes Depending on the image red eye may not be detected automatically a...

Page 123: ...r 3 2 guide to confirm the printable area for L size or postcard size prints Select Disp Overlay then press the qr buttons to select a setting Grid Lines A grid overlays the display 3 2 Guide The areas outside the 3 2 range are grayed out These areas will not print when printing on paper of 3 2 aspect ratio In and modes you cannot set 3 2 Guide and Both Grid lines will not be recorded on the image...

Page 124: ... the opqr buttons to select the functions to register then press the m button When you press the c button you can use the registered function or display the setting screen for the selected function If camera shake is too strong fix the camera to a tripod When you attach the camera to a tripod you are recommended to set IS Mode to Off to shoot When using Panning make sure to hold the camera horizon...

Page 125: ...125 Useful Information for Using the Camera This chapter introduces camera accessories contains lists of functions and the index 9 EC251 CDI E388_Guide_E book Page 125 Monday June 23 2008 10 51 AM COPY ...

Page 126: ...he camera on to use it After you finish turn off the camera and unplug the power cord from the power outlet High Power Flash HF DC1 sold separately is used to supplement the camera s built in flash when the subject is too far away for proper illumination For details on attaching and using the High Power Flash refer to the user guide provided with the flash Using Household Power Do not unplug the p...

Page 127: ...orm on the internal or external surfaces of the camera To avoid condensation put the camera in an airtight resealable plastic bag and let it adjust to temperature changes slowly before removing it from the bag When condensation has formed stop using the camera immediately Continued use may damage the camera Remove the batteries and memory card and wait until the moisture has completely evaporated ...

Page 128: ...rmance may be weak Clean the terminals with a cotton swab and re insert the batteries several times Lens will not retract Do not open the memory card slot battery cover while the power is on After closing the cover turn the power on then back off p 14 Image is distorted or not showing on TV Set the video setting NTSC or PAL for your TV p 100 Screen does not display properly while shooting The disp...

Page 129: ... contrasting area of the subject and press the shutter button halfway or repeatedly press the shutter button halfway the frame will appear and the camera will focus Subject is too dark or too bright overexposed Set the flash to p 59 Adjust the brightness with exposure compensation p 74 Use the AE lock or spot metering to shoot pp 85 86 The subject is too bright due to ambient lighting Image is dar...

Page 130: ...set shooting functions or Func menu settings Depending on the shooting mode available functions vary Refer to the Functions Available in Each Shooting Mode section p 134 Recording time does not display correctly or shooting stops unexpectedly Format the memory card in the camera or use a memory card capable of recording at high speeds Even if the recording time is not displayed correctly the movie...

Page 131: ...rd that has been formatted on this camera p 49 If you copy a movie to a memory card that reads slowly playback may interrupt momentarily When playing movies on your computer depending on the computer s capabilities it may drop frames or the audio may cut out Cannot operate buttons or zoom lever When the mode dial is set to Easy mode some buttons and the zoom cannot be used p 54 Messages appear on ...

Page 132: ... memory card Erase the images pp 25 101 to open space for new images or insert an empty memory card p 14 Change the batteries Battery charge is low Change the batteries p 16 No Image There are no images recorded on the memory that can be displayed Protected Protected images movies or sound memos cannot be erased Remove protection before erasing p 102 Unidentified Image Incompatible JPEG Image too ...

Page 133: ...g p 111 Images manipulated on a computer that have had their file name changed or have been taken with a different camera may not be supported Communication error Images could not be transferred to the computer due to the large amount of images approx 1000 stored on the memory card Use a commercially available USB card reader to transfer the images Lens error restart camera A lens error was detect...

Page 134: ... Monitor Setting p 45 No Information Information View Function menu Exposure Compensation p 74 Long Shutter p 88 White Balance p 73 1 My Colors p 75 Metering System p 85 Compression Ratio still images p 70 2 Number of Recording Pixels still images p 70 3 Number of Recording Pixels Frame Rate Compression Movie p 90 1 Optimum value is automatically set by the camera 2 Fixed to Fine 3 Fixed to Large ...

Page 135: ...Functions Available in Each Shooting Mode 135 Function menu 4 Setting available Setting not available EC251 CDI E388_Guide_E book Page 135 Monday June 23 2008 10 51 AM COPY ...

Page 136: ...Eye Lamp 2 Self Timer Custom Timer p 78 AF assist Beam p 123 2 Review Rec review p 52 3 Review Info p 45 Off Detailed Focus Check Auto Category p 96 2 Disp Overlay p 123 Off Grid Lines 3 2 Guide Both IS Mode p 124 Off Continuous Shoot Only Panning c Registering settings to the Print Share button p 124 1 Can not be set when or is selected 2 Always set to On 3 Fixed to 2 sec 4 Only when the flash is...

Page 137: ...Menus 137 2 2 2 2 4 Setting available Setting not available EC251 CDI E388_Guide_E book Page 137 Monday June 23 2008 10 51 AM COPY ...

Page 138: ...e On Off p 118 LCD Brightness 1 2 3 4 5 p 118 Power Saving Auto Power Down On Off Display Off 10 20 or 30 sec 1 2 or 3 min pp 42 119 Date Time Date y m d and time h m settings p 18 Format Formatting memory card erasing all data p 49 File Numbering Continuous Auto Reset p 119 Create Folder Create New Folder Auto Create p 120 Auto Rotate On Off p 120 Lens Retract 1 min 0 sec p 121 Language Select di...

Page 139: ...Rotates images p 104 Erase all Erases all unprotected images p 101 Transfer Order Sets images to transfer to a computer p 109 Resume Sets the image that displays when resuming playback Transition p 101 Item Options Summary Ref Page Print Prints images set for printing p 26 Select Images Qty Sets images for printing p 113 Select All Images Sets all images for printing p 113 Clear All Selections Can...

Page 140: ...n Lens shift type Metering System Evaluative Center weighted average Spot Exposure Compensation 2 stops in 1 3 stop increments ISO speed Standard Output Sensitivity Recommended Exposure Index Auto High ISO Auto ISO 80 100 200 400 800 1600 White Balance Auto Day Light Cloudy Tungsten Fluorescent Fluorescent H Custom Built in Flash Auto On Off Built in Flash Range 30 cm 3 5 m 1 0 11 ft W 50 cm 2 0 m...

Page 141: ...t rate 8 bits Sampling Rate 11 kHz Playback Modes Single Index Magnification Easy Slide Show My Category Red Eye Correction Resize Sound Memo Protect Rotate Focus Check Jump Movie Playback Direct Print PictBridge compliant and Canon Direct Print and Bubble Jet Direct compatible Interface Hi Speed USB mini B Audio Video output NTSC or PAL selectable monaural audio Communication Settings MTP PTP Pow...

Page 142: ... Quality Continuous Shooting 69 D Date and Time Î Date Time Date Time 18 Adding to Image 63 Changing 19 Date Time Battery 19 Setting 18 Default Settings 48 Deleting Î Erasing Digital Camera Solution Disk 2 Digital Tele Converter 62 Digital Zoom 61 Direct Print 27 Direct Print User Guide 2 Display Language 20 Display Overlay 123 DPOF 109 111 E Easy Mode 24 54 Editing Red Eye Correction 105 Resizing...

Page 143: ...Quality Compression Ratio 70 Images Display Time 52 Editing Î Editing Erasing Images 25 Playback Î Viewing 24 Indicator 41 42 Indoor Scene Mode 56 Infinity 65 Interface Cable 26 31 ISO Speed 72 ISO3200 Scene Mode 58 K Kids Pets Scene Mode 55 L L size 71 Lamp 40 122 Landscape Scene Mode 55 LCD monitor Î Screen Long Shutter Mode 88 M Macro 64 Magnifying Images 97 Memory Cards Available Shots 17 71 F...

Page 144: ... Images Smaller 103 Rotating Images 104 S Safety Zoom 61 Screen Information Displayed 43 Language 20 Menu Operations 46 47 Switching the Display 45 SD SDHC memory cards Î Memo ry Cards Self Timer Changing Delay and Number of Shots 78 Shoot 60 Sepia Tones 75 Shooting Date and Time Î Date Time Shooting Using a TV 77 Shutter Button 21 Slide Show 98 Snow Scene Mode 57 Software Digital Camera Solution ...

Page 145: ...ovies Viewing Playback 93 AF Point Zoom 82 Enlarged Display 97 Index Playback 94 Single Image Playback 24 Slide Show 98 W White Balance 73 Widescreen 71 Z Zoom 22 28 61 EC251 CDI E388_Guide_E book Page 145 Monday June 23 2008 10 51 AM COPY ...

Page 146: ... has been made to ensure that the information contained in this guide is accurate and complete However if you notice any errors or omissions please contact the Canon customer service center indicated on the customer support list included with the product The above items notwithstanding Canon accepts no liability for damages due to mistaken operation of the products For CA USA only Included lithium...

Page 147: ...erence to radio communications However there is no guarantee that interference will not occur in a particular installation If this equipment does cause harmful interference to radio or television reception which can be determined by turning the equipment off and on the user is encouraged to try to correct the interference by one or more of the following measures Reorient or relocate the receiving ...

Reviews: