background image

20

20

1

2

3

4

Introduction

Contents at 

a Glance

Downloading 

Images

Camera 

Settings

Remote 

Shooting

Reference

Preferences

Index

3

Open the folder containing the saved white balance 
file, select the file and then click the [Open] button.

¿

The white balance file is loaded.

O

The white balance files that you can register to the camera are 
files with the “.WBD” extension.

4

Enter a title into the [Title] input field.

O

 You cannot enter the title on 

.

5

Click the [Apply to camera] button.

¿

The personal white balance is registered on the camera.

O

This is registered as manual white balance on 

.

O

To register another setting, repeat step 2 to step 5.

6

Click the [Close] button.

¿

The [Personal white balance settings] dialog box closes and the 
display returns to the [Shooting menu].

7

Select a registered personal white balance on the 
camera.

O

Select a registered personal white balance (

) or 

manual white balance (

) as the white balance. 

O

For selecting personal white balance or manual white balance, 
refer to “Selecting the White Balance” (

) or 

“Setting the White Balance” (

) in the camera’s 

Instruction Manual provided with your camera.

40D

40D

1Ds Mk III

1D Mk III

40D

1Ds Mk III

1D Mk III

40D

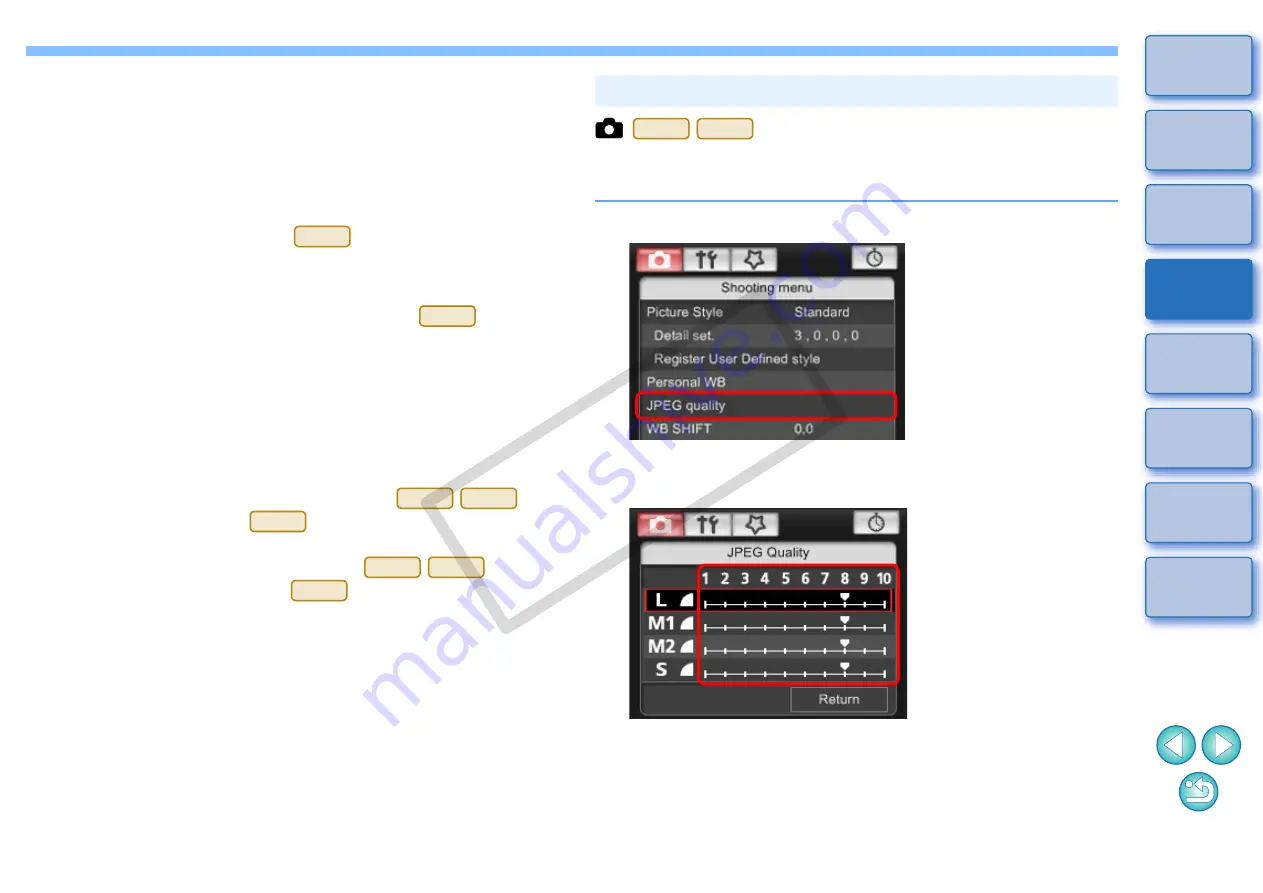
You can set the JPEG image quality and apply it to the camera, in the 
same way as operating from the camera.

1

Click [JPEG quality].

¿

The [JPEG Quality] window appears.

2

Click the setting position.

¿

The settings are applied to the camera.

O

Higher values give a lower compression ratio and higher image 
quality for any size.

3

Click [Return].

¿

The display returns to the [Shooting menu].

Setting JPEG Quality and Applying to the Camera

1Ds Mk III

1D Mk III

COP

Y

Summary of Contents for 1000D - EOS Rebel XS Transcend 8GB Memory...

Page 1: ...Window menu X Main Window O Square brackets are used to indicate items such as menu names button names and window names that appear on the computer screen O Text inside indicates a camera switch name...

Page 2: ...NCLUDING ANY WARRANTY OF MERCHANTABILITY OR FITNESS FOR A PARTICULAR PURPOSE WITH RESPECT TO THE SOFTWARE NEITHER CANON NOR ANY OF CANON S SUBSIDIARIES DISTRIBUTORS OR DEALERS IS LIABLE FOR ANY DAMAGE...

Page 3: ...an also shoot remotely by operating the camera s shutter button O Preset a time allowing the camera to shoot automatically with timer shooting O When downloading images or shooting remotely view check...

Page 4: ...ty and apply to the camera p 20 O To adjust a white balance setting and apply to the camera p 21 O To register peripheral illumination correction data for the lens in the camera p 21 O To set My Menu...

Page 5: ...computer starting up EU downloading images from your camera to your computer and exiting EU are explained here Connecting the Camera and Computer 5 Starting up EU 5 Batch Downloading Images to Your C...

Page 6: ...amera O Image downloading preparation is now complete Continue with Starting up EU O With you can fix the plug to the camera with the cable protector to prevent the plug from disconnecting For details...

Page 7: ...rts up the main window appears and your camera and computer can now communicate Continue with Batch Downloading Images to Your Computer Batch Downloading Images to Your Computer You can batch download...

Page 8: ...When you download images you can change the software that starts up from DPP to ZoomBrowser EX or another software p 45 O You can change images downloaded and the save destination p 44 p 45 O Download...

Page 9: ...mages to download 3 Click the Download button The Download image dialog box appears Viewer window Add check mark 4Specify the save destination and then click the OK button The Save File dialog box app...

Page 10: ...er EU does not support image downloading using a card reader For this reason when downloading images using a card reader use one of the following 3 procedures Downloading Images Using Digital Photo Pr...

Page 11: ...Settings Remote Shooting Reference Preferences Index Exiting EU 1 Click the Quit button The window closes and EU exits 2Turn the camera s power switch to OFF 3 Disconnect the cable from the camera an...

Page 12: ...ions 14 Available Settings by Camera Model 15 Setting Picture Styles and Applying to the Camera 16 Selecting a Picture Style and Applying to the Camera 16 Changing Picture Style Settings and Applying...

Page 13: ...opyright Notice and Date Time You can set and apply to the camera the camera owner s name copyright notice and date time recorded as shooting information in shot images 1 Connect your camera and compu...

Page 14: ...ters or symbols including a prefix as the author s name Photographer is set as the default prefix but you can change this to a new prefix Copyright notice 2 O You can enter and set up to 63 characters...

Page 15: ...x Setting up Camera Functions You can set and apply to the camera Picture Styles personal white balance JPEG quality and white balance adjustment 1 Connect your camera and computer and then start up E...

Page 16: ...gister to the camera a personal white balance file saved in RAW Image Task p 19 JPEG quality O You can set the JPEG image quality and apply it to the camera in the same way as operating from the camer...

Page 17: ...a as user defined settings You can also register Picture Style files in the camera as user defined settings you have downloaded from the Canon s website or created with Picture Style Editor Picture St...

Page 18: ...Color tone and apply them to the camera in the same way as operating from the camera 1 Click Detail set The Detail set dialog box appears 2Set by clicking the pointer on the slider for each item If yo...

Page 19: ...iles downloaded from the Canon s website or created with PSE and saved to your computer as user defined settings in your camera 1 Click Register User Defined style The Register Picture Style File dial...

Page 20: ...ure Style Editor Instruction Manual PDF electronic manual White balance files created by adjusting the white balance of a RAW image and saving the results can be registered in the camera as personal w...

Page 21: ...ox closes and the display returns to the Shooting menu 7 Select a registered personal white balance on the camera O Select a registered personal white balance or manual white balance as the white bala...

Page 22: ...ce and Applying to the Camera Displays the compensation value Compensates amber Compensates magenta Compensates green Compensates blue You can register peripheral illumination correction data for the...

Page 23: ...ions refer to p 54 O Lens names displayed in the Register peripheral illumination correction data window may be partially shortened depending on the lens type Setting My Menu and Registering to the Ca...

Page 24: ...ick the Add button The selected item is added to Items that can be configured in My Menu on the camera on the left side of the window O You can register up to six items with the above procedure O You...

Page 25: ...to shoot automatically with timer shooting Remote Live View Shooting 25 Remote Live View Window Functions 28 Focusing Manually 28 Focusing Using AF 30 Focusing Using Quick Mode 30 Focusing Using Live...

Page 26: ...urn the camera s power switch to ON EU starts up O cannot communicate with EU if the camera s mode dial is set to Set the mode dial to a mode other than O Looking into the viewfinder of the camera com...

Page 27: ...able in the Live View shoot window that appears Click Live View shoot window Click O On click Live View Movie func set For select Stills only and Still display in the Live View Movie func set window a...

Page 28: ...on to shoot The shot image is transferred to your computer and displayed in the Quick Preview window And then DPP starts up automatically O You can quickly review the shot image in the Quick Preview w...

Page 29: ...lso use mirror lockup with remote shooting You cannot take test shots after setting mirror lockup O You can save shot images to both your computer and a memory card p 45 O You can change the software...

Page 30: ...the section you want to enlarge in step 1 to display an enlarged view at 100 actual pixel size in the Zoom View window O Double click an image in the Zoom View window to return to the Remote Live View...

Page 31: ...ing the AF points by clicking the button Focusing Using AF 5D Mk II 50D REBELT1i 500D 5D Mk II 50D REBELT1i 500D 2Click the AF point in the position where you want to focus O You can switch between au...

Page 32: ...AF point appears O You can switch between showing and hiding the AF point by clicking the button 2Drag the enlargement display frame to move it to the position where you want to focus 5D Mk II 50D REB...

Page 33: ...g that position then selects the AF point O You can switch between showing and hiding the AF point by clicking the button 2Click the ON button AF is executed When focus is achieved the camera makes a...

Page 34: ...The selected white balance is registered in the camera as a personal white balance and applied to images that will be taken White Balance with the Remote Live View Window When taking flash shots wher...

Page 35: ...hite balance window Click 4Click the Apply to camera and execute test shooting button A shot will be taken again using the part of the image in step 3 clicked as the standard for white and the shot im...

Page 36: ...tal Vertical Alignment of the Camera As with the camera s Live View function it is possible to shoot with a feeling similar to film type medium format large format cameras such as 6 6 cm 6 4 5 cm and...

Page 37: ...the camera Also since the shot images are saved to your computer s hard disk you can shoot large quantities without having to worry about the capacity of the memory card 1 Display the capture window p...

Page 38: ...Live View window 7 Click the button and begin shooting At the bottom left of the Remote Live View window a icon and the recording time are displayed O Click the button again to end shooting O After yo...

Page 39: ...nd step 2 for Remote Live View Shooting p 25 2Set the camera s mode dial to O When setting the movie recording size click Live View Movie func set display the Live View Movie func Set window before se...

Page 40: ...n movie mode movie still image appear in a list After specifying Destination Folder and File Name click the OK button in the window and image data will be downloaded from the camera s memory card to y...

Page 41: ...l between shots and the number of shots to be taken 1 Display the capture window p 25 2Click the button The Timer shooting settings dialog box appears 3 Checkmark Interval timer shooting 4Enter the sh...

Page 42: ...to M Manual exposure Then set the shutter speed to BULB in the capture window or on the camera Bulb Exposures 1Ds Mk III 1D Mk III 5D Mk II 3 Set the desired aperture 4Click the button The Timer shoot...

Page 43: ...s Remote Shooting Reference Preferences Index Preferences You can change each of the EU functions in the preferences window to make them easier to use Preferences 43 Basic Settings 43 Destination Fold...

Page 44: ...settings Remote shooting screen is selected in Startup Action the capture window p 12 appears O When Execute Starts to download images is selected in Startup Action the Save File dialog box p 6 appea...

Page 45: ...ing or Monitor Folder a subfolder is generated when the checkmarked function is used O You can select the naming rule for a generated subfolder from the list box You can also customize the naming rule...

Page 46: ...at rotates the shot image Set the rotation angle in the capture window p 56 Download Images Remote Shooting From the list box you can select the linked software that starts up when images are download...

Page 47: ...or Folder Function Function for Use with the WFT E2 E2A E3 E3A or E4 E4A 48 Function for Use with the Accessories 49 Folder Structure and File Names in the Memory Card 50 Uninstalling the Software 50...

Page 48: ...could not be completed correctly EU does not start up EU and the camera are not communicating O Do not connect more than one camera to the same computer Two or more cameras may not operate normally O...

Page 49: ...r The Monitor Folder dialog box appears 2Click the Browse button and specify the save destination folder for shot images O You can specify the save destination folder for the shot images set in the WF...

Page 50: ...ld separately you can start up the previously mentioned accessory software from EU And you can also start up the Picture Style Editor Picture Style file creating software For details on using each sof...

Page 51: ...of factory shipment or set in the camera appears in of the file name O The YYYY in the file names represents a number between 0001 and 9999 File name File type YYYY JPG JPEG image file YYYY CR2 RAW im...

Page 52: ...camera with the cable protector to prevent it from detaching during remote shooting 1 Remove the cap 2Attach the cap on the fixing screw 3 Connect the small plug of the cable into the terminal on your...

Page 53: ...nts at a Glance Downloading Images Camera Settings Remote Shooting Reference Preferences Index List of Main Window Functions p 6 p 7 p 53 p 25 p 56 p 48 Exits EU p 10 p 43 Control camera tab sheet p 4...

Page 54: ...edia Downloads the images to the computer Selects the condition of the image Deletes the image RAW JPEG image icon Images already transferred to computer icon Protect icon Image display size Movie ico...

Page 55: ...Window Functions p 21 Displays lenses selected in Select a lens category by category Lens category Displays all the categories No of lenses registered in the camera No of lenses that can be registere...

Page 56: ...emote Shooting Reference Preferences Index List of My Menu Settings Window Functions p 22 My Menu up to 6 items Deletes from My Menu Applies My Menu to the camera Switches My Menu position Adds to My...

Page 57: ...lays the My Menu p 23 Displays the main window p 52 1 Each time you click the button the shot image rotates 90 degrees To make this function available checkmark Rotate image in the Remote Shooting tab...

Page 58: ...play frame Click white balance Lens drive p 29 Checks the depth of field p 32 Shows hides the histogram Shows hides the gridlines p 35 Sets the aspect ratio p 35 AF point Displays the Zoom View Window...

Page 59: ...ens drive p 29 Checks the depth of field p 32 Display mode Closes the window Controllers 2 Displays the capture window p 56 Returns to the Remote Live View window Shows hides the controllers 1 Moves t...

Page 60: ...hite balance window p 34 Saves the test shot image Enlargement ratio of the image Closes the window Enlargement reduction of the image Fit to window view 100 actual pixel size view Rotates the image D...

Page 61: ...utomatically Using AF Remote Live View Shooting 30 Focusing in Face Detection Live Mode Remote Live View Shooting 32 Focusing in Live Mode Remote Live View Shooting 31 Focusing in Quick Mode Remote Li...

Page 62: ...ing 40 U Uninstalling the Software 50 V Viewer Window 8 53 W White Balance for Flash Photography Remote Live View Shooting 33 Z Zoom View Window 29 58 About This Instruction Manual O It is prohibited...

Reviews: