background image


C & P 

Creativity and Personality for Assistive Technology 

www.chrisparkdesign.com


Designed in Newport Beach, California, USA 

Made in South Korea


Summary of Contents for i-loview 13

Page 1: ......

Page 2: ......

Page 3: ...Introduction...

Page 4: ...Introduction...

Page 5: ...hock or fire Do not touch power plug with wet hands to prevent electronic shock Important Misuse of the product may result in personal injury or damage to the unit Use only the adapter supplied with t...

Page 6: ...r use of the product Important After six 6 months usage the lifespan of the battery may be shortened Important Keep the product out of direct sunlight and extreme temperatures The display may not work...

Page 7: ...Contents 1 Package 2 Instructions before use 3 Configuration 4 Hot keys Features 5 Technical specifications 6 Warranty...

Page 8: ...choosing the i loview 13 Full HD i 1388 Please check for the following items in the i loview 13 Full HD i 1388 Package 1 Portable magnifier 2 Power adapter 3 Carrying pouch 4 User s manual 5 Microfib...

Page 9: ...ease connect the supplied power adapter to the DC input jack to charge the battery Remove the LCD protection film before using the unit Be careful not to allow foreign material to adhere to the camera...

Page 10: ...n the base plate with one hand while other hand grabs on top of the body frame Lift the arm until it locks in place Put both hands on the left and right sides of the LCD monitor Pull the LCD monitor t...

Page 11: ...left and right sides of the LCD monitor To close the i loview 13 push down the LCD monitor using both hands Push the LCD monitor toward the main body frame Place both hands on top of the body frame L...

Page 12: ...Camera positions You can use various modes by adjusting the Camera location adjuster Self view mode mirror mode Reading mode Distance view mode...

Page 13: ...3 Configuration 1 Power On Off button 2 Image optimizer Wheel Adjusting a brightness 3 Snap shot button 4 Zoom Wheel 5 Color mode button 6 Natural color button 7 Super Function Key A Jog Key 8 LCD...

Page 14: ...3 Configuration 9 Camera 10 Conversion lens 11 DC jack...

Page 15: ...3 Configuration 12 LED lights 13 Camera location adjuster...

Page 16: ...3 Configuration 1 HDMI IN 2 HDMI OUT 3 External Key port 4 USB 2 0 5 USB Micro B type USB 3 0...

Page 17: ...rn off the unit press the button for 2 seconds or more again with the power on state Image optimizer wheel Provide two functions according to the situation Natural color mode Adjust brightness level o...

Page 18: ...in out on the still image and adjust color and screen brightness Press the button again back to the live image mode Super Function Key scrolls the freezed image Zoom Wheel To adjust the magnification...

Page 19: ...ackground mode Green text on black background mode Blue text on yellow background mode Yellow text on blue background mode Up to 35 color modes can be set using the menu Natural color button Press the...

Page 20: ...foreign material is on the lens wipe it off with the provided microfiber cloth Conversion lens Open the conversion lens for the distance view mode DC jack You can insert the power adapter here to cha...

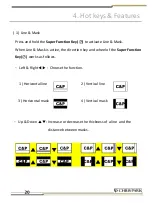
Page 21: ...e Mask When Line Mask is active the direction key and wheel of the Super Function Key works as follows Left Right Choose the function 1 Horizontal line 2 Vertical line 3 Horizontal mask 4 Vertical mas...

Page 22: ...ckwise 2 Battery status The status of the remaining battery power is not normally displayed The battery charging icon when the power adapter is connected will be displayed You can on or off the status...

Page 23: ...ode If the unit is left further 3 minutes after entering the Power saving mode power is automatically switched off 4 Color mode selection By rotating the Zoom wheel in the state pressing the Color mod...

Page 24: ...view mode Use when viewing a distant object such as a blackboard The camera operates in distance view mode by the sensor The magnification range will be minimized Return to the natural color mode Open...

Page 25: ...r modes MAX 35 modes You can personalize your own color setting Power saving mode You can set a time to operate into the power saving mode Default setting time 10 minutes Adjusting magnification range...

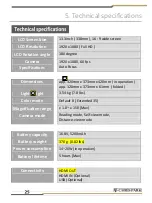
Page 26: ...p 320mm x 373mm x 420mm in operation app 320mm x 373mm x 61mm folded Light weight 3 54 kg 7 8 lbs Color mode Default 8 Extended 35 Magnification range x 1 8 x 150 Max Camera mode Reading mode Self vie...

Page 27: ...5 Technical specifications This unit is an EMC registered device This device bears the CE and FCC KC approval mark...

Page 28: ...d or food Any problem due to operation of the i loview 13 FHD with tools or equipment not supplied by C P All metal and plastic surfaces and all other externally exposed parts that will be scratched o...

Page 29: ...MEMO...

Page 30: ...MEMO...

Page 31: ...MEMO...

Page 32: ...C P Creativity and Personality for Assistive Technology www chrisparkdesign com Designed in Newport Beach California USA Made in South Korea...

Reviews: