


CS140 CONFIGURATION MENU 5
ID 0
S/N 1009
(1) Toggle dew heater override: AUTOMATIC
(2) Toggle hood heater override: AUTOMATIC
(3) Toggle dirty window compensation: NO COMPENSATION
(4) Toggle command line CRC Checking: DO NOT CHECK
(5) Sensor power down voltage: 9.0V
(9) Refresh
(0) Return to main menu
->
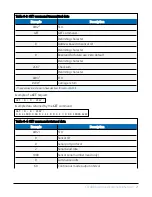
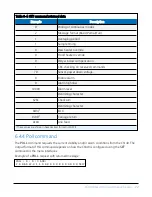
Menu option (6) allows calibration of the CS140 using an optional calibration device. It also allows
the user to reset the CS140 to factory default values.
CS140 CONFIGURATION MENU 6
ID 0
S/N 1009
(1) Perform a user calibration
(2) Reset the user calibration to factory values
(9) Refresh
(0) Return to main menu
->
To
perform
a
calibration
cho
o
se
option
(1);
see
27).
Once
a
calibration
is
finished
changes
are
immediate,
but
factory
calibrations
can
be
restored
if
needed
using
option
(2)
in
the
calibration
menu.
7.
Calibration
The CS140 can be checked and adjusted using the optional calibration device. The calibration
must be run using the onboard menu system. If you have Campbell Scientific
Device
Configuration
utility program, a terminal emulation screen is provided in the CS140 screens to let
you access this function.
To perform the calibration, you will need the calibrator device and a computer with a compatible
USB port. The calibrator device is sealed to IP52 and will generate a test light level of 4,500 cd/m
2
accurate to ±6% over a temperature range of 0 to 40°C.
Campbell Scientific recommends cleaning the window before calibrating the CS140. The system
is self-regulating. However, the CS140 should be calibrated at least every two years. The
CS140 Background Luminance Sensor
27