51
TROUBLESHOOTING
LED indicators
.
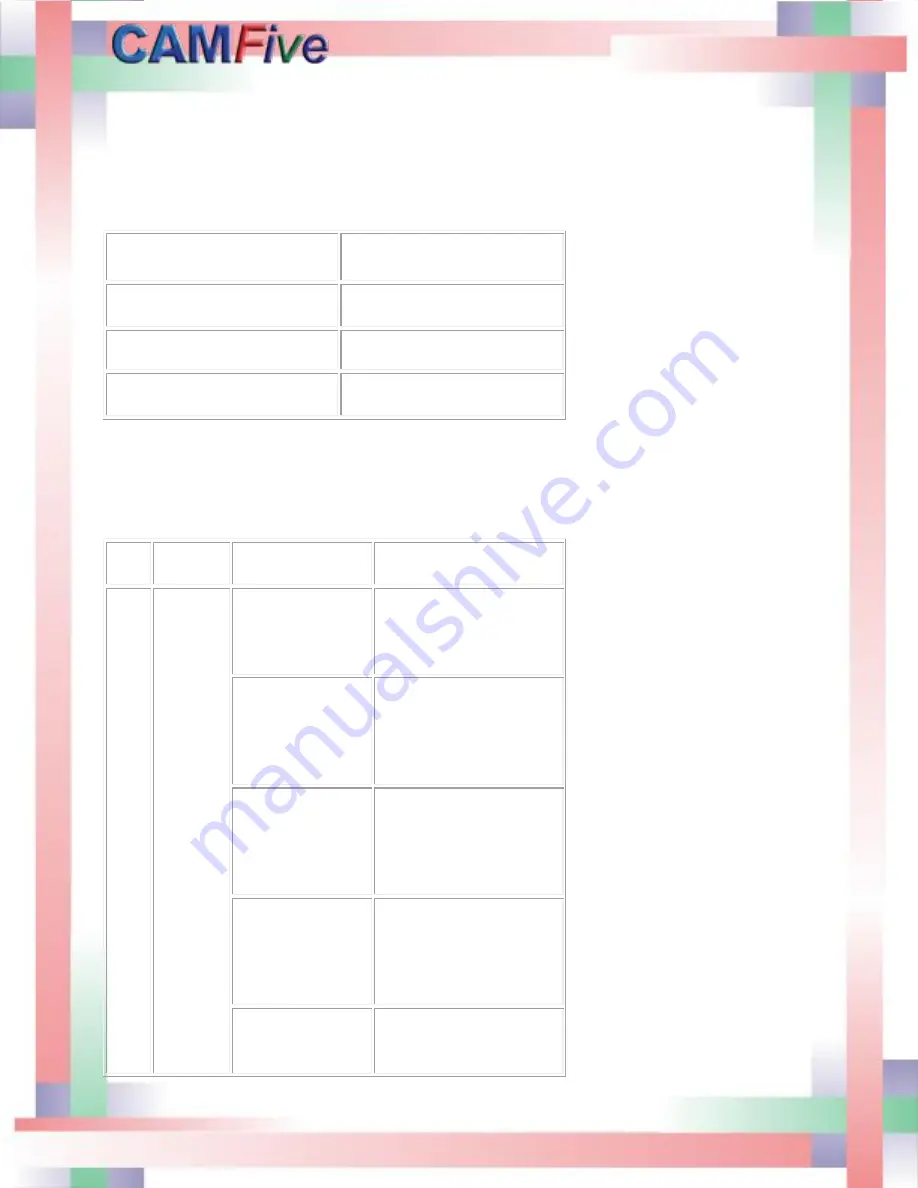
There are three LEDs on the control card. The table below describes them in detail.
State of LED indicators
Operation
State of LED indicators
Change in signal from each sensor
LED 1 flashes
Laser beam error or water cooling
failure
LED 2 is on
Normal operation
LED 3 flashes once every 1
second1)
When copying/deleting a file or updating the system, the LED3 stops flashing. On this condition, you can
press the
key to check whether the system is down.
SOFTWARE AND COMUNICATIONS TROUBLESHOOTING
No.
Failure
Analysis
Solution
1
NO. 1.1
Card fails
to
connect a
PC
1. Whether the
USB data cable is
connected
properly.
Plug and re-insert the
cable.
2. Whether the
communication
driver is installed
in the PC
properly.
Install the driver.
3. Whether the
COM port is
“disabled” on the
computer.
Go to “Device Manager”
of the PC and Select the
required COM port,
right-click it and select
“Enable”.
4. Whether a
correct COM port
is connected with
the SmartCarve4.2
software.
Select the right COM
port.
5. Breakdown or
abnormal error
occurs during
Re-open the COM port
or re-open
SmartCarve4.2. If the
Summary of Contents for CFL-CMA1610T
Page 4: ...4 ...
Page 6: ...6 ...
Page 12: ...12 The pictures below show the X and the Y step motors ...
Page 29: ...29 Press Next to continue on the following window ...
Page 30: ...30 Proceed to install software ...
Page 31: ...31 Press Finish to complete the software installation Select your language and then click OK ...
Page 32: ...32 The software has been successfully installed the following screen will appear in the PC ...
Page 34: ...34 On the next menu select controller 1 1 1 Next click the CDM20813_Setup option ...
Page 36: ...36 Double click on the SM icon to open the software ...
Page 39: ...39 Send the job to the laser machine with the carve out option Laser at work ...
Page 40: ...40 Final Product ...
Page 45: ...45 Maintenance and replacement of the mirrors ...
Page 46: ...46 Maintenance and replacement of the laser lens First removed the air hose and the nozzle ...
Page 47: ...47 Loosen the adjustment to remove the laser pen ...
Page 48: ...48 Using the ruler provided remove the nut and the o ring that hold the lens in place ...