


TLC Scanner 4
Instruction Manual, June 2018
Page 19
•
Press the key
LOAD POS
to start the automatic optimization
routine or any other key to get back to the USER DIALOG.
•
Press
to quit the USER DIALOG or
to select another func-
tion.
6.4
NEW D2 LAMP
Use this function to automatically optimize a new Deuterium lamp
in the ray path and measure the lamp emission. It may take as
much as 3 minutes to run this task.
•
In the USER-Dialog advance to the function NEW D2 LAMP in
(by means of the
key).
•
Use the key
to select the D2 lamp optimizing function; the
message CONFIRM:
LOAD POS
appears.
•
Proceed as outlined in the NEW HG LAMP part.
6.5
NEW W LAMP
Use this function to automatically optimize a new Tungsten lamp
in the ray path and measure the lamp emission. It may take as
much as 2 minutes to run this task.
•
In the USER-Dialog advance to the function NEW W LAMP (by
means of the
key).
•
Use the key
to select the Tungsten lamp optimizing function;
the message CONFIRM:
LOAD POS
appears.
•
Proceed as outlined in the NEW HG LAMP part.
6.6
TEST FUNCTIONS
This function contains some basic information about the system
that can be useful for diagnosing an error condition, e.g. in a tele-
phone contact with the service engineer.
7
Technical data
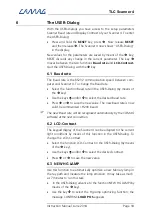
Light sources
•
Halogen Tungsten lamp: continuum 350 - 900 nm.
•
Mercury vapour lamp:
line spectrum 220 - 580 nm.
•
Deuterium lamp: continuum 190 - 450 nm.
All lamps are built into the instrument; the mechanical switch of the
lamps is triggered automatically by a stepper motor. The lamps are cur-
rent or voltage stabilized.
Lamp
power supply
The lamp power supply is built into the Scanner 4.
Pilot lamp
The slit is automatically illuminated with a visible wavelength (546 nm) if
the compartment illumination is turned ON.
Summary of Contents for TLC SCANNER 4
Page 1: ...INSTRUCTION MANUAL TLC SCANNER 4...
Page 22: ......


