AUTOFADERS
Autofaders allow Summa faders to be opened and closed under the control of another system through the
use of GPIs.
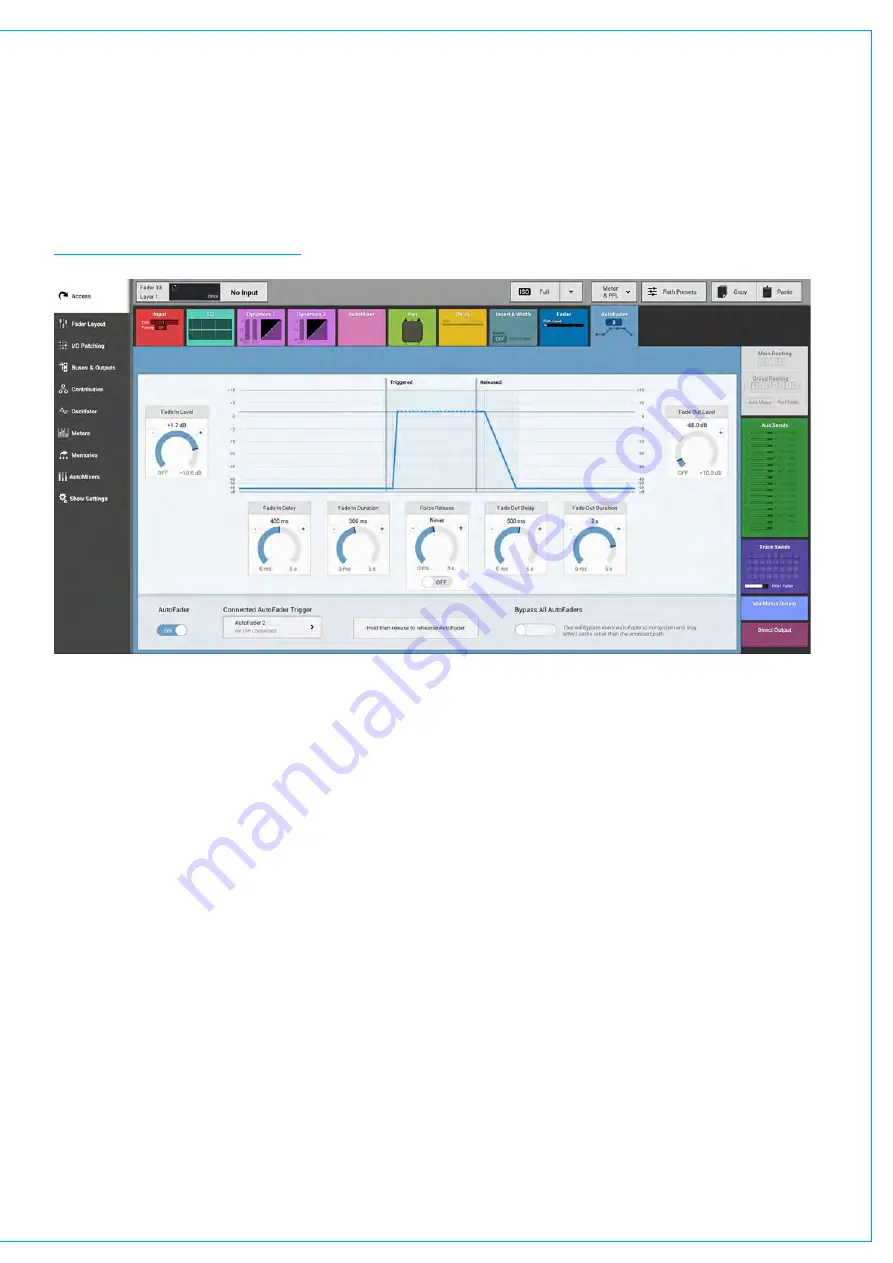
To control an assignable AutoFader, select the Access>Autofader page. and press the appropriate access button for the
channel whose Autofader is to be accessed. See Figure 1 below.
FIGURE 1 - AUTOFADER SCREEN
The AutoFader TFT screen gives a visual representation of the behaviour of the Autofaders position over time and provides
information about which Autofader is in use and which GPI the Autofader is being triggered from.
There are 9 individual Autofader controls provided and a global on screen switch to Bypass All Autofaders.
AutoFader Controls
• AUTOFADER ON - Enables the Autofader on this assign path. Note if the Autofader is shared across several paths
only this path is affected by this switch.
•
REHEARSE - Press and Hold this button labelled ‘ Hold then release to rehearse AutoFader’ to trigger the Autofader
and release to release the Autofader. This button allows the user to walk through the action of the Autofader and adjust
parameters if necessary.
•
FADE IN LEVEL - This is the level that the fader goes to when the GPI is triggered shown as an ‘IN’ line.
•
FADE OUT LEVEL - This is the level that the fader goes to when the GPI is released shown as an ‘OUT’ line.
•
FADE IN DELAY - This is the delay period before the fader starts to ramp up to the IN LEVEL.
•
FADE IN DURATION - This is the fader ramp up period.
Summary of Contents for SUMMA
Page 11: ...V3 0 196 V3 1 197 V3 1 1 197 V3 2 197 CALREC Putting Sound in the Picture 11...
Page 12: ...12 SUMMA Networked Audio Production System CONTENTS...
Page 13: ...PRODUCT INFORMATION calrec com Putting Sound in the Picture SUMMA...
Page 20: ...20 SUMMA Networked Audio Production System PRODUCT INFORMATION...
Page 21: ...SYSTEM OVERVIEW calrec com Putting Sound in the Picture SUMMA...
Page 33: ...CALREC Putting Sound in the Picture 33...
Page 38: ...38 SUMMA Networked Audio Production System SYSTEM OVERVIEW...
Page 52: ...52 SUMMA Networked Audio Production System SYSTEM OVERVIEW...
Page 53: ...SETTING UP calrec com Putting Sound in the Picture SUMMA...
Page 55: ...FIGURE 1 SYNCHRONISATION OPTIONS CALREC Putting Sound in the Picture 55...
Page 74: ...74 SUMMA Networked Audio Production System SETTING UP...
Page 75: ...GETTING SIGNALS IN AND OUT calrec com Putting Sound in the Picture SUMMA...
Page 93: ...FIGURE 4 SOURCE AND DESTINATION POP UP MEMORY LOAD CALREC Putting Sound in the Picture 93...
Page 105: ...MONITORING calrec com Putting Sound in the Picture SUMMA...
Page 107: ...FIGURE 2 EXAMPLE LOUDSPEAKERS SETUP CALREC Putting Sound in the Picture 107...
Page 110: ...FIGURE 1 THE MONITORING POP UP 110 SUMMA Networked Audio Production System MONITORING...
Page 113: ...METERING calrec com Putting Sound in the Picture SUMMA...
Page 121: ...calrec com Putting Sound in the Picture SUMMA PROCESSING...
Page 153: ...COMMUNICATIONS calrec com Putting Sound in the Picture SUMMA...
Page 161: ...FIGURE 4 MIX MINUS CONTRIBUTION POP UP CALREC Putting Sound in the Picture 161...
Page 163: ...ROUTING calrec com Putting Sound in the Picture SUMMA...
Page 165: ...FIGURE 1 CONFIGURING BUSES AND OUTPUTS CALREC Putting Sound in the Picture 165...
Page 171: ...EXTERNAL INTERFACING calrec com Putting Sound in the Picture SUMMA...
Page 179: ...FIGURE 2 LAN CONFIGURATION WINDOW CALREC Putting Sound in the Picture 179...
Page 180: ...180 SUMMA Networked Audio Production System EXTERNAL INTERFACING...
Page 181: ...CONSOLE FACILITIES calrec com Putting Sound in the Picture SUMMA...
Page 187: ...TERMINOLOGY calrec com Putting Sound in the Picture SUMMA...
Page 195: ...FEATURES BY SOFTWARE VERSION calrec com Putting Sound in the Picture SUMMA...


