background image

Setup

 28

 ©2019 CAE 905K560252 v1.0 

CAE

Luna

Step 3: Power on the Manikin

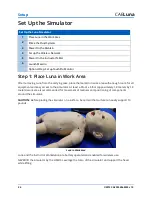
To power on the manikin, press and hold the Power button located on the back of the head.

Power Button on Head

The LED light will turn green and the manikin will cry when it is powering on. The light will remain 
green until it connects to the tablet’s wireless network.

When the wireless connection is made, the green LED power button will turn blue. 

If it is not connected to a power source during use, the LED light will turn red when the manikin 
reaches low battery status.

Step 4: Set up the Wireless Network

To set up the manikin’s wireless network:

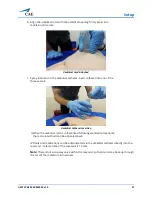
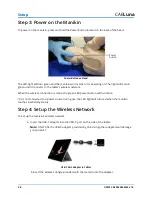
a. Insert the USB-C adapter into the USB-C port on the side of the tablet.

Note: 

ONLY USE the USB-C adapter provided by CAE. Using other adapters will damage 

your product. 

USB-C Port Adapter in Tablet

b.Insert the wireless dongle provided with the manikin into the adapter.

Power 

button

Summary of Contents for CAELuna

Page 1: ...Your worldwide training partner of choice User Guide...

Page 2: ...ts affiliates include but are not limited to Apollo Ares Athena BabySIM Caesar CathLabVR EndoVR HPS Human Patient Simulator iStan Juno LapVR Lucina Luna NeuroVR Orion PediaSIM Vimedix VimedixAR and Vi...

Page 3: ...components analyses compilations guides and other information or documents prepared by CAE its subsidiaries and affiliates and or their officers servants agents representatives employees or advisers...

Page 4: ...would make available to a third party on a commercial basis or not 2 4 Notwithstanding anything else contained in this License in no event shall Licensee use the Product and or Confidential Informatio...

Page 5: ...mited to the purpose requested with prior notice to CAE to permit it to seek an appropriate remedy to prevent the disclosure or alternatively to agree to the terms of such disclosure 5 2 The obligatio...

Page 6: ...N IF ADVISED OF THE POSSIBILITY OF SUCH DAMAGES 10 Administrative Positions 10 1 Applicable Law and Jurisdiction This License shall be governed by subject to and interpreted according to the laws of t...

Page 7: ...ion that is subject to heightened security requirements as a result of Licensee s internal policies or practices or by law collectively referred to as Excluded Data Licensee hereby agrees that License...

Page 8: ...EULA vi 2019 CAE 905K560252 v1 0 CAELuna...

Page 9: ...rds Identification 5 Hazard Summary 5 Hazardous Materials Information Label HMIS 6 NFPA Hazard Ratings 6 Other Hazards 6 Potential Health Effects 7 First Aid Measures 7 Transport Information 8 System...

Page 10: ...ructor Workstation 29 Step 6 Launch Maestro 29 Optional Step Set up TouchPro Monitor 30 Luna Features 31 Physiological and Pharmacological Features 32 Neurologic System 32 Respiratory System 32 Cardio...

Page 11: ...tanel 59 Active Arm Movements 61 Genitourinary System 62 Fluids 63 Using the StethoSym 64 Setting Up the StethoSym 64 Operating the StethoSym 64 Charging the StethoSym 66 Sounds 67 Umbilical Cord 70 C...

Page 12: ...AE 905K560252 v1 0 CAELuna Limitations of Plan 78 Return Materials Authorization RMA 78 Time and Materials 79 System Software Support 79 Customer Service and Training 80 Appendix A Recommended Clinica...

Page 13: ...ly Always use the supplied power cords Do not substitute Always use the supplied power adapter to run the simulator from AC Operate the system from a power source with the following ratings DO NOT all...

Page 14: ...l solvents Do not immerse the manikin in liquid or use abundant liquid to wash the manikin For more information see the Care and Maintenance section Do not place foreign substances into the airway wit...

Page 15: ...a battery needs to be replaced immediately remove the old battery from the equipment to ensure no damage occurs Before disposing of a battery apply vinyl tape to its positive and negative terminals to...

Page 16: ...airpins coins screws or other similar objects short circuit the positive and negative terminals place the battery in a device with the positive and negative terminals in the wrong positions strike the...

Page 17: ...he cell or battery Under recommended use conditions the electrode materials and liquid electrolyte are non reactive as long as the cell or battery integrity remains and the seals remain intact Potenti...

Page 18: ...manufacturer s website at https www rrc ps com en battery packs standard battery packs Other Hazards Appearance Color and Odor Solid object with no odor Primary Routes of Exposure Chemicals are contai...

Page 19: ...ure The electrolyte solution inside of the cells can react with alkaline basic materials and present a flammability hazard First Aid Measures The hazardous components of this cell or battery are conta...

Page 20: ...nd cells The UN Recommendations on the Transport of Dangerous Goods Manual of Tests and Criteria 38 3 Lithium batteries Revision 3 Amendment 1 or any subsequent revision and amendment applicable at th...

Page 21: ...ociated with a simulator SCE Development Workstation used to operate Maestro or TouchPro apart from Ethernet network connectivity Windows Operating System Windows 10 64 bit 8GB of RAM 32 GB Hard drive...

Page 22: ...System Requirements 10 2019 CAE 905K560252 v1 0 CAELuna...

Page 23: ...blet to other manikins or computers contact CAE Healthcare Size and Weight Ambient Temperature Range Size Weight Manikin Simulator 21 H 53 34 cm 8 lbs 3 63 kg Operation Storage Relative Humidity Manik...

Page 24: ...based on intercalation graphite Cathode positive electrode based on lithiated metal oxide Cobalt Nickel Manganese Power Adapter AC Input AC 100 240 VAC 50 60 Hz Manikin Simulator Internal Batteries R...

Page 25: ...actice interventions procedures and treatments at different stages of development through simulated clinical scenarios The live and advanced configurations of the simulator incorporate infant patient...

Page 26: ...Pre made tracheostomy site Manual chest excursion via bag valve mask endotracheal tube and tracheostomy Asymmetrical chest excursion with right mainstem intubation Chest compressions Intraosseous IO...

Page 27: ...tube placement Pneumothorax decompression Commercial ECG device compatible Optional Components Physiological model Commercial defibrillator compatible Advanced Live features Laryngospasm Spontaneous...

Page 28: ...16 2019 CAE 905K560252 v1 0 CAELuna...

Page 29: ...rations Base Configuration Full Body Neonate Manikin The Luna tetherless wireless infant manikin is designed to anatomically represent a one minute old neonate to one month old newborn Depending on yo...

Page 30: ...rted Guide Accessory Storage Box Small accessories for the Luna simulator will be organized and stored in a convenient plastic compartment box Accesory Storage Box Male and Female Genitalia The Luna n...

Page 31: ...umbillical cord is provided with the Luna manikin Consumable parts such as the umbillical cord can be reordered by contacting your CAE Sales Representative Umbilical Cord Live and Advanced Configurati...

Page 32: ...nd custom fitted for optimal protection of Luna and the standard accessories Canvas Rolling Bag Surface Go Tablet The Surface Go provides the capabilities of a laptop in an ultra portable tablet This...

Page 33: ...case is a way to store and protect the Surface Go tablet With an ergonomic design users can operate their tablet with ease and comfort StethoSym The StethoSym assembly attaches to a stethoscope and p...

Page 34: ...the simulation experience the Live and Advanced configurations offer optional and additional equipment available for purchase SymDefib The SymDefib box connects with a real defibrillator monitor This...

Page 35: ...tent of each item in the container against the shipping paperwork to ensure you received the correct product and parts Note Keep original shipping materials including boxes and foam Warranty and repai...

Page 36: ...components around the simulator CAUTION Before placing the simulator on a surface be certain that surface can easily support 10 pounds Luna in Work Area Luna and the Instructor Workstation are battery...

Page 37: ...red colored distilled water bag and close clamp c Connect tubing to the distal port of the stopcock and turn the stopcock lever so it is pointing towards the red colored IV bag and then open the clamp...

Page 38: ...cm Urinary Catheter Inserted b Attached empty filled syringe to the urinary catheter and pull back on the plunger to remove any air or fluid present in the urinary bladder c Remove syringe Remove the...

Page 39: ...three vessels Umbilical Catheter Insertion d When the umbilical cord is catheterized following standard procedures the red colored fluid can be aspirated back IV fluids and medications can be administ...

Page 40: ...eless connection is made the green LED power button will turn blue If it is not connected to a power source during use the LED light will turn red when the manikin reaches low battery status Step 4 Se...

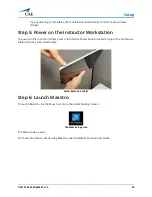
Page 41: ...To power on the instructor tablet press and hold the Power button located on top of the Surface Go tablet until the screen illuminates Power Button on Tablet Step 6 Launch Maestro To launch Maestro ta...
Page 42: ...Setup 30 2019 CAE 905K560252 v1 0 CAELuna Optional Step Set up TouchPro Monitor To set up the TouchPro monitor see the TouchPro Getting Started Guide provided with the TouchPro monitor...

Page 43: ...e patient embodied by the manikin In this way patient outcomes result from clinical interventions and provide a platform for objective performance assessment Neonatal Manikin The Luna manikin displays...

Page 44: ...ilation Skin tone colored patches are provided to insert over the pupil and underneath the head skin to simulate closed eyes For more information see Using Luna section of this user guide Respiratory...

Page 45: ...thes spontaneously with a self regulated rate and tidal volume sufficient to maintain a target arterial carbon dioxide partial pressure typically 40 mmHg which can be adjusted by the instructor The re...

Page 46: ...sounds including a range of pathological ones that are synchronized to the QRS complex of the ECG and are audible with the standard stethoscope and StethoSym assembly over the left upper and lower ste...

Page 47: ...sults in artificial circulation cardiac output central and peripheral blood pressures palpable pulses and CO2 return Pressure fluctuations are seen on invasive catheter waveforms The presence or absen...

Page 48: ...outline of the learning exercise and requires minimal additional faculty development time for use Each SCE is comprised of a patient and the scenario Luna includes five preconfigured SCEs or clinical...

Page 49: ...s use By utilizing the Scenario Designer feature of the Maestro software users can modify the preconfigured scenarios or create custom scenarios to meet specific educational objectives Instructors may...

Page 50: ...to enhance the course of a simulation exercise A Patient Status Display and set of simulation log entries provide a real time display of vital signs blood gases medications administered and other eve...

Page 51: ...ee Meet Luna on page 13 For recommended sizes for clinical supplies see Appendix A Recommended Clinical Supply Sizes on page 81 Cardiovascular The Luna manikin includes cardiovascular features that al...

Page 52: ...ew All pulses unless altered by an SCE are enabled by default Pulses on Homunculus Note Only two pulses can be palpated at the same time To disable a pulse 1 Tap the desired pulse location on the homu...

Page 53: ...ameters appear 2 Slide the Status toggle to On 3 Tap Accept Palpable Pulse Thresholds A pulse deficit automatically occurs when the systolic arterial blood pressure falls below the following threshold...

Page 54: ...0252 v1 0 CAELuna To create pulse deficit 1 Tap the desired pulse location The parameters appear Pulse Deficit Parameter 2 Slide the Deficit to the desired amount or tap the minus sign until desired v...

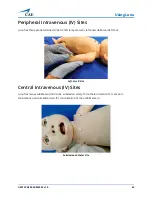
Page 55: ...ed IV ports left temporal vein left antecubital and left foot Left Arm IV Site Central Intravenous IV Sites Luna has two available central IV sites subclavian artery for catheter insertion for care an...

Page 56: ...bilical cord for cannulization of the umbilical arteries Umbilical Cannulization Intramuscular IM Subcutaneous SQ Sites The intramuscular subcutaneous sites are located on the right and left vastus la...

Page 57: ...ite The intraosseous site is located on the anterior tibia of the right leg The Intraosseous Site After multiple injections into the site the plug should be removed and replaced For more information o...

Page 58: ...op down menu and tap the desired rhythm 3 Slide the volume to the right to increase and left to decrease Heart Rate The manikin s heart rate can be manually adjusted in the Maestro software to represe...

Page 59: ...t setting to the desired amount of time for the increase or decrease to take affect You can also use the plus sign or minus sign to increase or decrease the time 4 Tap Accept Chest Compressions The pa...

Page 60: ...monophasic or biphasic from the menu 3 Set values for desired joules and tap Apply treatment to administer simulated shock To defibrillate using SymDefib 1 Connect the SymDefib cable to the defibrill...

Page 61: ...vel to the manikin or along the training pads The SymDefib box measures and reports the energy delivered via the software When demonstrating proper pad placement learners should attach the SymDefib pa...

Page 62: ...ibrillation pads intended for patient use This can result in pitting of the chest skin electrode Use cables or connectors with visible damage Spill fluids over any component inside the manikin torso T...

Page 63: ...m intubation Perform needle decompression Perform chest tube insertion Recognize cyanosis Maintain tracheostomy sites Airway Management The manikin s anatomically realistic upper airway provides for t...

Page 64: ...ovided Use ONLY the provided COTTONSEED OIL to lubricate the adjunct NEVER use a water based lubricant because of resulting residue damage Laryngospasm To activate the laryngospasm feature 1 Enable La...

Page 65: ...Stomach Distention Right Mainstem Intubation If a learner performs an intubation improperly that results in a right mainstem intubation the manikin chest will not rise when ventilated and breath soun...

Page 66: ...sk in place and squeeze the bag with the other hand Bag Valve Mask The chest excursions are visible when air fills the lungs Needle Decompression A needle decompression can be performed on the right s...

Page 67: ...e and catheter into the small hole located in the mid clavicular line of the second intercostal space Needle Decompression Upon proper insertion chest rise and fall and lung sounds will automatically...

Page 68: ...sertion 1 Lubricate the chest tube with cottonseed oil spray 2 Insert into the insertion point at the mid axillary line of the fifth intercostal space on the right side of the manikin and secure in pl...

Page 69: ...n screen 2 Tap the Cyanosis parameter in the Maestro software 3 For instant cyanosis slide the Cyanosis percentage or tap the plus sign and tap Accept to increase the brightness of cyanosis immediatel...

Page 70: ...also be ventilated via the tracheostomy tube Tracheostomy Neurological The Luna manikin can simulate neurological clinical indicators such as tristate pupils bulging sunken fontanel and active arm mo...

Page 71: ...es found in the accessory kit over the eye balls and under the face skin Closed Eyes Fontanel The fontanel can be activated to simulate increased intracranial pressure hydrocephalus or dehydration To...

Page 72: ...he current fontanel state Fontanel To deflate the fontanel 1 Turn the manikin over and lift the neck skin to access the Fontanel port 2 Attach the IV tubing to the Fontanel port 3 Connect a 10 mL syri...

Page 73: ...slide the Active Movement toggle to the On position highlighted in blue Active Movement Toggle When the active movement parameter is enabled the arms on the homunculus are highlighted in yellow Homunc...

Page 74: ...ikin s genitalia and pull the current genitalia piece out 3 Replace with the desired genitalia by aligning the block and peg on the genitalia with the corresponding holes on the manikin Genitalia Repl...

Page 75: ...flects an addition to the plasma volume without changing the red blood cell volume Colloids include modified fluid gelatin starch solutions pentastartch and hetastarch dextran and human albumin Infusi...

Page 76: ...bands StethoSym Speaker Module Connected to Diaphragm 2 Pull back the lever on the StethoSym module to open the clamp and attach it to the tubing of the stethoscope StethoSym Clipped to Tubing Operati...

Page 77: ...ID Locations Tag Location Sound 1 Upper Heart 2 Left Upper Lung 3 Lower Heart 4 Left Lower Lung 5 Left Lower Lung Lateral 6 Left Upper Quadrant 7 Left Lower Quadrant 8 Right Lower Quadrant 9 Right Upp...

Page 78: ...placed the StethoSym connects automatically to the new simulator Note StethoSym only works with CAE Luna when the manikin is running in the wireless mode with the tablet If the manikin is plugged int...

Page 79: ...itral Normal S1 S3 S4 S3 and S4 Early systolic murmur Mid systolic murmur Late systolic murmur Holosystolic murmur Late diastolic murmur Heart sounds can be adjusted by clicking the Sounds button on t...

Page 80: ...any sounds to be available Bowel Sounds Learners can auscultate bowel sounds over four intestinal regions using the StethoSym Upper Left Upper Right Lower Left and Lower Right Bowel Sounds The sounds...

Page 81: ...Stridor Wheezing Sneezing Screaming Coughing Cooing To select a sound from the Vocal Sounds drop down menu tap the Sounds button on the Run screen The Sounds panel appears Tap Vocal Sounds and select...

Page 82: ...the arteries and the vein To attach the umbilical cord align the ring at the end of the umbilical tube with the umbilical port and firmly press into manikin until the tube is secure Umbilical Attached...

Page 83: ...oiled area with a soft cloth DO NOT use solvents or abrasive pads Lubricate airway adjuncts with cottonseed oil spray prior to insertion DO NOT use water based lubricant Prior to using moulage of any...

Page 84: ...ng a syringe filled with clear distilled water To remove IV fluid a Ensure stopcock lever is turned towards the syringe and opened to the bag b Fill a 3 mL syringe with 24 gauge needle with distilled...

Page 85: ...rinary bladder fluid a Insert the urinary catheter through the genitalia on the manikin 10 cm for female and 12 cm for male b Fully depress a 10mL syringe c Connect the syringe to catheter and extract...

Page 86: ...e belly button plug or umbilical cord in place to allow reservoir to dry completely Step 3 Power off the Instructor Workstation To power off the instructor workstation a Tap the White back arrow at th...

Page 87: ...mers to purchase extended Assurance plans for all subsequent years For more information on Assurance plans visit https caehealthcare com support warranty agreements Units Out of Plan For units no long...

Page 88: ...s or modifications have been made or attempted or when the product or any part thereof has been damaged by accident misuse or abuse This plan does not cover normal wear or tear staining discoloration...

Page 89: ...e hourly rate x 1 5 A minimum of 48 hours notice is required for scheduling an on site support call Urgent on site support with less than 48 hours notice will be charged at the premium hourly rate On...

Page 90: ...Service Canada Monday Friday from 8 00 a m to 5 00 p m ET Toll Free 1 877 223 6273 Email can service cae com Customer Service Europe Middle East and Africa Monday Friday from 8 00 a m to 5 00 p m CET...

Page 91: ...d should not be used Recommended Clinical Supply Sizes Urinary Catheter 6 Fr Nasogastric Tube NGT 8 Fr Endotracheal ETT 3 5 mm uncuffed Bag Valve Mask BVM Infant 1 Laryngeal Mask Airway LMA 1 Laryngos...

Page 92: ...8 00 a m to 5 00 p m ET Phone 1 877 223 6273 Email can service cae com Customer Service Europe Middle East and Africa Monday Friday from 8 00 a m to 5 00 p m CET Phone 49 0 6131 4950354 Email interna...

Reviews: