background image

Plus-X ICRU Installation and Operation Manual Rev B 


If your initial connection was made without DHCP, your PC should now be restored to its prior 
network settings, and both the PC and the Plus-X device should be connected to the normal LAN.  

Complete the Network Settings 

Your browser will be redirected to the login page after the static IP address has been set. If this 
does not happen automatically

, enter the static IP address assigned above in the browser’s 

address field. Log in to the Plus-X ICRU using the admin account.  

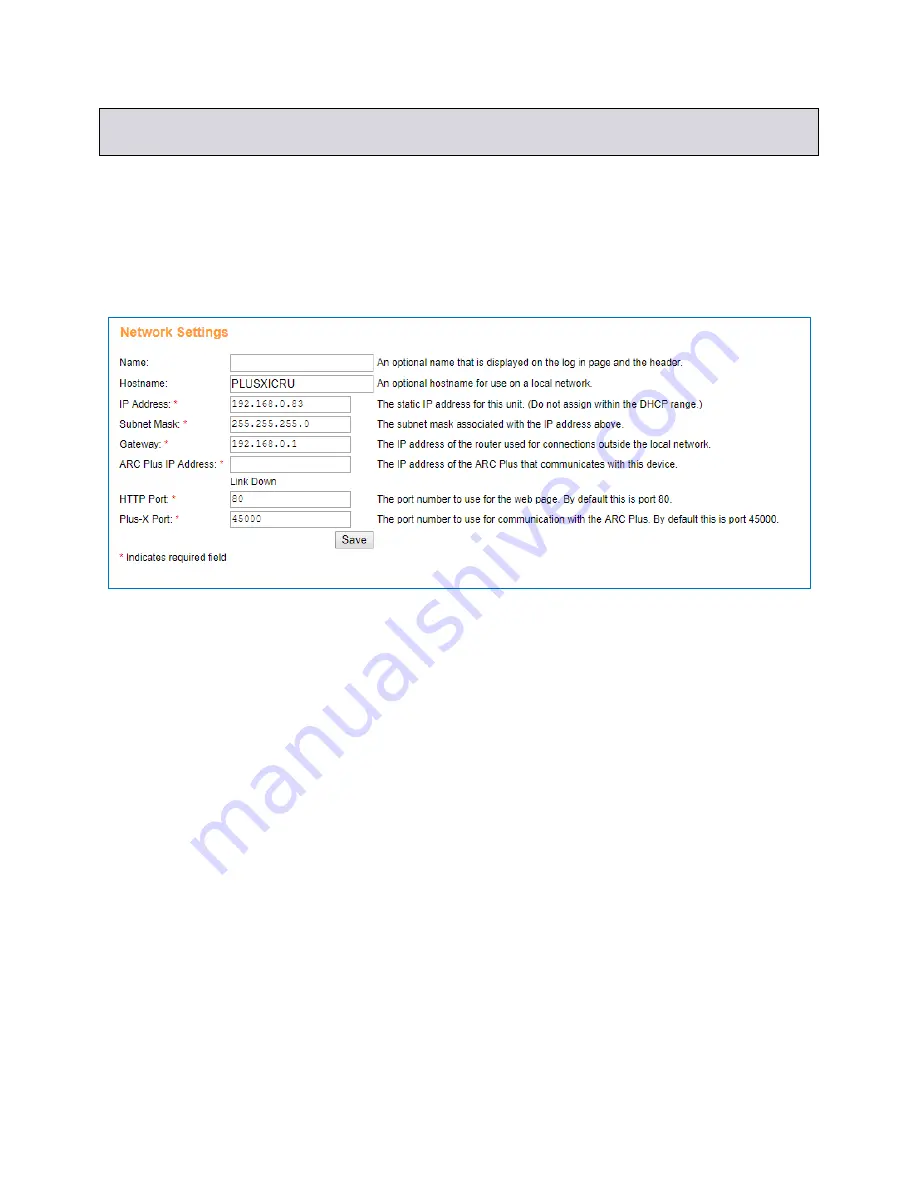
On this second login, a different 

Network Settings

 page is displayed as shown below. 

You will see the IP address you previously assigned. Additional fields must now be completed. It 
may be necessary to obtain the Subnet Mask and Gateway IP address from your network 
administrator. It is also necessary to assign the IP address of the ARC Plus unit that will be 
controlling the Plus-X ICRU.  

It is also a good idea to change the hostname from the default value so conflicts will not occur if 
multiple Plus-X devices of the same model are installed on the network. The default values for 
HTTP Port and Plus-X Port can most often be accepted. 

You may also add a name to the unit that will be displayed on the login page. 

Click the 

Save

 button to activate these settings.  

Connecting the Plus-X ICRU to the ARC Plus 

If you have not already done so, install the Plus-X ICRU in the equipment rack. If you wish, you 
may distribute Plus-X units in multiple racks, or at different locations. To add the channels from 
the Plus-X ICRU to the ARC Plus: 

1.  Launch AutoLoad Plus and connect to the ARC Plus site to which the Plus-X unit will be 

linked. 

2.  From the Edit menu, selected Plus-

X Devices… and click Add. 

Summary of Contents for Plus-X

Page 1: ...Plus X ICRU Installation and Operation Manual ...

Page 2: ...he Network Settings 5 Connecting the Plus X ICRU to the ARC Plus 5 Using a Status Channel to Monitor the State of a Relay Output 6 Connecting Command Channel Outputs 6 Pairing Relays 7 Relay Diagnostics 7 Restoring Factory Configuration 8 Uploading New Firmware 8 Getting Help 8 Warranty 8 Appendix A Specifications 9 Dimensions 9 Operating Temperature 9 Humidity 9 Power Requirements 9 Connectivity ...

Page 3: ...y default settings Power LED Amber No firmware loaded contact Technical Support Power LED Red Resetting to factory default settings Link LED Green Connected to ARC Plus Link LED Red No connection to ARC Plus Rear Panel Features Rear panel of the Plus X ICRU The Plus X ICRU provides 8 raise relay outputs left side of panel and 8 lower relay outputs right side of panel Ethernet and AC power connecti...

Page 4: ...power If this is the first power up for a new unit or the first network connection after execution of a master initialization the Plus X ICRU will issue a DHCP request for an IP address If the network supports DHCP functionality a dynamic IP address will be assigned to the unit To access the unit launch a web browser and enter the hostname from the table above in the browser s address field follow...

Page 5: ...self the default static IP address of 192 168 0 100 To access the unit it will be necessary to connect your PC directly to the Plus X device using a crossover LAN cable or using a simple Ethernet switch In addition your PC s internal network interface must be set to a static IP address of the form 192 168 0 x In the Windows Control Panel search for Change Ethernet Settings then select Change adapt...

Page 6: ...the address field You will be prompted as shown in the previous section to provide a password for the admin account and then to log in to the admin account using the newly assigned password Set a Static IP Address The first screen displayed after initial login is the Network Settings page as shown below Enter a static IP address for this unit as assigned by your network administrator in the IP Add...

Page 7: ...ateway IP address from your network administrator It is also necessary to assign the IP address of the ARC Plus unit that will be controlling the Plus X ICRU It is also a good idea to change the hostname from the default value so conflicts will not occur if multiple Plus X devices of the same model are installed on the network The default values for HTTP Port and Plus X Port can most often be acce...

Page 8: ...lect File Save to save the changes to the ARC Plus Using a Status Channel to Monitor the State of a Relay Output The ARC Plus Touch can monitor any Plus X ICRU relay to determine whether it is energized or de energized This is done by assigning the relay state to a status channel in the ARC Plus To monitor a relay state with a status channel follow the steps below 1 After adding the Plus X ICRU se...

Page 9: ... individually as up to 16 command channels or in raise lower pairs 8 channels To configure the relay behavior use a web browser to connect to the Plus X ICRU Click on the Configuration link in the menu bar and click on Relay Settings from the sidebar Click the Pair checkbox in the center column to pair the associated relays 1 and 9 2 and 10 etc When paired the relays will behave as one raise lower...

Page 10: ...manship for a period of 24 months from the date of purchase Equipment will be repaired or replaced at the option of Burk Technology and returned freight prepaid to the customer Damage due to abuse or improper operation or installation of the equipment or caused by fire or flood or harsh environment is not to be covered by this warranty Damage in shipping is not the responsibility of Burk Technolog...

Page 11: ...emperature 0 to 40 C Humidity 5 to 85 RH Power Requirements 100 to 240VAC 47 63Hz 1A Power entry module with standard grounded power cord supplied 1A fuse protection Connectivity Ethernet connection to ARC Plus Channel Capacity 16 relays individual or up to 8 raise lower pairs Output Types C NO NC relay outputs momentary or latching 5A 240VAC ...

Reviews: