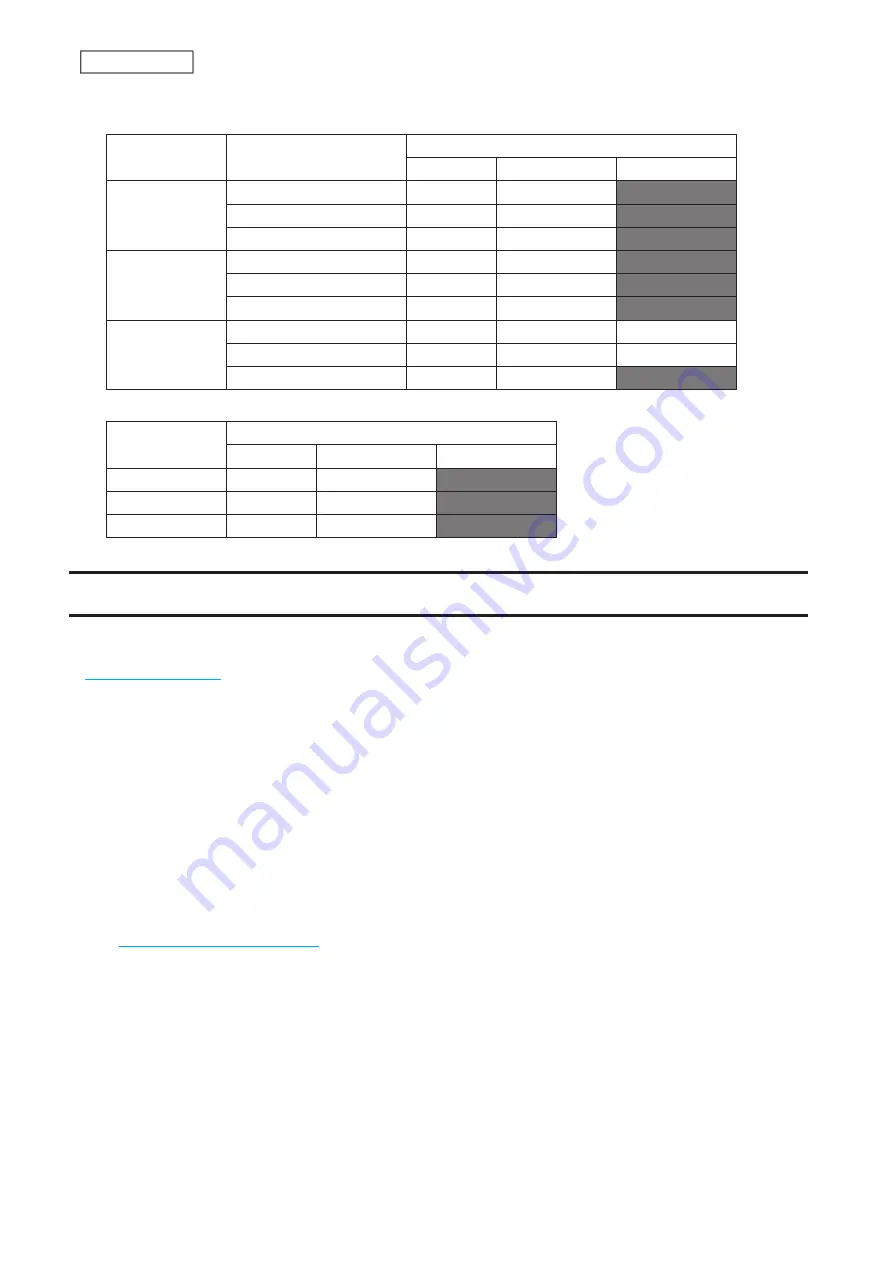
R/W: Read and write, R: Read-only, -: No access
• For the “Public” folder and shared folders created in Folder Setup
Access permissions
Available user
admin
Registered user
Not logged in
WebAccess i
Read and write
R/W
R/W
-
Read-only
R/W
R/W
-
Disabled
R/W
R/W
-
WebAccess A
Read and write
R/W
R
-
Read-only
R/W
R/W
-
Disabled
R/W
R
-
My LinkStation
Read and write
R/W
R/W
R
Read-only
R/W
R/W
R
Disabled
R/W
R/W
-
• For username folder
Available user
admin
Registered user
Not logged in
WebAccess i
R
R
-
WebAccess A
R/W
R/W
-
My LinkStation
R/W
R/W
-
Direct Copy
Use Direct Copy to copy data from a USB device directly onto the LinkStation.
Follow the procedure below to copy using Direct Copy. To copy using Direct Copy on a mobile device, refer to the
section in chapter 9.
Note:
Direct Copy will not work while the backup is running. The prior process will work.
1
Connect the USB device. When it mounts, the function LED will light up.
Note:
If the function LED does not light up, the device is not supported.
2
You now have 60 seconds to press the function button once. If you do, the function LED will flash as all the files
on the USB device are copied to the Direct Copy folder (“usb_backup” under “Public” folder) of the LinkStation.
Note:
While the function LED is flashing, press and hold down the function button for three seconds to cancel
Direct Copy.
3
When the copy operation is completed, the access LED of the USB device will stop flashing and the function
LED on the LinkStation will be extinguished. Dismount the USB device from the LinkStation by referring to the
“Dismounting an External Drive”
section in chapter 5.
Note:
To change the Direct Copy target folder, navigate to
System Settings
>
Direct Copy
>
Browse
, select a new
folder, and click
Apply
.
75
Chapter 7 Services
Summary of Contents for LinkStation 500
Page 38: ...2 Click the RAID tab 3 Click the array to delete 37 Chapter 5 Disk Manager ...
Page 40: ...2 Click the RAID tab 3 Click Create RAID Array 39 Chapter 5 Disk Manager ...
Page 57: ...3 The system log window will open 56 Chapter 6 System Information ...
Page 66: ...2 Click Folder Setup 3 Select a shared folder for the DLNA server 65 Chapter 7 Services ...
Page 77: ...76 Chapter 7 Services ...
Page 97: ...2 From Settings click System Settings 3 Click Firmware 4 Click Browse 96 Chapter 8 System ...
Page 100: ...2 Click Folder Setup 3 Choose the folder to set as a backup destination 99 Chapter 8 System ...


