9
Under “LAN Protocol Support”, select the “WebAccess” checkbox.
10
Select the desired WebAccess security level for “WebAccess Public Mode”.
Allow anonymous
: Anyone can access (view) shared folders. (Access restrictions configured for shared folders
will not work.)
Allow all groups and users
: All groups and users registered on the Buffalo NAS device can use WebAccess.
(Access restrictions configured for shared folders will not work.)
Use inherited folder permissions
: Users and groups have the same access permissions with WebAccess that
they do locally. If access restrictions are not set for the shared folder, then this option will not be shown.
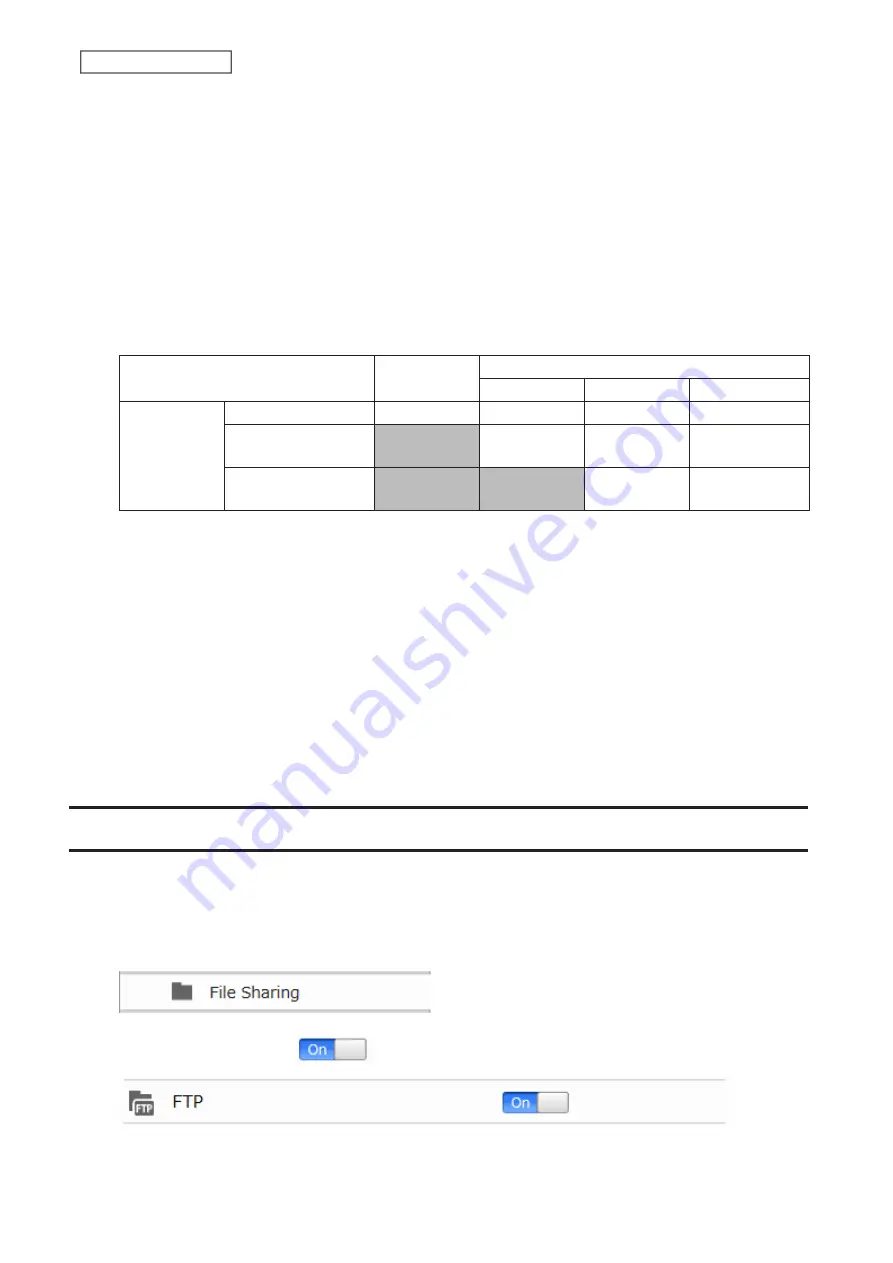
Whether a user or group can access a folder through WebAccess depends on a combination of WebAccess
settings and the shared folder’s settings.
Not logged in
Access restrictions for the logged-in users
No access
Read-only
Read and write
WebAccess
public mode
Allow anonymous
R
R/W
R/W
R/W
Allow all groups and
users
-
R/W
R/W
R/W
Use inherited folder
permissions
-
-
R
R/W
R/W: Read and write, R: Read-only, -: No access
11
Click
OK
.
There are many ways to access WebAccess folders depending on your device:
• From a computer, supported browsers include Microsoft Edge, Firefox, Google Chrome, Internet Explorer 9
or later, Safari 9 or later. Refer to the help guide at the BuffaloNAS.com website after connecting with your
BuffaloNAS.com name for more detailed information.
• To access from an iOS device, install the “WebAccess i” application from the App Store. Refer to the help guide for
the app for more detailed information.
• To access from an Android device, install the “WebAccess A” application from Google Play. Refer to the help guide
for the app for more detailed information.
FTP
By default, the LinkStation’s shares are only accessible by users connected to the same network or router as the
LinkStation. The optional FTP server allows users outside the local network to access the LinkStation.
Note:
FTP is intended for users who already have FTP client software and have experience with it.
1
From Advanced Settings, click
File Sharing
.
2
Move the FTP switch to the
position to enable FTP.
55
Chapter 5 Remote Access
Summary of Contents for LinkStation 200B
Page 24: ...3 Click Add Group 23 Chapter 3 File Sharing...
Page 60: ...4 Enter the backup password and click OK 5 Click Create New Job 59 Chapter 6 Backup...
Page 67: ...6 Click Time Machine 66 Chapter 6 Backup...
Page 68: ...7 Click Select Backup Disk 8 Select the shared folder then click Use Disk 67 Chapter 6 Backup...
Page 85: ...4 Select the desired Ethernet frame size and click OK 84 Chapter 8 Advanced Features...
Page 89: ...2 Tap Create User 88 Chapter 9 Configuring from Mobile Devices...
Page 100: ...3 Tap NAS Setup 99 Chapter 9 Configuring from Mobile Devices...
Page 104: ...6 Enter the BuffaloNAS com name and tap Set 103 Chapter 9 Configuring from Mobile Devices...


