105
Electrical and Ignition
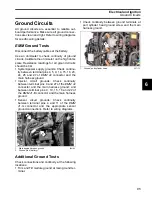
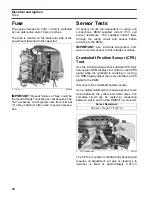
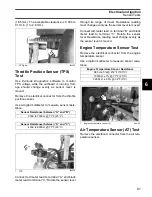
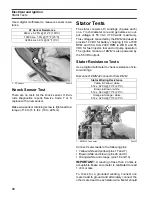
Electric Start Tests
6
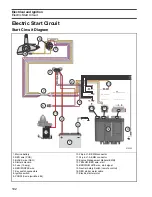
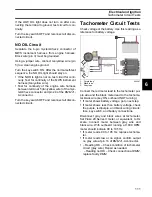
Use a digital voltmeter to measure the voltage
drop on each section of the start circuit.
If any voltage reading is greater than 0.5 VDC
check that connections are clean, tight and free of
corrosion. Clean or replace any corroded or dam-
aged cables or connections.
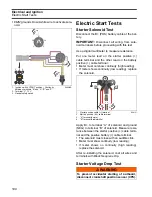
STEP 1:
Connect voltmeter positive (+) lead to
the terminal for the negative (–) battery cable at
powerhead. Connect voltmeter negative (–) lead
to negative (–) battery post.
•
Activate starter motor and observe voltage
reading.
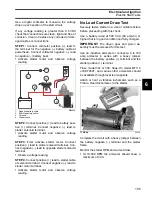
STEP 2:
Connect positive (+) lead to battery posi-
tive (+) terminal. Connect negative (–) lead to
starter solenoid terminal.
•
Activate starter motor and observe voltage
reading.
STEP 3:
First, activate starter motor. Connect
positive (+) lead to starter solenoid terminal. Con-
nect negative (–) lead to opposite starter solenoid
terminal.
•
Observe voltage reading.
STEP 4:
Connect positive (+) lead to starter cable
of solenoid terminal. Connect negative (–) lead to
starter motor terminal.
•
Activate starter motor and observe voltage
reading.
No Load Current Draw Test
Securely fasten starter in a vise or suitable fixture
before proceeding with this check.
Use a battery rated at 500 CCA (60 amp-hr) or
higher that is in good condition and fully charged.
IMPORTANT:
The driven gear and pinion as-
sembly must be removed for this test.
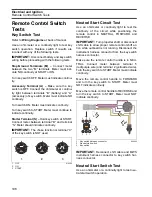
Use an inductive ammeter or connect a 0 to 100
amp ammeter in series with a heavy jumper
between the battery positive (+) terminal and the
starter positive (+) terminal.
Fluke
model 334 or 336,
Snap-On
model MT110
or EETA501, and various other ammeters should
be available through local tool suppliers.
Attach or hold a vibration tachometer, such as a
Frahm
†
Reed
tachometer, to the starter.
Complete the circuit with a heavy jumper between
the battery negative (–) terminal and the starter
frame.
Monitor the starter RPM and current draw.
•
At 10,500 RPM the ammeter should show a
maximum of 30 A.
1.
Negative battery cable
2.
Positive battery cable
3.
Solenoid
4.
Starter cable
008464A
+
V –
V
–
3
1
2
4
TYPICAL
24083
Summary of Contents for EVINRUDE E-TEC BE225HGXABA
Page 163: ...Oiling System Oil Supply Diagrams 163 8 008208R Port Side View Starboard Side View ...
Page 165: ...Oiling System Oil Supply Diagrams 165 8 008432R Port Side View Starboard Side View ...
Page 167: ...Oiling System Oil Recirculation Diagrams 167 8 008207R Starboard View Port View ...
Page 251: ...Powerhead Powerhead Views 251 11 Powerhead Views Port Hose Routings 3 3 L models 007153 ...
Page 252: ...252 Powerhead Powerhead Views Starboard Hose Routings 3 3 L models 007154 ...
Page 253: ...Powerhead Powerhead Views 253 11 Port Hose Routings 3 4 L models 008503 ...
Page 254: ...254 Powerhead Powerhead Views Starboard Hose Routings 3 4 L models 008502 ...
Page 255: ...Powerhead Powerhead Views 255 11 Port 3 3 L models 008448 ...
Page 256: ...256 Powerhead Powerhead Views Starboard 3 3 L models 008449 ...
Page 257: ...Powerhead Powerhead Views 257 11 Port 3 4 L models 008441 ...
Page 258: ...258 Powerhead Powerhead Views Starboard 3 4 L models 008442 ...
Page 259: ...Powerhead Powerhead Views 259 11 Front 3 3 L models 008450 ...
Page 260: ...260 Powerhead Powerhead Views Front 3 4 L models 008439 ...
Page 261: ...Powerhead Powerhead Views 261 11 Rear 3 3 L models 007142 ...
Page 262: ...262 Powerhead Powerhead Views Rear 3 4 L models 008440 ...
Page 263: ...Powerhead Powerhead Views 263 11 Top 008438 ...
Page 264: ...264 Powerhead Powerhead Views Starboard ICON models 008504 ...
Page 269: ...Midsection Service Charts 269 12 Muffler 004117R ...
Page 320: ...S 322 ...

