background image

 Home > 

Printer Settings

 > Change Printer Settings Using the Printer Setting Tool (Windows)

Change Printer Settings Using the Printer Setting Tool (Windows)

Make sure the AC Adapter is connected to the printer and the AC Power Cord is connected to an electrical
socket.

Make sure the printer driver has been installed correctly and you can print.

Connect the printer to a computer with a USB cable.

The Printer Setting Tool is installed in addition to the printer driver and other software when using the
installer.

The Printer Setting Tool is available only with compatible Brother printers.

1. Connect the printer you want to configure to the computer.
2. Start the Printer Setting Tool.

Windows 10/Windows Server 2016:

Click 

Start

 > 

Brother

 > 

Printer Setting Tool

.

Windows 8/Windows 8.1/Windows Server 2012/Windows Server 2012 R2:

Click the 

Printer Setting Tool

 icon on the 

Apps

 screen.

Windows 7/Windows Server 2008/Windows Server 2008 R2:

Click 

Start

 > 

All Programs

 > 

Brother

 > 

Label & Mobile Printer

 > 

Printer Setting Tool

.

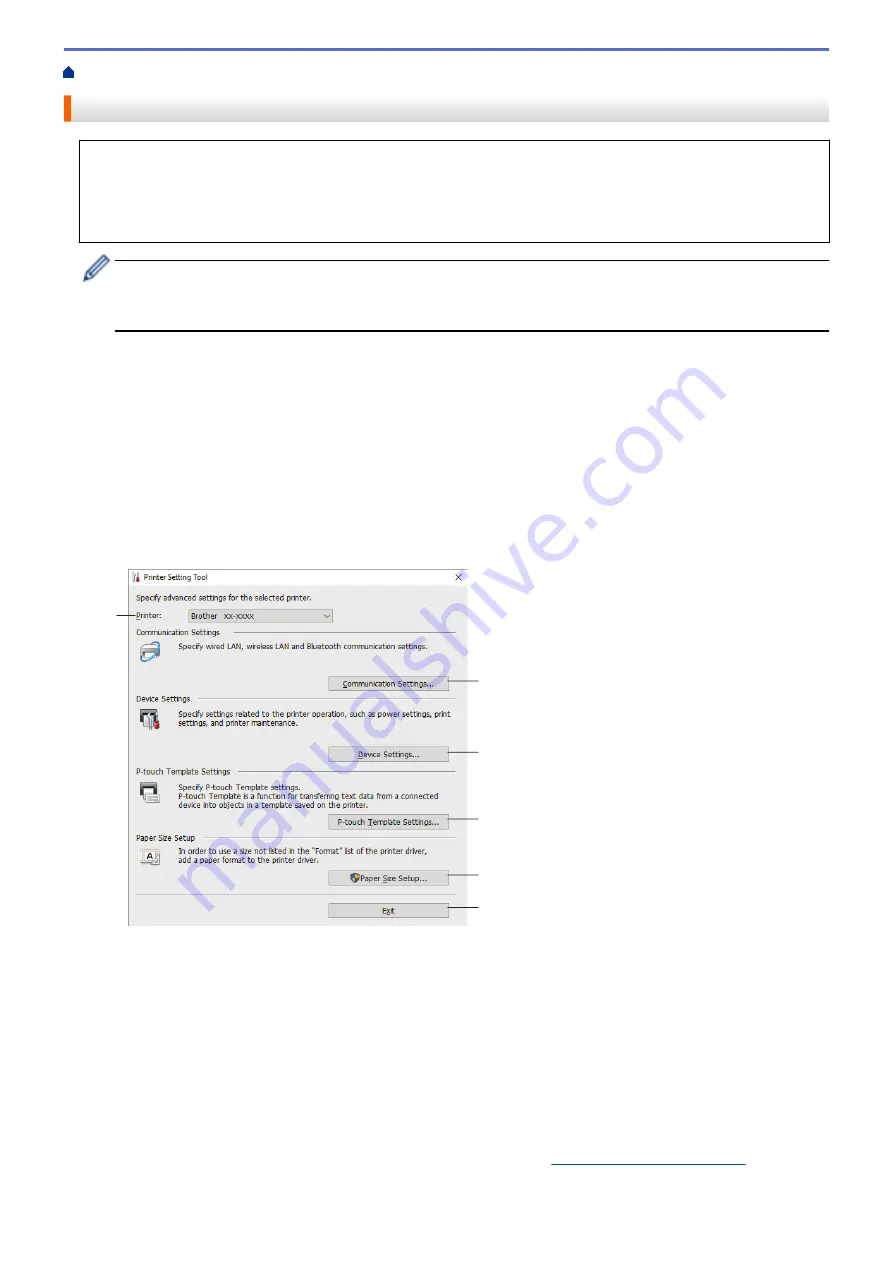
The main window appears.

3

2

4

5

6

1

1. Printer

Lists the connected printers.

2. Communication Settings (TD-4420DN/TD-4520DN)

(TD-4420DN/TD-4520DN) Specifies wired LAN communication settings.

3. Device Settings

Specifies device settings. For example, power settings.

4. P-touch Template Settings

Specifies P-touch Template settings.
For more information, see the 

P-touch Template Manual/Command Reference

 (English only). You can

download the latest version from the Brother support website at 

support.brother.com/manuals

.

76

Summary of Contents for TD-4210D

Page 1: ...User s Guide TD 4210D TD 4410D TD 4420DN TD 4520DN 2019 Brother Industries Ltd All rights reserved ...

Page 2: ...ing Software and Drivers 30 Print Using USB Interface Mass Storage Mode 31 Print Image Data without Using the Printer Driver 32 Print Labels Distributed to Multiple Printers to Reduce Printing Time Windows 33 Print Barcode Labels Using Crop Print Windows 35 Barcodes Compatible with Crop Print Windows 36 Barcode Document Compatible with Crop Print Windows 37 Print Barcode Labels Using Crop Print Wi...

Page 3: ...r Setting Tool Windows 89 Apply Setting Changes to Multiple Printers Windows 94 Change Printer Settings Using Web Based Management 95 Set or Change a Login Password for Web Based Management 96 Confirm Printer Settings 97 Routine Maintenance 98 Clean Your Printer 99 Troubleshooting 101 If You Are Having Difficulty with Your Machine 102 Error and Maintenance Indications 103 Printing Problems 105 Ver...

Page 4: ...Home Before You Use Your Brother Machine Before You Use Your Brother Machine Definitions of Notes General Precautions Trademarks and Licenses Open Source Licensing Remarks Important Note 1 ...

Page 5: ... minor or moderate injuries IMPORTANT IMPORTANT indicates a potentially hazardous situation which if not avoided may result in damage to property or loss of product functionality NOTE NOTE specifies the operating environment conditions for installation or special conditions of use Tips icons indicate helpful hints and supplementary information Bold Bold style identifies buttons on the machine s co...

Page 6: ... off or discolour Scratching the printed surface of the label with your fingernails or metal objects or touching the printed surface with wet hands can cause the colour to change or fade DO NOT affix labels to people animals or plants Never affix labels to public or private property without permission As the last label of the RD Roll may not be printed correctly each roll contains more labels than...

Page 7: ...PORATED BarStar Pro Encode Library PDF417 Micro PDF417 DataMatrix MaxiCode AztecCode GS1 Composite GS1 Databar Code93 MSI Plessey POSTNET Intelligent Mail Barcode Copyright 2007 AINIX Corporation All rights reserved Blue SDK Copyright 1995 2018 OpenSynergy GmbH All rights reserved All unpublished rights reserved Portions of this software are copyright 2014 The FreeType Project www freetype org All...

Page 8: ...Remarks Open Source Licensing Remarks This product includes open source software To see the Open Source Licensing Remarks go to your model s Manuals page on the Brother support website at support brother com Related Information Before You Use Your Brother Machine 5 ...

Page 9: ...ented including but not limited to typographical and other errors relating to the publications Screen images in this document may differ depending on your computer s operating system your product model and software version Before using the printer make sure you read all the documents included with the printer for information about safety and operation The printer shown in the illustrations may be ...

Page 10: ...Home Set Up Your Printer Set Up Your Printer Parts Description Load the RD Roll Check the Sensor Position Connect the Power Cord Turn Power On Off 7 ...

Page 11: ...Cover 3 Tear Bar 4 Status LED 5 Roll LED 6 Function Button 7 Feed Button 8 Power Button 9 Power LED To pause printing press any button Press the button again to resume printing Printing can be paused only after each full page has been printed and cannot be paused on the final page or between pages Rear 1 3 4 2 1 Power Port 8 ...

Page 12: ...2 Serial Port 3 TD 4420DN TD 4520DN LAN Port 4 USB Port Related Information Set Up Your Printer 9 ...

Page 13: ...Pull up the release levers on both sides of the printer to unlock the Roll Compartment Cover 3 Hold the printer by the front and firmly lift the Roll Compartment Cover to open it CAUTION Do not directly touch the Tear Bar with your hands Doing so may result in injury 4 Slide both Roll Guides outwards 10 ...

Page 14: ...rint side is facing up as shown in the illustration For fanfold paper Insert the fanfold paper as shown in the illustration a Print side Adjust the Roll Guides when using fanfold paper 6 Feed the end of the roll under the Media Guide Tips 1 Position the end of the paper slightly out of the Label Output Slot 11 ...

Page 15: ...ur finger gets pinched between the upper and lower parts of the cover IMPORTANT Do not leave any printed labels in the printer Doing so will cause label jams When not in use remove any rolls from inside the printer and close the Roll Compartment Cover to prevent dust and debris from accumulating in the printer Related Information Set Up Your Printer 12 ...

Page 16: ... the beginning of the label and feeds the label to the correct position Align the slider with b on the printer Die cut Labels With Black Mark The reflective black mark sensor detects the mark and feeds the media to the correct position Align the slider as shown in the illustration 2 3 1 1 Back of media 2 Black mark 3 Reflective black mark sensor Receipt Paper With No Black Mark The reflective blac...

Page 17: ...ark sensor can detect the black mark If the black mark is too short it cannot be detected by the reflective black mark sensor Media With Holes The reflective black mark sensor detects the hole and feeds the media to the correct position Align the slider as shown in the illustration 2 3 1 1 Back of media 2 Hole in media 3 Reflective black mark sensor Wristband The reflective black mark sensor detec...

Page 18: ...Related Information Set Up Your Printer Related Topics Auto Media Configuration 15 ...

Page 19: ...nect the Power Cord Connect the Power Cord 1 Connect the AC Adapter to the printer 2 Connect the AC Power Cord to the AC Adapter 3 Plug the AC Power Cord into an earthed electrical socket Related Information Set Up Your Printer 16 ...

Page 20: ...s Press to align the end of the roll The Power LED turns green To turn the printer off press and hold until the Power LED turns off NOTE When turning the printer off do not disconnect the AC Adapter and AC Power Cord until the Power LED turns off Related Information Set Up Your Printer 17 ...

Page 21: ...Home Install Software Install Software Install Printer Drivers and Software on a Computer Connect the Printer to a Computer 18 ...

Page 22: ...ware Documentation installer 2 Double click the downloaded installer and follow the on screen instructions to proceed with the installation 3 Close the dialog box when the installation is complete TD 4420DN TD 4520DN To use the printer with a different connection method than the one selected during installation use the installer again to reinstall the software and printer drivers and select the ne...

Page 23: ...are to the latest version Printer Setting Tool Specifies the printer s settings from a computer BRAdmin Light TD 4420DN TD 4520DN Finds the printer on your network and allows you to configure basic settings from your computer BRAdmin Professional TD 4420DN TD 4520DN Finds the printer on your network and allows you to configure advanced settings and updates from your computer Font Manager Allows yo...

Page 24: ...Home Install Software Connect the Printer to a Computer Connect the Printer to a Computer Connect the Printer to a Computer Using a USB Cable Connect the Printer to a Computer Using a Wired LAN 21 ...

Page 25: ...B Cable Connect the Printer to a Computer Using a USB Cable 1 Make sure the printer is turned off before connecting the USB cable 2 Connect the USB cable to the USB Port on the back of the printer and then to your computer 3 Turn the printer on Related Information Connect the Printer to a Computer 22 ...

Page 26: ...n specify the wired LAN connection settings Network Cable Use a straight through Category 5 or greater twisted pair cable for 10BASE T or 100BASE TX Fast Ethernet Network IMPORTANT Do not connect this product to any LAN connection that is subject to overvoltages 1 If on screen instructions appear during the installation make sure the printer is turned off before connecting the LAN cable 2 Connect ...

Page 27: ...g P touch Editor Windows Print Labels Using P touch Editor Windows Create Labels and Print without Installing Software and Drivers Print Labels Distributed to Multiple Printers to Reduce Printing Time Windows Print Barcode Labels Using Crop Print Windows Print Labels Using the Printer Driver Windows 24 ...

Page 28: ...her P touch P touch Editor 5 2 or double click the P touch Editor 5 2 icon on the desktop P touch Editor starts 2 Do one of the following To open an existing layout click Open 1 To connect a preset layout to a database select the check box next to Connect Database 2 To create a new layout double click the New Layout pane 3 or click the New Layout pane 3 and then click To create a new layout using ...

Page 29: ...itor Express Mode Windows Main Window of P touch Editor Express Mode Windows Express mode allows you to quickly create layouts including text and images 1 1 2 3 4 1 Edit Toolbars 2 Print Button 3 Operation Mode Selection Buttons 4 Property Palettes Related Information Create Labels Using P touch Editor Windows 26 ...

Page 30: ...nal Mode Windows Main Window of P touch Editor Professional Mode Windows Professional mode allows you to create layouts using a wide range of advanced tools and options 1 2 3 4 3 1 Print Menu 2 Property Palettes 3 Edit Toolbars 4 Operation Mode Selection Buttons Related Information Create Labels Using P touch Editor Windows 27 ...

Page 31: ...or Windows Main Window of P touch Editor Snap Mode Windows Main Window of P touch Editor Snap Mode Windows Snap mode allows you to capture all or a portion of your computer screen display and print it as an image Related Information Create Labels Using P touch Editor Windows 28 ...

Page 32: ...onfigure the settings in the Print screen before printing Click File Print from the menu bar or click Print Professional Mode Configure the settings in the Print screen before printing Click File Print from the menu bar or click Click to start printing without changing the settings Snap Mode Enter the text and then click Related Information Create Labels and Print Using Computer 29 ...

Page 33: ...g Computer Create Labels and Print without Installing Software and Drivers Create Labels and Print without Installing Software and Drivers Print Using USB Interface Mass Storage Mode Print Image Data without Using the Printer Driver 30 ...

Page 34: ...rage area appears as a folder on the computer or device s screen If the mass storage area does not appear automatically see the instructions for the operating system of your computer or mobile device for information about accessing the mass storage area 4 Drag and drop the file you want to copy to the mass storage area 5 Press The commands in the command file are executed and the Status LED flashe...

Page 35: ...turn any preprocessing of the JPEG image off Only JPEG images can be printed Limited to files with the jpg extension The maximum file size is 16 MB 2 MB when the mass storage feature is used The maximum resolution is as follows TD 4210D TD 4410D TD 4420DN Height Width 24000 832 dots TD 4520DN Height Width 36000 1280 dots If these limits are exceeded the data received by the printer is discarded an...

Page 36: ...of the printers as shown 67 67 66 200 It may not be possible to detect information for a printer connected via a USB hub or print server Before printing enter the settings manually and check if the printer can be used for printing TD 4420DN TD 4520DN Depending on whether a router is used and the security features in use such as a firewall it may not be possible to use this function We recommend pe...

Page 37: ...mation 5 Right click the selected printer or printers and then click Settings From the Paper Size drop down list select the label size If multiple printers have been selected the same label size setting is applied to all selected printers 6 Click OK to close the label size setting dialog box 7 Click OK to close the Distributed Printing Settings dialog box The setup is completed 8 Click OK to close...

Page 38: ...xxx xxxxxxxxxxxxxxxxxxxxx xxxxxxxxxxxxxxxxxxxxx xxxxxxxxxxxxxxxxxxxxx xxxxxxxxxxxxxxxxxxxxx xxxxxxxxx D00XXU001 D00XXU002 D00XXU003 D00XXX001 Z The Crop Print function is available only when printing from the Windows printer driver and cannot be executed using P touch Editor The accuracy of the Crop Print feature depends on the user s environment printing material and label content Clear black and...

Page 39: ...orizontal width The narrowest bar 0 5 mm minimum Margin 10 times the narrowest bar width minimum Colour Black Background colour White Cell width widest bar 0 5 mm minimum Code 39 Code 3 of 9 ITF ITF 14 Interleaved 2 of 5 GS1 128 UCC EAN 128 Codabar Code 2 of 7 NW 7 CODE 93 CODE 128 UPC A UPC E JAN 8 EAN 8 JAN 13 EAN 13 QR code 1 Datamatrix GS1 Datamatrix 1 PDF417 1 MaxiCode 1 Related Information P...

Page 40: ...ght Barcode Layout for Product Labels Correct Barcode Layout Incorrect Barcode Layout D00XXU001 D00VXY004 D00ZXX003 D00XXU002 D00X0X001 D00XXU003 D00X0X002 D00XXU004 D00X0X003 D00VXY001 D00X0X004 D00VXY002 D00ZXX001 D00VXY003 D00ZXX002 Not identified not aligned along the top margin D00XXU001 D00XXU002 D00X0X001 D00XXU003 D00X0X002 D00KYX001 D00XXU004 D00X0X003 D00KYX002 D00VXY001 D00X0X004 D00KYX...

Page 41: ...Correct Barcode Layout Related Information Print Barcode Labels Using Crop Print Windows 38 ...

Page 42: ...the Actual Size radio button 5 Under Orientation select the Portrait radio button 6 Click Properties 7 Click the Basic tab and do one of the following For Die cut labels clear the Cut Every check box For Continuous Rolls select the Cut Every check box 8 Click the Crop Print tab and select the Automatically print individual labels with barcodes check box 9 Select the Extract individual labels with ...

Page 43: ...tion s print screen Do not enlarge or reduce the size of the barcode sheet The barcodes may not be identified correctly When printing from Acrobat Reader do the following In the Page Sizing Handling section clear the Choose paper source by PDF page size check box Under Orientation select the Portrait radio button Related Information Print Barcode Labels Using Crop Print Windows 40 ...

Page 44: ... the print command in your application 4 Select your printer and then click the printing properties or preferences button The printer driver window appears 5 Change the printer settings if needed 6 Click OK 7 Complete your print operation The printer starts printing When printing is finished the printer reverts to the mode selected before printing started Related Information Create Labels and Prin...

Page 45: ...Home Print Labels Using Mobile Devices Print Labels Using Mobile Devices Install Mobile Apps 42 ...

Page 46: ...ile device install the Brother mobile applications and then connect your printer to your mobile device via a USB cable The cable is sold separately Download these free Brother apps from Google Play Application Features Print SDK Download the Software Development Kit SDK from the Brother Developer Center https support brother com g s es dev en index html Related Information Print Labels Using Mobil...

Page 47: ...r Manager Windows Transfer Templates to the Printer P touch Transfer Manager Windows Transfer Templates to the Printer Using P touch Transfer Manager Windows Distribute Templates to be Transferred to Users Without Using P touch Transfer Manager Windows 44 ...

Page 48: ... Windows Transfer Templates to the Printer Using P touch Transfer Manager Windows Notes on Using P touch Transfer Manager Windows Transfer Templates from the Computer to the Printer Windows Backup Templates or Other Data Saved in the Printer Windows Delete Printer Data Windows Create Transfer Files and Transfer Package Files Windows 45 ...

Page 49: ...rounds specified with P touch Editor are not compatible with the printer A P touch Editor layout using the split printing function enlarging the label and printing it on two or more labels cannot be transferred Only the portion of the label within the printable area is printed Fields overflowing the print area may not be printed completely Notes on Transferring Templates The printed label may diff...

Page 50: ... templates and other data to the printer and save backups of your data on the computer To use P touch Transfer Manager you must first transfer templates created in P touch Editor to P touch Transfer Manager Related Information Transfer Templates to the Printer Using P touch Transfer Manager Windows Transfer the Template to P touch Transfer Manager Windows Main Window of P touch Transfer Manager Wi...

Page 51: ...icon on the desktop Windows 8 Windows 8 1 Windows Server 2012 Windows Server 2012 R2 Click the P touch Editor 5 2 icon on the Apps screen or double click the P touch Editor 5 2 icon on the desktop Windows 7 Windows Server 2008 Windows Server 2008 R2 Click Start All Programs Brother P touch P touch Editor 5 2 or double click the P touch Editor 5 2 icon on the desktop P touch Editor starts 2 Open th...

Page 52: ...plates in the templates list 5 Folder List Displays a list of folders and printers When you select a folder the templates in the selected folder appear in the template list If you select a printer the current templates and other data stored in the printer appear 6 Toolbar Provides access to frequently used commands Explanations of the Toolbar Icons Icon Button name Function Transfer Transfers temp...

Page 53: ...s the selected template Search Allows you to search for templates or other data registered to P touch Library Display Style Changes the file display style Related Information Transfer Templates from the Computer to the Printer Windows 50 ...

Page 54: ...he computer to the printer To transfer templates from a mobile device to the printer see Related Information 1 Connect the printer and the computer via a USB cable and then turn the printer on The printer model name appears next to a printer icon in the folder view If you select the printer in the folder view the current templates and other data stored in the printer appear If a printer is disconn...

Page 55: ... a key number memory location in the printer when it is placed in the new folder Data type Maximum number of transferable items Restriction details Template 255 Each template can contain a maximum of 255 objects Database 255 Only CSV files can be transferred Each CSV file can contain a maximum of 65000 records Image transferred symbols 255 Only BMP files can be transferred Monochrome BMP files are...

Page 56: ...then select the key number you want Except for the data in databases all data transferred to the printer is assigned a key number If the template or other data transferred to the printer has the same key number as another template already saved in the printer the new template overwrites the old one You can confirm the assigned template numbers saved in the printer by backing up the templates or ot...

Page 57: ... a folder Select the template or other data you want to transfer and then click Transfer Multiple items and folders can be selected and transferred in one operation 8 Click OK The selected items are transferred to the printer Related Information Transfer Templates from the Computer to the Printer Windows 54 ...

Page 58: ...rable between different models 1 Connect the computer and the printer and turn the printer on The printer model name appears next to a printer icon in the folder view If you select the printer in the folder view the current templates and other data stored in the printer appear 2 Select the printer to back up from and then click Backup A confirmation message appears 3 Click OK A new folder is creat...

Page 59: ...or other data saved on the printer 1 Connect the computer and the printer and turn the printer on The printer model name appears next to a printer icon in the folder view 2 Right click the printer and then select the Delete All menu A confirmation message appears 3 Click OK All templates and other data saved in the printer is deleted Related Information Transfer Templates to the Printer Using P to...

Page 60: ...ode Template Transfer Method File Format From a computer P touch Transfer Express PDZ Mass storage BLF 1 Create the template using P touch Editor and then transfer it to P touch Transfer Manager For more information see Related Information When transferring a new template make sure you specify a Key Assign number in P touch Transfer Manager that is not currently used If the specified Key Assign nu...

Page 61: ... Transfer file BLF or Transfer Package file PDZ You can combine multiple templates into a single Transfer file BLF or Transfer Package file PDZ 4 In the Save as type field select the template format you want and then type in the name and save the template Related Information Transfer Templates to the Printer Using P touch Transfer Manager Windows Related Topics Transfer the Template to P touch Tra...

Page 62: ...used If the specified Key Assign number is already being used the existing template will be overwritten with the new one This function requires a USB connection Administrator Users 1 2 3 4 5 Administrator tasks User tasks Administrator tasks Preparing P touch Transfer Express Transfer the Template to P touch Transfer Manager Save the Template as a Transfer Package File PDZ Distribute the Transfer ...

Page 63: ...nsfer Package File PDZ To create a file in a format that can be used by P touch Transfer Express save the template as a Transfer Package file PDZ 1 Select the Configurations folder in the P touch Transfer Manager window 2 Select the templates you want to distribute 3 Click File Save Transfer File The Save Transfer File option appears only if the printer is disconnected from the computer or offline...

Page 64: ...ss folder In this case you can simply move the distributed Transfer Package file to the downloaded folder and then double click PtTrExp exe 1 Move the Transfer Package file PDZ to the downloads folder 2 Distribute all the files in the downloads folder to others User tasks Transfer the Transfer Package File PDZ to Your Printer You can transfer the Transfer Package file PDZ to the printer using the ...

Page 65: ...gle Transfer Package file PDZ within the folder containing the PtTrExp exe file click Transfer To transfer multiple Transfer Package files PDZ within the folder containing the PtTrExp exe file do the following a Click Browse b Select the Transfer Package file you want to transfer and then click Open c Click Transfer d Click Yes 5 When completed click OK Related Information Transfer Templates to th...

Page 66: ...Manage Templates P touch Library Store or Manage Templates P touch Library Edit Templates Using P touch Library Windows Print Templates Using P touch Library Windows Search Templates Using P touch Library Windows 63 ...

Page 67: ...008 Windows Server 2008 R2 Click Start All Programs Brother P touch P touch Tools P touch Library 2 3 The main window appears Overview of the Toolbar Icons Icon Button name Function Open Opens the selected template Print Prints the selected template with the printer Search Allows you to search for templates registered to P touch Library Display Style Changes the file display style 2 Select the tem...

Page 68: ... 2 3 Windows 8 Windows 8 1 Windows Server 2012 Windows Server 2012 R2 Click the P touch Library 2 3 icon on the Apps screen Windows 7 Windows Server 2008 Windows Server 2008 R2 Click Start All Programs Brother P touch P touch Tools P touch Library 2 3 The main window appears 2 Select the template you want to print and then click Print The connected printer prints the template Related Information S...

Page 69: ... Windows 10 Windows Server 2016 Click Start Brother P touch P touch Library 2 3 Windows 8 Windows 8 1 Windows Server 2012 Windows Server 2012 R2 Click the P touch Library 2 3 icon on the Apps screen Windows 7 Windows Server 2008 Windows Server 2008 R2 Click Start All Programs Brother P touch P touch Tools P touch Library 2 3 The main window appears 2 Click Search The Search dialog box appears 3 Sp...

Page 70: ...g the file name Type Search for a template by specifying the file type Size Search for a template by specifying the file size Date Search for a template by specifying the file date 4 Click Begin Search The search begins and the search results are displayed 5 Close the Search dialog box To confirm the search results click Search Results in the folder view You can register templates to P touch Libra...

Page 71: ...Home Network Network Related Models TD 4420DN TD 4520DN Learn about Network Management Software and Utilities Change Printer Settings Using Web Based Management 68 ...

Page 72: ...orarily disable them When you are sure you can print re enable them BRAdmin Professional Windows BRAdmin Professional is a utility for more advanced management of network connected Brother printers This utility can search for Brother printers on your network and view their status from an easy to read Windows Explorer style screen that changes colour to identify the status of each printer You can c...

Page 73: ...Home Update Update Update P touch Editor Windows Update the Firmware 70 ...

Page 74: ...ows Server 2012 Windows Server 2012 R2 Click the P touch Update Software icon on the Apps screen or double click the P touch Update Software icon on the desktop Windows 7 Windows Server 2008 Windows Server 2008 R2 Click Start All Programs Brother P touch P touch Update Software or double click the P touch Update Software icon on the desktop 2 Click the Computer software update icon 3 Select the Pr...

Page 75: ...Related Information Update 72 ...

Page 76: ...te Software icon on the desktop Windows 8 Windows 8 1 Windows Server 2012 Windows Server 2012 R2 Click the P touch Update Software icon on the Apps screen or double click the P touch Update Software icon on the desktop Windows 7 Windows Server 2008 Windows Server 2008 R2 Click Start All Programs Brother P touch P touch Update Software or double click the P touch Update Software icon on the desktop...

Page 77: ...t the cable during data transfer 6 Check the content to be updated and then click Start to begin the update The firmware update begins NOTE Do not turn the printer off or disconnect the cable during the update process Related Information Update 74 ...

Page 78: ...ttings Printer Settings Change Printer Settings Using the Printer Setting Tool Windows Apply Setting Changes to Multiple Printers Windows Change Printer Settings Using Web Based Management Confirm Printer Settings 75 ...

Page 79: ...the Printer Setting Tool Windows 10 Windows Server 2016 Click Start Brother Printer Setting Tool Windows 8 Windows 8 1 Windows Server 2012 Windows Server 2012 R2 Click the Printer Setting Tool icon on the Apps screen Windows 7 Windows Server 2008 Windows Server 2008 R2 Click Start All Programs Brother Label Mobile Printer Printer Setting Tool The main window appears 3 2 4 5 6 1 1 Printer Lists the...

Page 80: ...nt to change and then specify or change the settings in the dialog box 5 Click Apply to apply the settings to the printer 6 Click Exit in the main window to finish specifying settings Use the Printer Setting Tool to configure the printer only when the printer is idle The printer may malfunction if you try to configure it while it is processing or printing a print job Related Information Printer Se...

Page 81: ... 10 1 Menu Bar Provides access to various commands grouped under each menu title the File Tools and Help menus according to their functions 2 Node Name Displays the node name nodes can be renamed 3 Settings Display Change Area Displays the current settings for the selected item 4 Refresh Updates the displayed settings with the most recent information 5 Exit Exits the Communication Settings window ...

Page 82: ... settings check box is selected the settings are not saved The following information is not saved with the command file Node name IP address subnet mask and default gateway when the IP address is set to STATIC The saved communication settings commands are intended to be used only for applying settings to a printer To apply the settings to the printer using this command file use the mass storage mo...

Page 83: ...etected and the printer s current settings are displayed in the Current Status pane If the connected printer is different from the printer shown in the Printer drop down list the settings available on all tabs change to match the connected printer Change Node Name Bluetooth Device Name Allows renaming a node name Reset to Default Communication Settings Returns the communication settings to their f...

Page 84: ... authentication method User ID Password You can specify settings only when EAP MD5 EAP FAST PEAP EAP TTLS or EAP TLS is selected as the authentication method In addition with EAP TLS it is not necessary to register a password but a client certificate must be registered To register a certificate connect to the printer from a web browser and then specify the certificate Installation of the authentic...

Page 85: ...e retrieved the previous settings are displayed If the current settings cannot be retrieved and previous settings were not specified the machine s factory settings appear Settings Dialog Box Menu Bar Basic Tab Advanced Tab Print Position Sensors Tab Management Tab Settings Dialog Box 1 2 3 4 5 6 7 8 1 Menu Bar Provides access to various commands grouped under each menu title the File Maintenance a...

Page 86: ...ves the specified settings in a command file Import Imports an exported file Export Saves the current settings in a file Exit Exits the Device Settings window and returns to the main window of the Printer Setting Tool Maintenance Menu Options You must have administrator privileges for the computer or the printer to display some items Check if you have administrator privileges for the printer by cl...

Page 87: ...the serial port Sleep mode is cancelled when the following operations are performed Any of the printer buttons is pushed The Roll Compartment Cover is opened or closed The printer receives data excluding via the serial port A USB cable is disconnected and then reconnected Auto Power Off Specifies the period of time that passes before the printer turns off automatically when connected to an electri...

Page 88: ...Serialize Mode Specifies the serialise number method for your printed labels Save Printer Print Log Selects whether to save the printer s print log If Disable is selected the Save Print Log in File option cannot be enabled Print Data after Printing Specifies whether print data is erased after printing Print Position Sensors Tab If RD Rolls are being used it is unnecessary to adjust the sensors Pri...

Page 89: ... Tab To display this tab you must have administrator privileges for the computer or the printer Check if you have administrator privileges for the printer by clicking the Printer properties menu and then clicking the Security tab Command Mode Selects the command mode type Print Head Check When Powered On Sets whether to check the status of the print head when you turn the printer on Related Inform...

Page 90: ...ce English only You can download the latest version from the Brother support website at support brother com manuals 1 2 3 5 16 14 4 6 7 8 9 11 12 15 10 17 13 1 Default Command Mode Specifies the P touch Template mode as the default mode To change the mode select the mode by accessing the Management tab on the Device Settings window 2 Default Template Number Specifies a default template number that...

Page 91: ...ne in a text object Select one of four line feed codes or type the line feed code you want maximum of 20 characters 10 Replace FNC1 Replaces GS codes with FNC1 11 Number of Copies Sets the number of copies maximum of 99 copies 12 Auto Cut Specifies if the printer should cut the labels and how many labels to print before cutting maximum of 99 labels 13 Inverted 180 Degrees If this check box is sele...

Page 92: ...size NOTE Do not register a paper size already registered to avoid incorrect print results To use paper of the same size as one that is currently registered select the size you want from the Currently Registered Paper Sizes list in the Paper Size Setup dialog box and then change and overwrite the settings from the Edit dialog box 3 Edit Edits the settings for the selected paper format To save the ...

Page 93: ...egistered Paper Sizes list If the software is running exit the software and then restart it for the new paper format to appear in the list If the following functions are being used you can quickly apply their settings to the printer Mass storage feature These commands are only intended to be used to apply settings to a printer These commands cannot be imported into the Paper Size Setup New Dialog ...

Page 94: ...e point point of origin for printing This corrects printing misalignments resulting from differences in printer models or from the fixed margins of some software 2 Tear Adjust Adjust the cutting position when the paper is cut using the Tear Bar 3 Energy Rank Adjust the amount of heat energy from the print head for example with special paper There may be contrast variations in the print result due ...

Page 95: ...ecified when Paper Types is set to Media With Marks The settings for Media Sensor Reflective Bar in the Device Settings dialog box can influence the detection and calibration results Make sure you specify the appropriate values Example settings Setting EX1 Setting EX2 Device Settings 2 2 Paper Size Setup 2 2 Actual effect 4 0 6 Cancel Cancels the settings and closes the dialog box The settings wil...

Page 96: ...stalled on the recipient s computer only the paper formats need to be distributed 1 At the sender s computer specify the paper format settings and then click Export The following files are created TD 4210D bst421ed ptd bst421ed txt ptd4335 bin TD 4410D bst441ed ptd bst441ed txt pdt3735 bin TD 4420DN bst442ed ptd bst442ed txt pdt3835 bin TD 4520DN bst452ed ptd bst452ed txt pdt4135 bin 2 Save the TX...

Page 97: ...or all printers whose settings you want to change If the IP address is set to STATIC the printer s IP address is changed to the same address as the first printer Change the IP address if needed To save the current settings in a file click File Export The same settings can be applied to another printer by clicking File Import and then selecting the exported settings file Device Settings 1 After app...

Page 98: ...d to manage printer settings is initpass We recommend you change it to protect your printer from unauthorised access To use Web Based Management your network must use TCP IP and the printer and computer must have a valid IP address 1 Start your web browser 2 Type https machine s IP address in your browser s address bar where machine s IP address is the machine s IP address For example https 192 16...

Page 99: ... If you are using a Domain Name System or enable a NetBIOS name you can type another name such as SharedPrinter instead of the IP address For example https SharedPrinter If you enable a NetBIOS name you can also use the node name For example https brnxxxxxxxxxxxx 3 Do one of the following If you have previously set your own password type it and then click If you have not previously set your own pa...

Page 100: ...You can print a Printer Settings Report without connecting the printer to a computer or mobile device 1 Turn the printer on 2 Load a 102 mm or wider RD Roll into the printer 3 Press and hold for two seconds The report starts printing Related Information Printer Settings 97 ...

Page 101: ...Home Routine Maintenance Routine Maintenance Clean Your Printer 98 ...

Page 102: ...s from the main unit using a soft dry cloth Use a cloth slightly damp with water on difficult to remove marks IMPORTANT Do not use paint thinner benzene alcohol or any other organic solvent These may deform or damage the printer case Clean the Label Output Slot If adhesive residue gets attached to the Label Output Slot it may cause label jams Clean the Label Output Slot with a dry cotton swab IMPO...

Page 103: ...propyl alcohol or ethanol according to the manufacturer s safety guidelines as applicable Clean the Print Head Wipe the print head with a lint free cloth or cotton swab dipped in isopropyl alcohol or ethanol We recommend cleaning the print head monthly Use isopropyl alcohol or ethanol according to the manufacturer s safety guidelines as applicable Related Information Routine Maintenance 100 ...

Page 104: ...Home Troubleshooting Troubleshooting If You Are Having Difficulty with Your Machine Error and Maintenance Indications Printing Problems Version Information Reset the Printer 101 ...

Page 105: ...nstall and select the correct printer driver For more information see Related Information Connect the printer to a computer or mobile device For more information see Related Information Close the Roll Compartment Cover completely Insert the RD Roll correctly For more information see Related Information If you still have problems see Related Information If after reading the topics you are unable to...

Page 106: ...ode Mass storage mode Detecting the paper size Once for 3 seconds Printing is paused Once for 2 seconds Receiving data Once for 1 second Cancelling the print job Print preparation mode Downloading mode Cooling mode Cover open error Close the Roll Compartment Cover until it locks into place BLF file error Press any button to clear the error Communication error Database search error No template erro...

Page 107: ... Press and hold to clear the error Cutter error Print head undetected error The printer is in Boot mode Contact Brother customer service Once for 2 seconds Once for 2 seconds Once for 2 seconds Resetting mode is on Flashes rapidly Flashes rapidly Flashes rapidly System error Contact Brother customer service Data overwrite mode The Roll Compartment Cover is open Close the Roll Compartment Cover unt...

Page 108: ...shed print jobs If you try to print while other users are printing large amounts of data the printer is unable to accept your print job until the current print jobs are completed If this occurs send the print job again after the other jobs are completed I want to cancel the current printing job Press while printing is paused The print quality is poor Is there dust or dirt on the print head or roll...

Page 109: ...cool down because it overheated due to the type of roll you are using or the contents of the label printing may take longer than usual NOTE This condition may occur more often when the printer is used at high altitude more than 3 048 m due to a lower air density available to cool the printer I want to reset the printer delete the data transferred from the computer See Related Information Print hea...

Page 110: ...1 Windows Server 2012 Windows Server 2012 R2 Click Orientation in the Apps screen Click Hardware and Sound Devices and Printers Right click the printer you want to set up and then click the Printing preferences menu Click the Other tab and select the After one page of data is received option Windows 7 Windows Server 2008 Windows Server 2008 R2 Click Start Devices and Printers Right click the print...

Page 111: ... barcodes cannot be read Print labels so that barcodes are aligned with the print head as shown below 1 2 3 1 Print head 2 Barcodes 3 Printing orientation Barcodes may not be read if they are reduced or enlarged Network Problems TD 4420DN TD 4520DN Problem Solution You are using security software Confirm your settings in the installation dialog box Allow access when the security software alert mes...

Page 112: ...oes not print Uninstall the printer driver and the software and then reinstall them You did not select to allow access when the security alert dialog box appeared during the standard installation BRAdmin Light installation or when printing If you did not select to allow access when the security alert dialog box appeared the firewall function of your security software may be blocking access Some se...

Page 113: ...ng the Printer Settings Report For more information see Related Information I want to confirm whether I am using the latest version of the software Use the P touch Update Software to confirm whether you have the latest version For more information about the P touch Update Software see Related Information Related Information Troubleshooting Related Topics Confirm Printer Settings Update the Firmwar...

Page 114: ...D 4520DN Press once to reset the network settings The Power LED lights in red TD 4420DN TD 4520DN Press twice to reset the transferred data and the device settings The Roll LED lights in red Press three times to reset all the settings and device settings to the factory settings The Status LED lights in red 4 Release All LED indicators flash in red four times and then light in red Reset Data Using ...

Page 115: ...Home Appendix Appendix Specifications Software Development Kit Auto Media Configuration Options Brother Numbers 112 ...

Page 116: ...ximum 152 4 mm s 1 Maximum Print Width TD 4210D TD 4410D TD 4420DN 104 1 mm TD 4520DN 108 4 mm Maximum Print Length 3000 mm 1 Under Brother standard environment Size Weight TD 4210D TD 4410D Approximately 2 08 kg TD 4420DN TD 4520DN Approximately 2 08 kg Dimensions Approximately 180 mm W x 155 mm H x 224 mm D Interface USB USB Ver 2 0 Full Speed Type B Serial RS232C DB9 male 1 Wired LAN TD 4420DN ...

Page 117: ...mend using Brother thermal paper RD Rolls Media Type Wristbands Continuous Die Cut Fan Fold Perforated Tag Media Width From 19 mm to 118 mm Minimum Media Length 6 4 mm Continuous 6 4 mm Label Peeler 17 mm Cutter 20 mm Tear 18 mm Thickness From 0 058 mm to 0 279 mm Roll Outside Diameter maximum 127 mm Core Diameter minimum 12 7 mm Media Sensor Transmissive Reflective Compatible Operating Systems Fo...

Page 118: ...lso be downloaded The SDKs available are subject to change without notice TD 4420DN TD 4520DN The b PAC SDK and the SDKs for mobile devices Android iPhone and iPad can also be downloaded The SDKs available are subject to change without notice TD 4410D The b PAC SDK and the SDKs for mobile devices Android only can also be downloaded The SDKs available are subject to change without notice Related In...

Page 119: ...Home Appendix Auto Media Configuration Auto Media Configuration Auto Media Configuration Overview Use the Auto Media Configuration Function Check the Sensor Position 116 ...

Page 120: ...he paper to detect its characteristics By default the printer uses the continuous feed setting unless The transmissive gap sensor detects a die cut label The reflective black mark sensor detects marked media 1 If the paper runs out during the Auto Media Configuration the printer will not detect the media type successfully and an error will be displayed If the paper width is not aligned correctly t...

Page 121: ...Server 2016 Click Start Brother Printer Setting Tool Windows 8 Windows 8 1 Windows Server 2012 Windows Server 2012 R2 Click the Printer Setting Tool icon on the Apps screen Windows 7 Windows Server 2008 Windows Server 2008 R2 Click Start All Programs Brother Label Mobile Printer Printer Setting Tool 3 Click Paper Size Setup 4 Click Edit or New 5 TD 4210D TD 4410D Click Auto media configuration Aft...

Page 122: ...Home Appendix Options Options Clean Other Printer Components Change the Label Peeler Options Change the Cutting Options 119 ...

Page 123: ...d in isopropyl alcohol or ethanol After cleaning the roller make sure that no lint or other material remains on the roller Use isopropyl alcohol or ethanol according to the manufacturer s safety guidelines as applicable Print Head TD 4210D TD 4410D TD 4420DN PA HU2 001 TD 4520DN PA HU3 001 Wipe the print head with a lint free cloth or cotton swab dipped in isopropyl alcohol or ethanol We recommend...

Page 124: ...use alcohol to clean the Label Output Slot Label Peeler TD 4210D TD 4410D TD 4420DN TD 4520DN PA LP 002 1 Wipe the roller with a lint free cloth dipped in isopropyl alcohol or ethanol After cleaning the roller make sure that no lint or other material remains on the roller Use isopropyl alcohol or ethanol according to the manufacturer s safety guidelines as applicable 2 If adhesive residue gets on ...

Page 125: ...Related Information Options 122 ...

Page 126: ...ck Printer Printing Preferences Windows 8 Windows 8 1 Windows Server 2012 Windows Server 2012 R2 Click Orientation in the Apps screen Click Hardware and Sound Devices and Printers Right click the printer you want to set up and then click the Printing preferences menu Windows 7 Windows Server 2008 Windows Server 2008 R2 Click Start Devices and Printers Right click the printer you want to set up and...

Page 127: ...ows Server 2012 Windows Server 2012 R2 Click Orientation in the Apps screen Click Hardware and Sound Devices and Printers Right click the printer you want to set up and then click the Printing preferences menu Windows 7 Windows Server 2008 Windows Server 2008 R2 Click Start Devices and Printers Right click the printer you want to set up and then click the Printing preferences menu 2 Select the Cut...

Page 128: ...it www brother com for the contact information Internet Addresses Brother Global Web Site www brother com For Frequently Asked Questions FAQs Product Support and Technical Questions and Driver Updates and Utilities support brother com FAQs Frequently Asked Questions For more information on your Brother machine visit Brother s support website at support brother com For additional help and tips go t...

Page 129: ...Visit us on the World Wide Web www brother com UK Version A ...

Reviews: