background image

Scan (Windows

®

47

5

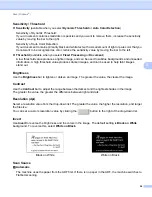
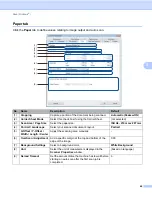
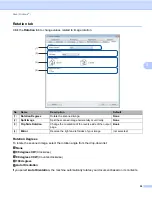
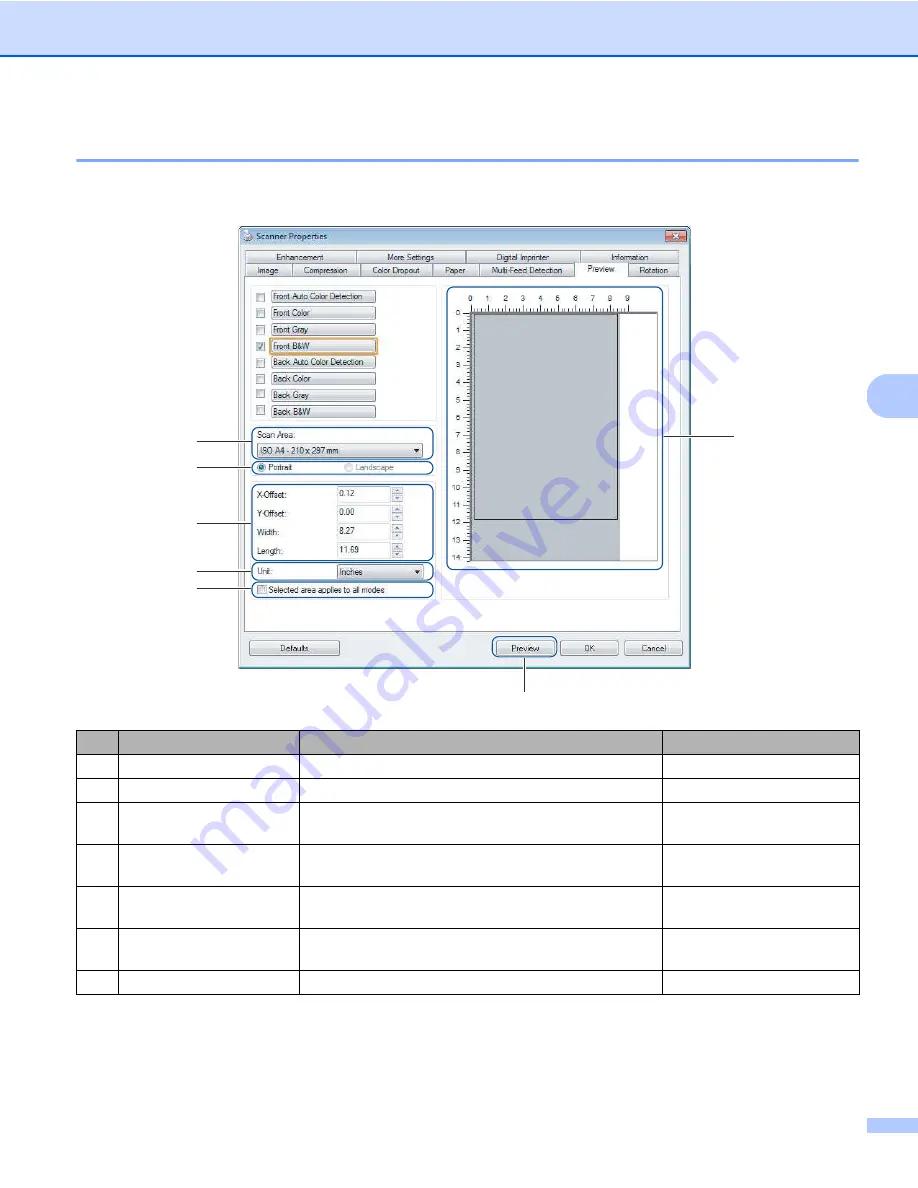
Preview tab

Click the 

Preview

 tab to display a low-resolution preview of your image before the final scan. The preview 

image helps to determine your scan area and check your color processing results.

No.

Name

Description

Default

(1)

Scan Area

Select the paper size.

ISO A4 - 210 mm x 297 mm

(2)

Portrait / Landscape

Select the scanned document’s layout.

Portrait

(3)

Display window

Display a preview of your scanned image or set your 
scan area manually.

-

(4)

X-Offset / Y-Offset / 
Width / Length

Adjust your scan area manually.

-

(5)

Unit

Select the unit of measurement displayed in the 

Scanner Properties

 window.

(based on language)

(6)

Selected area applies to 
all modes

Apply the same scan area settings to all documents.

(not selected)

(7)

Preview

Preview your scan.

-

(3)

(7)

(1)

(2)

(4)

(5)
(6)

Summary of Contents for PDS-5000F

Page 1: ...PDS 5000F PDS 6000F Version B ENG User s Guide PDS 5000F PDS 6000F ...

Page 2: ...ed may result in damage to property or loss of product functionality NOTE Notes tell you how you should respond to a situation that may arise or give tips about other scanning features Bold Bold style identifies keys on the machine or computer screen Italics Italicised style emphasises an important point or refers you to a related topic Courier New Text in Courier New font identifies messages on t...

Page 3: ...ding documents in the ADF 10 Loading documents on the Flatbed s scanner glass 13 Loading multiple different size documents in the ADF 14 Loading documents using the Carrier Sheet in the ADF 16 Loading documents wider than Letter A4 size 18 5 Scan Windows 20 Scan using the control panel 20 Assign a scanning application to the Scan button 20 Scan a document 24 Scan using your computer 25 Scan with D...

Page 4: ... tab 77 Paper tab 79 Rotation tab 84 Enhancement tab 86 Setting tab 90 Imprinter tab 91 Information tab 95 7 Maintenance 96 Clean the outside of your machine 96 Clean the Scanner Glass 97 Clean the inside of your machine 98 Replace parts 104 Supply information 104 Check replacement cycle 106 Replace the Rollers 106 Reset the usage counters 111 Packing and shipping the machine 112 8 Troubleshooting...

Page 5: ...Appendix B 132 Contact Brother 132 Register your product online at 132 Frequently Asked Questions FAQs 132 For customer service 133 For Brother accessories supplies 133 Technical support for PageManager 134 ...

Page 6: ...ol panel on page 64 Button Manager V2 Windows Use this application to extend the DS Capture scanning functionality and to create multiple types of scan buttons to perform one touch scanning If scanning with your computer click the button to which the required scan settings have been assigned with the application If scanning with your machine select the menu to which the required scan settings have...

Page 7: ...Document Guides 5 Automatic Document Feeder ADF 6 ADF Cover 7 Document Cover 8 Document Stopper 9 Flatbed 10 Control Panel 11 Cover Release Lever 12 Security Slot 13 USB 3 0 SuperSpeed Port 14 AC Power Port 15 Transport Lock General Information 2 1 2 4 3 6 7 8 10 9 12 14 13 15 11 5 ...

Page 8: ...s to scroll through the function numbers For more information about the function numbers see Scan using the control panel on page 20 step 4 and 5 3 Power button LED Press to turn the machine ON when the machine is off or in Power Saving Mode Press to enter Power Saving Mode when the machine is ON Press and hold down to turn the machine OFF For more information about Power Saving Mode see Energy Sa...

Page 9: ...er V2 User s Guide LED Indication Meaning No light The machine is OFF Green The machine is ON Blinking green The machine is initializing or in Power Saving Mode Blinking red There is a problem with the machine Machine Status Message Meaning Function X This shows the currently selected function number PageCount XXXXX The machine is ready to scan Where XXXXX is the document scan count Scanning XXXXX...

Page 10: ...0 sheets with 127 g m2 paper 50 sheets with 200 g m2 paper 15 sheets with 400 g m2 paper 15 sheets Business Card Standard Paper Size A4 8 3 in 11 7 in 210 mm 297 mm A5 5 8 in 8 3 in 148 mm 210 mm A6 4 1 in 5 8 in 105 mm 148 mm A7 2 9 in 4 1 in 74 mm 105 mm B5 7 2 in 10 1 in 182 mm 257 mm B6 5 0 in 7 2 in 128 mm 182 mm B7 3 6 in 5 0 in 91 mm 128 mm Legal 8 5 in 14 in 215 9 mm 355 6 mm Letter 8 5 in...

Page 11: ...able document with your Brother machine may not be covered under warranty Plastic Cards Length ADF 2 76 in to 3 74 in 70 mm to 95 mm Scanner Glass 14 0 in Maximum 356 mm Width ADF 2 0 in to 2 17 in 51 mm to 55 mm Scanner Glass 8 50 in Maximum 216 mm Standard Size ISO 3 37 2 13 0 03 in 85 6 54 0 0 76 mm Material Plastic PET Type Plastic card such as a driver s license or an insurance card Thickness...

Page 12: ...ter than 2 13 in 54 mm long Documents of uneven thickness such as envelopes Documents with large wrinkles or curls Bent or damaged documents Documents that use tracing paper Documents that use coated paper Photographs photographic paper Documents printed on perforated paper Documents printed on unusually shaped paper not square or rectangular Documents with photos notes or stickers affixed to them...

Page 13: ...or Automatic Document Feeder ADF use a Open the Top Cover 1 pull the Cover Extension 2 out and then unfold the Document Guides 3 b Lift the Document Stopper 1 and slide it to fit the size of your paper Scan Preparation 4 3 2 1 1 ...

Page 14: ...Scan Preparation 9 4 Set up your machine for Flatbed use a Lift the document cover 1 b Make sure the scanner glass is empty 1 ...

Page 15: ...sted or taped DO NOT try to scan cardboard or fabric NOTE Make sure the documents that have ink or correction fluid on them are completely dry Certain types of plastic cards may be scratched when scanned To prevent damage to the card we recommend using the Carrier Sheet or scanner glass If misfeeds frequently occur when you scan thin sheets reduce the number of documents held in the ADF and then s...

Page 16: ... b Adjust the Document Guides 1 to fit the width of your document NOTE When scanning documents with punch holes such as continuous form paper slide the Document Guide Stopper 1 up and then extend the Document Guide 2 1 1 2 ...

Page 17: ... cards Place your card face down and short side first in the ADF between the Guides until you feel it touch the inside of the machine Load only one plastic card at a time For documents longer than Letter A4 size If the document is longer than the Top Cover support the document with your hand Load only one document at a time See Acceptable documents on page 5 ...

Page 18: ...Preparation 13 4 Loading documents on the Flatbed s scanner glass a Lift the document cover 1 b Place the document face down in the right corner of the scanner glass 1 as shown c Close the document cover 1 1 ...

Page 19: ...ollers or it may cause a document jam a Stack the documents on top of each other making sure that the top edge and the left side of each document are aligned b Adjust the Document Guides 1 to fit the width of the largest document c Place the documents face down top edge first in the ADF between the Guides until you feel them touch the inside of the machine 1 ...

Page 20: ...e LTR P Carrier Sheet A4 P A5 L B5 P B6 L A5 P A6 L B6 P B7 L A6 P A7 L B7 P B8 L A7 P A8 L B8 P A8 P Width mm 1 216 210 182 149 129 105 91 74 3 64 3 52 5 Minimum size LTR P Carrier Sheet 216 A4 P A5 L 210 B5 P B6 L 182 Available range A5 P A6 L 149 B6 P B7 L 129 A6 P A7 L 105 B7 P B8 L 91 A7 P A8 L 74 3 B8 P 64 3 A8 P 52 5 ...

Page 21: ...the Carrier Sheet in direct sunlight or in an area subject to high temperatures and high humidity as the Carrier Sheet may warp Do not place large or heavy objects on the Carrier Sheet when it is lying flat Do not bend or pull the Carrier Sheet If it becomes damaged it may not be acceptable for scanning do not use it Do not scan multiple Carrier Sheets in a row a Insert the document into the Carri...

Page 22: ...e Document Guides 1 to fit the width of the Carrier Sheet c Place the Carrier Sheet in the ADF between the Guides until you feel it touch the inside of the machine NOTE To avoid document jams do not load the Carrier Sheet upside down 1 ...

Page 23: ... scanning see Loading documents using the Carrier Sheet in the ADF on page 16 for basic usage instructions and notes about the Carrier Sheet a For best results carefully fold your document in half making sure all the corners are even and then insert the document into the Carrier Sheet b Adjust the Document Guides 1 to fit the width of the Carrier Sheet 1 ...

Page 24: ...in the ADF between the Guides until you feel it touch the inside of the machine NOTE To reduce the white space in the center of a scanned page be sure to position the folded edge of the original document closer to the right edge of the Carrier Sheet ...

Page 25: ...ettings Devices Printers Scanners Devices Printers For Windows 8 8 1 Move your mouse to the lower right corner of your desktop When the menu bar appears click Control Panel In the Hardware and Sound group click View devices and printers For Windows 7 Click Start Devices and Printers For Windows Vista Click Start Control Panel Scanners and Cameras Printers For Windows XP SP3 Click Start Control Pan...

Page 26: ...d Click the Events tab and then select an event number from the Select an event drop down list The Button you select from this list directly corresponds with the function numbers Function X displayed on the machine s LCD ...

Page 27: ...Scan Windows 22 5 e Select Start this program from Actions and then select the scanning application you want to launch when you press the Scan button on your machine s control panel f Click OK ...

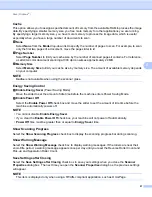
Page 28: ... Button Manager V2 application you can synchronize the machine s LCD and application s function names by assigning Brother Button Manager to all the Button in the Select an event drop down list For more information see the Button Manager V2 User s Guide LCD When Button Manager V2 is running Button Manager V2 Button Panel 1 Scan to File PageCount 0 LCD When Button Manager V2 is not running Function...

Page 29: ... Brother s Button Manager is running on your computer the machine s LCD displays a Button Manager function number and name For more information see the Button Manager V2 User s Guide d Press to launch the scanning application e Press again to begin scanning LCD When Button Manager V2 is running Button Manager V2 Button Panel 1 Scan to File PageCount 0 LCD When Button Manager V2 is not running Func...

Page 30: ...h DS Capture a Confirm that the machine is connected to your computer via a USB cable b Double click the DS Capture icon on your desktop NOTE If the DS Capture icon is not visible on your desktop click Start All Programs Brother PDS XXXX Scanner where XXXX is your model name DS Capture c The Select Scanner Model dialog box appears Select your Brother machine s model from the Scanner Model list and...

Page 31: ...on page 27 f Place your document either in the ADF or on the scanner glass g Click Scan Your machine starts scanning A thumbnail of the scanned image appears in the DS Capture window and the scanned image is saved in the directory you specified in the Path field For more information see DS Capture home screen on page 28 Check the scan result to confirm that all settings are correct ...

Page 32: ...ilt Paper tab on page 40 Remove the document base color Enhancement tab on page 52 Add a white or black edge around the border Enhancement tab on page 52 Remove small dots or specks from the background Enhancement tab on page 52 Efficient scanning See preview and check scan settings Preview tab on page 47 Save your scanner properties Image tab on page 31 Acquire multiple color type scan results wi...

Page 33: ... is complete Fast display mode In Fast display mode thumbnails are displayed in real time NOTE When you select Fast display mode scanning speed may be slower depending on your computer Fast scan mode Debug select from the File menu Set the debug value between 0 and 9 NOTE Debug is a developer s function Users should not need to change this setting 0 2 Setup Change scanner properties For more infor...

Page 34: ... from the drop down list JPEG 5 Path Specify the directory where you want to save scanned images My Documents My Scan 6 Fit Page View and resize the scanned image You cannot use Fit Page when PDF or Multi page PDF is selected in File Format selected 7 Actual Size 100 View the scanned image in Actual Size 100 You cannot use Actual Size 100 when PDF or Multi page PDF is selected in File Format not s...

Page 35: ...n be set individually for the front and back of any double sided document you scan No Name Description 1 Tabs Image Compression Color Dropout Paper Multi Feed Detection Preview Rotation Enhancement More Settings Digital Imprinter Information 2 Defaults Click Defaults to reset all settings in all tabs to factory settings 3 Scan OK Click the Scan button to start a scan Click OK to save the settings ...

Page 36: ...ype Non Color Selection Select an appropriate image processing mode This field name changes based on your choice in the Image Selection group Dynamic Threshold Document Black and White 4 Sensitivity Threshold Change sensitivity threshold value 5 Brightness Change brightness 0 6 Contrast Change contrast 0 7 Resolution dpi Select resolution 200 8 Invert Reverse the brightness and the colors in the i...

Page 37: ... image into a black and white image There are several methods of performing this conversion Image Type Description Color Select Color if your original is in color and you want an exact copy Gray Select Gray if your original contains shades of gray B W Select B W if your original is typed written in pencil or written in pen Auto Color Detection Select Auto Color Detection to automatically detect an...

Page 38: ...fusion Select Error Diffusion for a type of Halftone Error Diffusion results in good image texture and makes text in images more legible than Halftone 1 5 above Halftone Diffusion Document Type Description Document Select Document if your original contains only text or a mixture of text and graphics This is the optimal setting for regular business documents Photo Select Photo if your original cont...

Page 39: ... value produces darker images and can be used to help faint images stand out Brightness Use the Brightness bar to lighten or darken an image The greater the value the clearer the image Contrast Use the Contrast bar to adjust the range between the darkest and the lightest shades in the image The greater the value the greater the difference between light and dark Resolution dpi Select a resolution v...

Page 40: ...ages onto a single page Merge Vertically check box Select this check box to align both sides vertically Clear this check box to align both sides horizontally Profiles Click Profiles to save your frequently used scan settings To create a scan profile a Select your scan settings in the Scanner Properties dialog box using any of the tabs b When finished click the Image tab and then click Profiles The...

Page 41: ...rameters to adjust the image colors ICC profiles are used with color mapping mainly in digital photography and printing Document Select Document if your original contains only text or a mixture of text and graphics This is an optimal setting for regular business documents None Select None to disable the Color Profile option Photo Select Photo if your document contains photos and you want to reprod...

Page 42: ...following compression types are available JPEG Quality Move the JPEG Quality slider to the right or left to increase or decrease the level of compression The greater the JPEG Quality percentage value the larger the file size No Name Description Default 1 Compression Select a Compression mode None 2 JPEG Quality Change the JPEG quality 50 Available Compression Types Color or Gray Images Black and W...

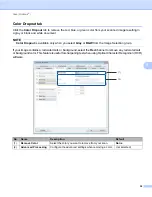
Page 43: ...rom the Image Selection group If your image contains a red watermark or background select the Red channel to remove any red watermark or background color This feature is useful for sharpening text when using Optical Character Recognition OCR software No Name Description Default 1 Remove Color Select the color you want to remove from your scan None 2 Advanced Processing Configure the advanced setti...

Page 44: ...eshold This value determines how much color to remove A lower value removes more of the selected color while a higher value keeps more of the selected color Filter Threshold is available only when Quality is selected in the Mode drop down list Custom settings Select Custom in the Remove Color drop down list to specify the exact color you want to remove by entering its RGB Red Green and Blue value ...

Page 45: ...7 mm 4 Portrait Landscape Select your scanned document s layout Portrait 5 X Offset Y Offset Width Length Center Adjust the scanning area manually 6 OverScan Adjustment Add a specific margin at the top and bottom of the edge of the image 0 00 7 Background Settings Select a background color White Background 8 Unit Select the unit of measurement displayed in the Scanner Properties window based on la...

Page 46: ... down arrow keys to define the x and y offset values width and length of your scan area EOP End of Page Detection Deskew OFF This option allows you to define the area or zone to be captured Use it when scanning batches of same width but different length documents If you select this option type numerical values or use the up or down arrow keys to define the x and y offset values width and length of...

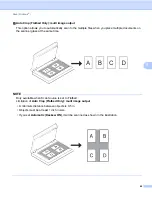
Page 47: ...place multiple documents on the scanner glass at the same time NOTE Only available when Scan Source is set to Flatbed Limitation of Auto Crop Flatbed Only multi image output A minimum distance between objects is 0 5 in Objects must be at least 1 inch in size If you set Automatic Deskew ON it will be scanned as shown in the illustration ...

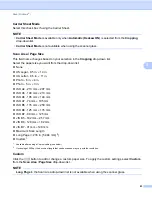
Page 48: ... in 4 in Photo 5 in 3 in ISO A4 210 mm 297 mm ISO A5 148 mm 210 mm ISO A6 105 mm 148 mm ISO A7 74 mm 105 mm ISO B5 176 mm 250 mm ISO B6 125 mm 176 mm ISO B7 88 mm 125 mm JIS B5 182 mm 257 mm JIS B6 128 mm 182 mm JIS B7 91 mm 128 mm Maximum Scan Length Long Page 236 in 5 994 mm 2 Custom 1 1 Available after adding a Custom setting see below 2 If scanning at 200 dpi the document length that can be sc...

Page 49: ...ed image based on the selected paper size OverScan Adjustment Allows you to add a specific margin at the top and bottom of the edge of the image This is used to reduce possible corner clipping on skewed images and is often applied to a batch of skewed documents Select a value between 0 in and 0 18 in 4 5 mm Background Setting Select White Background or Black Background from the drop down list to s...

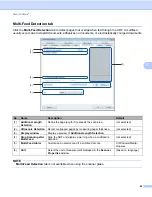
Page 50: ...ditional Length Detection Define the page length if it exceeds the scan area not selected 2 Ultrasonic Detection Detect overlapped pages by measuring paper thickness not selected 3 Display window Display a preview of Additional Length Detection 4 Stop Scanning after Multi Feed Stop the ADF and display a warning when a multifeed is detected not selected 5 Multi Feed Alarm Customize an alarm sound i...

Page 51: ...uter monitor Display window Displays a preview of the Additional Length Detection value When this feature is selected and your machine detects a multifeed scanning stops immediately and a warning message appears on your computer monitor Stop Scanning after Multi Feed Select this check box to stop the feeder and display the warning dialog box when a multifeed is detected NOTE This option is availab...

Page 52: ...O A4 210 mm x 297 mm 2 Portrait Landscape Select the scanned document s layout Portrait 3 Display window Display a preview of your scanned image or set your scan area manually 4 X Offset Y Offset Width Length Adjust your scan area manually 5 Unit Select the unit of measurement displayed in the Scanner Properties window based on language 6 Selected area applies to all modes Apply the same scan area...

Page 53: ...list None US Legal 8 5 in 14 in US Letter 8 5 in 11 in Photo 6 in 4 in Photo 5 in 3 in ISO A4 210 mm 297 mm ISO A5 148 mm 210 mm ISO A6 105 mm 148 mm ISO A7 74 mm 105 mm ISO B5 176 mm 250 mm ISO B6 125 mm 176 mm ISO B7 88 mm 125 mm JIS B5 182 mm 257 mm JIS B6 128 mm 182 mm JIS B7 91 mm 128 mm Maximum Scan Length Portrait Landscape NOTE Landscape cannot be selected when US Legal US Letter A4 B5 Max...

Page 54: ...e area in the document that you want to scan Width Adjust the width of the area in the document that you want to scan Length Adjust the length of the area in the document that you want to scan Unit Select Millimeters Inches or Pixels from the drop down list The default setting is based on your OS language Selected area applies to all modes Select the Selected area applies to all modes check box to...

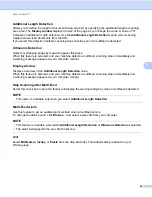
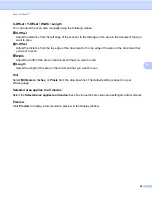
Page 55: ...ckwise 180 degrees Auto Orientation If you select Auto Orientation the machine automatically rotates your document based on its contents No Name Description Default 1 Rotation Degrees Rotate the scanned image None 2 Split Image Split the scanned image horizontally or vertically None 3 Flip Side Rotation Change the orientation of the reverse side of the output page Book 4 Mirror Reverse the right a...

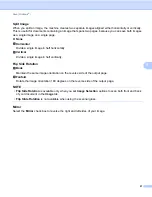
Page 56: ...ly Vertical Divide a single image in half vertically Flip Side Rotation Book Maintain the same image orientation on the reverse side of the output page Fanfold Rotate the image orientation 180 degrees on the reverse side of the output page NOTE Flip Side Rotation is available only when you set Image Selection options to scan both front and back of your document in the Image tab Flip Slide Rotation...

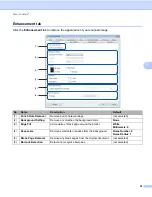
Page 57: ...ted 2 Background Setting Remove or smoothen the background color None 3 Edge Fill Add a white or black edge around the border White Millimeters 0 4 Despeckle Remove small dots or specks from the background Noise Number 0 Noise Radius 1 5 Blank Page Removal Remove any blank pages from the original document not selected 6 Barcode Detection Detect and recognize barcodes not selected 1 2 3 4 5 6 ...

Page 58: ...nd smooth and Removal removes the background color Sensitivity Move the Sensitivity slider to the left or right to adjust the sensitivity to base color or background The greater the sensitivity value the better the scan results the slower the scanning speed Mode This option is available only if you select Smooth under Background Processing above Select Auto to allow the software to process the ima...

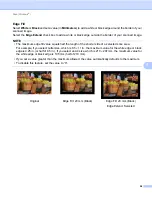
Page 59: ...he shorter side of a selected scan area For example if you select Letter size which is 8 5 11 in the maximum value for the white edge or black edge is 4 25 in or half of 8 5 in If you select an A4 size which is 210 297 mm the maximum value for the white edge or black edge is 105 mm half of 210 mm If you set a value greater than the maximum allowed the value automatically defaults to the maximum To...

Page 60: ...remove blank pages from your scanned image Move the slider to change the threshold or level of pixels that determines a blank page Barcode Detection Select the Barcode Detection check box to split multi page scanned files whenever a barcode is detected An avbarcode ini file containing the barcodes types is created and stored on your system drive for example C ProgramData PDS XXXX avbarcode ini whe...

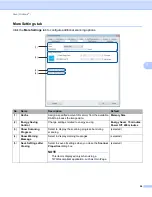
Page 61: ... Change settings related to energy saving Energy Saver 15 minutes Power Off 240 minutes 3 Show Scanning Progress Select to display the scanning progress bar during scanning selected 4 Show Warning Message Select to display warning messages selected 5 Save Settings after Closing Select to save all settings when you close the Scanner Properties dialog box NOTE This item is displayed only when using ...

Page 62: ...ver Power Saving Mode Move the slider to set the amount of idle time before the machine enters Power Saving Mode Enable Power Off Select the Enable Power Off check box and move the slider to set the amount of idle time before the machine automatically powers off NOTE You cannot disable Enable Energy Saver If you clear the Enable Power Off check box your machine will not power off automatically Pow...

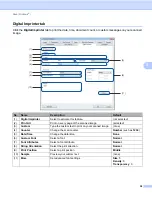
Page 63: ... image selected 3 Custom Type the custom text to print on your scanned image none 4 Counter Change the scan counter Number such as 1234 5 Date Time Change the date time None 6 Custom Font Select a font Normal 7 Font Attributes Select a font attribute Normal 8 String Orientation Select the print direction Normal 9 Print Position Select a print position Middle 10 Sample Preview your custom text none...

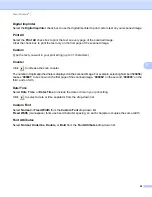
Page 64: ...umber of digits specified here is displayed on the scanned image For example selecting Number 123456 causes 000001 to be shown on the first page of the scanned image 000002 on the second 000003 on the third and so forth Date Time Select Date Time or Date Time to include the date or time in your print string Click to select a date or time separator from the drop down list Custom Font Select Normal ...

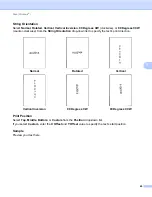
Page 65: ...he String Orientation drop down list to specify the text s print direction Print Position Select Top Middle Bottom or Custom from the Position drop down list If you select Custom enter the X Offset and Y Offset value to specify the text s start position Sample Preview your text here Normal Rotated Vertical Vertical Inversion 90 Degrees CW 90 Degrees CCW ...

Page 66: ...Size Move the slider to select font size Default 5 Density Move the slider to select font density Default 0 Transparency Move the slider to select a transparency value from 0 not transparent to 100 completely transparent This is useful when creating a partially transparent watermark ...

Page 67: ...E Do not reset the counter unless you have replaced the rollers Report Click the Report button to generate a report txt file that is stored on the system drive for example C XXXX where XXXX is your scanner model Use this text file for troubleshooting when you encounter an error message see Troubleshooting on page 115 or share this file with service personnel if you contact them via phone or email ...

Page 68: ...levels 3 Dots per inch Select the resolution you want 4 Page Size Select the page size you want 5 Brightness Adjust the brightness of your scanned image 6 Contrast Adjust the range between the darkest and the lightest shades in the image 7 Default Click to reset all settings to the factory settings 8 Area Select the scan area or position you want 9 More Click to reverse image set multifeed detecti...

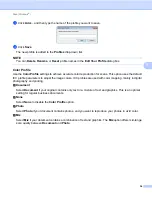
Page 69: ...S Capture and click the Profile tab c Click the Event pop up list and select an event number The Button you select from this list directly corresponds with the function numbers Function X displayed on the machine s LCD Scan a document a Confirm that the machine is connected to your computer via a USB cable b Place your document either in the ADF or on the scanner glass c Launch DS Capture d Press ...

Page 70: ...ck the DS Capture icon on your desktop c DS Capture launches d Change the scanning settings if needed For more information on changing settings see Change scan settings using the TWAIN driver on page 66 e Place your document either in the ADF or on the scanner glass f Click Scan in the DS Capture screen Your machine starts scanning The scanned image is saved in the directory you specified in the F...

Page 71: ...ically compensate the document tilt Paper tab on page 79 Remove the document base color Enhancement tab on page 86 Add a white or black edge around the border Enhancement tab on page 86 Remove small defects due to dust or scratches from a scanned image Enhancement tab on page 86 Efficient scanning See preview and check scan settings DS Capture screen overview on page 67 Save your scanner propertie...

Page 72: ...the Color Dropout tab can be set individually for the front and back of any double sided document you scan No Name Description 1 Tabs Profile Image File Color Dropout Paper Rotation Enhancement Setting Imprinter Information 2 Default Click Default to reset all settings in all tabs to factory settings 3 Scan Click Scan to start scanning 4 Exit Click Exit to close the window 5 Preview Window Click t...

Page 73: ... information see Scan using the control panel on page 64 No Name Description Default 1 Profile View all scan profiles saved in DS Capture Click a Profile to view its settings in the Description field 2 Event Select a button number from the pop up list The Button you select from this list directly corresponds with the function numbers Function X displayed on the machine s LCD 3 Description View the...

Page 74: ...appropriate image processing mode This field name changes based on your choice in the Image Selection group Dynamic Threshold Document 4 Sensitivity Threshold Change sensitivity threshold value none 5 Brightness Change brightness 0 6 Contrast Change contrast 0 7 Resolution Select resolution 200 8 Invert Reverse the brightness and the colors in the image Black on White 9 Scan Source Select a scan s...

Page 75: ... a black and white image There are several methods of performing this conversion Image Type Description Color Select Color if your original is in color and you want an exact copy Gray Select Gray if your original contains shades of gray B W Select B W if your original is typed written in pencil or written in pen Auto Detection Select Auto Detection to automatically detect and scan the front or bac...

Page 76: ... in images more legible than Halftone 1 5 above Halftone Diffusion Document Type Description Document Select Document if your original contains only text or a mixture of text and graphics This is the optimal setting for regular business documents Photo Select Photo if your original contains a photograph to reproduce it in a vivid grayscale image Normal Select Normal to adjust Brightness and Contra...

Page 77: ...mage Contrast Use the Contrast bar to adjust the range between the darkest and the lightest shades in the image The greater the value the greater the difference between light and dark Resolution Select a resolution value from the pop up list The greater the value the higher the resolution and larger the file size You can type a custom resolution value in the Resolution field Invert Use Invert to r...

Page 78: ... size you want from the pop up list Automatic Auto Crop Flatbed Only multi image output US Legal 8 5 in 14 in US Letter 8 5 in 11 in Photo 6 in 4 in Photo 5 in 3 in ISO A4 210 mm 297 mm ISO A5 148 mm 210 mm ISO A6 105 mm 148 mm ISO A7 74 mm 105 mm ISO B5 176 mm 250 mm ISO B6 125 mm 176 mm ISO B7 88 mm 125 mm JIS B5 182 mm 257 mm JIS B6 128 mm 182 mm JIS B7 91 mm 128 mm Maximum Scan Length Long Pag...

Page 79: ...ck OK To edit a profile enter the name of the profile you want to edit in the Add a New Profile dialog box and click OK Color Profile Use the Color Profile settings to achieve accurate color reproduction for scans This option uses the default ICC profile parameters to adjust the image colors ICC profiles are used with color mapping mainly in digital photography and printing Document Select Documen...

Page 80: ...h and year that is User1 December 2014 type User1 MM YYYY in the File Name field Digits Select the number of digits This setting is available when SEQ is set Sample Displays an example of your file name No Name Description Default 1 Directory Specify where you want to save scanned images Users xxx Documents where xxx is your user name 2 File Name options Specify the default file name of scanned im...

Page 81: ... image and overwrite the old one Ask User Display a dialog box that prompts you to either increase the sequence number of the new file or overwrite the old file File Format Select the file format you want from the pop up list To save multiple documents as one file select the Multi Page Output check box Scan to Select File Application E mail or Printer from the pop up list to specify where to send ...

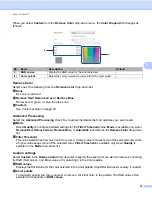
Page 82: ...r Dropout Select one of the following from the Color Dropout pop up list None No color is removed Remove Red Remove Green Remove Blue Removes red green or blue from the scan Custom Manually adjust the RGB value of the color you want to remove or select the dropout color from the preview image using Color Picker No Name Description Default 1 Color Dropout Select the color you want to remove from yo...

Page 83: ...ld is available only when Quality is selected in the Mode pop up list RGB values available when you select Custom Displays the RGB value for the color selected in the image preview window Adjust RGB values manually if needed Preview Result Click this button to preview your color dropout settings Before using this feature you must preview your image by clicking the Preview Window button Color Picke...

Page 84: ...rement displayed from the available options based on language 3 Carrier Sheet Mode Select this check box if using the Carrier Sheet not selected 4 Portrait Landscape Select your scanned document s layout Portrait 5 X Offset Y Offset Width Length Adjust the scanning area manually 6 Multi Feed Detection options Configure the options to detect documents that overlap when fed through the ADF OFF 7 Rel...

Page 85: ...to 6 in 4 in Photo 5 in 3 in ISO A4 210 mm 297 mm ISO A5 148 mm 210 mm ISO A6 105 mm 148 mm ISO A7 74 mm 105 mm ISO B5 176 mm 250 mm ISO B6 125 mm 176 mm ISO B7 88 mm 125 mm JIS B5 182 mm 257 mm JIS B6 128 mm 182 mm JIS B7 91 mm 128 mm Maximum Scan Length Long Page 236 in 5 994 mm 1 Custom 1 If scanning at 200 dpi the document length that can be scanned may vary with the resolution ...

Page 86: ...uments NOTE When you select Automatic scanned images are automatically deskewed if the images are crooked Punch Hole Removal is not available when Automatic Cropping is disabled Auto Crop Flatbed Only multi image output This option allows you to automatically scan to the multiple files when you place multiple documents on the scanner glass at the same time ...

Page 87: ...llustration Unit Select Millimeters Inches or Pixels from the pop up list The default setting is based on your OS language Carrier Sheet Mode Select this check box if using the Carrier Sheet NOTE This option is available only when Automatic is selected in the Page Size pop up list Carrier Sheet Mode is not available when using the scanner glass Portrait Landscape NOTE Landscape cannot be selected ...

Page 88: ...scanning multiple same sized documents from the ADF If you select this detection method scanning does not stop even if a multifeed is detected Ultrasonic Detection Detects overlapping pages by measuring paper thickness When this feature is selected and your machine detects a multifeed scanning stops immediately and a warning message appears on your computer monitor Stop Scanning after Multi Feed S...

Page 89: ...s CW Clockwise 180 degrees 90 degrees CCW Counter clockwise Auto based on contents If you select Auto based on contents the machine automatically rotates your document based on its contents No Name Description Default 1 Rotation Degrees Rotate the scanned image None 2 Split Image Split the scanned image horizontally or vertically None 3 Mirror Reverse the right and left sides of your image not sel...

Page 90: ...lly This is useful for documents containing an image that spans two pages because you can save both images as a single image on a single page None Horizontal Divide a single image in half horizontally Vertical Divide a single image in half vertically Mirror Select the Mirror check box to reverse the right and left sides of your image ...

Page 91: ...othen the background color None 3 Edge Fill Add a white or black edge around the border White Millimeters 0 4 Despeckle Remove small dots or speckles from the background Noise Number 0 Noise Radius 1 5 Blank Page Removal Threshold Remove any blank pages from the original document not selected 6 Barcode Detection Detect and recognize barcodes separates your multi page document whenever a barcode is...

Page 92: ...oth and Removal removes the background color Sensitivity Move the Sensitivity slider to the left or right to adjust the sensitivity to base color or background The greater the sensitivity value the better the scan results the slower the scanning speed Mode This option is available only if you select Smooth under Background Processing above Select Automatic to allow the software to process the imag...

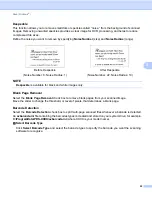
Page 93: ... edge is 105 mm half of 210 mm If you set a value greater than the maximum allowed the value automatically defaults to the maximum To disable this feature set the each value to 0 Despeckle This function allows you to remove small dots or speckles called noise from the background of scanned images Removing unwanted speckles provides a clear image for OCR processing and helps to reduce compressed fi...

Page 94: ...n check box to split multi page scanned files whenever a barcode is detected Select Barcode Types Click Select Barcode Type and select the barcode types to specify the barcode you want the scanning software to recognize NOTE This function is available only when the File Format setting on the File tab is set to PDF or TIFF and Multi Page Output is selected When you use Barcode Detection to split do...

Page 95: ...ergy Saver Power Saving Mode Move the slider to set the amount of idle time before the machine enters Power Saving Mode Power Off Time Move the slider to set the amount of idle time before the machine automatically powers off NOTE You cannot disable Enable Energy Saver Power Off Time must be greater than or equal to Energy Saver time No Name Description Default 1 Image Count Specify the number of ...

Page 96: ...ge selected 3 Custom Type the custom text to print on your scanned image none 4 Counter Change the scan counter Number such as 1234 5 Date Time Change the date time None 6 Custom Font Select a font Normal 7 Font Attributes Select a font attribute Normal 8 String Orientation Select the print direction Normal 9 Print Position Select a print position Middle 10 Sample Preview your custom text none 11 ...

Page 97: ...The number of digits specified here is displayed on the scanned image For example selecting Number 123456 causes 000001 to be shown on the first page of the scanned image 000002 on the second 000003 on the third and so forth Date Time Select Date Time or Date Time to include the date or time in your print string Click to select a date or time separator from the pop up list Custom Font Select Norma...

Page 98: ...the String Orientation pop up list to specify the text s print direction Print Position Select Top Middle Bottom or Custom from the Print Position pop up list If you select Custom enter the X Offset and Y Offset value to specify the text s start position Sample Preview your text here Normal Rotated Vertical Vertical Inversion 90 Degrees CW 90 Degrees CCW ...

Page 99: ... Size Move the slider to select font size Default 5 Density Move the slider to select font density Default 0 Transparency Move the slider to select a transparency value from 0 not transparent to 100 completely transparent This is useful when creating a partially transparent watermark ...

Page 100: ...this window Reset Roller Count After replacing the scanner rollers click the Reset button to reset the roller count NOTE Do not reset the counter unless you have replaced the rollers Language Change the language of the DS Capture user interface if needed No Name Description Default 1 Reset Roller Count Reset the roller count 2 Language Change the language of the DS Capture user interface based on ...

Page 101: ... clean any part of your Brother machine or the plastic may be permanently damaged Clean the outside of your machine To prevent dust accumulation we recommend cleaning the exterior of your Brother machine periodically Wipe the outside of the machine with a dry soft lint free cloth Maintenance 7 ...

Page 102: ...d with water NOTE In addition to cleaning the scanner glass and glass strip with a soft lint free cloth moistened with water run your finger tip over the glass to see if you can feel anything on it If you feel dirt or debris clean the glass again concentrating on that area You may have to repeat the cleaning process three or four times To test scan after each cleaning Close the document cover ...

Page 103: ...If a vertical line appears in the scanned data or if parts of the document are missing you must clean the inside of the machine a Unplug the machine from the AC power outlet b Open the Top Cover 1 and the ADF Cover 2 c In the ADF unit clean the glass strips 1 and feed rollers 2 with a soft lint free cloth moistened with water 1 2 2 1 ...

Page 104: ...of the ADF Cover and then pull the Reverse Roller Cover 2 down e Pinch the Reverse Roller 1 and pull it out of the machine f Clean the Reverse Roller with a soft lint free cloth moistened with water g Pinch the Reverse Roller and reinstall it in the machine 1 2 1 ...

Page 105: ...ly close the Reverse Roller Cover 1 until the hooks snap into the ADF Cover i Slide the document guides 1 as far apart as possible and pull the Roller Cover 2 down j Pinch the Pick up Roller and pull it out of the machine 1 2 1 ...

Page 106: ...Separation Roller down l Pinch the Separation Roller and pull it out of the machine m Clean the Pick up Roller and the Separation Roller with a soft lint free cloth moistened with water n Pinch the Separation Roller and reinstall it in the machine ...

Page 107: ...Maintenance 102 7 o Lift the blue hook that you pulled down in step k p Pinch the Pick up Roller and reinstall it in the machine q Close the Roller Cover 1 r Close the ADF Cover and the Top Cover 1 ...

Page 108: ... on it If you feel dirt or debris clean the glass again concentrating on that area You may need to repeat the cleaning process three or four times To test scan a document after each cleaning attempt When there is a spot of dirt or correction fluid on the glass strip the scanned sample shows a vertical line After the glass strip is cleaned the vertical line is gone ...

Page 109: ...rts and then replace the used parts with the new ones Supply information The following table lists part names and contains recommendations about usage and replacement NOTE Your replacement cycles may vary depending on the usage environment types of documents and scanning frequency We recommend replacing all three rollers at the same time or the roller count value will be incorrect Part Name Standa...

Page 110: ...cannot find the part you need you can order parts directly from Brother Visit us online for a complete selection of the Brother parts and supplies In USA 1 877 552 MALL 1 877 552 6255 1 800 947 1445 fax www brothermall com In Canada www brother ca Other Countries www brother com ...

Page 111: ...ADF Roller Count ADF Simplex Count or ADF Duplex Count For Macintosh a Launch DS Capture b Click the Information tab c Check ADF Roller Count ADF Simplex Count or ADF Duplex Count Replace the Rollers 7 When the machine has scanned 200 000 sheets the machine displays a message Please replace the roller and reset the roller count on your computer to remind you to replace the Rollers NOTE We recommen...

Page 112: ... on the inside of the ADF Cover and then pull the Reverse Roller Cover 2 down c Pinch the Reverse Roller 1 and pull it out of the machine d Remove the old Reverse Roller from the shaft and insert the new Reverse Roller completely onto the shaft 1 2 1 ...

Page 113: ...einstall it in the machine f Securely close the Reverse Roller Cover 1 until the hooks snap into the ADF Cover g Slide the document guides 1 as far as possible and pull the Roller Cover 2 down h Pinch the Pick up Roller and pull it out of the machine 1 2 1 ...

Page 114: ...Maintenance 109 7 i Pull the blue hook on the Separation Roller down j Pinch the Separation Roller and pull it out of the machine ...

Page 115: ... it in the machine l Lift the blue hook that you pulled down in the step i m Pinch a new Pick up Roller and reinstall it in the machine n Close the Roller Cover 1 o Close the ADF Cover and the Top Cover p Reset the counter see Reset the usage counters on page 111 1 ...

Page 116: ...r Windows a Launch DS Capture b Click Setup and then click the Information tab c Scroll down in the information window until you see Reset Roller button d Click Reset Roller Count to reset the usage counter For Macintosh a Launch DS Capture b Click the Information tab c Click Reset to reset the usage counter ...

Page 117: ...o not pack the machine correctly any damage that may occur in transit may not be covered by your warranty The machine should be adequately insured with the carrier a Close the Top Cover gently b Carefully turn the machine over Slide the transport lock switch on the reverse side to the Locked position as shown in the illustration Locked Unlocked ...

Page 118: ...Maintenance 113 7 c Wrap the machine in the bag it originally came in ...

Page 119: ...ng material as shown below NOTE USA and Canada only If you are returning your machine to Brother as part of the Exchange Service pack only the machine Keep all separate parts power cord and USB cable and printed materials to use with your Exchange machine e Close the carton and tape it shut Ṟ ṟ Ṡ Ṡ ṡ ṡ ṡ ṡ Ṣ ṣ ...

Page 120: ... Align the edges of the pages and place your document correctly and then try again Document Jam too Long The Document Guides are not set to the correct document size The settings are not suitable for your document Paper dust has accumulated on the surface of the Pick up Roller or Feed Roller Clear the document jam see Document jam on page 118 and then do the following Adjust the Document Guides to...

Page 121: ... for the machine see Document Information on page 5 DRAM R W test error A hardware error has occurred Contact Brother customer service For more information see For customer service on page 133 AFE R W test error NVRAM R W test error ADF front lamp error Ultrasonic error ADF AFE R W test error USB R W test error FlashROM R W test error AFE LVDS test error ADF AFE LVDS test error ADF rear lamp error...

Page 122: ...in Cannot find the scanner Your machine is not connected to your computer Confirm that the USB cable connecting the machine to the computer is connected correctly The machine may power off automatically if its automatic power off function is on Press the Power button to turn the machine ON Document misfeeds The document is not feeding correctly Remove the document align the pages place it carefull...

Page 123: ...om the ADF b Open the ADF Cover pulling the Cover Release Lever 1 towards you c Pull the jammed document out of the machine NOTE Check for ripped paper inside the machine Remove any ripped paper you find d Close the ADF Cover e Confirm that the pages scanned before the jam occurred are saved in the designated folder and then start scanning again at the next page or at the beginning of the document...

Page 124: ...etely by pushing it gently in the middle Configure the settings for your document correctly Clean the Rollers See Clean the inside of your machine on page 98 Stagger the pages and then load your document Make sure your document is acceptable for the machine See Acceptable documents on page 5 Load the card vertically when scanning cards Select Long Page from the Scan Area Page Size or Page Size dro...

Page 125: ...rom the ADF b Open the ADF Cover pulling the Cover Release Lever 1 towards you c Pull the multifed pages out of the machine d Close the ADF Cover e Confirm that the pages scanned before the multifeed error occurred are saved in the designated folder and then start scanning again at the next page or at the beginning of the document if necessary 1 ...

Page 126: ...per from the ADF before closing the ADF Cover To avoid future multi feeds do the following Disable the multifeed detection when scanning business cards Select the Carrier Sheet Mode check box in the Paper tab when scanning using the Carrier Sheet ...

Page 127: ...curs if a foreign object such as a paper clip or ripped paper is stuck in the machine Check the ADF slot and make sure that the slot is clear If you find foreign objects remove them from your machine My scanned image is missing The Document Guides are not adjusted to fit the width of the document Adjust the Document Guide to fit the width of the document When Cropping is set to Automatic Deskew ON...

Page 128: ...icky or has a sticky note on it which caused a multi feed Use the Carrier Sheet to scan the multifed document The document is jammed Causes may vary Open the machine s top cover and gently pull out the document Make sure no paper remains in the machine Your document is not acceptable for the machine for example if the paper is too long Make sure your document is suitable for the machine see Docume...

Page 129: ...ar on the scanned image The machine is under direct sunlight Move the machine out of direct sunlight A light source is near the machine Move the machine far away from the light source Bleed through is seen in the scanned image Your document is too thin Check that your document is acceptable see Document Information on page 5 The contrast setting is incorrect Increase the contrast level For Windows...

Page 130: ... been given administrator privileges From the Apple menu select System Preferences System Users Groups The left pane of the window lists the current accounts one of which should be your name with the word Admin below If this is not the case contact your system administrator The file size is too large The physical size of the document and the amount of text graphics on each page affect the resultin...

Page 131: ...dix A A PDS 5000F PDS 6000F Memory Capacity Standard 512 MB Power Source 100 240 V AC 50 60 Hz 24 V DC 2 A LCD Liquid Crystal Display 16 characters 2 lines Power Consumption 1 Scanning 53 W Ready 17 6 W Power Saving 2 7 W Power OFF 0 3 W ...

Page 132: ...umidity Operating 20 to 80 Storage 10 to 90 ADF Automatic Document Feeder Up to 100 pages Paper 20 lb 80 g m2 PDS 5000F PDS 6000F 318 mm 12 52 in 263 mm 10 35 in 332 mm 13 07 in 476 mm 18 74 in 323 mm 12 72 in 323 mm 12 72 in 613 mm 24 13 in 613 mm 24 13 in 211 mm 8 31 in 263 mm 10 35 in 613 mm 24 13 in ...

Page 133: ...idth 2 0 in to 8 58 in 51 mm to 218 mm Length 2 13 in to 14 0 in 54 mm to 356 mm Single Paper Width 2 0 in to 8 58 in 51 mm to 218 mm Length 1 sided scan 2 13 in to 236 0 in 54 mm to 5 994 mm 2 2 sided scan 2 13 in to 14 0 in 54 mm to 356 mm Flatbed Width Maximum 8 5 in 216 mm Length Maximum 14 0 in 356 mm PDS 5000F PDS 6000F ...

Page 134: ... SP3 Windows Vista Windows 7 8 8 1 10 Color Depth Input 48 bit color processing Output 24 bit color processing Resolution Optical Up to 600 600 dpi Interpolated Up to 600 600 dpi Scanning Width Up to 216 mm Gray Scale 8 bit Scanning Max Speed 2 Mono 60 ppm 200 300 dpi 15 ppm 600 dpi 80 ppm 200 300 dpi 20 ppm 600 dpi Color 60 ppm 200 300 dpi 15 ppm 600 dpi 80 ppm 200 300 dpi 20 ppm 600 dpi Duplex S...

Page 135: ...fault setting displayed on your Brother machine s LCD is based on the connected computer s OS language If the OS language is not one of the supported languages as listed in the table above the LCD displays English USB SuperSpeed USB 3 0 1 2 Use a USB 3 0 cable Type B that is no more than 1 8 meters long Display Languages English French German Italian Spanish Portuguese Dutch Norwegian Swedish Dani...

Page 136: ... 1 GB 2 GB 50 MB 1 5 GB USB Windows XP Professional x64 Edition SP3 64 bit Intel 64 or AMD64 supported CPU 1 GB 2 GB Windows Vista Intel Core 2 Duo or equivalent 64 bit Intel 64 or AMD64 supported CPU 1 GB 2 GB Windows 7 Intel Core 2 Duo or equivalent 64 bit Intel 64 or AMD64 supported CPU 1 GB 32 bit 2 GB 64 bit 2 GB 32 bit 4 GB 64 bit Windows 8 8 1 Intel Core i3 or equivalent 64 bit Intel 64 or ...

Page 137: ...p us notify you of enhancements to your product and special offers The most convenient and efficient way to register your new product is online at www brother com registration Frequently Asked Questions FAQs The Brother Solutions Center is our one stop resource for all your Brother machine needs You can download the latest software documents and utilities read FAQs and troubleshooting tips and lea...

Page 138: ... 1215 fax In Canada www brother ca support Self Service Videos Email Chat Facebook and Twitter Help If you have comments or suggestions please write us at In USA Printer Customer Support Brother International Corporation 7905 North Brother Boulevard Bartlett TN 38133 In Canada Brother International Corporation Canada Ltd Marketing Dept 1 Rue Hotel de Ville Dollard des Ormeaux PQ Canada H9B 3H6 Oth...

Page 139: ...ee For customer service on page 133 Company name NewSoft America Inc Postal Address 47102 Mission Falls Court Suite 202 Fremont CA 94539 Telephone 510 770 8900 Fax 510 770 8980 E mail Address contactus newsoftinc com URL www newsoftinc com E mail Address contactus newsoftinc com E mail Address tech newsoft eu com ...

Reviews: