


15
Ch. 3 Funciones
Fu
nc
ion
es
Alt Modo (
a
)
Los caracteres acentuados o los signos de
puntuación especiales del lado derecho de las
teclas se pueden añadir al texto mediante el
modo Alt. Para entrar o salir del modo Alt, pulse
a
. Aparecerá el indicador
Alt
en el lado
izquierdo de la pantalla mientras se pulsa
a
.
Para añadir en el texto un carácter
acentuado o signos de puntuación especiales
escritos en color:
1
Mantenga pulsada
a
. Aparecerá el
indicador
Alt
.
2
Pulse la tecla del carácter correspondiente.
Tecla Return (
n
)
Como en una máquina de escribir o un
procesador de textos, la tecla Return (
n
) de esta
máquina se usa para terminar una línea de texto y
empezar otra. Cuando haya acabado de escribir
una línea, pulse la tecla de retorno para crear una
línea nueva y desplazar el cursor hasta ella.
El número de líneas de texto que se pueden
imprimir varía en función de la anchura de la
cinta.
Para las cintas TZ:
Para etiquetas AV:
Para crear una línea nueva:
●
Pulse
n
. La marca de retorno (
) aparece
al final de la línea.
New Block Función (
d
+
n
)
Para que una sección del texto tenga un número
de líneas diferente que otras secciones del texto
o para aplicar un formato diferente a una
sección del texto (consulte
Funciones de
formato de bloque
en la página 21.), se tiene
que crear un bloque de texto nuevo mediante la
función New Block.
NOTA
Para salir del modo Alt en cualquier momento
,
suelte
a
. El indicador
Alt
desaparece.
NOTA
Un bloque de texto sólo puede contener un
máximo de 16 líneas de texto. Si ya se ha escrito el
número máximo de líneas de texto, cuando se
pulse
n
aparecerá el mensaje de error “16 LINE
LIMIT”.
Length
Margin
Font
Width
Size
1
2
3
4
5
6
7
8
9
A
B
C
D
E
F
K
Q
Q
Q
Q
Q
Q
Q
Q
Q
Q
Q
Q
Q
Q
Q
Q
Q
Q
Q
Q
Q
Q
Q
Q
R
R
R
R
R
R
G
H
I
J
L
M
NO
AUTO
1.10
HELSINKI
A
AUTO
<<< P-touch >>>
1:_
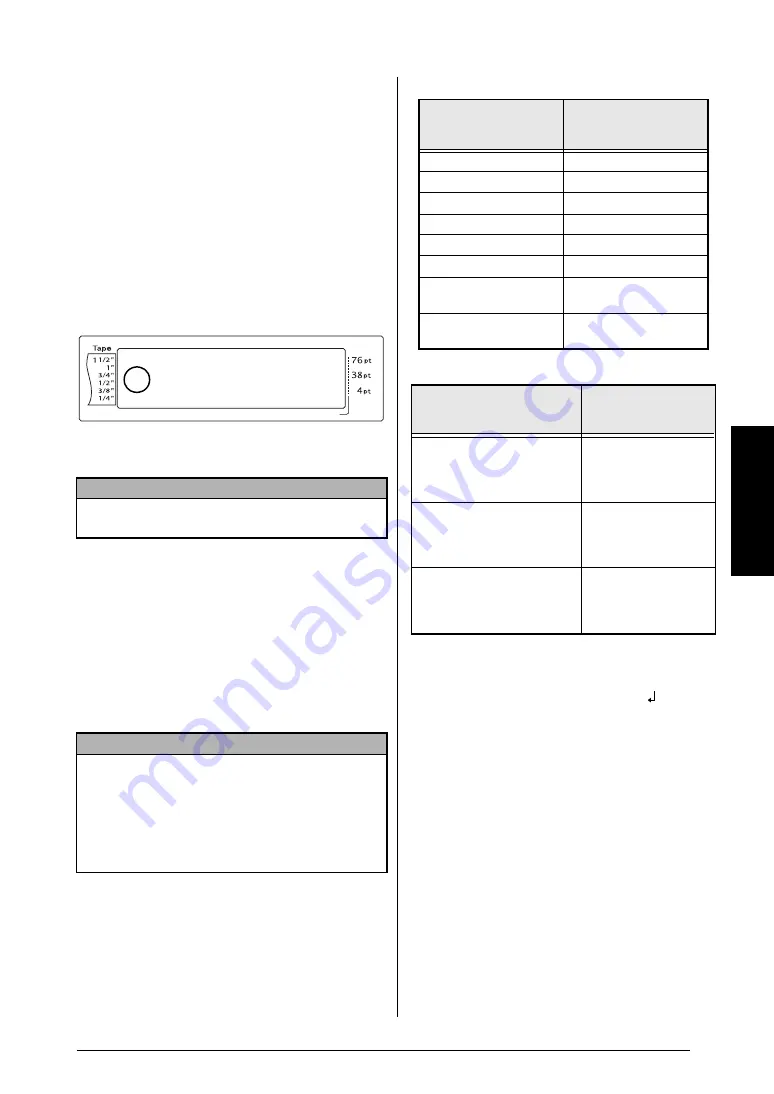
Anchura de la cinta
Máximo número de
líneas que se pueden
imprimir
1/4 pulgadas
(6 mm)
3
3/8 pulgadas
(9 mm)
4
1/2 pulgadas
(12 mm)
6
3/4 pulgadas
(18 mm)
10
1 pulgada
(24 mm)
13
1 1/2 pulgadas (36 mm)
16
Sello 3/4 pulgadas
(18 mm)
6
Sello 1 de pulgada
(24 mm)
10
Tamaños de etiquetas
Máximo número de
líneas que se pueden
imprimir
Etiquetas de direcciones
AV2067:
3/4 de pulgada
×
2 5/8
pulgadas (20 mm
×
67 mm)
10
Etiquetas de direcciones de
remitente AV1957:
3/4 de pulgada
×
2 1/4
pulgadas (19 mm
×
57 mm)
9
Etiquetas de carpetas de
archivos AV1789:
5/8 de pulgada
×
3 1/2
pulgadas (17 mm
×
89 mm)
8
Summary of Contents for P-touch PT-9600
Page 14: ...vi ...
Page 15: ...1 Ch 1 Before You Start Before You Start Chapter 1 Before You Start ...
Page 19: ...5 Ch 2 Getting Started Getting Started Chapter 2 Getting Started ...
Page 24: ...10 Ch 2 Getting Started Getting Started ...
Page 25: ...11 Ch 3 Functions Functions Chapter 3 Functions ...
Page 61: ...47 Ch 4 Advanced Functions Advanced Functions Chapter 4 Advanced Functions ...
Page 80: ...66 Ch 4 Advanced Functions Advanced Functions ...
Page 81: ...67 Ch 5 Machine Adjustments Machine Adjustments Chapter 5 Machine Adjustments ...
Page 96: ...82 MACHINE SPECIFICATIONS ...
Page 97: ...83 Appendix Appendix Appendix ...
Page 118: ...104 V Vertical text style 26 W Width function 24 WIDTH parameter 17 ...
Page 120: ......
Page 121: ...GUÍA DE USUARIO ...
Page 131: ...1 Ch 1 Antes de empezar Antes de empezar Capítulo 1 Antes de empezar ...
Page 135: ...5 Ch 2 Introducción general Introducción general Capítulo 2 Introducción general ...
Page 140: ...10 Ch 2 Introducción general Introducción general ...
Page 141: ...11 Ch 3 Funciones Funciones Capítulo 3 Funciones ...
Page 177: ...47 Ch 4 Funciones avanzadas Funciones avanzadas Capítulo 4 Funciones avanzadas ...
Page 197: ...67 Ch 5 Ajustes de la máquina Ajustes de la máquina Capítulo 5 Ajustes de la máquina ...
Page 213: ...83 Apéndice Apéndice Apéndice ...
Page 235: ...Printed in China LW5539001 ...


