background image

9

Continue with the procedure in 

Installing the

printer driver below.

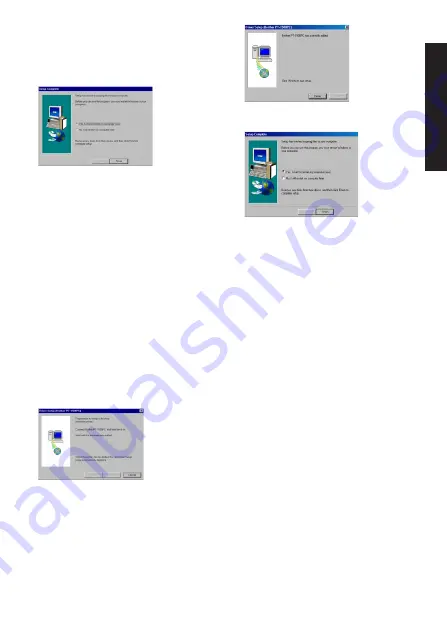
If the printer driver is already installed, click
the No button. A dialog box appears,
showing that installation is finished.

Select “Yes, I want to restart may computer
now.”, click the Finish button to restart the
computer, and then remove the CD-ROM
from the CD-ROM drive.

Installing the printer driver

With Plug-and-Play, new devices connected to the
system are detected, and their drivers are auto-
matically installed. Since the PT-1500PC will be
connected through the USB port, its driver will be
installed with Plug-and-Play. Be sure to read the
installation instructions described below before
installing the printer driver supplied on the CD-
ROM.
Be sure not to connect the PT-1500PC until you
are instructed to do so.

1

Click the Next button. A dialog box appears,
instructing you to connect the PT-1500PC to
the computer.

2

Connect the PT-1500PC to the computer
using the enclosed USB interface cable as
described on page 5, and then turn on the
PT-1500PC. A dialog box appears, showing
that the printer driver has been installed.

3

Click the Finish button. A dialog box
appears, showing that installation is finished.

4

Select “Yes, I want to restart my computer
now.”, click the Finish button to restart the
computer, and then remove the CD-ROM
from the computer.

Reading the User’s Guide

The P-touch Editor User’s Guide can be viewed
either by inserting the CD -ROM into the drive
each time you wish to refer to it or by installing it
onto your hard disk so that it is quickly available
at any time. Since the User’s Guide is an HTML
document, a browser is needed to read it.
• From the CD-ROM:

1

Start up Windows Explorer.

2

Select the CD-ROM drive.

3

Double-click “Main.htm” in the Manual
folder within the Ptouch folder on the
CD-ROM.

• From the P-touch Editor 3.1 group window:

Double-click The User’s Guide P-touch
Editor Ver3.1 icon.

• With the Start button:

1

Click the Start button in the taskbar to
display the Start menu.

2

Select “Programs”.

3

Select “P-touch Editor 3.1”.

4

Click “The User’s Guide P-touch Editor
Ver3.1”.

For W

indows®

Summary of Contents for P-touch PT-1500PC

Page 1: ...1500PC Quick Reference Guide de référence rapide Model PT 1500PC ...

Page 2: ......

Page 3: ...Quick Reference Quick Reference E N G L I S H ...

Page 4: ...ing applications are available on the enclosed CD ROM The easy to use P touch Quick Editor software allows text to be entered and formatted quickly so that simple labels can be printed instantly The more advanced P touch Editor Ver 3 1 application not only automates complex layout functions but it also includes a variety of pre formatted templates for immediate use Canadian Department of Communica...

Page 5: ...g P touch Editor Ver 3 1 13 Selecting the driver 14 Reading the User s Guide 14 Uninstalling the software and printer driver 14 Starting up the P touch Editor Ver 3 1 software 15 Starting up P touch Editor Ver 3 1 15 Starting up the P touch Quick Editor software 16 Starting up P touch Quick Editor 16 Using P touch Quick Editor 16 Specifying a label size 16 Entering text 17 Importing text 17 Using ...

Page 6: ...id the warranty Use only the enclosed USB interface cable Use of any other cable will void the warranty When the machine is not being used for a long period of time disconnect the AC adapter Do not try to disassemble the P touch IBM is a trademark of International Business Machines Inc Microsoft and Microsoft Windows are registered trademarks of Microsoft Corp in the US and other countries Macinto...

Page 7: ...ssette may be damaged If the label is attached to a wet or dirty surface it may easily peel off Before affixing the label clean the surface where it will be attached Depending on the environmental conditions and the material condition roughness and shape of the affixing surface the label may move out of place or peel off In order to test the label s adhesive strength or before using this label whe...

Page 8: ...ape cassette firmly into the tape compartment making sure that the entire back of the cassette touches the bottom of the compartment When inserting the tape cassette make sure that the ink ribbon does not catch on the corner of the metal guide 5 Securely close the tape compartment cover by pressing down on the textured area of the cover near the tape exit slot Tape cassette Tape separator Connecti...

Page 9: ...r on the enclosed USB interface cable into the USB port on the computer 2 Insert the square connector on the enclosed USB interface cable into the USB port on the PT 1500PC When making a USB connection through a hub a proper connection may not be possible due to the type of hub used If printing is not possible with a hub connection try connecting the PT 1500PC directly to the computer using the US...

Page 10: ... In addition printing requires power user or administrator privileges This software cannot be operated in Users groups Installing P touch Quick Editor The P touch Quick Editor software provides quick access to the more simple label designing features for easy text input and instant printing of labels Install the P touch Quick Editor software on a PC as described below 1 Insert the enclosed CD ROM ...

Page 11: ...To change the information click the No button and then return to step 4 The Choose Destination Location dialog box appears 7 Click the Next button to begin installation 8 After P touch Quick Editor is installed a dialog box appears allowing you to select where the shortcut to P touch Quick Editor will be added page 16 9 Select the desired location for the shortcut and then click the Next button A ...

Page 12: ... touch Editor Ver 3 1 software starts up and then the Welcome dialog box appears 4 Follow the instructions that appear and continue with the installation During installation the following installation methods will be available Typical All of the basic options P touch Editor Ver 3 1 clip art Auto Format templates Help and 13 fonts are installed Compact Only P touch Editor Ver 3 1 is installed Custo...

Page 13: ...enclosed USB interface cable as described on page 5 and then turn on the PT 1500PC A dialog box appears showing that the printer driver has been installed 3 Click the Finish button A dialog box appears showing that installation is finished 4 Select Yes I want to restart my computer now click the Finish button to restart the computer and then remove the CD ROM from the computer Reading the User s G...

Page 14: ...the No button 6 In the dialog box that appears indicating that the application is deleted click the OK button Replacing deleting or adding another printer driver 1 Turn off the PT 1500PC and then disconnect it from the computer 2 Insert the enclosed CD ROM into the computer s CD ROM drive A dialog box automatically appears allowing you to select the language If the dialog box does not automaticall...

Page 15: ...1500PC or Add Brother PT 1500PC was selected A dialog box appears instructing you to connect the PT 1500PC to the computer Connect the PT 1500PC to the computer using the enclosed USB interface cable as described on page 5 and then turn on the PT 1500PC A dialog box appears showing that the printer driver has been installed Select Yes restart immediately and then click the Finish button to restart...

Page 16: ...able hard disk space is needed If enough hard disk space is available click the Install button Clicking the Custom Install button displays a dialog box that allows you to select which options to install For Macintosh users Before labels can be printed on the PT 1500PC label designing software and the PT 1500PC printer driver must be installed In order to design labels that can be printed on the PT...

Page 17: ...cintosh 3 Insert the enclosed CD ROM into the computer s CD ROM drive A folder opens allowing you to view the contents of the CD ROM 4 Double click the P touch Editor Ver3 1 folder to open it 5 Double click the P touch Editor 3 1 Installer icon in the folder The installer starts up 6 Select the installation method Clicking the Install button immediately starts installing the most basic options Som...

Page 18: ... Editor Ver3 1 folder on the CD ROM With the Start button Double click Main htm in the User s Guide folder within the P touch Editor Ver3 1 folder installed on the hard disk Uninstalling the software and printer driver Uninstall P touch Quick Editor P touch Editor Ver3 1 and the printer driver as described below When deleting the printer driver be sure that the P touch is turned off and unplugged ...

Page 19: ...indow is displayed For more details on the functions of P touch Editor Ver 3 1 refer to its User s Guide which can either be installed on the computer or viewed from the CD ROM Menu bar Standard toolbar Property dock Layout area Print area Object dock Title bar Rulers Cursor Status bar Draw toolbar Menu bar Draw toolbar Print toolbar Database toolbar Status bar Object dock Property dock Rulers Lay...

Page 20: ...of the label view until the layout is the desired size Starting up the P touch Quick Editor software Starting up P touch Quick Editor When P touch Quick Editor is installed on a PC you can choose to add shortcuts to the desktop the StartUp menu and to the Quick Launch toolbar On an IBM PC compatible computer If a shortcut was added to the StartUp menu P touch Quick Editor automatically starts up w...

Page 21: ... size style and alignment In addi tion a frame can be drawn around the text 1 Click the arrow beside the Properties button to display a drop down menu 2 Click Text Settings to display various text format settings The Text Settings can also be displayed by selecting View Properties then clicking Text Settings in the pop up menu displayed by right clicking Windows or holding down the Control key and...

Page 22: ... print options appears On the Macintosh this dialog box can also be displayed by just clicking the Print button 3 Select the desired print settings Cut Marks This option allows you to select whether or not to print cut marks which indicate where to cut the label so that the left and right margins are equal Mirror Printing This option allows you to print the text in reverse so it can be attached to...

Page 23: ...es the PT 1500PC may stop printing for a short while in order for the print head to cool down Printing will continue once the print head has sufficiently cooled down To feed out extra tape hold down the Power Feed key for a few seconds Fe ed Removing the label backing The enclosed tape separator enables you to easily remove the backing from labels printed on laminated tape 1 Hold the tape in your ...

Page 24: ...ler A blank horizontal line appearing through the printed label indicates that the print head and roller are dirty Clean the print head and roller according to the following procedure 1 Turn off the PT 1500PC 2 Open the tape compartment cover 3 Remove the tape cassette if one is installed Print head 4 Use a dry cotton swab to gently wipe up and down along the print head and roller Caution Be caref...

Page 25: ...ssette A transmission error occurred Press the power feed key to turn the PT 1500PC off then on again The tape cutter button was pressed while printing Try printing again An EEPROM error occurred Contact your service representative The print head is cooling down Wait until printing continues Cleaning the tape cutter After a while adhesive may accumulate on the cutter preventing it from cutting or ...

Page 26: ...t up or flash con tact your service representative Clean the print head and roller according to the procedure in Cleaning the print head and roller on page 20 Windows Under Print to the following port in the printer Properties dialog box select PTUSB for the USB connection Mac Select in the Chooser the PT 1500PC where the P touch is connected Problem solving If you think the P touch is not printin...

Page 27: ... 1 2 12 mm TZ131 Black Characters on Clear Adhesive 1 19 99 TZ231 Black Characters on White Adhesive 1 20 99 TZM31 Black Characters on Clear Mat Adhesive 1 20 99 TZ431 Black Characters on Red Adhesive 1 20 99 TZ531 Black Characters on Blue Adhesive 1 20 99 TZ631 Black Characters on Yellow Adhesive 1 20 99 TZ731 Black Characters on Green Adhesive 1 20 99 TZ132 Red Characters on Clear Adhesive 1 19 ...

Page 28: ...TZS211 Industrial Strong Adhesive Black Characters on White Adhesive 1 19 99 Non laminated tapes Stock No Description QTY PACKAGE PRICE 3 4 18 mm TZN641 Black Characters on Yellow Adhesive 1 21 99 TZN541 Black Characters on Blue Adhesive 1 21 99 TZNF41 Black Characters on Purple Adhesive 1 21 99 1 2 12 mm TZN631 Black Characters on Yellow Adhesive 1 17 99 TZN531 Black Characters on Blue Adhesive 1...

Page 29: ...rCard number and expiration date available Supply Accessory Total All Residents of Canada Please add G S T applicable sales taxes G S T P S T P S T Shipping Handling 5 00 TOTAL DUE G S T R100663764 P S T 100100117TQ0001 Prices subject to change without notice ACCESSORY ORDER FORM This order form is provided for your convenience should your retailer not stock the item s needed or if you prefer to o...

Page 30: ......

Page 31: ...rCard number and expiration date available Supply Accessory Total All Residents of Canada Please add G S T applicable sales taxes G S T P S T P S T Shipping Handling 5 00 TOTAL DUE G S T R100663764 P S T 100100117TQ0001 Prices subject to change without notice ACCESSORY ORDER FORM This order form is provided for your convenience should your retailer not stock the item s needed or if you prefer to o...

Page 32: ......

Page 33: ...Guide de référence rapide Guide de référence rapide FRANÇAIS ...

Page 34: ...tage spéciaux Les deux applications de conception d étiquettes sont enregistrées sur le CD ROM Le logiciel P touch Quick Editor facile à utiliser vous permet d écrire un texte et d effectuer un formatage rapide de façon à imprimer instantanément des étiquettes simples L application P touch Editor Ver 3 1 plus perfectionnée permet non seulement d automatiser les fonctions de page complexes mais éga...

Page 35: ...12 Installation de P touch Editor Ver 3 1 13 Sélection de l imprimante 14 Consultation du mode d emploi 14 Désinstallation du logiciel et du pilote d imprimante 14 Lancement du logiciel P touch Editor Ver 3 1 15 Lancement de P touch Editor Ver 3 1 15 Lancement du logiciel P touch Quick Editor 16 Lancement de P touch Quick Editor 16 Utilisation de P touch Quick Editor 16 Réglage de la taille de l é...

Page 36: ...eur annulerait la garantie Utilisez uniquement le câble d interface USB fourni L utilisation d un autre câble annulerait la garantie Si vous ne prévoyez pas d utiliser l appareil pendant un certain temps débranchez l adaptateur secteur N essayez pas de démonter la P touch IBM est une marque de International Business Machines Inc Microsoft et Microsoft Windows sont des marques déposées de Microsoft...

Page 37: ...sur une surface humide ou sale elle risque de se décoller facilement Avant de fixer l étiquette nettoyez la surface où vous allez la coller Selon les conditions de l environnement et le matériau l état la rugosité et la forme de la surface de fixation il est possible que l étiquette se déplace ou se décolle Pour vérifier la force d adhérence de l étiquette ou avant d utiliser l étiquette sur un en...

Page 38: ...ans le logement de ruban en veillant à ce que tout le dos de la cassette touche bien le fond du logement Lorsque vous insérez la cassette de ruban veillez à ce que le ruban ne soit pas pris sur le coin du guide métallique 5 Refermez le couvercle du logement de ruban à fond en appuyant sur la section hachurée du couvercle près de la fente de sortie du ruban Cassette de ruban Séparateur de cassette ...

Page 39: ...face USB fourni dans le port USB de l ordinateur 2 Insérez le connecteur carré du câble d interface USB fourni dans le port USB de la PT 1500PC Si vous faites le raccordement USB via un concentrateur le raccordement peut ne pas être correct en fonction du type de concentrateur Si l impression n est pas possible avec un raccordement par concentrateur essayez de raccorder la PT 1500PC directement à ...

Page 40: ... de puissance Ce logiciel ne peut pas fonctionner dans des groupes d utilisateurs Installation de P touch Quick Editor Le logiciel P touch Quick Editor assure un accès rapide aux fonctions de conception d étiquette les plus simples permettant une entrée de texte et une impression instantanée des étiquettes Installez le logiciel P touch Quick Editor sur le PC en procédant de la manière suivante 1 I...

Page 41: ...ton Non puis revenez à l étape 4 La boîte de dialogue Sélection du dossier d installation s affiche 7 Cliquez sur le bouton Suivant pour commencer l installation 8 Lorsque P touch Quick Editor est installé une boîte de dialogue s affiche pour vous permettre de sélectionner où ajouter le raccourci d accès à P touch Quick Editor page 16 9 Sélectionnez l emplacement du raccourci et cliquez sur le bou...

Page 42: ...Ver 3 1 est lancé puis la boîte de dialogue Bienvenue s affiche 4 Suivez les instructions qui s affichent et continuez l installation Pour l installation vous avez plusieurs méthodes au choix Typique Toutes les options de base P touch Editor Ver 3 1 Clip Art Modèles auto formatés Aide et 13 polices de caractères sont installées Compacte Seul P touch Editor Ver 3 1 est installé Personnalisée Editeu...

Page 43: ...ez la PT 1500PC sous tension Une boîte de dialogue s affiche pour vous informer que le pilote d imprimante est installé 3 Cliquez sur le bouton Terminer Une boîte de dialogue s affiche pour vous indiquer que l installation est terminée 4 Sélectionnez Oui je veux redémarrer mon ordinateur maintenant cliquez sur le bouton Terminer pour redémarrer l ordinateur et enlevez le CD ROM de l ordinateur Con...

Page 44: ...n Non 6 Dans la boîte de dialogue qui apparaît pour vous indiquer que l application est supprimée cliquez sur le bouton OK Remplacement suppression ou ajout d un autre pilote d imprimante 1 Mettez la PT 1500PC hors tension puis débranchez la de l ordinateur 2 Insérez le CD ROM fourni dans le lecteur de CD ROM de l ordinateur Une boîte de dialogue s affiche automatiquement pour vous permettre de sé...

Page 45: ...other PT 1500PC Une boîte de dialogue s affiche pour vous inviter à raccorder la PT 1500PC à l ordinateur Raccordez la PT 1500PC à l ordinateur à l aide du câble d interface USB fourni comme expliqué à la page 5 puis mettez la PT 1500PC sous tension Une boîte de dialogue s affiche pour vous informer que le pilote d imprimante est installé Sélectionnez Oui redémarrer immédiate ment et cliquez sur l...

Page 46: ... suffisamment d espace sur le disque dur cliquez sur le bouton Install Si vous cliquez sur le bouton Custom Install une boîte de dialogue s affiche pour vous permettre de sélectionner quelles options installer Pour les utilisateurs d un Macintosh Pour pouvoir imprimer des étiquettes sur la PT 1500PC il faut que le logiciel de conception d étiquettes et le pilote d imprimante soient installés Pour ...

Page 47: ...dinateur étant hors tension raccordez la PT 1500PC au Macintosh à l aide du câble d interface USB fourni Laissez bien la PT 1500PC hors tension 2 Mettez le Macintosh sous tension 3 Insérez le CD ROM fourni dans le lecteur de CD ROM de l ordinateur Un dossier s ouvre pour vous permettre de voir le contenu du CD ROM 4 Double cliquez sur le dossier P touch Editor Ver3 1 pour l ouvrir 5 Double cliquez...

Page 48: ...nt un document au format HTML vous aurez besoin d un moteur de recherche pour le lire Sur le CD ROM Double cliquez sur Main htm dans le dossier Mode d emploi à l intérieur du dossier P touch Editor Ver 3 1 sur le CD ROM Avec le bouton Démarrer Double cliquez sur Main htm dans le dossier Mode d emploi à l intérieur du dossier P touch Editor Ver 3 1 sur le disque dur Désinstallation du logiciel et d...

Page 49: ... sur les fonctions de P touch Editor Ver 3 1 voyez le mode d emploi que vous pouvez soit installer dans l ordinateur soit consulter sur le CD ROM Barre de menus Barre de tâches standard Ancrage de propriété Zone de page Zone d impression Ancrage d objets Barre de titres Règles Curseur Barre d état Barre de tâches de dessin Sur un ordinateur Macintosh Double cliquez sur l icône P touch Editor Ver 3...

Page 50: ... les bords de l étiquette dans la zone d affichage jusqu à ce que vous obteniez la taille de page voulue Lancement de P touch Quick Editor Si vous avez installé P touch Quick Editor sur votre ordinateur vous pouvez ajouter des raccourcis vers le poste de travail le menu Démarrer et la barre d outils Quick Launch Sur un ordinateur compatible IBM PC Si vous avez ajouté un raccourci vers le menu Déma...

Page 51: ...pouvez tracer un cadre tout autour du texte 1 Cliquez sur la flèche à côté du bouton Propriétés pour afficher un menu déroulant 2 Cliquez sur Réglages du texte pour afficher différents paramètres de formatage du texte Vous pouvez également afficher les Réglages du texte en sélectionnant Afficher propriétés puis en cliquant sur Réglages du texte dans le menu déroulant qui s affiche avec un clic dro...

Page 52: ...t Sur le Macintosh vous pouvez également afficher cette boîte de dialogue en cliquant sur le bouton Print 3 Sélectionnez les paramètres d impression Repères de découpage Cette option vous permet de sélectionner si vous voulez imprimer ou non des repères de découpage qui indiquent l endroit où couper l étiquette pour que les marges gauche et droite soient égales Impression miroir Cette option vous ...

Page 53: ...rdinateur 2 Démarrez P touch Quick Editor ou P touch Editor Ver 3 1 et vérifiez que la PT 1500PC est bien sélectionnée comme imprimante 3 Concevez l étiquette 4 Cliquez sur la commande Imprimer dans l application sélectionnez les paramètres d impression puis cliquez sur le bouton Imprimer L indicateur d état de la PT 1500PC clignote pendant la réception des données Lorsque l impression de l étique...

Page 54: ...igne horizontale blanche qui apparaît sur l étiquette imprimée signifie que la tête d impression et le rouleau sont sales Nettoyez la tête d impression et le rouleau en procédant de la façon suivante 1 Mettez la PT 1500PC hors tension 2 Ouvrez le couvercle du logement du ruban 3 Retirez la cassette de ruban s il y en a une 4 Utilisez un coton tige sec pour essuyer délicatement et de haut en bas la...

Page 55: ...ssion Cliquez sur la touche d alimentation avance pour mettre la PT 1500PC hors tension puis à nouveau sous tension Vous avez appuyé sur la touche de couteau du ruban pendant l impression Recommencez l impression Il s est produit une erreur EEPROM Contactez votre service après vente La tête d impression est en train de refroidir Attendez que l impression reprenne Nettoyage du couteau du ruban Au b...

Page 56: ...ation ne s allume toujours pas contactez votre service après vente Nettoyez la tête d impression et le rouleau en procédant comme indiqué dans Nettoyage de la tête d impression et du rouleau à la page 20 Windows Sous Imprimer par le port suivant de la boîte de dialogue Propriétés de l imprimante sélectionnez PTUSB pour le raccordement USB Mac Sélectionnez dans le Sélecteur la PT 1500PC à laquelle ...

Page 57: ...aractères noirs sur ruban clair 1 19 99 TZ231 Caractères noirs sur ruban blanc 1 20 99 TZM31 Caractères noirs sur ruban clair mat 1 20 99 TZ431 Caractères noirs sur ruban rouge 1 20 99 TZ531 Caractères noirs sur ruban bleu 1 20 99 TZ631 Caractères noirs sur ruban jaune 1 20 99 TZ731 Caractères noirs sur ruban vert 1 20 99 TZ132 Caractères rouges sur ruban clair 1 19 99 TZ135 Caractères blancs sur ...

Page 58: ...5 Caractères blancs sur ruban noir 1 20 99 TZS211 Industriel à adhérence spéciale caractères noirs sur ruban blanc 1 19 99 Ruban non laminé N de stock Description Qté Paquet Prix 18 mm 3 4 po TZN641 Caractères noirs sur ruban jaune 1 21 99 TZN541 Caractères noirs sur ruban bleu 1 21 99 TZNF41 Caractères noirs sur ruban violet 1 21 99 12 mm 1 2 po TZN631 Caractères noirs sur ruban jaune 1 17 99 TZN...

Page 59: ...rte Visa ou MaterCard de même la date d éxpiration Total Fournitures Accessoires Tous les résidents du Canada doivent TPS ajouter les taxes de ventes applicables TPS et TVP TVP Expédition Manutention 5 MONTANT DÛ TPS No R100663764 TVP No 100100117TQ0001 Les prix sont sujets à changements sans préavis BON DE COMMANDE POUR LES ACCESSOIRES Veuillez faire parvenir ce bon de commande à vos clients conc...

Page 60: ......

Page 61: ...rte Visa ou MaterCard de même la date d éxpiration Total Fournitures Accessoires Tous les résidents du Canada doivent TPS ajouter les taxes de ventes applicables TPS et TVP TVP Expédition Manutention 5 MONTANT DÛ TPS No R100663764 TVP No 100100117TQ0001 Les prix sont sujets à changements sans préavis BON DE COMMANDE POUR LES ACCESSOIRES Veuillez faire parvenir ce bon de commande à vos clients conc...

Page 62: ......

Page 63: ......

Page 64: ...Printed in China Imprimé en Chine LA6475001 ...

Reviews: