background image

Changing the P-touch Labelling Machine Settings 

81

6

Using the Printer Setting Tool for Windows

®

6

a

Connect the machine you want to configure to the computer.

b

Start the Printer Setting Tool.

For Windows Vista

®

 / Windows

®

7 / Windows Server

®

 2008 / Windows Server

®

 2008 R2

From the Start button, click [

All Programs

] - [

Brother

] - [

Label & Mobile Printer

] - [

Printer Setting 

Tool

].

For Windows

®

8 / Windows

®

8.1 / Windows Server

®

 2012 / Windows Server

®

 2012 R2

Click the [

Printer Setting Tool

] icon on the [

Apps

] screen.

For Windows

®

 10:


From the Start button, select [

All apps

], and then click [

Brother

] - [

Label & Mobile Printer

] - [

Printer 

Setting Tool

].

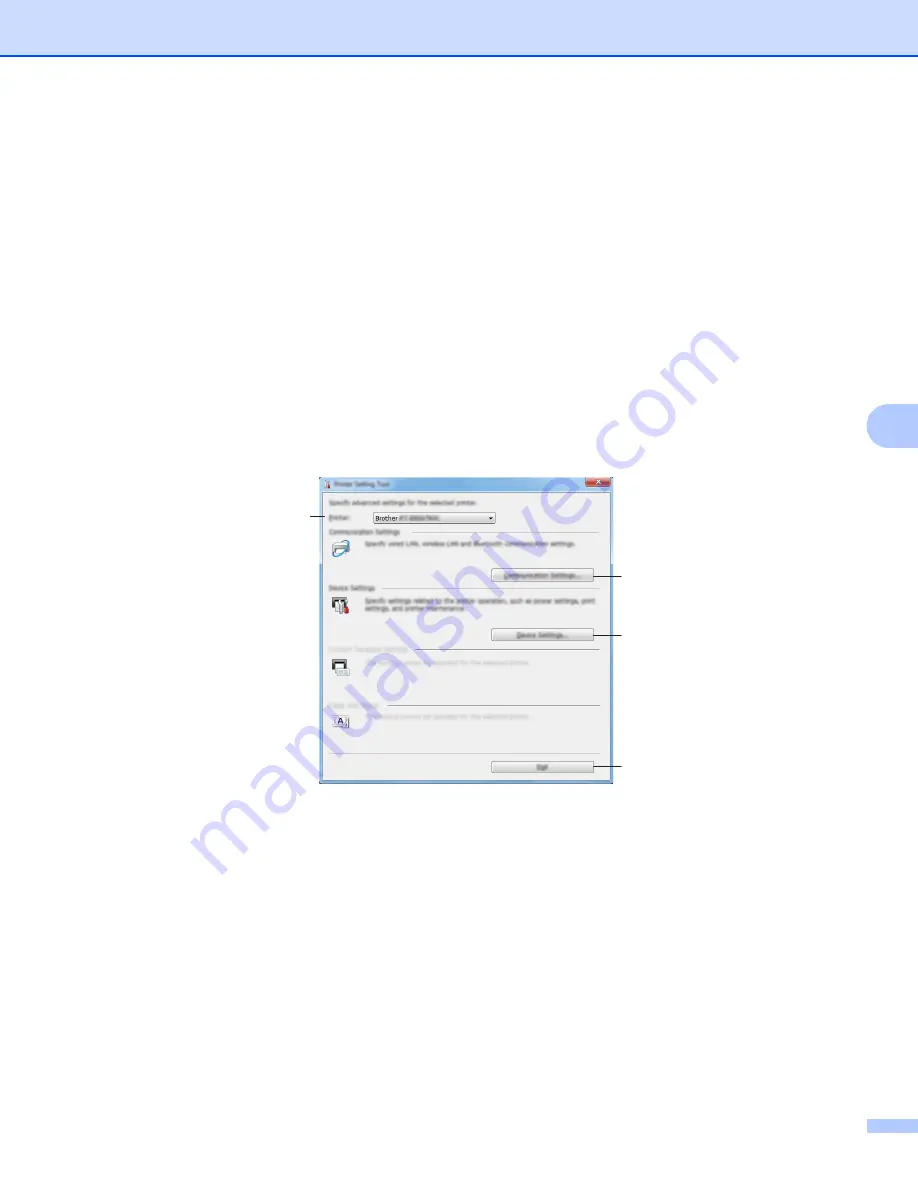
The main window appears.


1 Printer

Lists the connected machines.

2 Communication settings

Specifies wireless LAN communication settings.

3 Device Settings

Specifies machine device settings, such as power settings and machine settings.

4 Exit

Closes the window.

3

2

4

1

Summary of Contents for p-touch D800W

Page 1: ...User s Guide D800W Read the whole guide before using your product and keep it for later reference Version 0 AP ENG ...

Page 2: ...luded with the machine for information about safety and proper operation Not all options and the consumables such as TZe tape FLe label and HSe tube are available in all countries The available options and supplies may vary depending on the country Available Manuals Visit the Brother Solutions Center at support brother com and click Manuals on your model page to download the latest manuals 1 Print...

Page 3: ...edures you must follow to avoid minor personal injury or damage to the machine Important Indicates information or directions that should be followed Ignoring them may result in damage or failed operations Note Indicates notes that provide information or directions that can help you better understand and use the product more efficiently WARNING CAUTION ...

Page 4: ...ows 8 Windows 8 1 in this document represents all editions of Windows 8 1 Windows 10 in this document represents Windows 10 Home Windows 10 Pro Windows 10 Enterprise and Windows 10 Education Windows 10 in this document does not represent Windows 10 Mobile Windows 10 Mobile Enterprise or Windows 10 IoT Core Windows Server 2008 in this document represents all editions of Windows Server 2008 and Wind...

Page 5: ...om the Keyboard 14 Inserting Text 14 Adding a New Line 14 Deleting Text 15 Using Text Reminder 16 Inserting a Tab 17 Adding a New Block 17 Adding a New Page 17 Entering Accented Characters 18 Entering Symbols 18 Entering a Serialised Label 20 Creating a Barcode Label 26 Using the Time Stamp Function 28 Setting Character Attributes 31 Setting Frames 32 Using Auto Format Layouts 33 Cable Label Type ...

Page 6: ...talling the Printer Driver and Software 62 Connecting the Machine to a Computer 62 Connecting Using USB 62 Connecting Using Wi Fi 63 Printing from a Computer 69 Available Applications 69 Printing from Your Computer 70 Attaching Labels 72 5 Printing Using the Mobile Device 73 Installing Applications for Use with Mobile Devices 73 Available Applications 73 Connecting the machine to a Mobile Device 7...

Page 7: ...ouch Labelling Machines Settings 110 Printing Labels Distributed to Multiple Machines Windows only 111 Distributed Printing 111 Printing Labels in High Resolution Mode 115 Printing Labels in High Speed Mode 116 Mass Storage Mode 117 Description 117 Using the Mass Storage Mode 117 Section II Application for Windows 8 Using P touch Software 120 Installing P touch Software 120 9 How to Use Cable Labe...

Page 8: ...Templates 147 Printing Templates 148 Searching for Templates 149 13 Transferring Templates with P touch Transfer Express 151 Preparing P touch Transfer Express 151 Transferring the Template to P touch Transfer Manager 152 Saving the Template as a Transfer Package File pdz 153 Distributing the Transfer Package File pdz and P touch Transfer Express to the User 155 Transferring the Transfer Package F...

Page 9: ... Management 178 Overview 178 Configuring the Machine Settings Using Web Based Management Web Browser 179 Section V Appendix 21 Resetting the P touch Labelling Machine 181 Resetting All Settings to the Factory Settings Using the Machine Buttons 181 Resetting Data Using the Settings in the Home screen 182 Resetting Data Using the Printer Setting Tool 182 22 Maintenance 183 Cleaning the Unit 183 Clea...

Page 10: ... Even after Successful Installation 201 Security Software Problems 201 Checking the Operation of Network Devices 202 Error Messages 203 LED Indicators 204 Indicator Warnings 207 26 Product Specifications 208 P touch Labelling Machines Specifications 208 Operating Environment 210 27 Notes on Using P touch Transfer Manager 211 Notes on Creating Templates 211 Notes on Transferring Templates 211 Notes...

Page 11: ...x Character Attribute 226 Frames 229 Auto Format 231 Template 231 Block Layout 234 Barcodes 236 Barcode Settings Table 236 Special Character List 236 Time Date 238 Time Date Format Options Table 238 ...

Page 12: ...ne 2 Printing a Label Using the P touch Labelling Machine Keyboard 9 Using the Data Transferred to the P touch Labelling Machine 51 Printing Using the Computer 62 Printing Using the Mobile Device 73 Changing the P touch Labelling Machine Settings 80 Other Functions 110 ...

Page 13: ...er open button 3 Top cover 4 Tape exit slot 5 Label indicator 6 Battery indicator 7 Power button 8 Feed and Cut button 9 Wi Fi button 10 Keyboard LCD unit 11 Keyboard LCD unit interface socket Setting Up the P touch Labelling Machine1 1 2 3 4 5 6 7 8 9 10 13 12 11 14 ...

Page 14: ... keyboard LCD unit cable 13 USB port 14 AC adapter socket Inside 1 1 Accessory storage compartment Use this space to store TZe tape cassettes and the AC adapter 2 Coin cell battery holder 3 Tape cassette compartment 4 Print head 5 Tape cutter unit 6 Tape exit slot 1 2 6 3 4 5 ...

Page 15: ...t the USB cable on the keyboard LCD unit to the socket on the side of the machine Note When you turn the machine on the keyboard LCD unit is also turned on The keyboard LCD unit can be installed on the machine by sliding it on the top cover When storing the keyboard LCD unit turn it upside down and install it to the top cover to prevent it from becoming dusty or dirty You can place the excess cabl...

Page 16: ...pter 2 Power supply cord c Insert the power supply plug into a standard electrical socket Important Turn the machine off before disconnecting the AC adapter Do not pull or bend the AC adapter cord and power supply cord After the power supply plug is inserted into the electrical socket it may take a few seconds until the Power button is enabled Note To safeguard and back up the machine memory when ...

Page 17: ...f it does not pass it through the tape guide as shown in the illustration 1 End of tape 2 Tape guides The actual shape may be different depending on the tape width b Press the cover open button to open the top cover c Carefully insert the tape cassette into the tape cassette compartment with the end of the tape facing the machine tape exit slot then push down evenly until the tape cassette is inst...

Page 18: ...ture high humidity or dusty locations After opening the sealed package use the tape cassette as quickly as possible Turning Power On Off 1 On Press the Power button to turn the machine on The Power indicator lights in green Note When the machine is turned on for the first time the language selection screen appears Select the language you want using the or key The language setting can also be chang...

Page 19: ... tape and then cuts the tape a Press the Feed and Cut button Feed Cut appears on the LCD b Select Feed Cut using the or key and then press the OK or Enter key The message Feeding Tape Please Wait appears while the tape is fed and then the tape is cut Note To exit or cancel this function press the Esc key Feed Only 1 This function ejects the tape approximately 22 3 mm resulting in a blank label sti...

Page 20: ...ge of the label that will be printed in the set layout 7 Cancel Deletes the print job 8 Print Print Options Prints the current data onto the tape Prints multiple copies or changes the print settings when used in combination with the Shift key 9 Backspace Deletes the character to the left of the cursor 10 Next Creates the next page 11 Enter Adds a new line when entering text Selects the displayed o...

Page 21: ...nserts a blank space Returns a setting to the default value 17 Accent Selects and enters an accented character 18 Symbol Selects and enters a symbol from a list of available symbols 19 Serialize Sets serialised numbers 20 Insert Inserts a time stamp barcode database or transferred symbol 21 Caps Turns the Caps mode on and off 22 Tab Inserts a tab 23 Letter Enters letters or numbers Enters upper ca...

Page 22: ...red Templates Retrieves data that was transferred from a computer 7 Settings Specifies various settings for the machine 8 Register Programmable Function Registers deletes and renames programs 9 Wireless Connection The left icon indicates the status of the Wi Fi connection and the right icon indicates the status of the Wireless Direct connection 10 Battery Level Indicates the remaining battery leve...

Page 23: ...in the label layout 6 Page Separator Line Indicates the end of one page and the beginning of the next page 7 Block Separator Line Indicates the end of a block 8 Enter Return Symbol Indicates the end of a line of text 9 Cursor Indicates the current data input position Characters are entered to the left of the cursor 10 Wireless Connection Indicates the current status of the wireless connection See ...

Page 24: ...ing a Label Using the P touch Labelling Machine Keyboard 13 2 13 Battery Level Indicates the remaining battery level It appears only when using the Li ion battery See Battery Level in the Home Screen section ...

Page 25: ...elect Create Label in the Home screen using the or key and then press the OK or Enter key Entering Text from the Keyboard 2 You can use your machine s keyboard in the same way as a standard computer keyboard Inserting Text 2 To insert additional text into an existing line of text move the cursor to the character at the position where you want to start inserting text and then enter the additional t...

Page 26: ... mm tape 2 lines Deleting Text 2 Deleting One Character at a Time 2 To delete a character from an existing line of text move the cursor to the character at the right of the position where you want to start deleting text and then press the Backspace key The character to the left of the cursor is deleted each time the Backspace key is pressed Note If you press and hold the Backspace key the characte...

Page 27: ...history of all printed character sequences to date and displays those character sequences as a list of options that you can select For example if you enter B a mark appears on the screen if there is a character sequence beginning with B in the history If you press the OK key the machine displays a list of words beginning with the letter B such as Brother Select the word you want using the or key a...

Page 28: ...the or key and then press the OK or Enter key Note To return to the label creation screen press the Esc key You can also set the tab length by typing in the tab length you want To apply the setting after typing in the tab length press the OK or Enter key and then press the OK or Enter key again The tab length can be set to between 0 mm and 100 mm Adding a New Block 2 You can create up to 99 new bl...

Page 29: ...g Symbols 2 In addition to the symbols available on the keyboard there are various symbols including international extended ASCII characters and transferred symbols 1 available with the symbol function To enter a symbol use the symbol function see Entering Symbols Using the Symbol Function on page 18 Alternatively press the Shift key and a key on the keyboard simultaneously to enter the symbol pri...

Page 30: ...erted into the line of text Note When selecting a symbol press the Shift key and key to go to the next page and press the Shift key and key to go to the previous page The inserted transferred symbol appears as a mark in the label creation screen To view the transferred symbol in the label creation screen move the cursor to the mark and press the Insert key To return to the previous step press the ...

Page 31: ...ory follow steps a and b above and then select Off in the Symbol History screen in step c Entering a Serialised Label 2 Numerically serialised labels can be created You can set the increment and count for the series In the serialize mode you can create a series of labels by incrementing one numeric character in the pattern In the advanced serialize mode you can select between Simultaneous or Group...

Page 32: ...phabet Specifies the format of the serialised number from decimal octal hexadecimal and alphabetic Format Normal 000 999 __0 999 0 999 Specifies how the digits of the serialised numbers are aligned 000 Zeroes are used to align the digits __0 Blank spaces are used to align the digits 0 The digits are not aligned Octal 000 777 __0 777 0 777 Hex 000 FFF __0 FFF 0 FFF Alphabet a z A Z Specifies lower ...

Page 33: ...ng order in Settings Print Order in the Home screen When creating labels with a serialised barcode select the entered barcode and then press the Serialize key For more information about barcodes see Creating a Barcode Label on page 26 To return to the previous step press the Esc key Advanced Serialize Mode 2 Simultaneous 2 a Enter the text except the text that you want to serialise Example To crea...

Page 34: ...Alphabet Format A Z From A and Increased by 1 See the Serialize Settings table in step c of Serialize Mode for more information Note Because the serialised number count is the same for the first serialised text and second serialised text the value for To is set automatically f Press the OK or Enter key to display an image of the labels on the screen Example Note Although the machine creates multip...

Page 35: ...From To and Increased by using the or key set the values using the or key and then press the OK or Enter key Example Type Normal Format 000 999 From 1 To 4 and Increased by 1 See the Serialise Settings table in step c of Serialize Mode for more information d Position the cursor where you want to insert the second serialised text to the left of 0 and then press the OK or Enter key e For the second ...

Page 36: ...hen you want to print multiple copies of the serialised labels you can select Serialize or Copy for the printing order in Settings Print Order in the Home screen When creating labels with a serialised barcode select the entered barcode and then press the Serialize key For more information about barcodes see Creating a Barcode Label on page 26 To return to the previous step press the Esc key Note L...

Page 37: ...printing a large number of labels with barcodes can overheat the print head which may affect printing quality Setting Barcode Parameters and Entering Barcode Data 2 a Press the Insert key b Select Bar Code using the or key and then press the OK or Enter key The Bar Code screen appears Note Up to five barcodes can be entered on a label c Select an attribute using the or key and then select the sett...

Page 38: ...racter in the barcode data h Press the OK or Enter key to insert the barcode in the label The barcode appears on the label creation screen Note To return to the previous step press the Esc key To set the selected attribute as the default setting press the Space key Editing and Deleting a Barcode 2 To edit barcode parameters and barcode data select the barcode and then press the OK or Enter key See...

Page 39: ... You can also set the time and date by typing in the numbers you want The clock will activate from when the clock setting is applied The coin cell battery is used to back up the clock setting when the AC adapter is unplugged Time Date Format Setting 2 You can select from various formats of the time and date to add to your label Selectable Time Date formats are listed in the Appendix See Time Date ...

Page 40: ...tting and a clock icon is added to the text by pressing the Insert key selecting Time Stamp using the or key and then pressing the OK or Enter key you can confirm the icon settings as follows Position the cursor to the left of the clock icon press the Insert key select Time Stamp using the or key and then press the OK or Enter key Attribute Setting Description Timing Auto Press the Insert key sele...

Page 41: ... Select Time Stamp Setting using the or key and then press the OK or Enter key c Select Forward using the or key select On using the or key and then press the OK or Enter key d Select Add or Reduce using the or key select the year month week date hour or minute using the or key and then set the amount to increase or decrease from the currently set clock using the or key After all parameters are se...

Page 42: ... 226 a Press the Format key The Font dialog box appears b Select an attribute using the or key c Select the setting for that attribute using the or key and then press the OK or Enter key to apply the settings Note New settings are NOT applied unless you press the OK or Enter key Note To return to the previous step press the Esc key To set the selected attribute as the default setting press the Spa...

Page 43: ... the Format key When you change the setting on this screen using the or key the same change is applied to all lines of the label When different attribute values are set for each line the settings of the line where the cursor is positioned in the label creation screen appear at the top of the screen Setting Frames 2 You can select the frame of the label using the Format key Selectable Frames are li...

Page 44: ... category using the or key and then press the OK or Enter key c Select a template using the or key and then press the OK or Enter key d Enter text or a barcode for each text field if needed and then press the OK or Enter key e When finished press the OK or Enter key To print the label select Print using the or key and then press the OK or Enter key Note For more information about barcodes see Crea...

Page 45: ...odes see Creating a Barcode Label on page 26 You can use the serialise settings with the entered text and barcodes To specify the serialise settings see Entering a Serialised Label on page 20 The advanced serialize mode cannot be used To print the label see Printing a Label on page 40 To preview the label before printing select Preview using the or key and then press the OK or Enter key For more i...

Page 46: ...is rotated 90 counterclockwise and printed UOM Unit of Measure Dia Ø Length CAT5 6 CAT6A COAX AWG Value Varies depending on the UOM Unit of Measure setting Repeat On Off Note When using Flexible ID Tape We recommend using Flexible ID Tape for Cable Wrap labels Labels made with Flexible ID Tape are not designed for use as electrical insulation When wrapping labels around cylindrical objects the dia...

Page 47: ...ddle that wraps around the cable 1 Flag length at least 5 mm Layout same text on both sides different text on each side Flag Length 30 mm 10 200 mm Cable Diameter 6 mm 3 90 mm Orientation Horizontal Vertical Note You can enter up to two barcodes when is selected in flag layout We recommend using Flexible ID Tape for Cable Flag labels Labels made with Flexible ID Tape are not designed for use as el...

Page 48: ... mm 5 0 300 0 mm of Blocks 4 1 99 Separator Tic Dash Line Bold Frame None Orientation Horizontal Vertical Reverse Off On Advanced Off On Adjust block length independently when Advanced is set to On 1 Block length No Margins Off On Set the left and right label margins to zero Note Advanced and No Margins cannot be set to On at the same time 1A B01 1A B02 1A B03 1 1 1 ...

Page 49: ... Type Sequence Type is set to None When None is selected in Sequence Type appears for Start Value and you cannot set a value Selecting Horizontal or Backbone however allows you to set the Start Value setting from 1 to 99 999 Die cut Flag 2 Labels of this type can be printed on special die cut flag labels to create flag labels for cables and wires Use FLe label cassettes for this type of applicatio...

Page 50: ...pe cassette In addition you can create labels with a small label height by setting Orientation to Vertical Label Length Auto 5 999 mm Orientation Horizontal Vertical Note The font and font style are set to Helsinki and bold respectively and cannot be changed The following types of tape cannot be used 3 5 mm tape Stencil tape Heat Shrink Tube Die cut flag label ON A 01 A 02 A 03 A 04 A 05 ...

Page 51: ...e LCD b Select Feed Cut using the or key and then press the OK or Enter key The message Feeding Tape Please Wait appears while the tape is fed and then the tape is cut Note To exit or cancel this function press the Esc key Feed Only 2 This function ejects the tape approximately 22 3 mm resulting in a blank label sticking out of the tape cassette This action is recommended when using Fabric tapes w...

Page 52: ...Esc key See the following table for a list of all available settings When printing multiple copies of different labels you can select the chain printing option to reduce the blank space between the labels The chain printing option is used for cutting option numbers 5 8 See the following Cut Option Table When using the chain printing option press the Feed and Cut button after the last label is prin...

Page 53: ...t option from a computer using the printer driver These options cannot be set using the keyboard 5 No Yes Yes 6 Yes Yes Yes 7 No No Yes 8 Yes No Yes 9 Special tape FLe Label 1 No FLe Label 1 Yes Cut Option Table Cut Option No Auto Cut Half Cut Chain Printing Image ABC ABC ABC ABC ABC ABC ABC ABC ABC ABC ABC ABC ABC ABC ...

Page 54: ...t to a specific length you can select the way of reducing the text size to fit within the label length a Select Settings in the Home screen using the or key and then press the OK or Enter key b Select Auto Fit Style using the or key and then press the OK or Enter key c Select the style using the or key Note When Text Size is selected the total text size is modified to fit within the label When Tex...

Page 55: ...dicates the tape width of the installed tape cassette and the label length as follows Tape width x Label length Press the or key to scroll the preview Press the Preview key to change the magnification of the preview Note To return to the label creation screen press the Esc OK or Enter key To scroll the preview to the left or right end press the Shift key and then press the or key To print the labe...

Page 56: ...tape remaining when printing several labels continuously If tape is running low set fewer copies print labels one at a time or replace the tape cassette Striped tape indicates the end of the tape cassette If this appears during printing press and hold the Power button to turn the machine off Attempting to print with an empty tape cassette may damage the machine Printing a Single Page 2 Press the P...

Page 57: ...need all pages press the Print key and then press the Print or OK key to print all pages without specifying the range To return to the previous step press the Esc key To cancel the current print job press the Cancel key The figures shown on the screen during printing indicate the count number of copies set Pressing the Space key when setting the number of copies resets the value to 01 default Mirr...

Page 58: ...ontent using the or key and then press the OK or Enter key 1 Because the file size may vary depending on the characters input and the type of data you may not be able to store a file even if the available space that appears in Available XXXXXchrs indicates there is sufficient space Storing a Label in the File Memory 2 a After entering the text and formatting the label press the Save key b Select a...

Page 59: ...key Deleting a Stored Label File 2 Important To delete a label created using a transferred template see Deleting the Transferred Data on page 61 a Select File in the Home screen using the or key and then press the OK or Enter key b Select a file using the or key and then press the OK or Enter key Note To display the layout for the selected file press the Preview key At this time you can also delet...

Page 60: ... the item that you want to register and then press the OK or Enter key e Enter the program name and then press the OK or Enter key The program registration is completed Note The registered program name can also be changed later You can register up to 10 programs If 10 programs are already registered you must delete one of the programs before registering a new program If you recall a registered pro...

Page 61: ...then press the OK or Enter key b Select a program using the or key and then press the OK or Enter key c Select Delete using the or key and then press the OK or Enter key The Delete message appears d Press the OK or Enter key Note You can also recall a program by typing the program number using the number keys selecting Register Programmable Function in the Home screen ...

Page 62: ...achine and then use it as a template for printing labels To edit or print templates type new text directly or use text from a database Important Before editing a template transfer the template to the machine When the transfer of the data to the machine is complete turn the machine off and then on again When the Template has No Object to be Edited 3 a Select Transferred Templates in the Home screen...

Page 63: ...en using the or key and then press the OK or Enter key b Select the template using the or key and then press the OK or Enter key Note When the template is linked to a database the icon appears in the upper right corner of the screen c Select Edit Label without Saving using the or key and then press the OK or Enter key Objects that can be edited appear d Select the object to be edited using the or ...

Page 64: ...Template is Linked to the Database and will not be Edited 3 a Select Transferred Templates in the Home screen using the or key and then press the OK or Enter key b Select the template using the or key and then press the OK or Enter key Note When the template is linked to a database the icon appears in the upper right corner of the screen c Select Print from Database using the or key and then press...

Page 65: ...the maximum number of blocks and pages is reached If the set number of blocks and pages is larger than the selected database range the operation will finish when the complete database is imported The remaining blocks and pages will not be printed a Press the Insert key select Database using the or key and then press the OK or Enter key b Select the database you want using the or key and then press...

Page 66: ...cord in the range that you want to insert and then press the OK or Enter key The selected record is highlighted d Select the last record in the range that you want to insert and then press the OK or Enter key The selected range is highlighted The contents of the selected database appear ...

Page 67: ...rs and the upper symbols shown on the keys a Press the Insert key select Database using the or key and then press the OK or Enter key b Select the database you want using the or key and then press the OK or Enter key The first record of the selected database appears c Type in the first character for example B that you want to search for Example If you type B the fields will be searched from the fi...

Page 68: ...to that data and BR becomes highlighted In addition BR will be stored in the internal memory e Continue searching the database using the same procedure Note If the character that you searched for is contained in multiple fields in the database press the Next key to move to the next field containing the character The character will be highlighted in the field Press the Backspace key to delete the l...

Page 69: ...lect the database you want to edit using the following procedure Select Transferred Templates in the Home screen using the or key and then press the OK or Enter key Select the template linked to a database you want to edit using the or key and then press the OK or Enter key Select Print from Database using the or key and then press the OK or Enter key The first record of the selected database appe...

Page 70: ...ious screen press the Esc key Important You can add or delete a line break Each cell can contain a maximum of 17 lines e Press the OK key The new text appears Note If you do not want to print the database press the OK key and then press the Esc key The edited data will be saved f Press the OK key again The edited record becomes highlighted ...

Page 71: ...o print using the or key and then press the OK or Enter key to start printing When the range is set the selected records become highlighted When the database has been transferred without a template Select the last record in the range that you want to insert and then press the OK or Enter key The selected range becomes highlighted The contents of the selected database appears h Press the Print key ...

Page 72: ...is selected If needed delete the next image Deleting Templates 3 a Select Transferred Templates in the Home screen using the or key and then press the OK or Enter key b Select the template you want to delete using the or key and then press the OK or Enter key c Select Delete using or key and then press the OK or Enter key The Delete message appears d Press the OK or Enter key The selected template...

Page 73: ...Settings in the Home screen or Printer Setting Tool For more information see Connecting Using Wi Fi on page 63 or Changing the P touch Labelling Machine Settings on page 80 Install the software on a computer wirelessly connected to your network and configuring the machine using a USB cable Get the SSID network name and password network key of the wireless network in advance c Close the dialog box ...

Page 74: ...r network we recommend contacting your system administrator prior to installation You must confirm your Wi Fi settings before you proceed with this installation To configure the Wi Fi settings again or if the status of the Wi Fi connection for your machine is not clear reset the Wi Fi settings of the machine 1 Select Settings in the Home screen using the or key and then press the OK or Enter key 2...

Page 75: ...n using WEP from 5 to 13 characters and then press the OK or Enter key i The screen returns to the Settings menu screen and blinks while the connection is being established After 90 seconds the indicator will change to but your machine will continue trying to connect to the network j When connected depending on the strength of the wireless signal the wireless connection indicator shows of the foll...

Page 76: ...reless Settings in the Wireless LAN tab For details see Changing the P touch Labelling Machine Settings on page 80 For Mac Start the Wireless Device Setup Wizard included in the Printer Driver Package and then follow the on screen instructions The Wireless Device Setup Wizard can be found in the Utilities folder e Enter the SSID that you wrote down or click Search and select the SSID from the disp...

Page 77: ...PS on Your Wireless Access Point message appears i Press the WPS button on your wireless access point router and then press the OK or Enter key on your machine Note To return to the previous step press the Esc key j Connecting appears for a while and then Connected appears k Press the OK or Enter key The screen returns to the Settings menu screen Depending on the strength of the wireless signal th...

Page 78: ...for a while and then Connected appears i Press the OK or Enter key The screen returns to the Settings menu screen Depending on the strength of the wireless signal the wireless connection indicator may show one of the following symbols Note If you start the setup wizard for the Infrastructure mode or select the network settings for the Direct mode when the wireless function of the machine is turned...

Page 79: ...f Off is selected in the Direct Mode On Off and Infrastructure Mode On Off screen the wireless function will remain off even if you press the Wi Fi button The factory setting is On for both Direct mode and Infrastructure mode For more information see Infrastructure Mode on page 63 or Connecting the machine to a Mobile Device on page 73 When the wireless function is on the Li ion battery power will...

Page 80: ...s application is installed with P touch Editor P touch Update Software r r Update software to the latest version Printer Setting Tool r r Specify the printer s device settings from a computer Wireless Device Setup Wizard r This application allows you to configure your machine for a wireless network BRAdmin Light r Finds the machine on your network and is used to make basic configuration settings f...

Page 81: ...n c Check the cutting options See Cutting Options on page 70 d Select File then Print from the menu bar or by clicking the Print icon Cutting Options 4 The cutting options allow you to specify how the item is fed and cut when it is printed Use the printer driver to select the cutting option when printing from the computer using the application See the following table for a list of all available se...

Page 82: ...he Computer 71 4 No Yes Yes Yes Yes Yes No No Yes Yes No Yes Special tape No FLe Label Yes FLe Label Tape Cut Option Table Auto Cut Half Cut Chain Printing Image ABC ABC ABC ABC ABC ABC ABC ABC ABC ABC ABC ABC ABC ABC ...

Page 83: ...ith your finger to attach the label Note The backing of some types of tapes may be pre cut to make it easier to peel the backing To remove the backing simply fold the label lengthwise with the text facing inwards to expose the inside edges of the backing Next peel off the backing one piece at a time Labels may be difficult to attach to surfaces that are wet dirty or uneven The labels may peel off ...

Page 84: ...r machine to your mobile device Connecting using the machine keyboard a Select Settings in the Home screen using the or key and then press the OK or Enter key b Select WLAN using the or key and then press the OK or Enter key c Select Direct Mode using the or key and then press the OK or Enter key The machine displays the symbol d Select Network Setting using the or key and then press the OK or Ent...

Page 85: ...ttings page of your mobile device and type the SSID name and password h You have completed the Wireless Direct network setup Connecting using a Computer a Confirm the Wireless Direct settings of the machine For Windows Connect the machine and computer with a USB cable Start the Printer Setting Tool on your computer and click Communication settings Confirm that Infrastructure and Wireless Direct or...

Page 86: ...astructure mode Turning the Wireless Function On or Off 5 To turn the wireless function on or off press the Wi Fi button a Press the Wi Fi button The wireless function is now on b Press the Wi Fi button again to turn the wireless function off Note If Off is selected in the Direct Mode On Off and Infrastructure Mode On Off screen the wireless function will remain off even if you press the Wi Fi but...

Page 87: ...late or design Note You can also select a label or image you designed previously and print it c Check the cutting option See Cutting Options on page 76 d Tap Print in the application menu Cutting Options 5 The cutting options allow you to specify how the item is fed and cut when it is printed Use the printing option to select the cutting option when printing from the mobile device using the applic...

Page 88: ...e 77 5 Yes No No No Yes Yes Yes Yes Yes No No Yes Yes No Yes Special tape No FLe Label Mobile Cable Label Tool only Tape Cut Option Table Auto Cut Half Cut Chain Printing Image ABC ABC ABC ABC ABC ABC ABC ABC ABC ABC ABC ABC ABC ABC ...

Page 89: ...a blf file with your mobile device Save the file using a cloud storage service and then use the sharing function of the mobile device s OS to share the file Send the file as an email attachment from the computer to the mobile device and then save the file to the mobile device c Connect the machine to your mobile device and then start Mobile Transfer Express The template data appears d Select the t...

Page 90: ...remove the backing simply fold the label lengthwise with the text facing inwards to expose the inside edges of the backing Next peel off the backing one piece at a time Labels may be difficult to attach to surfaces that are wet dirty or uneven The labels may peel off easily from these surfaces Extra Strength Adhesive Tape For rough and textured surfaces we recommend using Extra Strength Adhesive T...

Page 91: ...e Printer Driver and Software on page 62 Important The Printer Setting Tool is available only with compatible Brother machines Before Using the Printer Setting Tool 6 Make sure the AC adapter is connected to the machine and to an electrical socket or a fully charged battery is installed Make sure the printer driver has been installed correctly and you can print Connect this machine to a computer w...

Page 92: ...ter Printer Setting Tool For Windows 8 Windows 8 1 Windows Server 2012 Windows Server 2012 R2 Click the Printer Setting Tool icon on the Apps screen For Windows 10 From the Start button select All apps and then click Brother Label Mobile Printer Printer Setting Tool The main window appears 1 Printer Lists the connected machines 2 Communication settings Specifies wireless LAN communication settings...

Page 93: ...you want to change and then specify or change the settings in the dialog box For more information on the settings dialog boxes see Communication Settings for Windows on page 83 or Device Settings for Windows on page 96 e Click Apply Exit in the settings dialog box to apply the settings to the machine f Click Exit in the main window to finish specifying settings Important Use the Printer Setting To...

Page 94: ...cted appears in the tab and the settings can no longer be specified or changed Settings in a tab where appears will not be applied to the machine even if Apply is clicked In addition the settings in the tab will not be saved or exported when the Save in Command File or Export command is executed To apply the settings to the machine or save or export them make sure you clear the check box 2 Items W...

Page 95: ...ns to the main window of the Printer Setting Tool Important Settings are not applied to machines if Exit is clicked without clicking Apply after changing settings 10 Apply Applies the settings to the machine To save the specified settings in a command file select Save in Command File from the drop down list The saved command file can be used with the mass storage mode to apply the settings to a ma...

Page 96: ...hat tab are not saved Important The following information is not saved with the command file Node name IP address subnet mask and default gateway when the IP address is set to STATIC The saved communication settings commands are intended to be used only for applying settings to a machine To apply the settings to the machine using this command file use the mass storage mode Saved command files cont...

Page 97: ...ant to import The settings in the selected file appear in the settings display change area Note All settings such as wireless settings or TCP IP settings can be imported except for node names Only profiles that are compatible with the selected machine can be imported If the imported profile s IP address is set to STATIC change the IP address of the imported profile if needed so that it does not du...

Page 98: ...ings are displayed in the Current Status pane Note If the model of the connected machine is different from that of the machine shown in the Printer drop down list the settings available on all tabs change to match the connected machine 7 Change Node Name Bluetooth Device Name Allows renaming a node 8 Reset to Default Communication Settings Returns the communication settings to their factory settin...

Page 99: ...ings 6 1 Network Settings on Power On Specifies the conditions for connecting via Wi Fi when the machine is turned on Select On by Default Off by Default or Keep Current State 2 Selected Interface Select Infrastructure or Ad hoc Infrastructure and Wireless Direct or Wireless Direct 1 2 ...

Page 100: ...Changing the P touch Labelling Machine Settings 89 6 IPv6 6 1 IPv6 usage Select Enable or Disable 2 Priority on IPv6 address Select to give priority to an IPv6 address 1 2 ...

Page 101: ... STATIC 2 IP Address Subnet Mask Gateway Specifies the various networking values You can enter these settings only when the IP address is set to STATIC 3 DNS Server Method Select AUTO or STATIC 4 Primary DNS Server IP Address Secondary DNS Server IP Address You can enter these settings only when the DNS server is set to STATIC 1 2 3 4 ...

Page 102: ...ddress Specifies a permanent IPv6 address 2 Enable this address Enables the specified static IPv6 address 3 Primary DNS Server IPv6 Address Secondary DNS Server IPv6 Address Specifies the DNS server IPv6 addresses 4 IPv6 Address List Displays the list of IPv6 addresses 1 2 4 3 ...

Page 103: ...tting only when WEP is selected as the encryption mode 6 Passphrase You can specify a setting only when WPA WPA2 PSK is selected as the authentication method 7 User ID Password You can specify settings only when LEAP EAP FAST PEAP EAP TTLS or EAP TLS is selected as the authentication method In addition with EAP TLS it is not necessary to register a password but a client certificate must be registe...

Page 104: ...he machine is configured to connect to the network specify the certificate by accessing the machine from a web browser For more information on using a web browser see Web Based Management on page 178 Authentication Method Encryption Mode Open System None WEP Authentication Method Encryption Mode Open System None WEP Shared Key WEP WPA WPA2 PSK TKIP AES AES LEAP CKIP EAP FAST NONE TKIP AES AES EAP ...

Page 105: ...ork Key Specifies the SSID 25 ASCII characters or fewer and the network key 63 characters or fewer you want to use in the Wireless Direct mode Note The factory settings for the SSID and password are as follows SSID PT D800W or DIRECT _PT D800W is the last five digits of the product serial number Password Network key 00000000 1 ...

Page 106: ...he first machine are applied to the second machine Note We recommend selecting the Automatically restart the printer after applying new settings check box when configuring the first machine so that you can confirm that a connection with the wireless access point router can be correctly established with the settings For more information see Communication Settings for Windows on page 83 d Repeat ste...

Page 107: ...e current settings could not be retrieved the previous settings are displayed If the current settings could not be retrieved and previous settings have not been specified this tool s factory settings are displayed Settings Dialog Box 6 1 Menu Bar Select a command contained in each menu from the list 2 Printer Specifies the machine whose device settings are to be configured If only one machine is c...

Page 108: ...will not be applied to the machine even if Apply is clicked In addition the settings in the tab will not be saved or exported when the Save in Command File or Export command is executed 6 Parameters Displays the current settings 7 Exit Exits Device Settings and returns to the main window of the Printer Setting Tool 8 Apply Applies the settings to the machine To save the specified settings in a com...

Page 109: ...from the Apply drop down list 3 Import Imports the exported file 4 Export Saves the current settings in a file 5 Save Print Log in File Saves the print log in a file in the CSV format 6 Print Unit Settings Prints a report containing firmware version and device setting information You can also print this report using the Feed and Cut button for more than 10 seconds See Confirming the P touch Labell...

Page 110: ...base Deletes the templates and databases stored in the machine 9 Delete Print Log Deletes the print log stored in the machine 10 Option Settings If the Do not display an error message if the current settings cannot be retrieved at startup check box is selected a message will not be displayed next time 11 About Displays the version information ...

Page 111: ...gs None 10 20 30 40 50 Minutes 1 2 4 8 12 hours 3 Auto Power Off Li ion Specifies the amount of time that passes before the machine turns off automatically when powered by the rechargeable Li ion battery Available settings None 10 20 30 40 50 Minutes 1 hour 4 Contents Specifies the machine information that will be printed Available settings All Usage Log Printer Settings Printer Transfer Data 5 Sa...

Page 112: ...played on the computer Available settings 4 to 4 1 increments 2 Full Cut Margin Adjustment Adjusts the margin length when fully cutting labels Available settings 2 to 2 1 increments 3 Half Cut Margin Adjustment Adjusts the margin length when half cutting labels Available settings 2 to 2 1 increments 4 Test Print Prints a test label to check the results of each adjustment 1 2 3 4 ...

Page 113: ...newly connected machine from the Printer drop down list c Click Apply The same settings that were applied to the first machine are applied to the second machine d Repeat steps a c for all machines whose settings you want to change Note To save the current settings in a file click File Export The same settings can be applied to another machine by clicking File Import and then selecting the exported...

Page 114: ...ed correctly and you can print Connect this machine to a computer with a USB cable Settings can be specified only via USB using this tool Using the Printer Setting Tool for Mac 6 a Connect the machine you want to configure to the computer b Click Macintosh HD Applications Brother Printer Setting Tool Printer Setting Tool app The Printer Setting Tool window appears c Check that the machine you want...

Page 115: ...t Settings Prints a report containing firmware version and configuration information You can also print this report using the Feed and Cut button for more than 10 seconds See Confirming the P touch Labelling Machines Settings on page 110 for more information Note When you print this report use 24 mm or 36 mm tape 7 Factory Reset Resets machine settings to factory settings 8 Current Settings Retrie...

Page 116: ...ctrical socket Available settings None 10 20 30 40 50 Minutes 1 2 4 8 12 hours 3 Auto Power Off Li ion Specifies the period of time that passes before the machine turns off automatically when powered by the rechargeable Li ion battery Available settings None 10 20 30 40 50 Minutes 1 hour 4 Print Information Report Specifies the machine information that will be printed Available settings All Usage ...

Page 117: ...played on the computer Available settings 4 to 4 1 increments 2 Full Cut Margin Adjustment Adjusts the margin length when fully cutting labels Available settings 2 to 2 1 increments 3 Half Cut Margin Adjustment Adjusts the margin length when half cutting labels Available settings 2 to 2 1 increments 4 Test print Prints a test label to check the results of each adjustment 1 2 3 4 ...

Page 118: ...D Network Name Network Key Specifies the SSID 3 to 25 ASCII characters and the network key you want to use in the Wireless Direct mode You can specify a setting only when STATIC is selected as SSID Network Key Generation 4 Display current settings Displays the current settings for Wireless Direct Click Current Settings to update the displayed settings with the most recent information 1 2 3 4 ...

Page 119: ...wly connected machine from the Printer drop down list c Click Apply Settings to the Printer The same settings that were applied to the first machine are applied to the second machine d Repeat steps a c for all machines whose settings you want to change Note To save the current settings in a file click Export The same settings can be applied to another machine by clicking Import then selecting the ...

Page 120: ...he settings as necessary using the application before printing The settings that can be changed vary according to the application Note Before connecting a mobile device you can specify detailed settings by connecting the machine to a computer via USB and using the Printer Setting Tool see Using the Printer Setting Tool for Windows on page 81 ...

Page 121: ...ormation The firmware version device setting information Wi Fi setting information and transferred data information templates databases and transferred symbols a Turn the machine on b Press and hold the Feed and Cut button for more than 10 seconds to print the report Note When you print this report use 24 mm or 36 mm tape This operation can also be performed using the Printer Setting Tool see Chan...

Page 122: ... reduced Note Printing can be distributed to machines connected via a USB or network connection The number of pages is automatically divided among the selected machines If the specified number of pages cannot be evenly divided among the machines it will be divided in the order of the machines listed in the Distributed Printing Settings dialog box when the print settings are specified in step d a F...

Page 123: ...ributed printing 1 Click Detect Current Paper Information 2 The current printer information that was detected appears below Current Width and Paper Type 3 Select the check box next to the Printer Name you want Note If the selected tape width is different from that displayed beside Current Width appears beside the setting below Current Width Load the printer with tape of the width specified Set Wid...

Page 124: ...on displayed in the Distributed Printing Settings dialog box from step d can be entered in the Notes text box B If multiple machines have been selected In the Distributed Printing Settings dialog box from step d select the machines whose settings you want to specify right click them and then click Settings From the Set Width drop down list select the tape width The same tape width setting is appli...

Page 125: ...connected using a USB hub or print server Before printing enter the settings manually and check if the machine can be used for printing Depending on whether a router is used and the security features in use such as a firewall it may not be possible to use this function We recommend performing a connection test for your operating environment Contact your information technology manager or administra...

Page 126: ...er is connected and TZe laminated tape with black ink is installed Use the printer driver to select the high resolution mode when printing the labels You cannot use this function for TZe FX 1 tape a From the File menu in P touch Editor click Print b Click Properties c On the Basic tab select High resolution from the Quality drop down list d Click OK ...

Page 127: ...er is connected and TZe laminated tape with black ink is installed Use the printer driver to select the high speed mode when printing the labels You cannot use this function for TZe FX 1 tape a From the File menu in P touch Editor click Print b Click Properties c On the Basic tab select High Speed from the Quality drop down list d Click OK ...

Page 128: ...ode 7 a Confirm that the machine is turned off b Press and hold the Power button the Program key and the Home key at the same time The machine starts up in mass storage mode the Power indicator lights in green and the Label indicator lights in orange c Connect the computer or device to the machine via USB The machine s mass storage area appears as a folder on the computer or device s screen Note I...

Page 129: ...eated files in the folder cannot be accessed The capacity of the mass storage area is 2 5 MB Files larger than 2 MB may not work correctly If multiple files are copied the order that the commands will be executed in cannot be guaranteed Wi Fi features are not available while the machine is running in mass storage mode Do not access other files in the mass storage area when executing a copied file ...

Page 130: ...P touch Software 120 How to Use Cable Label Tool 121 How to Use P touch Editor 130 How to Use P touch Transfer Manager 134 How to Use P touch Library 145 Transferring Templates with P touch Transfer Express 151 How to Update P touch Software 159 ...

Page 131: ...load the installer from www brother com inst For more information on installing the software and driver see Installing the Printer Driver and Software on page 62 To download the latest driver and software individually visit the Brother Solutions Center at support brother com Select your region country Downloads Choose your product Using P touch Software 8 ...

Page 132: ... double click Cable Label Tool 1 0 shortcut icon on the desktop For Windows 8 Windows 8 1 Windows Server 2012 Windows Server 2012 R2 Click Cable Label Tool 1 0 on the Apps screen or double click Cable Label Tool 1 0 on the desktop For Windows 10 From the Start button select All apps and click Cable Label Tool 1 0 under Brother P touch or double click Cable Label Tool 1 0 on the desktop How to Use ...

Page 133: ... Label Tool 122 9 b Click the button for the cable label type you want Creating a Cable Label 9 Faceplate 9 Labels of this type can be used to identify various faceplates Blocks of text are evenly spaced on each label ...

Page 134: ...printed Note When using Flexible ID Tape We recommend using Flexible ID Tape for the Cable Wrap labels Labels made with Flexible ID Tape are not designed for use as electrical insulation When wrapping labels around cylindrical objects the diameter 1 of the object should be at least 3 mm The overlapping 2 ends of the label should be at least 5 mm 2 1 ...

Page 135: ...abels is printed on both ends of the label leaving a blank space in the middle that wraps around the cable Note The flag length 1 should be at least 5 mm Orientation We recommend using Flexible ID Tape for the Cable Flag labels Labels made with Flexible ID Tape are not designed for use as electrical insulation Horizontal Vertical 1 Flag length 2 Cable circumference 1 1 2 1 1 2 1 ...

Page 136: ...s of this type can be used to identify various types of panels Punch Down Block 9 Labels of this type can be used to identify a type of electrical connection often used in telecommunications You can enter up to eight lines for each block on a single label ...

Page 137: ...n be printed on special die cut flag labels to create flag labels for cables and wires Use FLe label cassettes for this type of application Heat Shrink Tube 9 Tubes of this type can be heated to shrink them to fit cables Use HSe tube cassettes for this type of application ...

Page 138: ...Cable Label Tool 127 9 Linking a Database 9 You can link databases to templates a Click Database b Select a database c The database linked to the template appears Specify the data to print and the number of copies ...

Page 139: ...ised labels a Highlight the text you want to serialise b Click Serialize c Specify the settings using the screen image as an example Printing with Cable Label Tool 9 You can print by selecting Print from the File menu or by clicking the Print button Configure the printing settings in the Print screen before printing ...

Page 140: ...signment key Note If the template or other data transferred to the machine has the same key number as another template already saved in the machine the new template will overwrite the old one d To transfer a template with a connected database select the Transfer with Database check box e Click Transfer The template or template with database is transferred to the machine Note Serialize settings wil...

Page 141: ...tor 5 1 on the desktop For Windows 10 From the Start button select All apps and click P touch Editor 5 1 under Brother P touch or double click P touch Editor 5 1 on the desktop b When P touch Editor starts select whether you want to create a new layout or open an existing layout Note To change how P touch Editor functions when it starts click Tools Options in the P touch Editor menu bar to display...

Page 142: ...reset layout double click a category button or select a category button and then click 3 To connect a preset layout to a database select the check box next to Connect Database 4 To open an existing layout click Open 5 To open the application for creating labels for electrical equipment management double click Cable Labelling Wizard or click Cable Labelling Wizard and then click 2 1 5 4 3 ...

Page 143: ...Configure the printing settings in the Print screen before printing Professional mode 10 This mode allows you to create layouts using a wide range of advanced tools and options You can print by selecting Print from File in the menu bar or by clicking the Print Setting icon A Configure the printing settings in the Print screen before printing In addition you can click the Print icon B to start prin...

Page 144: ...nd save it for future use a Click the Snap mode selection button The Description of Snap mode dialog box appears b Click OK The Snap mode palette appears Transferring Data to the P touch Labelling Machine 10 To transfer data to the machine you must use P touch Transfer Manager For more information see How to Use P touch Transfer Manager on page 134 ...

Page 145: ...mplate file lbx b Click File Transfer Template Transfer When P touch Transfer Manager starts the main window appears Note The following method can also be used to start P touch Transfer Manager For Windows Vista Windows 7 Windows Server 2008 Windows Server 2008 R2 From the Start button click All Programs Brother P touch P touch Tools P touch Transfer Manager 2 2 For Windows 8 Windows 8 1 Windows S...

Page 146: ... data will be transferred to When you select a machine only the data that can be sent to the selected machine appears in the data list 4 Folder view Displays a list of folders and machines When you select a folder the templates in the selected folder appear in the template list If you select a machine the current templates and other data stored in the machine appear 5 Template list Displays a list...

Page 147: ...Mass Storage Mode USB or when transferring the data using BRAdmin Professional Wi Fi or Mobile Transfer Express Wi Fi Select PDZ when transferring the data using TransferExpress USB The available interfaces differ depending on your model Backup Only for P touch Transfer Manager Retrieves the templates and other data saved in the machine and saves it on the computer Open Opens the selected template...

Page 148: ...t the machine in the folder view the current templates and other data stored in the machine appear Note If a machine is disconnected or offline it is not listed in the folder view Before transferring data check that the computer and the machine are correctly connected using a USB cable or a wireless connection and that the machine is on b Select the machine that you want to transfer the template o...

Page 149: ...r Function Specification Data type Maximum number of transferable items Restriction details Template 99 Each template can contain a maximum of 50 objects Each object can contain a maximum of 17 lines Database 99 Only csv files can be transferred Each csv file can contain a maximum of 256 fields and 65000 records Image transferred symbols 99 Only bmp files can be transferred Monochrome bmp files ar...

Page 150: ...e the file size may vary depending on the characters input and the type of data you may not be able to store a file even if the available space that appears in Available X XXMB indicates there is sufficient space You can view the templates and other data by selecting The folder in the Configurations folder All Contents One of the categories under Filter such as Layouts When transferring multiple t...

Page 151: ...e new template will overwrite the old one You can confirm the templates key number assignments saved in the machine by backing up the templates or other data see Backing up Templates or Other Data Saved in the Machine on page 142 If the machine memory is full remove one or more templates from the machine memory see Backing up Templates or Other Data Saved in the Machine on page 142 f To change the...

Page 152: ...o the machine without adding them to a folder Select the template or other data that you want to transfer and then click Transfer Multiple items and folders can be selected and transferred in one operation h Click OK The selected data are transferred to the machine Note To print data that was transferred to the machine the machine must be switched from the transfer mode to the normal mode Turn the...

Page 153: ...rred to another machine model a Connect the computer and the machine and turn the machine on The machine model name appears next to a printer icon in the folder view If you select the machine in the folder view the current templates and other data stored in the machine appear b Select the machine to back up from and then click Backup A confirmation message appears c Click OK A new folder is create...

Page 154: ...s or other data saved on the machine a Connect the computer and the machine and turn the machine on The machine model name appears next to a printer icon in the folder view b Right click the machine and then select Delete All A confirmation message appears c Click OK All templates and other data saved in the machine is deleted ...

Page 155: ...ansfer Manager on page 134 b Without connecting the machine to the computer select Configurations in the P touch Transfer Manager window and then select the template to save Note You can select multiple templates at the same time c Click File Save Transfer File Important The Save Transfer File button appears only if the machine is disconnected from the computer or offline Note If you click Save Tr...

Page 156: ...dows 8 Windows 8 1 Windows Server 2012 Windows Server 2012 R2 Click P touch Library 2 2 on the Apps screen For Windows 10 From the Start button select All apps and then click P touch Library 2 2 under Brother P touch When P touch Library starts the main window appears Main window 12 1 Menu bar Provides access to all available commands which are grouped under each menu title File Edit View Tool and...

Page 157: ...plates in the selected folder 5 Preview Displays a preview of the templates selected in the templates list Explanations of the Toolbar Icons Icon Button name Function Open Opens the selected template Print Only for P touch Library Prints the selected template with the P touch labelling machine Search Allows you to search for templates registered to P touch Library Display Style Changes the file di...

Page 158: ... Use P touch Library 147 12 Opening and Editing Templates 12 Select the template you want to open or edit and then click Open The program associated with the template starts so that you can edit the template ...

Page 159: ...How to Use P touch Library 148 12 Printing Templates 12 Select the template you want to print and then click Print The connected machine prints the template ...

Page 160: ...Parameters Determines how the program searches when multiple criteria are specified If you select AND the program searches for files that satisfy all of the criteria If you select OR the program searches for files that satisfy any of the criteria Name Search for a template by specifying the file name Type Search for a template by specifying the file type Size Search for a template by specifying th...

Page 161: ...y by dragging and dropping them into the All Contents folder or to the folder list You can also configure P touch Editor to register templates to P touch Library automatically using the following procedure 1 From the P touch Editor menu select Tools Options 2 In the Options dialog box click Registration Settings in the General tab 3 Select the timing for registering templates created with P touch ...

Page 162: ...ng used the existing template will be overwritten with the new one This function requires a USB connection Preparing P touch Transfer Express 13 The user must prepare P touch Transfer Express for transferring templates to a machine Important The printer driver must be installed before using Transfer Express P touch Transfer Express is available only in English a You can download the latest version...

Page 163: ...ll Programs Brother P touch P touch Tools P touch Transfer Manager 2 2 to start P touch Transfer Manager and then dragging the lbx file to the P touch Transfer Manager window For Windows 8 Windows 8 1 Windows Server 2012 Windows Server 2012 R2 The template can also be transferred to P touch Transfer Manager by clicking P touch Transfer Manager 2 2 on the Apps screen to start P touch Transfer Manag...

Page 164: ...ving the Template as a Transfer Package File pdz 13 To create a file in a format that can be used by P touch Transfer Express save the template as a Transfer Package file pdz a In the folder view select Configurations b Select the templates you want to distribute ...

Page 165: ...isconnected from the computer or offline Note If you click Save Transfer File after selecting Configurations or a created folder all templates in the folder are saved as the Transfer Package file pdz You can combine multiple templates into a single Transfer Package file pdz d Type in the name and then click Save The template is saved as a Transfer Package file pdz ...

Page 166: ...Transfer Express folder onto their computer it is not necessary for the administrator to send the Transfer Express folder to the user In this case the user can simply move the distributed Transfer Package file to the downloaded folder and then double click PtTrExp exe a Move the Transfer Package file pdz to the downloads folder b Distribute all files in the downloads folder to the user ...

Page 167: ...ile pdz to the machine Important Do not turn off the power when transferring templates a Turn the machine on b Using a USB cable connect the machine to the computer c Double click PtTrExp exe in the Transfer Express folder then double click PtTrExp exe which was received from the administrator d 1 If there is a single Transfer Package file pdz in the folder containing PtTrExp exe click Transfer Th...

Page 168: ...touch Transfer Express 157 13 2 If there are either multiple or no Transfer Package files pdz in the folder containing PtTrExp exe click Browse Select the Transfer Package file you want to transfer and then click Open Click Transfer ...

Page 169: ...Transferring Templates with P touch Transfer Express 158 13 Click Yes The transfer of the Transfer Package file begins e Click OK The transfer of the Transfer Package file is completed ...

Page 170: ... Vista Windows 7 Windows Server 2008 Windows Server 2008 R2 Double click the P touch Update Software icon Note The following method can also be used to start P touch Update Software Click the Start button and then select All Programs Brother P touch P touch Update Software For Windows 8 Windows 8 1 Windows Server 2012 Windows Server 2012 R2 Click P touch Update Software on the Apps screen or doubl...

Page 171: ... b Click the Computer software update icon c Select the Printer and Language settings select the check box next to Cable Label Tool and P touch Editor and then click Install d A message appears indicating that the installation has finished ...

Page 172: ...s 7 Windows Server 2008 Windows Server 2008 R2 Double click the P touch Update Software icon Note The following method can also be used to start P touch Update Software Click the Start button and then select All Programs Brother P touch P touch Update Software For Windows 8 Windows 8 1 Windows Server 2012 Windows Server 2012 R2 Click P touch Update Software on the Apps screen or double click P tou...

Page 173: ...How to Update P touch Software 162 14 c Click the Machine update icon d Select the Printer settings ensure that The machine is connected correctly appears and then click OK ...

Page 174: ... want to update to and then click Transfer Important Do not turn the machine off or disconnect the cable during data transfer f Check the content to be updated and then click Start to begin the update The firmware update begins Important Do not turn the machine off or disconnect the cable during the update process ...

Page 175: ...Section III Application for Mac III Using P touch Software 165 How to Use P touch Editor 166 How to Update P touch Software 169 ...

Page 176: ...nload the installer from www brother com inst For more information on installing the software and driver see Installing the Printer Driver and Software on page 62 To download the latest driver and software individually visit the Brother Solutions Center at support brother com Select your region country Downloads Choose your product Using P touch Software 15 ...

Page 177: ...so be used to start P touch Editor Double click Macintosh HD Applications P touch Editor 5 1 and then double click the P touch Editor application icon When using a Mac computer you cannot transfer label data created using P touch Editor to the P touch labelling machine P touch Editor starts How to Use P touch Editor 16 ...

Page 178: ...peration modes 16 Standard Mode 16 This mode allows you to create labels with text and images The layout window consists of the following sections 1 Command bar 2 Draw Edit toolbar 3 Inspector 4 Layout window 5 Database window 1 2 5 4 3 ...

Page 179: ...tart the Snap mode follow the steps below a Click the Snap mode selection button The Description of Snap mode dialog box appears b Click OK The Snap mode palette appears Transferring Data to the Machine 16 To transfer data to the machine you must use a Windows computer For more information see How to Use P touch Transfer Manager on page 134 ...

Page 180: ...dating P touch Editor 17 Important The printer driver must be installed before updating P touch Editor a Double click the P touch Update Software icon on the desktop Note The following method can also be used to start P touch Update Software Double click Macintosh HD Applications P touch Update Software and then double click the P touch Update Software application icon b Click the Computer softwar...

Page 181: ... Update P touch Software 170 17 c Select the Printer and Language settings select the check box next to P touch Editor and then click Install d A message appears indicating that the installation has finished ...

Page 182: ...other application is running exit the application a Turn the P touch labelling machine on and connect the USB cable b Double click the P touch Update Software icon on the desktop Note The following method can also be used to start P touch Update Software Double click Macintosh HD Applications P touch Update Software and then double click the P touch Update Software application icon c Click the Mac...

Page 183: ...ttings select the check box next to the firmware you want to update to and then click Transfer Important Do not turn the machine off or disconnect the cable during data transfer f Check the content to be updated and then click Start to begin the update The firmware update begins Important Do not turn the machine off or disconnect the cable during the update process ...

Page 184: ...Section IV Wireless Network IV Introduction 174 Changing Your P touch Labelling Machine Network Settings 175 Web Based Management 178 ...

Page 185: ... can be shared on an IEEE 802 11b g n wireless network using the internal network print server The print server supports various functions and methods of connection on a network supporting TCP IP depending on the operating system you are running Introduction 18 ...

Page 186: ...lable as a download from the Brother Solutions Center at support brother com If using firewall anti spyware or antivirus software temporarily disable them When you are sure that you can print re enable them The node name appears in the current BRAdmin Light window The default node name of the print server in the machine is BRWxxxxxxxxxxxx xxxxxxxxxxxx is based on your machine s MAC Address Etherne...

Page 187: ...se a DHCP BOOTP RARP server the device appears as Unconfigured in the BRAdmin Light utility screen d Select STATIC for Boot Method Type the IP Address Subnet Mask and Gateway settings if needed for your print server e Click OK f If you have set the IP address up correctly the Brother print server appears in the device list ...

Page 188: ...d display the device status from an easy to read Explorer style window that changes colour to represent the status of each device You can configure network and device settings along with the ability to update device firmware from a Windows computer on your Local Area Network LAN BRAdmin Professional can also log activity of Brother devices on your network and export the log data For more informati...

Page 189: ...Displaying software version information of the machine and print server Changing network and machine configuration details Note We recommend Microsoft Internet Explorer 7 0 or later or Firefox 25 0 1 or later for Windows Safari 5 0 6 or later or Firefox 26 0 or later for Mac Make sure JavaScript and cookies are always enabled in the browser you use To use Web Based Management your network must use...

Page 190: ...e can be seen on the machine settings page The NetBIOS name assigned is the first 15 characters of the node name and by default it appears as BRWxxxxxxxxxxxx where xxxxxxxxxxxx is the Ethernet address b You can now change the print server settings Note Setting a password We recommend setting a logon password to prevent unauthorised access to Web Based Management a Click Administrator b Type the pa...

Page 191: ...enance 183 Useful Settings 188 Using the Rechargeable Li ion Battery Battery Base Optional PA BT 4000LI PA BB 003 191 Troubleshooting 195 Product Specifications 208 Notes on Using P touch Transfer Manager 211 Network Terms and Information 213 Symbols Characters Styles 223 ...

Page 192: ...until the Power indicator lights in orange and the Label indicator blinks in green c While holding the Power button press the Feed and Cut button as follows Press two times to reset the customised settings and clear the data except all of the transferred data from the computer registered programs and the contents in the file memory The settings that you can make using the keyboard LCD unit are res...

Page 193: ...ctory settings For more information see Changing the P touch Labelling Machine Settings on page 80 Value Details Reset All Settings Transferred data templates databases and transferred symbols registered programs and the contents in the file memory are NOT cleared Other data is cleared and all settings except the Wi Fi settings are reset to factory settings Erase All Content Transferred data templ...

Page 194: ...Do not use paint thinner benzene alcohol or any other organic solvent These may deform the case or damage the appearance of your machine Cleaning the Print Head 22 Streaks or poor quality characters on printed labels generally indicate that the print head is dirty Clean the print head using a dry cotton swab or the optional print head cleaning cassette TZe CL6 WARNING Do not touch the print head d...

Page 195: ...ler with a dry cotton swab by moving the swab up and down while rotating the roller Cleaning the Tape Cutter Unit 22 Tape adhesive can build up on the cutter blades after repeated use dulling the blades which may result in the tape jamming About once every year wipe the cutter blades using a cotton swab WARNING Do not touch the cutter blades directly with your bare hands ...

Page 196: ... in the machine Other batteries may cause damage to the machine Dispose of the batteries at an appropriate collection point not in the general waste stream In addition be sure to observe all applicable federal state and local regulations When storing or discarding the battery wrap it for example with cellophane tape to prevent it from short circuiting Battery insulation example 1 Cellophane tape 2...

Page 197: ...ant If the coin cell battery cover is forcibly turned past the stop position it may become damaged d Remove the battery As shown below press part A of the battery so that it can be removed e Install the new battery Important Be sure to insert the new battery with the and sides facing the correct direction f Return the coin cell battery cover to its original position To install the coin cell batter...

Page 198: ...Maintenance 187 22 g Close the top cover Note You can configure the time and date using Settings in the Home screen For more information see Clock Setting on page 28 ...

Page 199: ... or Enter key c Select AC Adapter or Li ion Battery using the or key and set the value using the or key d Press the OK key You can also use the Printer Setting Tool to change the settings See Changing the P touch Labelling Machine Settings on page 80 for more information Important If you connect the AC adapter to the machine after you specified Auto Power Off the machine uses the AC Adapter settin...

Page 200: ...g the Space key on the contrast setting screen sets the contrast to the factory setting of 0 Backlight 23 You can change the backlight setting either to On or Off The display is easier to see with the backlight on The factory setting is On a Select Settings in the Home screen using the or key and then press the OK or Enter key b Select Backlight using the or key and then press the OK or Enter key ...

Page 201: ...ais Hrvatski Italiano Magyar Nederlands Norsk Polski Português Português Brasil Română Slovenski Slovenský Suomi Svenska and Türkçe d Press the OK or Enter key Note To return to the previous step press the Esc key Setting Unit 23 a Select Settings in the Home screen using the or key and then press the OK or Enter key b Select Unit using the or key and then press the OK or Enter key c Select a unit...

Page 202: ...tached to the machine Installing the Rechargeable Li ion Battery 24 a Disconnect the AC adapter and then attach the battery base optional PA BB 003 to the machine For more information about attaching the battery base see its instruction manual b Open the battery cover on the bottom of the machine c Insert the battery into the battery compartment d Close the battery cover Note The voltage supplied ...

Page 203: ... this does not cause any injuries Charging the Rechargeable Li ion Battery 24 Note Before use fully charge the battery Up to three hours may be needed to fully charge the battery a Make sure the battery is installed in the machine b Use the AC adapter and power supply cord to connect the machine to an electrical socket Press the Power button to turn the machine on if it is not on already The Batte...

Page 204: ...ge and the Battery indicator will remain lit If the charging stops because the environment temperature is too low or too high place the machine with a temperature between 0 C and 40 C and try charging again If the machine is used to print feed or perform another operation when both the battery is installed and the AC adapter is connected the Battery indicator may turn off and charging may stop eve...

Page 205: ...echargeable Li ion Battery 24 Size approx 74 mm W 86 mm D 32 mm H Weight approx 0 240 kg Voltage 14 4 V Capacity 1800 mAh Charging discharging cycle approx 300 times Charging time approx 3 hours Battery Base 24 Size approx 168 mm W 126 mm D 44 mm H Weight approx 0 3 kg Charging current 1000 mA Charging voltage 16 4 V ...

Page 206: ...on page 191 Remove all protective packaging from the machine Install and select the correct printer driver see Installing the Printer Driver and Software on page 62 Connect the machine to a computer or mobile device see Connecting the Machine to a Computer on page 62 Close the top cover completely Insert a tape cassette correctly see Inserting a Tape Cassette on page 6 If you still have problems r...

Page 207: ... want Problem Solution The label is not printed Check that text has been entered and that the tape cassette is installed correctly with sufficient tape remaining If the tape is bent cut off the bent section and thread the tape through the exit slot When printing from a computer or mobile device make sure the computer or mobile device is connected correctly to the machine The label is not printed c...

Page 208: ...d and TZe laminated tape with black ink is installed Use the printer driver to select the high speed mode when printing the labels You cannot use this function for TZe FX 1 tape I want to print in higher resolution High resolution printing can be used if you are printing from a computer the AC adapter is connected and TZe laminated tape with black ink is installed Use the printer driver to select ...

Page 209: ...d Printers right clicking the machine you want to set up and then clicking Printing Preferences Windows 8 Windows 8 1 Windows Server 2012 Windows Server 2012 R2 To display the Quality options open the machine properties by clicking Control Panel in the Apps screen Hardware and Sound Devices and Printers right clicking the machine you want to set up and then clicking Printing Preferences Windows 10...

Page 210: ...e version number of the firmware of my machine The version number and other information for the firmware can be confirmed using the following procedure 1 Select Settings in the Home screen using the or key and then press the OK or Enter key 2 Select Version Information using the or key and then press the OK or Enter key In addition you can also use the following procedure 1 Turn the machine on 2 P...

Page 211: ...e Move your machine to an obstruction free area A wireless computer Bluetooth supported device microwave oven or digital cordless phone is near the machine or the wireless access point router Move other devices away from the machine You are using MAC Address filtering You can confirm the MAC address by printing the machine settings report See Confirming the P touch Labelling Machines Settings on p...

Page 212: ...on Devices and Printers and select your machine from Printers and Faxes Double click your machine s icon and then select Cancel All Documents in the Printer menu I have checked and tried all of the above but my machine does not print Uninstall the printer driver and the software and then reinstall them Problem Solution You did not select to allow access when the security alert dialog box appeared ...

Page 213: ...ng Machine Settings on page 80 Can you ping your machine from your computer Ping your machine from your computer using the IP address or the node name Successful Your machine is working correctly and connected to the same network as your computer Unsuccessful Your machine is not connected to the same network as your computer Contact the network administrator You can confirm the IP address or the n...

Page 214: ...ilable When using high resolution or high speed printing you must connect the AC adapter and use only TZe laminated tape with black ink and print from the computer Otherwise print using the standard setting You cannot use this function for TZe FX 1 tape Holder Malfunction Label The operation of the label feeding mechanism is faulty Turn the machine off and then on again Check that the tape cassett...

Page 215: ...ator can be off lit or flashing in any colour Indicator is off Label Power indicator Label Power Condition Power is turning off Top cover open Idle mode Initialising mode Tape feed and cutting mode 1 time in 1 second Transferring data Now cooling System error 1 System error 2 System error 3 1 time in 1 second USB host power supply excessive voltage error Mass storage error 1 time in 2 seconds Labe...

Page 216: ...conds Memory full error Communication error When blinking alternately Cutter error When blinking simultaneously High temperature error 2 times in 1 8 seconds Non compliant tape error 1 time in 1 second Wrong media error 2 times in 1 8 seconds No cassette error Media end error Top cover open error when printing 2 times in 1 8 seconds 2 times in 1 8 seconds High resolution high speed printing error ...

Page 217: ...ry power low Rechargeable battery error Rechargeable battery power empty Adapter connection disconnection error Wi Fi indicator Wi Fi Power Condition No available WPS access point was found WPS access point connection error Check the protocol 2 times in 1 8 seconds Incorrect security settings 2 times in 1 8 seconds WPS access point search error Wi Fi on not connected Wi Fi on connected Wi Fi off ...

Page 218: ...ust cool down because it overheated due to the type of tape cassette you are using or the contents of the label printing may take longer than usual Note This condition may occur more often when the machine is used at high altitude more than 10 000 ft 3 048 m due to a lower air density available to cool the machine Machine is in boot mode To resolve the issue contact your Brother dealer or Brother ...

Page 219: ...ette Brother TZe tape cassette 3 5 mm 6 mm 9 mm 12 mm 18 mm 24 mm 36 mm widths Brother HSe tube cassette 5 8 mm 8 8 mm 11 7 mm 17 7 mm 23 6 mm widths Brother FLe label cassette 21 mm x 45 mm No of lines TZe tape cassette 36 mm tape 17 lines 24 mm tape 13 lines 18 mm tape 10 lines 12 mm tape 6 lines 9 mm tape 4 lines 6 mm tape 3 lines 3 5 mm tape 1 line HSe tube cassette 23 6 mm tape 12 lines 17 7 ...

Page 220: ...function for TZe FX 1 tape 2 Actual character size may be smaller than maximum print height Interface USB Version 2 0 Full Speed Wi Fi Wireless Direct IEEE 802 11n Ad Hoc mode IEEE 802 11b Infrastructure mode IEEE 802 11b g n WPS 2 0 Other Operating temperature humidity When running between 10 C and 35 C between 20 and 80 max wet bulb temperature 27 C Model Name PT D800W ...

Page 221: ... website are subject to change without notice Item Specifications Operating System Windows Windows Vista Windows 7 Windows 8 Windows 8 1 Windows 10 Windows Server 2008 Windows Server 2008 R2 Windows Server 2012 Windows Server 2012 R2 Mac OS X v10 9 5 10 10 x 10 11 Hard Disk Windows Disk space 460 MB or more Mac Disk space 500 MB or more Memory Windows Windows Vista Windows Server 2008 Windows Serv...

Page 222: ... In addition some character styles are not available on the machine A numbering field specified with P touch Editor cannot be transferred Backgrounds specified with P touch Editor are not compatible with the machine A P touch Editor layout that uses the split printing function enlarging the label and printing it on two or more labels cannot be transferred Only the first 17 lines of text typed in a...

Page 223: ...ly the database csv file is transferred to update it the database may not link correctly with the template In addition the first line of data in the transferred file must be recognised by the machine as field names Logos symbols and graphics downloaded to the machine will automatically be scaled like the resident font or any of the resident symbol in the library ...

Page 224: ...P RARP BOOTP DHCP APIPA Auto IP mDNS WINS NetBIOS name resolution DNS Resolver LPR LPD Custom Raw Port Port9100 FTP Server TFTP client and server SNTP client ICMP LLMNR responder SNMPv1 v2c Protocol IPv6 NDP RA DNS Resolver LPR LPD mDNS Custom Raw Port Port9100 FTP Server SNMPv1 TFTP client and server ICMP LLMNR responder SNMPv1 v2c Network Security Wireless SSID 32 chr WEP 64 128 bit WPA WPA2 PSK...

Page 225: ...TCP IP 28 In a Peer to Peer environment each computer directly sends and receives data to each device There is no central server controlling file access or machine sharing 1 Router In a smaller network of two or three computers we recommend the Peer to Peer printing method as it is easier to configure than the Network Shared printing method See Network Shared printing on page 215 Each computer mus...

Page 226: ... is to control the printing of all print jobs In a larger network we recommend using a Network Shared printing environment The server or the print server must use the TCP IP print protocol Your machine needs to have an appropriate IP address configuration except when the machine is connected via the USB interface to the server 1 Client computers 2 Also known as Server or Print server 3 TCP IP or U...

Page 227: ...er is between 0 and 254 For example in a small network you would normally change the final number 192 168 1 1 192 168 1 2 192 168 1 3 How the IP address is assigned to your print server 28 If you have a DHCP BOOTP RARP server on your network the print server will automatically obtain its IP address from that server Note On smaller networks the DHCP server may also be the router If you do not have ...

Page 228: ...an communicate with any device with an IP address that begins with 192 168 1 x where x is a number between 0 and 254 Gateway and router 28 A gateway is a network point that acts as an entrance to another network and sends data transmitted via the network to an exact destination The router knows where to direct data that arrives at the gateway If a destination is located on an external network the ...

Page 229: ...on methods for an enterprise wireless network on page 220 Authentication methods 28 Open system Wireless devices are allowed to access the network without any authentication Shared key A secret pre determined key is shared by all devices that will access the wireless network The Brother wireless machine uses a WEP key as the pre determined key WPA PSK Enables a Wi Fi Protected Access Pre shared ke...

Page 230: ...t hexadecimal Uses 10 digits of hexadecimal data For example 71f2234aba 128 104 bit ASCII Uses 13 text characters For example Wirelesscomms case sensitive 128 104 bit hexadecimal Uses 26 digits of hexadecimal data For example 71f2234ab56cd709e5412aa2ba WPA PSK WPA2 PSK and TKIP or AES WPA2 with AES Uses a Pre Shared Key PSK that is eight or more characters in length up to a maximum of 63 character...

Page 231: ...PEAP PEAP Protected Extensible Authentication Protocol has been developed by Microsoft Corporation Cisco Systems and RSA Security PEAP creates an encrypted SSL Secure Sockets Layer TLS Transport Layer Security tunnel between a client and an authentication server for sending a user ID and password PEAP provides mutual authentication between the server and the client The machine supports the followi...

Page 232: ... protection using a symmetric key encryption CKIP The original Key Integrity Protocol for LEAP by Cisco Systems Inc When Communication Mode is set to Infrastructure Authentication Method Encryption Mode LEAP CKIP EAP FAST NONE TKIP AES EAP FAST MS CHAPv2 TKIP AES EAP FAST GTC TKIP AES PEAP MS CHAPv2 TKIP AES PEAP GTC TKIP AES EAP TTLS CHAP TKIP AES EAP TTLS MS CHAP TKIP AES EAP TTLS MS CHAPv2 TKIP...

Page 233: ...and Information 222 28 User ID and password 28 The following security methods support a user ID less than 64 characters and a password less than 32 characters in length LEAP EAP FAST PEAP EAP TTLS EAP TLS For user ID ...

Page 234: ...223 29 29 Symbols 29 Symbols Characters Styles 29 Category Symbols Punctuation Datacom Audio Visual Electrical Arrows Safety Prohibited Brackets Mathematics Greek Super Subscript ...

Page 235: ...Symbols Characters Styles 224 29 Note The symbols shown in the table may look slightly different on the P touch labelling machine LCD and when printed Bullets Currency Misc Category Symbols ...

Page 236: ...Symbols Characters Styles 225 29 Accented Characters 29 Character Accented Characters Character Accented Characters a n A N c o C O d r D R e s E S g t G T i u I U k y K Y l z L Z ...

Page 237: ...er Attribute 29 1 The default font for labels 2 The default font for cable labels Attribute Value Result Value Result Font Helsinki 1 Belgium Brussels Atlanta US Adams Los Angeles Brunei San Diego Sofia Florida Germany Calgary Letter Gothic 2 ...

Page 238: ...text is automatically adjusted to print in the largest size available for each tape width 4 90 pt The character is fixed to the selected size Width x 2 x 2 3 x 3 2 x 1 2 x 1 Style Normal I Bold Bold I Outline Outline I Shadow Shadow I Solid Solid Vertical Italic Vertical Bold Line Off Underline Strike out ...

Page 239: ...ach a minimum size the selected font will be changed to a default custom font which is based on the Helsinki style This allows labels using the smallest text possible on narrow or multi line labels If 4 point or 5 point is selected for the font size the text is printed in the Brussels font regardless of the selected font Alignment Left Right Center Justify Attribute Value Result Value Result ...

Page 240: ... Characters Styles 229 29 Frames 29 Value Result Value Result Value Result 1 2 3 4 5 6 7 8 9 10 11 12 13 14 15 16 17 18 19 20 21 22 23 24 25 26 27 28 29 30 31 32 33 34 35 36 37 38 39 40 41 42 43 44 45 46 47 48 ...

Page 241: ...racters Styles 230 29 49 50 51 52 53 54 55 56 57 58 59 60 61 62 63 64 65 66 67 68 69 70 71 72 73 74 75 76 77 78 79 80 81 82 83 84 85 86 87 88 89 90 91 92 93 94 95 96 97 98 99 Value Result Value Result Value Result ...

Page 242: ...ze Label layout Asset Management Asset Tag 1 36 mm x 70 mm Asset Tag 2 24 mm x 70 mm Asset Tag 3 18 mm x 70 mm Bin Box 1 36 mm x 76 mm Bin Box 2 24 mm x 76 mm Bin Box 3 18 mm x 76 mm Equipment Label 1 36 mm x 58 mm Equipment Label 2 24 mm x 58 mm Equipment Label 3 18 mm x 58 mm ...

Page 243: ... 111 mm Cabinet Label 5 36 mm x 160 mm Cabinet Label 6 24 mm x 160 mm Signage Signage 1 36 mm x 126 mm Signage 2 24 mm x 126 mm Signage 3 36 mm x 66 mm Signage 4 24 mm x 66 mm File Binder Spine 1 36 mm x 219 mm Binder Spine 2 24 mm x 219 mm Binder Spine 3 18 mm x 219 mm File Folder Tab 12 mm x 82 mm Divider Tab 12 mm x 42 mm Category Value Size Label layout ...

Page 244: ...0 mm Address Label 3 18 mm x 70 mm Name Badge 1 36 mm x 72 mm Name Badge 2 24 mm x 72 mm Name Badge 3 18 mm x 72 mm Name Badge 4 18 mm x 72 mm Media SD Card Label 12 mm x 25 mm USB Flash Memory 9 mm x 25 mm CD Case Spine 1 6 mm x 113 mm CD Case Spine 2 3 5 mm x 113 mm Category Value Size Label layout ...

Page 245: ...lue Details Value Details 36 mm 2LineA 1 2LineB 2LineB 1 3Line 3Line 1 4Line 1 2LineA 1 5Line 24 mm 2LineA 1 2LineB 2LineB 1 3Line 3Line 1 4Line 1 2LineA 1 5Line 18 mm 2LineA 1 2LineB 2LineB 1 3Line 3Line 1 4Line 1 2LineA 1 5Line 12 mm 2LineA 3Line 2LineB 1 2Line ...

Page 246: ...Symbols Characters Styles 235 29 9 mm 2LineA 1 2Line 2LineB 6 mm 1 2Line Attribute Value Details Value Details ...

Page 247: ...racter List 29 Attribute Value Protocol CODE39 CODE128 EAN 8 EAN 13 GS1 128 UCC EAN 128 UPC A UPC E I 2 5 ITF CODABAR Width Small Large Under characters printed below barcode On Off C Digit check digit Off On available only for the CODE39 I 2 5 and CODABAR protocols CODE39 Special Character SPACE CODABAR Special Character ...

Page 248: ...racters Styles 237 29 CODE128 GS1 128 UCC EAN 128 Special Character SPACE DC3 DC4 NAK SYN NUL ETB CAN SOH EM STX SUB ETX ESC EOT ENQ FS ACK BEL GS BS HT RS LF VT US FF DEL CR FNC3 SO FNC2 SI FNC4 DLE FNC1 DC1 DC2 ...

Page 249: ...ate Format Options Table 29 Note Factory settings are shown in bold Attribute Value Date 12 31 2099 2099 12 31 12 31 2099 31 12 2099 12 31 2099 31 12 2099 December 31 2099 31 12 2099 Dec 31 2099 31 December 2099 2099 12 31 31 Dec 2099 Time 11 59 PM 23 59 ...

Page 250: ......

Reviews: