


MFC-J2730DW/MFC-J5730DW/MFC-J5930DW
1. Swipe left or right or press
d
or
c
to display
[Web]
.
Press
[Web]
.
•
If information regarding the Internet connection appears on the machine's LCD, read the information
and press
[OK]
.
•
Occasionally, updates or announcements about Brother Web Connect's features will appear on the
LCD. Read the information, and then press
[OK]
.
2. Swipe left or right or press
d
or
c
to display the service with which you want to register.
Press the service name.
3. If information regarding Brother Web Connect appears, press
[OK]
.
4. Press
[Register/Delete Account]
>
[Register Account]
.
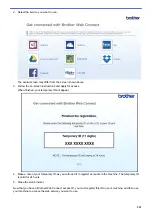
5. The machine will prompt you to enter the temporary ID you received when you applied for Brother Web
Connect access.
Press
[OK]
.
6. Enter the temporary ID using the LCD, and then press
[OK]
.
An error message will appear on the LCD if the information you entered does not match the temporary ID
you received when you applied for access, or if the temporary ID has expired. Either enter the temporary ID
correctly, or apply for access again and receive a new temporary ID.
7. The machine will prompt you to enter the account name that you want to be displayed on the LCD.
Press
[OK]
.
8. Enter the name using the LCD, and then press
[OK]
.
9. Do one of the following:
•
To set a PIN for the account, press
[Yes]
. (A PIN prevents unauthorized access to the account.) Enter a
four-digit number and press
[OK]
.
•
If you do not want to set a PIN, press
[No]
.
When the account information you entered appears, confirm that it is correct.
10. Press
[Yes]
to register your information as entered.
11. Press
[OK]
.
Account registration is complete and your machine can now access the service.
12. Press
.
Related Information
•
525
Summary of Contents for MFC-J2330DW
Page 12: ... Features Tables 3 7 93 4 mm Touch Panel models 5 ...
Page 25: ... Use the A3 Copy Shortcuts Error and Maintenance Messages 18 ...
Page 27: ...Related Information Touchscreen LCD Overview 20 ...
Page 30: ... Touchscreen LCD Overview Check the Ink Volume 23 ...
Page 32: ...Related Information Introduction to Your Brother Machine 25 ...
Page 37: ...Home Paper Handling Paper Handling Load Paper Load Documents 30 ...
Page 44: ... Choose the Right Print Media Change the Paper Size and Paper Type 37 ...
Page 173: ...Related Information Set up a Scan to Network Profile 166 ...
Page 189: ...Related Information Scan Using the Scan Button on Your Brother Machine 182 ...
Page 253: ... TWAIN Driver Settings Macintosh 246 ...
Page 278: ... Important Note 271 ...
Page 291: ...Related Information Send a Fax Fax Options 284 ...
Page 297: ... Set up Groups for Broadcasting Enter Text on Your Brother Machine 290 ...
Page 311: ... Telephone and Fax problems 304 ...
Page 326: ...Related Information Memory Receive Options 319 ...
Page 348: ...Related Information Store Fax Numbers 341 ...
Page 350: ... Store Address Book Numbers 343 ...
Page 375: ... Set the Machine to Power Off Automatically 368 ...
Page 376: ...Home Fax PC FAX PC FAX PC FAX for Windows PC FAX for Macintosh 369 ...
Page 431: ... Wi Fi Direct Network Configuration Overview 424 ...
Page 440: ...Related Information Configure Your Brother Machine for Email or I Fax 433 ...
Page 526: ...Related Information Set Up Brother Web Connect 519 ...
Page 530: ...Related Information Set Up Brother Web Connect 523 ...
Page 565: ...4 Press OK The machine scans the document Related Information NotePrint and NoteScan 558 ...
Page 675: ... My Brother Machine Cannot Print Scan or PC FAX Receive over the Network 668 ...
Page 691: ... Clean the Print Head from Your Brother Machine 684 ...
Page 814: ...UK Version 0 ...