Brother MFC-8460N User Manual Download Page 152

138

j

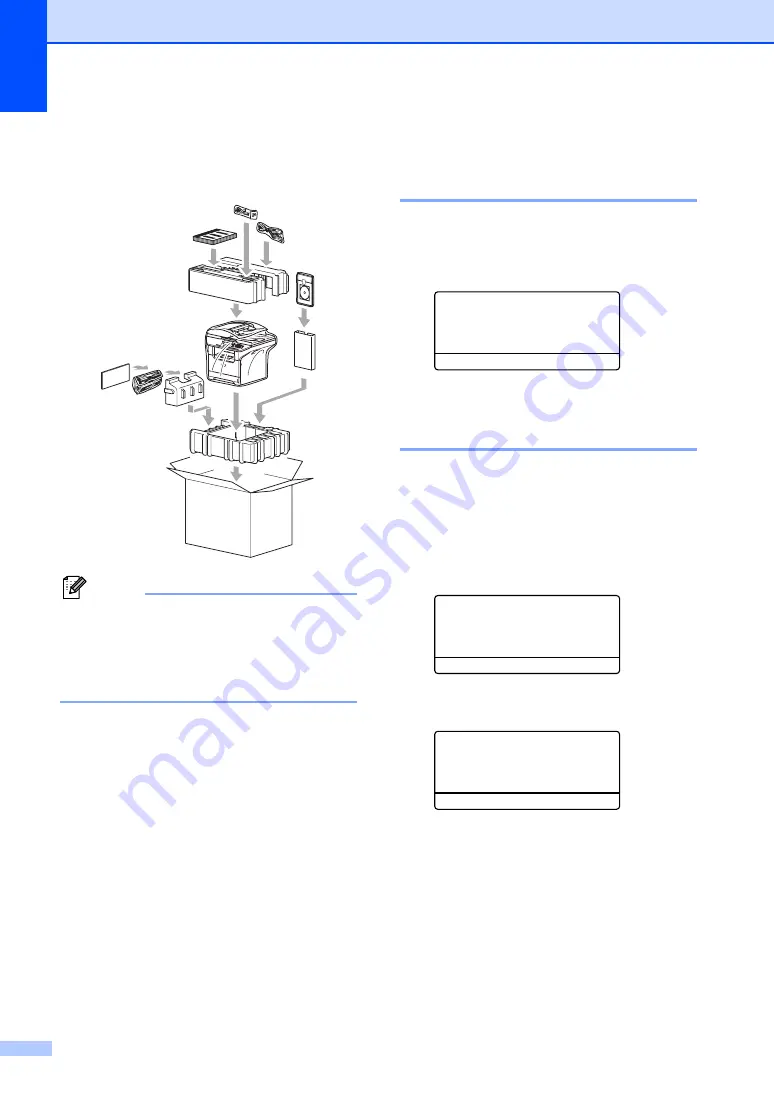
Pack the drum unit and toner cartridge 
assembly, AC power cord and printed 
materials in the original carton as shown 
below.


Note

If you are returning your machine to 
Brother as part of the Exchange Service, 
pack only the machine. Keep all separate 
parts and printed materials to use with 
your ‘Exchange’ machine.


k

Close the carton and tape it shut.

Machine Information

C

Checking the serial number

C

You can see the machine’s serial number on 
the LCD.

a

Press 

Menu

7

1

.


71.Serial No.

  XXXXXXXXX

b

Press 

Stop/Exit

.

Checking the page counters

C

You can see the machine’s page counters for 
copies, printed pages, reports and lists, faxes 
or a summary total.

a

Press 

Menu

7

2

.

The LCD shows number of pages for 

Total

 and 

Copy

.


72.Page Counter

a

    Total    :XXXXXX

b

    Copy     :XXXXXX

b

Press 

a

 or 

b

 to see 

Print

 or 

List/Fax

.


72.Page Counter

a

    Print    :XXXXXX

b

    List/Fax :XXXXXX

c

Press 

Stop/Exit

.

Summary of Contents for MFC-8460N

Page 1: ...USER S GUIDE MFC 8460N MFC 8660DN MFC 8670DN MFC 8860DN MFC 8870DW Version D ...

Page 2: ...warranty service Register your product on line at http www brother com registration By registering your product with Brother you will be recorded as the original owner of the product Your registration with Brother may serve as confirmation of the purchase date of your product should you lose your receipt may support an insurance claim by you in the event of product loss covered by insurance and wi...

Page 3: ...ay to register your new product register on line at http www brother com registration FAQs frequently asked questions The Brother Solutions Center is our one stop resource for all your Fax Machine Multi Function Center needs You can download the latest software and utilities and read FAQs and troubleshooting tips to learn how to get the most from your Brother product http solutions brother com Not...

Page 4: ... 1 877 552 6255 1 800 947 1445 fax http www brothermall com In Canada 1 877 BROTHER http www brother ca Description Item Toner Cartridge TN 550 Standard Prints approx 3 500 pages TN 580 High yield Prints approx 7 000 pages Drum Unit DR 520 Telephone Line Cord LG3077001 IEEE 1284 Bi directional Cable F2A046 10 Paper Tray 2 Option LT 5300 User s Guide MFC 8460N MFC 8660DN MFC 8670DN MFC 8860DN and M...

Page 5: ...E LIKE ARISING OUT OF THE USE OR INABILITY TO USE THE SOFTWARE EVEN IF BROTHER S LICENSOR HAS BEEN ADVISED OF THE POSSIBILITY OF SUCH DAMAGES BECAUSE SOME STATES IN THE USA AND SOME PROVINCES IN CANADA DO NOT ALLOW THE EXCLUSION OR LIMITATION OF LIABILITY FOR CONSEQUENTIAL OR INCIDENTAL DAMAGES THE ABOVE LIMITATIONS MAY NOT APPLY TO YOU IN ANY EVENT BROTHER S LICENSOR S LIABILITY TO YOU FOR ACTUAL...

Page 6: ...device or software used with this Product including but not limited to damage resulting from use of non Brother brand parts and Consumable and Accessory Items 4 Consumable and Accessory Items that expired in accordance with a rated life 5 Problems arising from other than defects in materials or workmanship and 6 Normal Periodic Maintenance Items such as Paper Feeding Kit Fuser and Laser Units This...

Page 7: ...r within five 5 business days ii the problems with your original Product are not covered by the limited warranty iii the proper packaging instructions are not followed and has caused damage to the product or iv the warranty period on your original Product has expired or has not been sufficiently validated with a copy of the proof of purchase bill of sale The replacement Machine you receive even if...

Page 8: ...r transport will cause severe damage to the Laser MFC Fax machine and will void the Warranty For inkjet units When shipping your Inkjet MFC Fax machine remove the ink cartridges and replace them with the original protective parts If original protective parts are not available leave ink cartridges installed Please avoid shipping the unit without original protective parts or ink cartridges Damage to...

Page 9: ...ing the scanner glass 12 Acceptable paper and other media 12 Recommended media 12 Handling and using media 13 Loading paper and other media 15 Loading paper 15 Loading envelopes and other media 16 Printable Area 17 3 General setup 18 Mode timer 18 Paper settings 18 Paper Type 18 Paper Size 19 Tray use in Copy mode 19 Tray use in Fax mode 20 Tray use in Print mode 20 Volume Settings 21 Ring volume ...

Page 10: ...ng faxes using multiple settings 33 Electronic cover page 33 Contrast 35 Changing fax resolution 35 Dual access 36 Real time transmission 36 Overseas mode 37 Delayed faxing 37 Delayed batch transmission 38 Checking and canceling waiting jobs 38 Sending a fax manually 39 Out of Memory message 39 6 Receiving a fax 40 Choose the correct Receive Mode 40 Using Receive Modes 41 Fax Only 41 Fax Tel 41 Ma...

Page 11: ...3 Connecting an external phone 53 Using a cordless external handset 53 Using remote codes 53 8 Dialing and storing numbers 55 How to Dial 55 Manual dialing 55 One Touch dialing 55 Speed Dialing 55 Search 56 LDAP Search MFC 8860DN and MFC 8870DW only 56 Fax redial 56 Storing numbers 57 Storing a pause 57 Storing One Touch dial numbers 57 Storing Speed Dial numbers 59 Changing One Touch and Speed Di...

Page 12: ... transmit 73 Setup for polled transmit 73 Section III Copy 12 Making copies 76 How to copy 76 Entering copy mode 76 Making a single copy 76 Making multiple copies 76 Stop copying 76 Copy options 77 Changing copy quality 77 Changing text copy resolution 78 Enlarging or reducing the image copied 78 Making N in 1 copies or a poster page layout 79 Duplex 2 sided copying MFC 8670DN MFC 8860DN and MFC 8...

Page 13: ...oving the print quality 110 Setting Dial Tone Detection 115 Phone line interference 115 Error messages 116 Checking if the machine has faxes in its memory 120 Sending faxes to another fax machine 120 Sending faxes to your PC 120 Document jams 121 Paper jams 122 Routine maintenance 126 Cleaning the outside of the machine 126 Cleaning the scanner glass 128 Cleaning the laser scanner window 128 Clean...

Page 14: ...E Specifications General 159 Print media 160 Fax 161 Copy 162 Scan 163 Print 164 Interfaces 164 Computer requirements 165 Consumable items 166 Ethernet wired network 167 Ethernet wireless network MFC 8870DW only 168 Authentication and encryption for wireless users only 169 Wi Fi Alliance certification 170 F Glossary 171 G Index 175 ...

Page 15: ...Section I General I General information 2 Loading documents and paper 11 General setup 18 Security features 24 ...

Page 16: ...ow a Turn on your PC MFC 8460N MFC 8860DN and MFC 8870DW Insert the Brother CD ROM labeled Windows into your CD ROM drive MFC 8660DN and MFC 8670DN Insert the Brother CD ROM into your CD ROM drive For Windows Vista Users insert the Brother CD ROM labeled Windows Vista b If the language selection screen appears click your language General information 1 Bold Bold style indentifies keys on the machin...

Page 17: ...uide PaperPort User s Guide Document management software How to find Scanning instructions 1 There are several ways you can scan documents You can find the instructions as follows Software User s Guide 1 Scanning a document using the TWAIN driver in Chapter 2 Scanning a document using the WIA driver For Windows XP and Windows Vista in Chapter 2 Using ControlCenter2 in Chapter 3 Network Scanning Fo...

Page 18: ...ides 3 manuals User s Guide for stand alone operations Network User s Guide and Software User s Guide How to find Scanning instructions 1 There are several ways you can scan documents You can find the instructions as follows Software User s Guide 1 Scanning from a Macintosh in Chapter 9 For Mac OS 9 1 9 2 Mac OS X 10 2 4 or greater Using ControlCenter2 in Chapter 10 For Mac OS X 10 2 4 or greater ...

Page 19: ...will appear To access our web site www brother com click Brother Home Page To view all Brother Numbers including Customer Service numbers for the USA and Canada click Support Information To access the USA Brother online shopping mall www brothermall com for additional product and service information click Brother Mall com For the latest news and product support information http solutions brother c...

Page 20: ... help you use your machine 4 Menu keys Menu Accesses the main menu Clear Back Deletes entered data or lets you exit the menu OK Selects a setting d or c Scrolls backwards or forwards through menu selections Changes the volume when in fax or standby mode a or b Scrolls through the menus and options 5 Dial pad Used to enter telephone and fax numbers or to enter text The key temporarily switches the ...

Page 21: ...rast for the next copy Quality MFC 8460N and MFC 8660DN only Lets you change the quality for the next copy Enlarge Reduce Reduces or enlarges copies Tray Select Lets you change which tray will be used for the next copy Sort Sorts multiple copies using the ADF N in 1 You can choose N in 1 to copy 2 or 4 pages onto one page 9 Mode keys Fax Puts the machine in Fax mode Scan Puts the machine in Scan m...

Page 22: ...ly It also lets you look up the stored number in Speed Dial numbers by pressing Shift and Search Speed Dial simultaneously and then the three digit number Redial Pause Redials the last number called It also inserts a pause when programming quick dial numbers 11 Print keys Secure When using Secure Function Lock you can switch restricted users by holding down Shift as you press Secure see Secure Fun...

Page 23: ...D is off Green Yellow Red LED is on Green Yellow Red LED is blinking LED Machine Status Description Sleep Mode The power switch is off or the machine is in Sleep mode Green Warming Up The machine is warming up for printing Green Ready The machine is ready to print Yellow Receiving Data The machine is either receiving data from the computer processing data in memory or printing data Yellow Data Rem...

Page 24: ...nd you see the same service call indication after turning the machine back on please call Brother Customer Service See Brother numbers on page i Red Cover open The front cover or fuser cover is open Close the cover Toner Life End Replace the toner cartridge with a new one Paper error Put paper in the tray or clear the paper jam Check the LCD message Scan lock Check that the scanner lock lever is r...

Page 25: ...Document MFC 8670DN MFC 8860DN and MFC 8870DW only When you load a 2 sided document the document must be from 5 8 to 8 5 inches 148 0 to 215 9 mm wide and from 5 8 to 11 7 inches 148 0 to 297 0 mm long For information on the capacity of the ADF see Specifications on page 159 a Unfold the ADF document output support flap 1 b Fan the pages well c Place your documents face up top edge first in the AD...

Page 26: ...of media plain paper transparencies labels or envelopes For best results follow the steps below Use paper made for plain paper copying Use paper that is 20 to 24 lb 75 to 90 g m2 Use labels or transparencies which are designed for use in laser printers When using transparencies remove each sheet immediately to prevent smudging or paper jams Avoid touching the printed surface of the paper immediate...

Page 27: ... either side of transparencies as this can decrease the print quality Only use transparencies recommended for laser printing Only use sharply creased envelopes Improper Setup Do not use any of the following paper as they will cause paper feed problems damaged coated curled wrinkled highly textured irregularly shaped or paper that has previously been printed on by a printer 1 0 08 in 4 mm or longer...

Page 28: ...per and Bond paper up to 250 20 lb 80 g m2 Transparency up to 10 Multi purpose tray MP tray Width 2 75 to 8 5 in 69 9 to 215 9 mm Length 4 57 to 16 0 in 116 0 to 406 4 mm Plain paper Recycled paper Bond paper Envelope and Labels up to 50 20 lb 80 g m2 Transparency up to 10 Paper Tray Tray 2 A4 Letter Legal Executive A5 B5 B6 and Folio 1 Plain paper Recycled paper and Bond paper up to 250 20 lb 80 ...

Page 29: ... guide release lever 1 slide the paper guides to fit the paper size Make sure that the guides are firmly in the slots For legal size paper press the lever 2 located at the back of the tray and pull out the back of the paper tray Move the tray lock button 3 to the lock position d Fan the stack of paper well to avoid paper feeding problems e Insert the paper into the paper tray with the top edge of ...

Page 30: ... first and the printing side face up Loading Envelopes 2 Before loading press the corners and sides of the envelopes to make them as flat as possible CAUTION Do not use the following types of envelopes as they will cause paper feed problems That are of a baggy construction That are embossed have raised writing on them That have clasps or staples That are pre printed on the inside Glue 2 Rounded fl...

Page 31: ...own above is for a single copy or a 1 in 1 copy using Letter size paper The printable area changes with the paper size Printable Area when printing from a computer 2 When using the default driver the printable area is smaller than the paper size as shown below Portrait 1 0 16 in 4 23 mm 2 0 25 in 6 35 mm Landscape 1 0 16 in 4 23 mm 2 0 2 in 5 08 mm Note The printable area shown above is for Letter...

Page 32: ...Mins 5 Mins or Off Press OK c Press Stop Exit Paper settings 3 Paper Type 3 Set up the machine for the type of paper you are using This will give you the best print quality a Choose one of the options below To set the paper type for the MP Tray press Menu 1 2 1 To set the paper type for Tray 1 press Menu 1 2 2 To set the paper type for Tray 2 press Menu 1 2 3 if you installed the optional tray 12 ...

Page 33: ...or the MP tray when making N in 1 copies You must choose one of the other available Paper Size selections for the MP tray A6 size is not available for the optional Tray 2 Tray use in Copy mode 3 You can change the priority tray that the machine will use for printing copies When you select Tray 1 Only MP Only or Tray 2 Only 1 the machine loads the paper only from that tray If the selected tray is o...

Page 34: ... Fax a MP T1 b T1 MP Select ab OK b Press a or b to select Tray 1 Only Tray 2 Only MP Only MP T1 T2 1 or T1 T2 1 MP Press OK 1 Tray 2 Only or T2 appears only if the optional tray is installed Tray use in Print mode 3 You can change the default tray the machine will use for printing from your computer a Press Menu 1 7 3 17 Tray Use 3 Print a MP T1 b T1 MP Select ab OK b Press a or b to select Tray ...

Page 35: ...me 3 When the beeper is on the machine will beep when you press a key make a mistake or after you send or receive a fax You can select a range of volume levels from High to Off a Press Menu 1 4 2 14 Volume 2 Beeper a Med b High Select ab OK b Press a or b to select Off Low Med or High Press OK c Press Stop Exit Speaker volume 3 You can select a range of speaker volume levels from High to Off To ad...

Page 36: ... On b Off Select ab OK b Press a or b to select On or Off Press OK c Press Stop Exit Ecology features 3 Toner save 3 You can save toner using this feature When you set toner save to On print appears lighter The default setting is Off a Press Menu 1 6 1 16 Ecology 1 Toner Save a On b Off Select ab OK b Press a or b to choose On or Off Press OK c Press Stop Exit Note We do not recommend Toner Save f...

Page 37: ...ss Stop Exit To turn off sleep mode press Secure and Job Cancel at the same time in b Press a or b to select Off or On Press OK Note When you turn off sleep mode the setting will take effect the next time the machine copies prints or is turned off and on Turning off the scanner lamp 3 The scanner lamp stays on for 16 hours before automatically switching off to preserve the life of the lamp and red...

Page 38: ...cology Tray Use LCD Contrast Security settings Setting up the password 4 a Press Menu 1 9 1 19 Security 1 Setting Lock New Passwd Enter OK Key b Enter a four digit number for the password Press OK c Re enter your password when the LCD shows Verify Press OK d Press Stop Exit Changing your password 4 a Press Menu 1 9 1 19 Security 1 Setting Lock a On b Set Password Select ab OK b Press a or b to sel...

Page 39: ...enu settings 1 PCprint includes PC Fax Send as well as all print jobs Disabling at least one function is required to turn on Secure Function Lock for the Public user Access to restricted operations can be enabled by creating a restricted user Restricted users must select the stored name and enter a password to use the machine Make a careful note of your password If you forget it please call Brothe...

Page 40: ...ify Press OK d Press Stop Exit Setting up the Public user 4 You can set up the Public user Public users do not need to enter a password Note You must disable at least one function a Press Menu 1 9 2 19 Security 2 Function Lock a Lock OffiOn b Set Password Select ab OK b Press a or b to select Setup User Press OK c Enter the administrator password Press OK 19 Security Setup User a Public b User01 S...

Page 41: ...After you have set Fax Tx repeat this step for Fax Rx Copy and Scan Press OK h Repeat d to g for entering each additional user and password i Press Stop Exit Turning Secure Function Lock on off 4 If you enter the wrong password when following the instructions below the LCD will show Wrong password Re enter the correct password Turning Secure Function Lock on 4 a Press Menu 1 9 2 19 Security 2 Func...

Page 42: ...return to the Public setting within the same time as the Mode Timer setting Menu 1 1 See Mode timer on page 18 Also you can exit from an individual user by pressing the lighted Mode key a Hold down Shift as you press Secure Function Lock Change User a John b Mary Select ab OK b Press a or b to select the registered name of the user to be logged on Press OK c Enter your four digit password Press OK...

Page 43: ...Section II Fax II Sending a fax 30 Receiving a fax 40 Phone services and external devices 46 Dialing and storing numbers 55 Remote fax options 63 Printing reports 70 Polling 72 ...

Page 44: ...to Dial on page 55 d Press Start The machine will now scan and send your document Sending a 2 sided fax from the ADF MFC 8670DN MFC 8860DN and MFC 8870DW only 5 You can send the 2 sided document from the ADF To cancel a fax in progress press Stop Exit a Make sure you are in Fax mode b Put your document in the ADF c Press Duplex d Dial the fax number See How to Dial on page 55 e Press Start The mac...

Page 45: ...Place the next page on the scanner glass press OK Repeat e and f for each additional page Flatbed Fax Set Next Page Then Press OK g Your machine will automatically send the fax Note When faxing multiple pages from the scanner glass real time transmission should be set to Off Faxing legal size documents from the scanner glass 5 When faxing legal size documents you need to set the scan glass size to...

Page 46: ...s Note The scan profile of the One Touch Speed Dial or Group number you chose first will be applied to the broadcast If the fax resolution of the fax number you choose first is S Fine and you enter a stored IFAX number Select Std Fine will appear on the LCD Press Resolution and choose Standard Fine or Photo then re enter the IFAX number If you want to enter other numbers go back to c When you crea...

Page 47: ...ature will not work unless you have already programmed your Station ID See the Quick Setup Guide You can automatically send a cover page with every fax Your cover page includes your Station ID a comment and the name stored in the One Touch or Speed Dial memory By choosing Next Fax On you can also display the number of pages on the cover page You can choose one of the following preset comments or y...

Page 48: ... of pages blank If you make a mistake press d or Clear Back to back up and re enter the number of pages Send a cover page for all faxes 5 You can set the machine to send a cover page whenever you send a fax a Make sure you are in Fax mode b Press Menu 2 2 7 22 Setup Send 7 Coverpg Setup a Next Fax On b Next Fax Off Select ab OK c Press a or b to choose On or Off Press OK d Press a or b to choose a...

Page 49: ...oto as the Fax Resolution Changing fax resolution 5 The quality of a fax can be improved by changing the fax resolution Resolution can be changed for the next fax or for all faxes To change the fax resolution for the next fax 5 a Make sure you are in Fax mode b Load your document c Press Resolution then a or b to select the resolution Press OK To change the default fax resolution 5 a Make sure you...

Page 50: ...e will start dialing and sending If the memory is full the machine will send the document in real time even if Real Time TX is set to Off Sometimes you may want to send an important document immediately without waiting for memory transmission You can set Real Time TX to On for all documents or Next Fax On for the next fax only Sending in real time for all faxes 5 a Make sure you are in Fax mode b ...

Page 51: ...ab OK d Press a or b to select On or Off Press OK Delayed faxing 5 You can store up to 50 faxes in the memory to be sent within a twenty four hour period a Make sure you are in Fax mode b Load your document c Press Menu 2 2 3 22 Setup Send 3 Delayed Fax Set Time 00 00 Enter OK Key d Enter the time you want the fax to be sent in 24 hour format Press OK For example enter 19 45 for 7 45 PM 22 Setup S...

Page 52: ...r b to choose On or Off Press OK d Press Stop Exit Checking and canceling waiting jobs 5 Check which jobs are still waiting in the memory to be sent If there are no jobs the LCD will show No Jobs Waiting You can cancel a fax job that is stored and waiting in the memory a Press Menu 2 6 26 Remaining Jobs a 001 12 34 BROTHER 002 15 00 BIC b 003 17 30 ABCDEFG Select ab OK The number of jobs still to ...

Page 53: ...arty before you both hang up a Ask the other party to wait for fax tones beeps and then to press the Start or Send key before hanging up b Make sure you are in Fax mode c Load your document d Press Start Out of Memory message 5 If you get an Out of Memory message while scanning the first page of a fax press Stop Exit to cancel the fax If you get an Out of Memory message while scanning a subsequent...

Page 54: ...vice on the same telephone line as your Brother machine Your external telephone answering device TAD will automatically answer every call Voice messages are stored on the external TAD and fax messages are printed Choose External TAD as your receive mode See External TAD on page 41 Will you be using your Brother machine on a dedicated fax line Your machine automatically answers every call as a fax ...

Page 55: ... your machine Also see F T Ring Time on page 42 and Ring Delay on page 42 Manual 6 Manual mode turns off all automatic answering functions unless you are using the Distinctive Ring Receive feature To receive a fax in manual mode press Start when you hear fax tones short repeating beeps You can also use the Easy Receive feature to receive faxes by lifting a handset on the same line as the machine A...

Page 56: ...eive it however if it is a voice call the machine will sound the F T ring a fast double ring for the time you have set in the F T ring time setting If you hear the F T ring it means that you have a voice caller on the line Because the F T ring is made by the machine extension and external telephones will not ring however you can still answer the call on any telephone For more information see Using...

Page 57: ... easy receive to Off a Make sure you are in Fax mode b Press Menu 2 1 3 21 Setup Receive 3 Easy Receive a On b Off Select ab OK c Press a or b to select On or Off Press OK d Press Stop Exit Setting the Print Density 6 You can adjust print density to make your printed pages darker or lighter a Make sure you are in Fax mode b Press Menu 2 1 6 21 Setup Receive 6 Print Density nnonn Select d c OK c Pr...

Page 58: ...e 5 Auto Reduction a On b Off Select ab OK c Press a or b to select On or Off Press OK d Press Stop Exit Duplex 2 sided printing for Fax mode MFC 8670DN MFC 8860DN and MFC 8870DW only 6 If you set Duplex to On for fax receive the machine will print received faxes on both sides of the paper You can use A4 Letter Legal or Folio 8 13 size of paper for this function a Make sure you are in Fax mode b P...

Page 59: ...he current date and time in the machine Receiving a fax at the end of a conversation 6 At the end of a conversation you can ask the other party to send you a fax before you both hang up a Ask the other person to place the document in their machine and to press Start or Send key b When you hear the CNG tones slowly repeating beeps press Start c Replace the external handset Printing a fax from the m...

Page 60: ... of the following Get the Distinctive Ring service from your telephone company Distinctive Ring is a feature of your Brother machine that allows a person with one line to receive fax and voice calls through two different telephone numbers on that one line Brother uses the term Distinctive Ring but telephone companies market the service under a variety of names such as Custom Ringing Personalized R...

Page 61: ...o work with it Do you have Voice Mail 7 If you have Voice Mail on the phone line that you will install your new machine on there is a strong possibility that Voice Mail and the machine will conflict with each other while receiving incoming calls However the Distinctive Ring feature allows you to use more than one number on your line so both Voice Mail and the machine can work together without any ...

Page 62: ...tinctive a Off b Set Select ab OK b Press a or b to select Set c Press OK d Press a or b to select the stored ring pattern you want to use Press OK e You will hear each pattern as you scroll through the four patterns Make sure you choose the pattern that the telephone company gave you f Press Stop Exit Distinctive Ring is now set to on Turning off Distinctive Ring 7 a Press Menu 2 0 2 20 Miscellan...

Page 63: ... finished press Stop Exit Connecting an external TAD telephone answering device 7 You can connect an external Telephone Answering Device TAD to the same line as your machine When the TAD answers a call your machine will listen for the CNG fax calling tones sent by a sending fax machine If it hears them it will take over the call and receive the fax If it does not hear them it will let your TAD tak...

Page 64: ... listen for fax tones b Limit your speaking to 20 seconds c End your 20 second message by giving your Fax Receive Code for people sending manual faxes For example After the beep leave a message or send a fax by pressing l51 and Start Note We recommend beginning your OGM with an initial 5 second silence because the machine cannot hear fax tones over a loud voice You may try leaving out this pause b...

Page 65: ...r If your machine is on Line 2 plug it into L2 of the triple adapter Installing machine external two line TAD and two line telephone 7 When you are installing an external two line telephone answering device TAD and a two line telephone your machine must be isolated on one line at both the wall jack and at the TAD The most common connection is to put the machine on Line 2 which is explained in the ...

Page 66: ...nual We cannot guarantee that your machine will operate properly under all circumstances when connected to a PBX Any difficulties with sending or receiving faxes should be reported first to the company who handles your PBX External and extension phones 7 Operation from extension telephones 7 If you answer a fax call on an extension telephone or an external telephone connected to the EXT jack of th...

Page 67: ...xternal telephone the LCD shows Telephone Using a cordless external handset 7 If your cordless telephone is connected to the EXT jack of the machine see page 53 and you typically carry the cordless handset elsewhere it is easier to answer calls during the Ring Delay If you let the machine answer first you will have to go to the machine so you can press Hook to transfer the call to the cordless han...

Page 68: ... your external TAD try changing the three digit remote codes for example and 999 a Make sure you are in Fax mode b Press Menu 2 1 4 21 Setup Receive 4 Remote Codes a On b Off Select ab OK c Press a or b to select On or Off Press OK d If you selected On in c enter the new Fax Receive Code Press OK e Enter the new Telephone Answer Code Press OK f Press Stop Exit ...

Page 69: ...to call To dial One Touch numbers 21 to 40 hold down Shift as you press the One Touch key Speed Dialing 8 Hold down Shift as you press Search Speed Dial and then enter the three digit Speed Dial number Three digit number Note If the LCD shows Not Registered when you enter a One Touch or a Speed Dial number it means that a number is not stored there Dialing and storing numbers 8 ...

Page 70: ... 8 If the machine is connected to your LDAP server you can search for information such as fax numbers and E mail addresses from your server For details about how to set up LDAP see the Network User s Guide on the CD ROM Fax redial 8 If you are sending a fax manually and the line is busy press Redial Pause wait for the other fax machine to answer and then press Start to try again If you want to mak...

Page 71: ...n numbers You can press Redial Pause as many times as needed to increase the length of the pause Storing One Touch dial numbers 8 Your machine has 20 One Touch keys where you can store 40 fax or phone numbers E mail addresses for automatic dialing To access numbers 21 to 40 hold down Shift as you press the One Touch key MFC 8460N MFC 8660DN and MFC 8670DN 8 a Press Menu 2 3 1 23 Set Quick Dial 1 O...

Page 72: ... choose one of the options below If you selected Fax Tel in c press a or b to select Std Fine S Fine or Photo Press OK and then go to h If you selected E Mail in c press a or b to select B W200dpi B W200x100dpi Color150dpi Color300dpi or Color600dpi Press OK and then go to g If you selected IFAX in c press a or b to select Std Fine or Photo Press OK and then go to h Press OK if you don t want to c...

Page 73: ...t to change the default resolution f Choose one of the options below To store another Speed Dial number go to b To finish storing Speed Dial numbers press Stop Exit MFC 8860DN and MFC 8870DW 8 a Press Menu 2 3 2 23 Set Quick Dial 2 Speed Dial Speed Dial Enter OK Key b Use the dial pad to enter a three digit Speed Dial location number 001 300 Press OK c Press a or b to select Fax Tel E Mail or IFAX...

Page 74: ...the scan profile of the One Touch Speed Dial or Group number you chose first will be applied to the broadcast When you create a group or broadcast using Scan to E mail only B W200x100 and B W200dpi are available The file format can be TIFF or PDF Changing One Touch and Speed Dial numbers 8 If you try to store a One Touch or Speed Dial number over an existing number the LCD will show the name or nu...

Page 75: ...d MFC 8860DN and MFC 8870DW only Press a or b to select Fax IFAX or E Mail Press OK e To add One Touch or Speed Dial numbers follow the instructions below For One Touch numbers press the One Touch keys one after the other For Speed Dial numbers hold down Shift as you press Search Speed Dial and then enter the three digit Speed Dial location The LCD will display your chosen One Touch numbers with a...

Page 76: ... You can use them both to dial 555 7000 if you press the following keys Hold down Shift as you press Search Speed Dial 003 Hold down Shift as you press Search Speed Dial 002 and Start Numbers can be added manually by entering them on the dial pad Hold down Shift as you press Search Speed Dial 003 7001 on the dial pad and Start This would dial 555 7001 You can also add a pause by pressing the Redia...

Page 77: ...or a Speed Dial location the faxes will be forwarded to several fax numbers MFC 8860DN and MFC 8870DW only You can also enter an E mail address if your machine has been configured for the Internet Fax feature For details about Internet Fax see the Network User s Guide on the CD ROM For information about Fax Forward to E mail see the Brother Solutions Center at http solutions brother com d Press OK...

Page 78: ...number followed by Press OK For example press 1 2 3 4 5 Redial Pause 1 8 0 0 5 5 5 6 7 8 9 If you do not need a PIN press Redial Pause enter your fax number followed by Press OK For example press Redial Pause 1 8 0 0 5 5 5 6 7 8 9 e Press Stop Exit Note You cannot change a Paging number or PIN remotely If you have set Paging a backup copy will automatically be printed at the machine Fax Storage Th...

Page 79: ...rint On the machine will also print the fax a Press Menu 2 5 1 25 Remote Fax Opt 1 Fwd Page Store a Off b Fax Forward Select ab OK b Press a or b to select PC Fax Receive Press OK c Press a or b to select the interface to which the PC is connected USB or Parallel or your computer name if the machine is connected to a network 25 Remote Fax Opt 1 Fwd Page Store USB Parallel Select ab OK d Press a or...

Page 80: ...ote fax option Fax Forward Paging or Fax Storage the LCD will ask you the following message 25 Remote Fax Opt Send Fax to PC a 1 Yes b 2 No Select ab OK If you press 1 faxes in the memory will be sent to your PC before the setting changes Faxes in the memory will be sent to your PC when the PC Fax Receive icon is active on your PC See the Software User s Guide on the CD ROM If you press 2 faxes in...

Page 81: ...age 54 You can change your code at any time If you want to make your code inactive press Clear Back and then OK in b to restore the default setting l Using your Remote Access Code a Dial your fax number from a telephone or another fax machine using touch tone b When your machine answers immediately enter your Remote Access Code 3 digits followed by l c The machine signals if it has received messag...

Page 82: ...e You can insert a pause in a fax number by using the key Changing the Fax Forwarding number You can change the default setting of your fax forwarding number from another telephone or fax machine using touch tone a Dial your fax number from a telephone or another fax machine using touch tone b When your machine answers enter your remote access code 3 digits followed by l If you hear one long beep ...

Page 83: ... registered You can register your fax forwarding number by entering 4 See Changing the Fax Forwarding number on page 68 Once you have registered the number fax forwarding will work 3 Paging 4 Fax forwarding number 6 Fax storage 96 Retrieve a fax 2 Retrieve all faxes Enter the number of a remote fax machine to receive stored fax message s See Retrieving fax messages on page 68 3 Erase faxes from th...

Page 84: ...set the machine to print a fax journal activity report at specific intervals every 50 faxes 6 12 or 24 hours 2 or 7 days The default setting is Every 50 Faxes this means that your machine will print the journal when the machine has stored 50 jobs If you set the interval to Off you can still print the report by following the steps on the next page a Press Menu 2 4 2 24 Report Setting 2 Journal Peri...

Page 85: ...Dial memory in numerical or alphabetical order 4 Fax Journal Prints a list of information about your last 200 incoming and outgoing faxes TX transmit RX receive 5 User Settings Print a list of your current settings 6 Network Config Lists your network settings How to print a report 10 a Press Menu 5 5 Print Reports 1 Transmission 2 Help List 3 Tel Index List Select ab OK b Choose one of the options...

Page 86: ...ter the fax number you are polling Press Start The LCD shows Dialing Sequential polling 11 Sequential polling lets you request documents from several fax machines in one operation Afterwards a Sequential Polling Report will be printed a Make sure you are in Fax mode b Press Menu 2 1 7 Polling RX Dial Start c Specify the fax machines you want to poll by using One Touch Speed Dial Search a Group and...

Page 87: ...p for polled transmit 11 a Make sure you are in Fax mode b Load your document c Press Menu 2 2 6 22 Setup Send 6 Polled TX a On b Off Select ab OK d Press a or b to select On or Off Press OK Note The document will be stored and can be retrieved by any other fax machine until you delete it from the memory See Checking and canceling waiting jobs on page 38 ...

Page 88: ...Chapter 11 74 ...

Page 89: ...Section III Copy III Making copies 76 ...

Page 90: ... your document c Press Start Making multiple copies 12 a Make sure you are in Copy mode b Load your document c Use the dial pad to enter the number of copies up to 99 d Press Start Note To sort your copies press Sort See Sorting copies using the ADF on page 83 Stop copying 12 To stop copying press Stop Exit Making copies 12 Contrast Quality Auto Enlg Red 100 Tray MP T1 Press ab or Start 1 4 3 2 01...

Page 91: ...ry printouts Suitable for documents that contain both text and photographs Text Suitable for documents containing only text Photo Suitable for copying photographs To temporarily change the quality setting follow the steps below a Make sure you are in Copy mode b Load your document c Use the dial pad to enter the number of copies up to 99 d MFC 8460N and MFC 8660DN Press Quality MFC 8670DN MFC 8860...

Page 92: ...ext copy resolution Press OK e Press Stop Exit Enlarging or reducing the image copied 12 You can select the following enlargement or reduction ratios Custom 25 400 allows you to enter a ratio from 25 to 400 Auto sets the machine to calculate the reduction ratio that best fits the size of paper To enlarge or reduce the next copy follow the steps below a Make sure you are in Copy mode b Load your do...

Page 93: ...you want to print a poster use the scanner glass Important 12 Please make sure the paper size is set to Letter A4 Legal or Folio P means Portrait and L means Landscape You can not use the Enlarge Reduce setting with the N in 1 and poster features You can only make one poster copy at a time a Make sure you are in Copy mode b Load your document c Use the dial pad to enter the number of copies up to ...

Page 94: ...1 L 4 in 1 P 4 in 1 L If you are copying from the scanner glass 12 Insert your document face down in the direction shown below 2 in 1 P 2 in 1 L 4 in 1 P 4 in 1 L Poster 3x3 You can make a poster size copy of a photograph ...

Page 95: ... select 1sided i 2sided 2sided i 2sided or 2sided i 1sided Duplex a1sided i 2sided 2sided i 2sided b2sided i 1sided Select ab OK Press OK e Press Start to scan the document Note Duplex copy using a 2 sided legal size document is not available from the ADF If you are using the scanner glass f After the machine scans the page press 1 to scan the next page Flatbed Copy Next Page a 1 Yes b 2 No Select...

Page 96: ...to select 2sided i 1sided or 1sided i 2sided Press OK Duplex Advanced a2sided i 1sided b1sided i 2sided Select ab OK f Press Start to scan the document Note Duplex copy using a 2 sided legal size document is not available from the ADF If you are using the scanner glass g After the machine scans the page press 1 to scan the next page Flatbed Copy Next Page a 1 Yes b 2 No Select ab OK h Place the ne...

Page 97: ...e contrast setting follow the steps below a Make sure you are in Copy mode b Load your document c Use the dial pad to enter the number of copies up to 99 d MFC 8460N and MFC 8660DN Press Contrast MFC 8670DN MFC 8860DN and MFC 8870DW Press Contrast Quality Press a or b to choose Contrast Press OK Contrast nnonn c Quality Auto Enlg Red 100 Tray MP T1 Select d c OK e Press d or c to increase or decre...

Page 98: ...mes full while you are making copies the LCD message will guide you through the next step If you get an Out of Memory message while scanning a subsequent page you will have the option to press Start to copy the pages scanned so far or to press Stop Exit to cancel the operation To gain extra memory choose one of the solutions below Print the faxes that are in the memory See Printing a fax from the ...

Page 99: ...Section IV Software IV Software and Network features 86 ...

Page 100: ...r 5 in the Software User s Guide on the CD ROM For Macintosh see Chapter 12 in the Software User s Guide on the CD ROM Brother PC FAX For Windows see Chapter 6 in the Software User s Guide on the CD ROM For Macintosh see Chapter 8 in the Software User s Guide on the CD ROM LDAP See the Network User s Guide on the CD ROM Network Printing See the Network User s Guide on the CD ROM Network Scanning F...

Page 101: ...Section V Appendixes V Safety and Legal 88 Options 99 Troubleshooting and routine maintenance 102 Menu and Features 140 Specifications 159 Glossary 171 ...

Page 102: ...n magnets or generate magnetic fields Do not expose the machine to direct sunlight excessive heat open flames salty or corrosive gasses moisture or dust Do not connect your machine to an AC power outlet controlled by wall switches or automatic timers Disruption of power can wipe out information in the machine s memory Do not connect your machine to an AC power outlet on the same circuit as large a...

Page 103: ...lephone line cord first and then the power cord from the AC power outlet Do not handle the plug with wet hands Doing this might cause an electrical shock Always make sure the plug is fully inserted After you have just used the machine some internal parts of the machine will be extremely hot When you open the front or back cover of the machine DO NOT touch the shaded parts shown in the illustration...

Page 104: ...hine grasp the side hand holds that are under the scanner DO NOT carry the machine by holding it at the bottom Use caution when installing or modifying telephone lines Never touch telephone wires or terminals that are not insulated unless the telephone line has been unplugged at the wall jack Never install telephone wiring during a lightning storm Never install a telephone wall jack in a wet locat...

Page 105: ...ic shock and injury to people including the following 1 Do not use this product near water for example near a bath tub wash bowl kitchen sink washing machine or in a wet basement or near a swimming pool 2 Avoid using this product during an electrical storm There may be a remote risk of electric shock from lightning 3 Do not use this product to report a gas leak in the vicinity of the leak 4 Use on...

Page 106: ...as the sum of RENs should not exceed five 5 0 To be certain of the number of devices that may be connected to a line as determined by the total RENs contact the local telephone company For products approved after July 23 2001 the REN for this product is part of the product identifier that has the format US AAAEQ TXXXX The digits represented by are the REN without a decimal point e g 06 is a REN of...

Page 107: ...t all cables from the wall outlet before servicing modifying or installing the equipment This equipment may not be used on coin service lines provided by the telephone company or connected to party lines Brother cannot accept any financial or other responsibilities that may be the result of your use of this information including direct special or consequential damages There are no warranties exten...

Page 108: ...radio communications However there is no guarantee that interference will not occur in a particular installation If this equipment does cause harmful interference to radio or television reception which can be determined by turning the equipment off and on the user is encouraged to try to correct the interference by one or more of the following measures Reorient or relocate the receiving antenna In...

Page 109: ...r completely LAN connection A CAUTION Do not connect this product to a LAN connection that is subject to over voltages Laser safety A This equipment is certified as a Class 1 laser product under the U S Department of Health and Human Services DHHS Radiation Performance Standard according to the Radiation Control for Health and Safety Act of 1968 This means that the equipment does not produce hazar...

Page 110: ...roducts marketed in the United States WARNING Use of controls adjustments or performance of procedures other than those specified in this manual may result in hazardous invisible radiation exposure Internal laser radiation Max Radiation Power 5 mW Wave Length 770 810 nm Laser Class Class 3B Manufactured BROTHER TECHNOLOGY SHENZHEN LTD NO6 Gold Garden Ind Nanling Buji Longgang Shenzhen China This p...

Page 111: ...y feature If you are unable to insert the plug into the outlet call your electrician to replace your obsolete outlet Do not defeat the purpose of the grounded plug 9 Use only the power cord supplied with this machine 10 Do not allow anything to rest on the power cord Do not place this product where people can walk on the cord 11 If an extension cord is used with this product make sure that the tot...

Page 112: ... phone do not use it to report a gas leak in the vicinity of the leak Trademarks A The Brother logo is a registered trademark of Brother Industries Ltd Brother is a registered trademark of Brother Industries Ltd Multi Function Link is a registered trademark of Brother International Corporation Windows Vista is either a registered trademark or a trademark of Microsoft Corporation in the United Stat...

Page 113: ...99 B Options B This machine has the following optional accessories You can increase the capabilities of the machine with these items Options B Lower tray unit DIMM memory LT 5300 ...

Page 114: ...ions DIMM types B You can install the following DIMM 128 MB Buffalo Technology VN133 D128 VN133 X128 256 MB Buffalo Technology VN133 D256 512 MB Buffalo Technology VN133 D512 64 MB TechWorks 12165 0004 128 MB TechWorks 12462 0001 256 MB TechWorks 12485 0001 512 MB TechWorks 12475 0001 Note For more information visit the Buffalo Technology site at http www buffalotech com For more information visit...

Page 115: ...MM and hold it by its edges CAUTION To prevent damage to the machine from static electricity DO NOT touch the memory chips or the board surface e Hold the DIMM by the edges and align the notches in the DIMM with the protrusions in the slot Insert the DIMM diagonally 1 then tilt it toward the interface board until it clicks into place 2 f Put the interface access cover and the DIMM cover back on g ...

Page 116: ...by a poor telephone connection If your copy looks good you probably had a bad connection with static or interference on the telephone line Ask the other party to send the fax again Poor print quality See Improving the print quality on page 110 Vertical black lines when receiving Your machine s primary corona wire for printing may be dirty Clean your primary corona wire See Cleaning the corona wire...

Page 117: ...ending the fax again If you send a PC FAX message and get RESULT NG on the Transmission Verification Report your machine may be out of memory To free up extra memory you can turn off fax storage see Turning off Remote Fax Options on page 66 print fax messages in memory see Printing a fax from the memory on page 45 or cancel a delayed fax or polling job see Checking and canceling waiting jobs on pa...

Page 118: ...estions Vertical streaks appear in copies Either the scanner or the primary corona wire for printing is dirty Clean them both See Cleaning the scanner glass on page 128 and Cleaning the corona wire on page 130 Printing Difficulties Difficulties Suggestions No printout Check that the machine is plugged in and the power switch is turned on Check that the toner cartridge and drum unit are installed p...

Page 119: ...aper size setting in the printer driver You need to select A4 Letter Legal or Folio The machine is not printing or has stopped printing and the machine s status LED is yellow Press Job Cancel As the machine cancels the Job and clears it from the memory it may produce an incomplete printout Scanning Difficulties Difficulties Suggestions TWAIN errors appear while scanning Make sure that the Brother ...

Page 120: ...re is no paper load a new stack of paper into the paper tray If there is paper in the paper tray make sure it is straight If the paper is curled you should straighten it Sometimes it is helpful to remove the paper turn the stack over and put it back into the paper tray Reduce the amount of paper in the paper tray and then try again Check that the MP tray mode is not chosen in the printer driver If...

Page 121: ...rs when making copies or printing received faxes turn Toner Save mode to off in the machine menu settings See Toner save on page 22 Set Toner Save mode to off in the Advanced tab in the printer driver See Advanced tab in the Software User s Guide on the CD ROM Network Difficulties Difficulties Suggestions Cannot print over a wired Network Make sure your machine is powered on and is on line and in ...

Page 122: ...ice Enter 54925 4 In Internal Port number for this service Enter 54925 5 Make sure UDP is selected 6 Click OK e Click the Add button f To add port 54926 for network PC Fax enter the information below 1 In Description of service Enter any description for example Brother PC Fax 2 In Name or IP address for example 192 168 0 12 of the computer hosting this service on your network Enter Localhost 3 In ...

Page 123: ...canner 2 In Port number Enter 54925 3 Make sure UDP is selected Then click OK g Click the Add port button h To add port 54926 for Network PC Fax enter the information below 1 In Name Enter any description for example Brother PC Fax 2 In Port number Enter 54926 3 Make sure UDP is selected Then click OK i Make sure that the new setting is added and is checked and then click Apply j If you still have...

Page 124: ...h humidity can increase the amount of background shading See Choosing a location on page 88 Install a new toner cartridge See Replacing the toner cartridge TN 550 TN 580 on page 132 Clean the primary corona wire and the drum unit See Cleaning the corona wire on page 130 and Cleaning the drum unit on page 131 If the print quality has not improved put in a new drum unit See Replacing the drum unit D...

Page 125: ...hics at 3 7 in 94 mm intervals Black Spots at 3 7 in 94 mm intervals Dust paper powder glue and so on may stick to the surface of the photosensitive drum OPC and cause black or white spots to appear on printed documents Make a few copies of a blank white sheet of paper See Making multiple copies on page 76 If you still see the spots on printed documents after making multiple copies clean the drum ...

Page 126: ... drum unit See Cleaning the corona wire on page 130 Make sure the primary corona wire s blue tab is at the home position a The drum unit may be damaged Put in a new drum unit See Replacing the drum unit DR 520 on page 135 The toner cartridge may be damaged Put in a new toner cartridge See Replacing the toner cartridge TN 550 TN 580 on page 132 The fuser unit may be smudged Call Brother Customer Se...

Page 127: ...and quality See Acceptable paper and other media on page 12 Turn over the stack of paper in the tray or rotate the paper 180 in the input tray Envelope creases a Open the back cover b Press against the 1 on the blue levers on either side of the machine as shown below c As the top of the lever rotates backward lift the bottom portion of the lever from below until it stops d Close the back cover and...

Page 128: ...xing Open the back cover and make sure that the two blue levers on the left and right hand sides are in the down position Examples of poor print quality Recommendation ABCDEFGH abcdefghijk A B C D abcd e 0 1 2 3 4 ...

Page 129: ...o possible interference on the phone line we recommend that you adjust the Equalization for compatibility to reduce the modem speed for fax operations a Press Menu 2 0 1 20 Miscellaneous 1 Compatibility a High b Normal Select ab OK b Press a or b to choose Basic or Normal or High Basic cuts the modem speed to 9600 bps Unless interference is a recurring problem on your phone line you may prefer to ...

Page 130: ...ar the cooling fan running while the LCD shows Cooling Down and Wait for a while Make sure that you can hear the fan in the machine spinning and that the exhaust outlet isn t blocked by something If the fan is spinning remove any obstacles that surround the exhaust outlet and then leave the machine turned on but do not use it for several minutes If the fan is not spinning follow the suggestions be...

Page 131: ...ge 130 Fuser Error The temperature of fuser unit does not rise at a specified temperature within specified time Turn the power switch off wait a few seconds and then turn it on again Leave the machine for 15 minutes with the power on The machine can be turned off for up to 4 days without losing faxes stored in the memory See Checking if the machine has faxes in its memory on page 120 The fuser uni...

Page 132: ...d in the MP tray of the machine See Paper jams on page 122 Paper Jam Tray1 Paper Jam Tray2 The paper is jammed in the paper tray of the machine See Paper jams on page 122 Replace Fuser It is time to replace the fuser unit Call Brother Customer Service to replace the fuser unit Replace Laser It is time to replace the laser unit Call Brother Customer Service to replace the laser unit Replace PF Kit1...

Page 133: ...trays Unable to Init Initialize Unable to Print The machine has a mechanical problem Turn off the machine s power switch and then turn it on again If the error message continues leave the machine for several minutes and then try it again The machine can be turned off for up to 4 days without losing faxes stored in the memory See Checking if the machine has faxes in its memory on page 120 Unable to...

Page 134: ...ransfer mode a Follow a and b in Checking if the machine has faxes in its memory on page 120 b Enter the fax number to which faxes will be sent c Press Start Sending faxes to your PC C You can move the faxes from your machine s memory to your PC a Press Stop Exit b Make sure that you have installed MFL Pro Suite on your PC and then turn on PC Fax Receiving on the PC For details about PC Fax Receiv...

Page 135: ...t is too long Follow the steps below to clear a document jam a Take out any paper from the ADF that is not jammed b Open the ADF cover c Pull the jammed document out to the left d Close the ADF cover e Press Stop Exit Document is jammed under the document cover C a Take out any paper from the ADF that is not jammed b Lift the document cover c Pull the jammed document out to the right d Close the d...

Page 136: ...d b Pull the jammed document out to the right c Press Stop Exit Paper jams C To clear paper jams please follow the steps in this section HOT SURFACE After you have just used the machine some internal parts of the machine will be extremely hot When you open the front or back cover of the machine DO NOT touch the shaded parts shown in the illustration Paper is jammed inside the machine C a Pull the ...

Page 137: ...d out with the toner cartridge and drum unit assembly or this may release the paper so you can pull it out of the paper tray opening CAUTION To prevent damage to the machine from static electricity DO NOT touch the electrodes shown in the illustration e Put the drum unit and toner cartridge assembly back in the machine f Close the front cover g Put the paper tray firmly back in the machine ...

Page 138: ... to open the front cover b Take out the drum unit and toner cartridge assembly c Open the back cover d Pull the tabs at the left and right hand sides toward you to open the fuser cover 1 e Using both hands gently pull the jammed paper out of the fuser unit f Close the back cover 1 ...

Page 139: ...DN MFC 8670DN MFC 8860DN and MFC 8870DW only C a Pull the duplex tray completely out of the machine b Pull the jammed paper out of the machine or the duplex tray c Put the duplex tray back in the machine Paper is jammed inside the drum unit and toner cartridge assembly C a Press the cover release lever to open the front cover b Take out the drum unit and toner cartridge assembly ...

Page 140: ...ridge assembly back in the machine f Close the front cover Routine maintenance C CAUTION The drum unit contains toner so handle it carefully If toner scatters on your hands or clothes wipe or wash it off with cold water at once Cleaning the outside of the machine C CAUTION Use neutral detergents Cleaning with volatile liquids such as thinner or benzine will damage the outside surface of the machin...

Page 141: ... paper tray completely out of the machine b Wipe the outside of the machine with a soft cloth to remove dust c Remove anything that is stuck inside the paper tray d Wipe the inside of the paper tray with a soft cloth to remove dust e Re load the paper and put the paper tray firmly back in the machine ...

Page 142: ...and the scanner glass strip 2 under it with isopropyl alcohol on a lint free cloth Cleaning the laser scanner window C CAUTION DO NOT use isopropyl alcohol to clean the laser scanner window DO NOT touch the laser scanner window with your fingers a Turn off the machine s power switch Unplug the telephone line cord first and then unplug the power cord from the AC power outlet b Open the front cover ...

Page 143: ...vent damage to the machine from static electricity DO NOT touch the electrodes shown in the illustration c Gently clean the laser scanner window 1 by wiping it with a clean soft dry lint free cloth Do not use isopropyl alcohol d Put the drum unit and toner cartridge assembly back into the machine e Close the front cover f Plug the machine s power cord back into the AC power outlet first and then p...

Page 144: ...and toner cartridge assembly b Clean the primary corona wire inside the drum unit by gently sliding the blue tab from right to left and left to right several times c Return the blue tab and snap it into the home position b CAUTION If you do not return the blue tab to the home position b your printed pages may have vertical black stripes on them d Put the drum unit and toner cartridge assembly back...

Page 145: ...you check the surface of the OPC drum 1 d When you have found the mark on the drum that matches the print sample wipe the surface of the OPC drum with a dry cotton swab until the dust or glue on the surface comes off CAUTION The OPC drum is photosensitive so do not touch it with your fingers Do not use a scrubbing or wiping motion because this might damage the drum DO NOT clean the surface of the ...

Page 146: ...tridge according to local regulations keeping it separate from domestic waste Be sure to seal up the toner cartridge tightly so that toner powder does not spill out of the cartridge If you have questions call your local waste disposal office We recommend that you clean the machine and corona wire of the drum unit when you replace the toner cartridge See Cleaning the laser scanner window on page 12...

Page 147: ...ded with your machine We also strongly recommend that you continue to use only Genuine Brother Brand replacement toner cartridges TN 550 TN 580 Use or attempted use of potentially incompatible toner and or cartridges in the Brother machine may cause damage to the machine and or may result in unsatisfactory print quality Our warranty coverage does not apply to any problem that is caused by the use ...

Page 148: ...off the protective cover f Put the new toner cartridge firmly into the drum unit until you hear it lock into place If you put it in properly the lock lever will lift automatically g Clean the primary corona wire inside the drum unit by gently sliding the blue tab from left to right and right to left several times Be sure to return the blue tab to the home position b h Put the drum unit and toner c...

Page 149: ...on your hands or clothes wipe or wash it off with cold water at once Note The drum unit is a consumable item and it is necessary to replace it periodically There are many factors that determine the actual drum life such as temperature humidity type of paper and how much toner you use for the number of pages per print job The estimated drum life is approximately 25 000 pages The actual number of pa...

Page 150: ...office CAUTION Wait to unpack a new drum unit until immediately before installing it Put the old drum unit into the plastic bag c Unpack the new drum unit d Put the toner cartridge firmly into the new drum unit until you hear it lock into place If you put it in properly the lock lever will lift automatically e Put the drum unit and toner cartridge assembly back in the machine Do not close the fron...

Page 151: ... c Unplug all the cables and AC power cord from the machine d Push the Scanner Lock Lever down to lock the scanner This lever is located on the left of the scanner glass CAUTION Damage caused to your machine by failure to lock the scanner before packing and shipping may void your warranty e Open the front cover f Take out the drum unit and toner cartridge assembly Leave the toner cartridge install...

Page 152: ... and tape it shut Machine Information C Checking the serial number C You can see the machine s serial number on the LCD a Press Menu 7 1 71 Serial No XXXXXXXXX b Press Stop Exit Checking the page counters C You can see the machine s page counters for copies printed pages reports and lists faxes or a summary total a Press Menu 7 2 The LCD shows number of pages for Total and Copy 72 Page Counter a T...

Page 153: ...um 2 Fuser 3 Laser Select ab OK b Press a or b to select 1 Drum 2 Fuser 3 Laser 4 PF Kit MP 5 PF Kit 1 or 6 PF Kit 2 Press OK 73 Parts Life 1 Drum Remaining 100 Note The life check of a part will be accurate only if that part s life counter was reset when the new part was installed It will not be accurate if that part s life counter was reset during the life of the used part ...

Page 154: ...Menu followed by the menu numbers to program your machine For example to set Beeper volume to Low a Press Menu 1 4 2 b Press a or b to choose Low c Press OK Memory storage D Your menu settings are stored permanently and in the event of a power failure will not be lost Temporary settings for example Contrast Overseas Mode will be lost Your machine can store the date and time for up to 4 days Menu k...

Page 155: ...menu Press 6 for LAN menu Press 7 for Machine Info menu Press 0 for Initial Setup You can also scroll through each menu level by pressing a or b for the direction you want c Press OK when the option you want is highlighted on the LCD The LCD will then show the next menu level d Press a or b to scroll to your next menu selection e Press OK When you have finished setting an option the LCD shows Acce...

Page 156: ...time the machine will change from individual user to public user when using Secure Function Lock 18 25 2 Paper Type 1 MP Tray Thin Plain Thick Thicker Transparency Recycled Paper Sets the type of paper in the MP tray 18 2 Tray 1 Thin Plain Thick Thicker Transparency Recycled Paper Sets the type of paper in the paper tray 18 3 Tray 2 This menu only appears if you have the optional tray 2 Thin Plain...

Page 157: ...e paper in the paper tray 19 3 Tray 2 This menu only appears if you have the optional tray 2 A4 Letter Legal Executive A5 B5 B6 Folio Sets the size of the paper in the optional paper tray 2 19 4 Volume 1 Ring Off Low Med High Adjusts the ring volume 21 2 Beeper Off Low Med High Adjusts the volume level of the beeper 21 3 Speaker Off Low Med High Adjusts the speaker volume 21 Main Menu Submenu Menu...

Page 158: ... paper tray Selects the tray that will be used for Copy mode 19 2 Fax Tray 1 Only Tray 2 Only MP Only MP T1 T2 T1 T2 MP Tray 2 or T2 appears only if you installed the optional paper tray Selects the tray that will be used for Fax mode 20 3 Print Tray 1 Only Tray 2 Only MP Only MP T1 T2 T1 T2 MP Tray 2 or T2 appears only if you installed the optional paper tray Selects the tray that will be used fo...

Page 159: ... mode 42 3 Easy Receive On Off Receives fax messages without pressing Start 42 4 Remote Codes On l51 51 Off Allows you to answer all calls at an extension or external phone and use codes to turn the machine on or off You can personalize these codes 53 5 Auto Reduction On Off Cuts the size of incoming faxes 44 6 Print Density nnnno nnnon nnonn nonnn onnnn Makes printouts darker or lighter 43 7 Poll...

Page 160: ...etrieved by another fax machine 73 7 Coverpg Setup Next Fax On Next Fax Off On Off Print Sample Automatically sends a cover page you have programmed 33 8 Coverpage Msg Sets up your own comments for the fax cover page 33 9 Overseas Mode On Off If you are having difficulty sending faxes overseas set this to on 37 0 Glass Fax Size A4 Letter Legal Folio Adjusts the scan area of the scanner glass to th...

Page 161: ... send faxes to your PC If you choose Fax Forward or PC Fax Receive you can turn on the safety feature backup print 63 2 Remote Access l Sets your own code for Remote Retrieval 67 3 Print Fax Prints incoming faxes stored in the memory 45 6 Remaining Jobs You can check which jobs are in the memory and lets you cancel chosen jobs 38 0 Miscellaneous 1 Compatibility High Normal Basic Adjusts the equali...

Page 162: ...ine s printer settings 3 Reset Printer 1 Reset 2 Exit Restores the printer settings to the original factory default settings 5 Print Reports 1 Transmission 1 View on LCD 2 Print Report You can view the Transmission Verification Report for your last 200 outgoing faxes and print the last report 71 2 Help List Prints the Help List so you can see at a glance how to quickly program your machine 71 3 Te...

Page 163: ...eway address 5 Node Name BRN_XXXXXX Enter the Node name 6 WINS Config Auto Static Chooses the WINS configuration mode 7 WINS Server Primary 000 000 000 000 Secondary 000 000 000 000 Specifies the IP address of the primary or secondary WINS server 8 DNS Server Primary 000 000 000 000 Secondary 000 000 000 000 Specifies the IP address of the primary or secondary DNS server 9 APIPA On Off Automatical...

Page 164: ...Off Automatically checks the POP3 server for new messages 2 Poll Frequency 10 MIN Sets the interval for checking for new messages on the POP3 server 3 Header All Subject From To None Selects the contents of the mail header to be printed 4 Del Error Mail On Off Deletes error mails automatically 5 Notification On MDN Off Receives notification messages 3 Setup Mail TX 1 Sender Subject Displays the su...

Page 165: ...server system 7 Time Zone MFC 8860DN UTC XX XX Sets the time zone for your country 0 Factory Reset 1 Reset 1 Yes 2 No Restore all network settings to factory default 2 Exit 6 LAN MFC 8870DW 1 Wired 1 TCP IP 1 BOOT Method Auto Static RARP BOOTP DHCP Chooses the BOOT method that best suits your needs 2 IP Address 000 255 000 255 000 255 000 255 Enter the IP address 3 Subnet Mask 000 255 000 255 000 ...

Page 166: ...l If you want to use the IPv6 protocol visit http solutions brother com for more information 2 Ethernet Auto 100B FD 100B HD 10B FD 10B HD Chooses the Ethernet link mode 3 Set to Default 1 Reset 1 Yes 2 No Restore the wired network setting to factory default 2 Exit 4 Wired Enable On Off 2 WLAN 1 TCP IP 1 BOOT Method Auto Static RARP BOOTP DHCP Chooses the BOOT method that best suits your needs 2 I...

Page 167: ... If you want to use the IPv6 protocol visit http solutions brother com for more information 2 Setup WLAN 1 Setup Wizard You can configure your print server 2 SecurEasySetup You can configure the wireless network easily 3 WLAN Status 1 Status Active 11b Active 11g Wired LAN Active WLAN OFF Connection NG You can see the current wireless network status 2 Signal Strong Medium Weak None You can see the...

Page 168: ...s the interval for checking for new messages on the POP3 server 3 Header All Subject From To None Selects the contents of the mail header to be printed 4 Del Error Mail On Off Deletes error mails automatically 5 Notification On MDN Off Receives notification messages 3 Setup Mail TX 1 Sender Subject Displays the subject that is attached to the Internet Fax data 2 Size Limit On Off Limits the size o...

Page 169: ...IFF 5 Scan to FTP 1 Color PDF JPEG 2 B W PDF TIFF 6 Fax to Server On Off You can store a prefix suffix address in the machine and can send a document from a fax server system 7 Time Zone UTC XX XX Sets the time zone for your country 0 Factory Reset 1 Reset 1 Yes 2 No Restores all network settings to factory default 2 Exit Main Menu Submenu Menu Selections Options Descriptions Page ...

Page 170: ...optional LT 5300 tray is installed 139 0 Initial Setup 1 Receive Mode Fax Only Fax Tel External TAD Manual Chooses the receive mode that best suits your needs 40 2 Date Time Puts the date and time on the LCD and in headings of faxes you send See Quick Setup Guide 3 Station ID Fax Tel Name Sets your name and fax number to appear on each page you fax 4 Tone Pulse Canada only Tone Pulse Chooses the d...

Page 171: ...nter a space in a name press c twice between characters Making corrections If you entered a letter incorrectly and want to change it press d to move the cursor under the incorrect character and then press Clear Back Repeating letters To enter a character on the same key as the previous character press c to move the cursor right before pressing the key again Press Key one time two times three times...

Page 172: ...ess l or 0 then press d or c to move the cursor under the symbol or character you want Press OK to select it 1 m is not available for I Fax settings Press l for space l m 1 Press for _ Press 0 for Á À Ã Â Ç É È Ê Ë Í Î Ï Ó Õ Ô Ö Œ Ú Ù Û Ø ...

Page 173: ...e 100 120 V AC 50 60 Hz Power Consumption Copying Average 660 W Sleep Average 17 W MFC 8460N MFC 8660DN MFC 8670DN and MFC 8860DN Average 18 W MFC 8870DW Standby Average 85 W Dimensions Weight Without Drum Toner Unit 36 4 lb 16 5 kg MFC 8460N 36 9 lb 16 7 kg MFC 8660DN MFC 8670DN MFC 8860DN and MFC 8870DW Noise level Sound power Operating Copying LWAd 7 0 Bell Standby LWAd 4 6 Bell Sound pressure ...

Page 174: ...s of 20 lb 80 g m2 plain paper or up to 10 transparencies Multi purpose tray MP tray Paper type Plain paper Recycled paper Transparencies Envelopes Bond paper or Labels Paper size Width 2 75 to 8 5 in 69 9 to 215 9 mm Length 4 57 to 16 in 116 0 to 406 4 mm Paper Weight 16 to 43 lb 60 to 161 g m2 Maximum paper tray capacity Up to 50 sheets of 20 lb 80 g m2 plain paper Paper Output Up to 150 sheets ...

Page 175: ...idth Max 8 5 in 215 9 mm Scanner Glass Length Max 14 in 355 6 mm 2 Sided Duplex Document Size MFC 8670DN MFC 8860DN and MFC 8870DW only ADF Width 5 8 to 8 5 in 148 0 to 215 9 mm ADF Length 5 8 to 11 7 in 148 0 to 297 0 mm Scanning Width Max 8 2 in 208 mm Printing Width Max 8 2 in 208 mm GrayScale 256 levels Polling Types Standard Sequential Contrast Control Automatic Light Dark manual setting Reso...

Page 176: ...5 8 to 14 in 148 0 to 355 6 mm Scanner Glass Width Max 8 5 in 215 9 mm Scanner Glass Length Max 14 in 355 6 mm Copy Width Max 8 32 in 211 3 mm 2 Sided Duplex Document Size MFC 8670DN MFC 8860DN and MFC 8870DW only ADF Width 5 8 to 8 5 in 148 0 to 215 9 mm ADF Length 5 8 to 11 7 in 148 0 to 297 0 mm Multiple Copies Stacks or Sorts up to 99 pages Reduce Enlarge 25 to 400 in increments of 1 Resolutio...

Page 177: ...ndows Vista Mac OS 9 1 9 2 Mac OS X 10 2 4 or greater WIA Compliant Yes Windows XP Color Depth 24 bit color Resolution Up to 19200 19200 dpi interpolated 1 Up to 600 2400 dpi optical 2 Single Sided Document Size ADF Width 5 8 to 8 5 in 148 0 to 215 9 mm ADF Length 5 8 to 14 in 148 0 to 355 6 mm Scanner Glass Width Max 8 5 in 215 9 mm Scanner Glass Length Max 14 in 355 6 mm 2 Sided Duplex Document ...

Page 178: ...n Version 4 0 Windows Vista Brother Laser Driver for Mac OS 9 1 9 2 Mac OS X 10 2 4 or greater Resolution 1200 dpi 1 HQ1200 2400 600 dpi 600 dpi 300 dpi Print Speed Up to 30 pages minute Letter size 2 Duplex Printing Up to 13 sides minute 6 5 pages MFC 8660DN MFC 8670DN MFC 8860DN and MFC 8870DW only First Print Less than 8 5 seconds Parallel A bi directional shielded parallel cable that is IEEE 1...

Page 179: ...nimum Speed Minimum RAM Recommended RAM Available Hard Disk Space For Drivers For Applications 7 98 98SE Parallel USB Ethernet Wireless 802 11 b g 8 Intel Pentium II or equivalent 32 MB 128 MB 90 MB 130 MB Me Parallel USB Ethernet Wireless 802 11 b g 8 NT Workstation 4 0 Parallel Ethernet Wireless 802 11 b g 5 8 64 MB 256 MB Windows Operating System 2000 Professional Printing PC Fax 3 Scanning 4 P...

Page 180: ...inting Letter or A4 size paper at 5 print coverage Toner Cartridge Life TN 550 Standard Toner Cartridge Approx 3 500 pages 1 TN 580 High Yield Toner Cartridge Approx 7 000 pages 1 Drum Unit Life Expectancy DR 520 Approx 25 000 pages ...

Page 181: ...station Version 4 0 and Windows Vista Mac OS 9 1 9 2 Mac OS X 10 2 4 or greater 2 Protocols IPv4 TCP IP ARP RARP BOOTP DHCP APIPA Auto IP ICMP WINS NetBIOS DNS mDNS LPR LPD Port Port9100 NetBIOS Print IPP FTP Server Telnet SNMP HTTP TFTP SMTP Client POP3 LDAP MFC 8860DN only IPv6 TCP IP ICMPv6 NDP DNS mDNS LPR LPD Port Port9100 IPP FTP Server Telnet SNMP HTTP TFTP SMTP Client POP3 LDAP MFC 8860DN ...

Page 182: ...d Remote Setup 1 Support for Windows 98 98SE Me 2000 XP Windows NT Workstation Version 4 0 and Windows Vista Mac OS 9 1 9 2 Mac OS X 10 2 4 or greater 2 Protocols IPv4 TCP IP ARP RARP BOOTP DHCP APIPA Auto IP ICMP WINS NetBIOS DNS mDNS LPR LPD Port Port9100 NetBIOS Print IPP FTP Server Telnet SNMP HTTP TFTP SMTP Client POP3 LDAP IPv6 TCP IP ICMPv6 NDP DNS mDNS LPR LPD Port Port9100 IPP FTP Server ...

Page 183: ...cryption WPA Personal LEAP Cisco LEAP Light Extensible Authentication Protocol has been developed by Cisco Systems Inc and enables the Brother wireless product to associate with access points using CKIP and CMIC encryptions Encryption methods Encryption is used to secure the data that is sent over the wireless network The Brother machine supports the following encryption methods WEP By using WEP W...

Page 184: ...s case sensitive 128 104 bit hexadecimal Uses 26 digits of hexadecimal data e g 71f2234ab56cd709e5412aa2ba WPA PSK and TKIP AES Uses a Pre Shared Key PSK that is more than 7 and less than 64 characters in length Wi Fi Alliance certification This wireless Ethernet multi function print server is a Wi Fi certified IEEE 802 11b 802 11g product by the Wi Fi Alliance The Wi Fi Alliance certification ens...

Page 185: ...olling CNG tones The special tones beeps sent by fax machines during automatic transmission to tell the receiving machine that a fax machine is calling Coding method Method of coding the information contained in the document All fax machines must use a minimum standard of Modified Huffman MH Your machine is capable of greater compression methods Modified Read MR Modified Modified Read MMR and JBIG...

Page 186: ...calls Do not use this mode if you are using a telephone answering device TAD Fine resolution Resolution is 203 196 dpi It is used for small print and graphs Gray scale The shades of gray available for copying and faxing photographs Group number A combination of One Touch and Speed Dial numbers that are stored on a One Touch key or in a Speed Dial location for Broadcasting Help list A printout of t...

Page 187: ...jobs You can check which jobs are waiting in memory and cancel jobs individually Remote Access Code Your own four digit code l that allows you to call and access your machine from a remote location Remote Retrieval Access The ability to access your machine remotely from a touch tone phone Resolution The number of vertical and horizontal lines per inch Ring Delay The number of rings before the mach...

Page 188: ...ng on the telephone line used for Touch Tone telephones Transmission The process of sending faxes over the phone lines from your machine to the receiving fax machine Transmission Verification Report A report for each transmission that shows its date time and number User Settings List A printed report that shows the current settings of the machine ...

Page 189: ...ng external telephone 52 two line external TAD or telephone 51 Control panel overview 2 ControlCenter2 See Software User s Guide on the CD ROM Copy Contrast key 83 duplex 81 82 Enlarge Reduce key 78 enter Copy mode 76 keys 77 multiple 76 N in 1 key page layout 79 poster 79 Quality key 77 single 76 Sort ADF only 83 temporary settings 77 Tray Select key 84 using ADF 76 Cordless phone 53 Cover page c...

Page 190: ... Stamp 45 from extension phone 52 53 Paging 64 phone line interference 115 polling receive 72 receive mode choosing 40 reducing to fit on paper 44 retrieving from a remote site 68 Ring Delay setting 42 sequential polling 72 sending 18 30 at end of conversation 39 Broadcasting 32 canceling from memory 38 contrast 35 delayed batch 38 delayed fax 37 duplex 2 sided 30 from ADF 30 from memory Dual Acce...

Page 191: ...ption 100 installing 101 storage 140 Menu Table 140 using menu keys 140 Mode entering Copy 76 Fax 30 Scan 7 Multi line connections PBX 52 N N in key page layout 79 Network Faxing See Software User s Guide on the CD ROM Printing See Network User s Guide on the CD ROM Scanning See Software User s Guide on the CD ROM O One Touch changing 60 setting up 57 using 55 Out of Memory message 39 84 P Packing...

Page 192: ...7 62 Reducing copies 78 incoming faxes 44 Remote Retrieval 67 access code 67 commands 69 getting your faxes 68 Remote Setup See Software User s Guide on the CD ROM Reports 70 72 Caller ID List 49 Fax Journal 71 Journal Period 70 Help List 71 how to print 71 Network Configuration 71 Quick Dial List 71 Transmission Verification 70 User Settings 71 Resolution copy 162 fax Standard Fine SuperFine Phot...

Page 193: ...Troubleshooting 102 document jam 121 error messages on LCD 116 if you are having difficulty copy quality 104 incoming calls 103 paper handling 106 phone line 115 print quality 107 printing 102 103 104 scanning 105 software 105 paper jam 122 Two line phone system 51 V Voice Mail 46 Volume setting beeper 21 ring 21 speaker 21 W Warranties iii Canada vi Notice Disclaimer iii USA iv Windows See Softwa...

Page 194: ...180 ...

Page 195: ...ifications NOTICE The Ringer Equivalence Number is an indication of the maximum number of devices allowed to be connected to a telephone interface The termination on an interface may consist of any combination of devices subject only to the requirement that the sum of the RENs of all the devices does not exceed five ...

Page 196: ...the World Wide Web http www brother com These machines are made for use in the USA and Canada only We cannot recommend using them overseas because it may violate the Telecommunications Regulations of that country and the power requirements of your multi function center may not be compatible with the power available in foreign countries Using USA or Canada models overseas is at your own risk and ma...

Reviews: