Brother HL-L5000D User Manual Download Page 295

 Home > 

Routine Maintenance

 > 

Replace Supplies

 > Replace the Toner Cartridge

Replace the Toner Cartridge

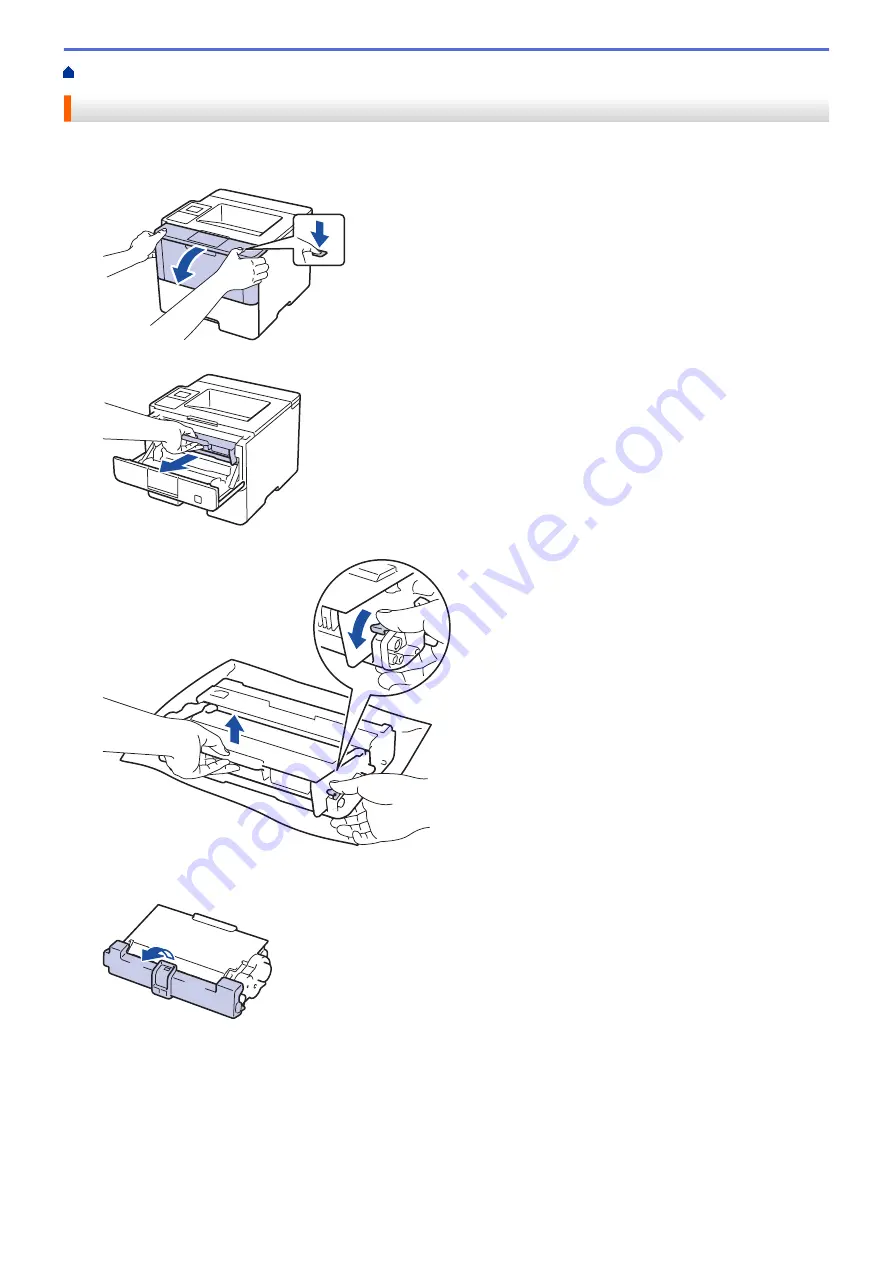
1. Make sure the machine is turned on.
2. Open the front cover.

3. Remove the toner cartridge and drum unit assembly from the machine.

4. Push down the green lock lever and take the toner cartridge out of the drum unit.

5. Unpack the new toner cartridge.
6. Remove the protective cover.

7. Put the new toner cartridge firmly into the drum unit until you hear it lock into place.

290

Summary of Contents for HL-L5000D

Page 1: ...Online User s Guide HL L5000D HL L5100DN HL L5200DW HL L6200DW HL L6400DW 2015 Brother Industries Ltd All rights reserved ...

Page 2: ...ting 40 Unprintable Area 41 Using Special Paper 42 Print 43 Print from Your Computer Windows 44 Print a Document Windows 45 Print More Than One Page on a Single Sheet of Paper N in 1 Windows 47 Print as a Poster Windows 48 Print on Both Sides of the Paper Windows 49 Print as a Booklet Windows 52 Secure Print Windows 54 Use a Macro from Your Computer Windows 56 Use a Preset Print Profile Windows 57...

Page 3: ...2 Configure Your Machine for a Wireless Network Using the Machine s Control Panel Setup Wizard 108 Configure Your Machine for a Wireless Network When the SSID Is Not Broadcast 111 Configure Your Machine for an Enterprise Wireless Network 114 Use Wi Fi Direct 119 Advanced Network Features 133 Print the Network Configuration Report 134 Print the WLAN Report 135 Configure the SNTP Protocol Using Web ...

Page 4: ... Wireless Network Setup Configuration 274 My Brother Machine Cannot Print over the Network 276 I Want to Check that My Network Devices are Working Correctly 278 Other Problems 279 Check the Machine Information 281 Reset Functions 283 Network Reset 284 Factory Reset 285 Routine Maintenance 286 Replace Supplies 287 Replace the Toner Cartridge 290 Replace the Drum Unit 293 Clean the Machine 295 Clean...

Page 5: ...achine Settings Using Web Based Management 343 Appendix 348 Specifications 349 How to Enter Text on Your Brother Machine 357 Supplies 359 Accessories 361 Mailbox Unit 362 Glossary 367 Home Table of Contents iv ...

Page 6: ...Home Before You Use Your Brother Machine Before You Use Your Brother Machine Applicable Models Definitions of Notes Trademarks Important Note 1 ...

Page 7: ...plicable Models Applicable Models This User s Guide applies to the following models 1 line LCD models HL L5000D HL L5100DN HL L5200DW HL L6200DW 1 8 inch Touchscreen LCD models HL L6400DW Related Information Before You Use Your Brother Machine 2 ...

Page 8: ...f product functionality NOTE NOTE specifies the operating environment conditions for installation or special conditions of use Tips icons indicate helpful hints and supplementary information Electrical Hazard icons alert you to possible electrical shock Fire Hazard icons alert you to the possibility of a fire Hot Surface icons warn you not to touch hot machine parts Prohibition icons indicate acti...

Page 9: ...Wi Fi Alliance WPA WPA2 Wi Fi Protected Setup and Wi Fi Protected Setup logo are trademarks of Wi Fi Alliance Android Google Cloud Print Google Drive Google Chrome and Google Play are trademarks of Google Inc Use of these trademarks is subject to Google Permissions Mopria is a trademark of Mopria Alliance Inc Mozilla and Firefox are registered trademarks of the Mozilla Foundation UNIX is a registe...

Page 10: ...2003 x64 Edition Windows Server 2003 R2 and Windows Server 2003 R2 x64 Edition Windows Server 2008 in this document represents Windows Server 2008 and Windows Server 2008 R2 In this User s Guide the LCD messages of the HL L5100DN HL L5200DW are used unless otherwise specified In this User s Guide the illustrations of the HL L6400DW are used unless otherwise specified Unless otherwise specified the...

Page 11: ...ing Your Machine Front View and Back View Control Panel Overview Touchscreen LCD Overview How to Navigate the Touchscreen LCD Access Brother Utilities Windows Brother Utilities is an application launcher that offers convenient access to all Brother applications installed on your computer 6 ...

Page 12: ...cure Firewall Windows If your computer is protected by a firewall and you are unable to network print you may need to configure the firewall settings If you are using the Windows Firewall and you installed the printer driver from the CD ROM the necessary firewall settings have already been set If you are using any other personal firewall software see the User s Guide for your software or contact t...

Page 13: ...2 Face down output tray 3 Front cover release button 4 Front cover 5 Paper tray 6 Multi purpose tray MP tray 7 Control panel with a Liquid Crystal Display LCD 8 For wired network models 10BASE T 100BASE TX 1000BASE T port supported models only 9 USB port 10 Parallel port supported models only 11 AC power connector cord 12 Back cover Face up output tray The machine is equipped with a non detachable...

Page 14: ...y 6 Multi purpose tray MP tray 7 Touch panel with a tiltable Touchscreen LCD 8 For wired network models 10BASE T 100BASE TX 1000BASE T port 9 USB port 10 USB accessory port 11 AC power connector cord 12 Back cover Face up output tray 13 Paper stopper The machine is equipped with a non detachable AC power cord depending on the model Related Information Introduction to Your Brother Machine 9 ...

Page 15: ...th if you are using a wireless connection 0 Max 2 Data LED The Data LED blinks depending on the machine s status When the Data LED is on data is in the machine s memory When the Data LED blinks the machine is receiving or processing data 3 Error LED The Error LED blinks when the LCD displays an error or an important status message 4 Menu Buttons OK Press to store your machine s settings After you ...

Page 16: ...tiple print jobs hold down Cancel until the LCD displays Cancel All Jobs 8 Power On Off Turn the machine on by pressing Turn the machine off by pressing and holding down The LCD displays Shutting Down for a few seconds before going off 9 WiFi Network or Report buttons Non Network Models Report Press the Report button to print the Printer Settings page Wired Network Models Network Press the Network...

Page 17: ...screen While the machine is in Sleep Mode the Home icon blinks Cancel Press to cancel an operation available when lit Press to cancel a programmed print job and clear it from the machine s memory To cancel multiple print jobs hold down until the LCD displays Cancel All Jobs or Press to display the previous or next page 4 WiFi For infrastructure mode When the WiFi light is on your Brother machine i...

Page 18: ... For Ad Hoc mode The WiFi LED is always off Related Information Introduction to Your Brother Machine 13 ...

Page 19: ...trol panel will be locked The available features vary depending on your model 1 Wireless Status If you are using a wireless connection a four level indicator in the Home screen displays the current wireless signal strength 0 Max If you see at the top on the screen press it to configure wireless settings 2 Toner Displays the remaining toner life Press to access the Toner menu 3 Settings Press to ac...

Page 20: ...de Go to your model s Manuals page on the Brother Solutions Center at support brother com to download the guide Warning icon The warning icon appears when there is an error or maintenance message press to view it and then press to return to Ready Mode Related Information Introduction to Your Brother Machine 15 ...

Page 21: ...this example the LCD Backlight setting is changed from Light to Med IMPORTANT DO NOT press the LCD with a sharp object such as a pen or stylus It may damage the machine NOTE DO NOT touch the LCD immediately after plugging in the power cord or turning on the machine Doing this may cause an error 1 Press Settings 2 Press a or b to display the General Setup option and then press General Setup Se ngs ...

Page 22: ...LCD Se ngs 5 Press Backlight Light LCD Se ngs Backlight Dim Timer Off 6 Press a or b to display the Med option and then press Med Backlight Light Med 7 Press Related Information Introduction to Your Brother Machine 17 ...

Page 23: ...erver 2008 R2 Click Start All Programs Brother Brother Utilities Windows 8 and Windows Server 2012 Tap or click Brother Utilities either on the Start screen or the desktop Windows 8 1 and Windows Server 2012 R2 Move your mouse to the lower left corner of the Start screen and click if you are using a touch based device swipe up from the bottom of the Start screen to bring up the Apps screen When th...

Page 24: ...Related Information Introduction to Your Brother Machine Uninstall the Brother Software and Drivers Windows 19 ...

Page 25: ...tilities either on the Start screen or the desktop Windows 8 1 and Windows Server 2012 R2 Move your mouse to the lower left corner of the Start screen and click if you are using a touch based device swipe up from the bottom of the Start screen to bring up the Apps screen When the Apps screen appears tap or click Brother Utilities 2 Click the drop down list and then select your model name if not al...

Page 26: ...Handling Paper Handling Load Paper Paper Settings Change the Tray Size for 2 sided Printing Unprintable Area Using Special Paper Always test paper samples before purchasing them to ensure desirable performance 21 ...

Page 27: ... and Print Using the Paper Tray Load and Print Using the Multi purpose Tray MP Tray You can load up to ten envelopes letterhead coloured paper thin or thick paper recycled paper Bond paper labels or up to 50 sheets of plain paper in the MP tray 22 ...

Page 28: ...the Paper Tray Load and Print Using the Paper Tray Load and Print Plain Paper Letterhead Coloured Paper Thin Paper and Recycled Paper Using the Paper Tray Load and Print Thick Paper Using the Paper Tray Printing Problems Error and Maintenance Messages 23 ...

Page 29: ...the paper tray out of the machine a message appears on the LCD asking if you want to change the paper size and paper type Change the paper size and paper type settings if needed following the LCD instructions When you load a different size and type of paper in the tray you must change the Paper Size and Paper Type settings in the machine or on your computer also 1 Pull the paper tray completely ou...

Page 30: ...r trays with a release lever 2 3 Fan the stack of paper well 4 Load paper in the paper tray with the printing surface face down When you use Letterhead or Preprinted paper load the paper in the correct orientation as shown in the illustrations Paper Orientation for Letterhead and Preprinted Paper For 1 sided printing face down top edge toward the front of the paper tray For automatic 2 sided print...

Page 31: ...gle Image 2 sided Feed HL L6400DW Press Settings Paper Tray 2 sided Single Image 2 sided Feed 5 Make sure the paper is below the maximum paper mark b b b Overfilling the paper tray will cause paper jams 6 Slowly push the paper tray completely into the machine 7 Lift the support flap to prevent paper from sliding off the output tray 8 Send your print job to the machine Change your print preferences...

Page 32: ...he LCD asking if you want to change the paper size and paper type Change the paper size and paper type settings if needed following the LCD instructions When you load a different size and type of paper in the tray you must change the Paper Size and Paper Type settings in the machine or on your computer also 1 Pull the paper tray completely out of the machine 2 Press and slide the paper guides to f...

Page 33: ...trays with a release lever 2 3 Fan the stack of paper well 4 Load paper in the paper tray with the printing surface face down DO NOT load different sizes and types of paper in the paper tray at the same time Doing this may cause the paper to jam or misfeed 5 Make sure the paper is below the maximum paper mark b b b Overfilling the paper tray will cause paper jams 6 Slowly push the paper tray compl...

Page 34: ...the machine Change your print preferences in the Print dialog box before sending the print job from your computer 10 Close the paper stopper 11 Close the back cover the face up output tray until it locks in the closed position Related Information Load and Print Using the Paper Tray 29 ...

Page 35: ... coloured paper thin or thick paper recycled paper Bond paper labels or up to 50 sheets of plain paper in the MP tray Load and Print Plain Paper Letterhead Coloured Paper Thin Paper Recycled Paper and Bond Paper in the MP Tray Load and Print Thick Paper and Labels Using the MP Tray Load and Print on Envelopes Using the MP Tray Printing Problems Error and Maintenance Messages 30 ...

Page 36: ...ize and Paper Type settings in the machine or on your computer also 1 Lift the support flap to prevent paper from sliding off the face down output tray 2 Open the MP tray and lower it gently 3 Pull out the MP tray support 1 and unfold the flap 2 2 1 4 Slide the MP tray paper guides to fit the width of the paper you are using If the paper guide on the right side has a lever press it and slide the p...

Page 37: ...d paper for 2 sided printing change the machine s setting by completing the following step HL L5000D HL L5100DN HL L5200DW HL L6200DW Press Paper Tray 2 sided Single Image 2 sided Feed HL L6400DW Press Settings Paper Tray 2 sided Single Image 2 sided Feed 6 Send your print job to the machine Change your print preferences in the Print dialog box before sending the print job from your computer Relat...

Page 38: ...t on thick paper or labels When you load a different size and type of paper in the tray you must change the Paper Size and Paper Type settings in the machine or on your computer also 1 Open the machine s back cover the face up output tray 2 Open the paper stopper Available only for certain models 3 On the front of the machine open the MP tray and lower it gently 4 Pull out the MP tray support 1 an...

Page 39: ...ng surface face up 7 Send your print job to the machine Change your print preferences in the Print screen before sending the print job from your computer 8 Close the paper stopper 9 Close the back cover the face up output tray until it locks in the closed position Related Information Load and Print Using the Multi purpose Tray MP Tray 34 ...

Page 40: ...size and type of paper in the tray you must change the Paper Size and Paper Type settings in the machine or on your computer also 1 Open the machine s back cover the face up output tray 2 Open the paper stopper Available only for certain models 3 On the front of the machine open the MP tray and lower it gently 4 Pull out the MP tray support 1 and unfold the flap 2 2 1 5 Slide the MP tray paper gui...

Page 41: ...nd your print job to the machine Change your print preferences in the Print dialog box before sending the print job from your computer Settings Options for Envelopes Paper Size Com 10 DL C5 Monarch Media Type Envelopes Env Thick Env Thin 8 Close the paper stopper 9 Close the back cover the face up output tray until it locks in the closed position Related Information Load and Print Using the Multi ...

Page 42: ...ou load in the tray you must change the Paper Size and Paper Type settings on the LCD at the same time Change the Check Paper Size Setting When you turn on your machine s Check Size setting the machine displays a message when you remove a paper tray or load paper using the MP tray asking if you changed the paper size and paper type 37 ...

Page 43: ...ss a or b to select the paper type you want and then press OK 5 Press Back 6 Press a or b to select the Paper Size option and then press OK 7 Press a or b to select the paper tray that you want to change and then press OK 8 Press a or b to select the paper size you want and then press Go HL L6400DW 1 Press Settings Paper Tray Paper Type 2 Press a or b to display the paper tray options and then pre...

Page 44: ...hanged the paper size and paper type The default setting is On HL L5000D HL L5100DN HL L5200DW HL L6200DW HL L6400DW HL L5000D HL L5100DN HL L5200DW HL L6200DW 1 Press a or b to select the Paper Tray option and then press OK 2 Press a or b to select the Check Size option and then press OK 3 Press a or b to select the On or Off option and then press Go HL L6400DW 1 Press Settings Paper Tray Check S...

Page 45: ...d tray size to the paper size If you do not set the 2 sided tray the paper will not feed correctly resulting in a skewed printout or a paper jam This feature is not available in some countries 1 Slide the lever on the 2 sided tray to the correct paper size a b a A4 for A4 b Letter for Letter Legal Mexico Legal India Legal and Folio Related Information Paper Handling 40 ...

Page 46: ...The measurements may vary depending on the paper size or settings in the application you are using 1 3 2 4 Do not attempt to print into these areas your output will not reflect anything in these areas Usage Document Size Top 1 Bottom 3 Left 2 Right 4 Print Letter 4 23 mm 4 23 mm A4 4 23 mm 4 23 mm Legal 4 23 mm 4 23 mm Related Information Paper Handling 41 ...

Page 47: ... IMPORTANT Some types of paper may not perform well or may cause damage to your machine DO NOT use paper that is highly textured that is extremely smooth or shiny that is curled or warped that is coated or has a chemical finish that is damaged creased or folded that exceeds the recommended weight specification in this guide with tabs and staples with letterheads using low temperature dyes or therm...

Page 48: ...of Paper Use the Carbon Copy function to make multiple copies of the same print data as if printing on carbon paper Send the data to individual paper trays that you pre loaded with different paper types or colours Cancel a Print Job Test Print If there are problems with print quality follow these instructions to do a test print 43 ...

Page 49: ... stored the electronic forms macros in your machine s memory you can use the macro to print the data as an overlay on the print job you want Use a Preset Print Profile Windows Print Profiles are presets designed to give you quick access to frequently used printing configurations Change the Default Print Settings Windows When you change print settings from within a program the changes apply only to...

Page 50: ...ize 5 In the Orientation field select the Portrait or Landscape option to set the orientation of your printout If your application contains a similar setting we recommend that you set the orientation using the application 6 Type the number of copies 1 999 you want in the Copies field 7 Click the Media Type drop down list and then select the type of paper you are using 8 To print multiple pages on ...

Page 51: ...Related Information Print from Your Computer Windows Print Settings Windows 46 ...

Page 52: ... select the Portrait or Landscape option to set the orientation of your printout If your application contains a similar setting we recommend that you set the orientation using the application 4 Click the Multiple Page drop down list and then select the 2 in 1 4 in 1 9 in 1 16 in 1 or 25 in 1 option 5 Click the Page Order drop down list and then select your page order 6 Click the Border Line drop d...

Page 53: ...or preferences button The printer driver window appears 3 Click the Multiple Page drop down list and then select the 1 in 2x2 Pages 1 in 3x3 Pages 1 in 4x4 Pages or 1 in 5x5 Pages option 4 Select the Print cut out line check box if needed Print cut out line Prints a faint cut out line around the printable area so that you can easily cut it out 5 Change other printer settings if needed 6 Click OK 7...

Page 54: ... be paper jams or poor print quality 1 Select the print command in your application 2 Select Brother XXX XXXX where XXXX is the name of your model and then click the printing properties or preferences button The printer driver window appears 3 In the Orientation field select the Portrait or Landscape option to set the orientation of your printout If your application contains a similar setting we r...

Page 55: ...Option for Portrait Description Long Edge Left Long Edge Right Short Edge Top Short Edge Bottom Option for Landscape Description Long Edge Top Long Edge Bottom 50 ...

Page 56: ...settings if needed 10 Do one of the following For automatic 2 sided printing click OK again and then complete your print operation For manual 2 sided printing click OK again and follow the on screen instructions If the paper is not feeding correctly it may be curled Remove the paper straighten it and put it back in the paper tray Related Information Print from Your Computer Windows Print Settings ...

Page 57: ...t it back in the paper tray Use regular paper or thin paper DO NOT use bond paper If the paper is too thin it may wrinkle When you use the manual 2 sided printing function it is possible there may be paper jams or poor print quality 1 Select the print command in your application 2 Select Brother XXX XXXX where XXXX is the name of your model and then click the printing properties or preferences but...

Page 58: ...re of the smaller individual booklet sets without having to change the order of the printed pages You can specify the number of sheets in each smaller booklet set from 1 15 This option can be helpful when folding a printed booklet that has a large number of pages 8 Select the Binding Offset check box if you want to specify the offset for binding in inches or millimetres 9 Click OK 10 Change other ...

Page 59: ...8 Complete your print operation 9 On the machine s control panel press Secure 10 Press a or b to display your user name and then press OK The LCD displays the list of secured jobs for that name 11 Press a or b to display the job and then press OK 12 Enter your four digit password To enter each digit press a or b to select a number and then press OK 13 Press a or b to select the Print option and th...

Page 60: ...the list of secured jobs for that name 12 Press a or b to display the print job you want to print and then press it 13 Enter your four digit password and then press OK 14 Enter the number of copies you want 15 Press Start The machine prints the data After you print the secured data it will be cleared from the machine s memory Related Information Print from Your Computer Windows 55 ...

Page 61: ...ton 7 Enter Macro ID and Macro Name you want to use 8 Select Insert Macro Command 9 Select the page to overlay the macro data Option Description All Pages Lets you insert the macro onto all pages Page Lets you insert the macro onto a specific page Select this option and then enter a page number within the range 1 to 255 Add to Top of Page Send the macro data to the top of the page Add to End of Pa...

Page 62: ...nces button The printer driver window appears 3 Click the Print Profiles tab 4 Select your profile from the print profile list The profile settings are shown on the left side of the printer driver window 5 Do one of the following If the settings are correct for your print job click OK To change the settings go back to the Basic or Advanced tab change settings and then click OK To display the Print...

Page 63: ... Create or Delete Your Print Profile Windows Print Settings Windows 58 ...

Page 64: ...d tab and configure the print settings you want for the new Print Profile 4 Click the Print Profiles tab 5 Do one of the following To create a new print profile a Click Add Profile The Add Profile dialog box appears b Type the new profile name in the Name field c Click the icon you want to use to represent this profile from the icon list d Click OK The new Print Profile name is added to the list i...

Page 65: ... group click View devices and printers For Windows Server 2012 Move your mouse to the lower right corner of your desktop When the menu bar appears click Settings and then click Control Panel In the Hardware group click View devices and printers For Windows Server 2012 R2 Click Control Panel on the Start screen In the Hardware group click View devices and printers 2 Right click the Brother XXX XXXX...

Page 66: ...rol Panel In the Hardware and Sound group click View devices and printers For Windows Server 2012 Move your mouse to the lower right corner of your desktop When the menu bar appears click Settings and then click Control Panel In the Hardware group click View devices and printers For Windows Server 2012 R2 Click Control Panel on the Start screen In the Hardware group click View devices and printers...

Page 67: ...CD ROM select Custom in Select Machine section and then check PS Driver check box 1 Select the print command in your application 2 Select Brother XXX XXXX BR Script3 where XXXX is the name of your model and then click the printing properties or preferences button The printer driver window appears 3 Click the Layout Paper Quality or Secure Print tab to change basic print settings Click the Layout o...

Page 68: ...rver 2012 Click Brother Utilities and then click the drop down list and select your model name if not already selected Click Tools in the left navigation bar and then click Status Monitor Windows 8 1 and Windows Server 2012 R2 Move your mouse to the lower left corner of the Start screen and click if you are using a touch based device swipe up from bottom of the Start screen to bring up the Apps sc...

Page 69: ...pies Type the number of copies 1 999 that you want to print in this field Collate Select this option to print sets of multi page documents in the original page order When this option is selected one complete copy of your document will print and then reprint according to the number of copies you choose If this option is not selected then each page will print according to the number of copies chosen...

Page 70: ...ferent from the fills and patterns you see on your computer screen Improve Thin Line Select this option to improve the image quality of thin lines Use System Halftone Select this option to use Windows to express halftones TrueType Mode Mode Select how the fonts are processed for printing Use Printer TrueType Fonts Select whether to use built in fonts for the font processing 7 Multiple Page Select ...

Page 71: ...elect these options to enlarge or reduce the size of the pages in your document Fit to Paper Size Select this option to enlarge or reduce the document pages to fit a specified paper size When you select this option select the paper size you want from the drop down list Free Select this option to enlarge or reduce the document pages manually When you select this option type a value into the field 2...

Page 72: ...the printer automatically selects the next available bin MX Sorter When you print multiple copies each copy is ejected onto a different bin from 1 to 4 Use Std Tray when full Select this option to continue printing even if the Mailbox bin is full When you select this option the machine continues the print job ejecting the remaining pages onto the machine s main output tray when the Mailbox bin is ...

Page 73: ...age on a Single Sheet of Paper N in 1 Windows Print as a Poster Windows Print on Both Sides of the Paper Windows Print as a Booklet Windows Use a Preset Print Profile Windows Change the Default Print Settings Windows Use Standard Tray When Full Assign a Mailbox Bin to a User or Group Mailbox Unit 68 ...

Page 74: ...d on the machine s control panel Print a Document Using the BR Script3 Printer Driver PostScript 3 language emulation Macintosh The BR Script3 printer driver lets you print PostScript data more clearly Monitor the Status of the Machine from Your Computer Macintosh The Status Monitor utility is a configurable software tool for monitoring the status of a device allowing you to get immediate notifica...

Page 75: ...he number of copies you want in the Copies field 5 Click the Paper Size pop up menu and then select your paper size 6 Select the Orientation option that matches the way you want the document to print 7 Click the application pop up menu and then select Print Settings The Print Settings options appear 8 Click the Media Type pop up menu and then select the type of paper you are using 9 Change other p...

Page 76: ... application such as Apple TextEdit click the File menu and then select Print 2 Select Brother XXX XXXX where XXXX is your model name 3 Select the Orientation option that matches the way you want the document to print 4 For automatic 2 sided printing do the following a Click the application pop up menu and then select Layout The Layout setting options appear b In the Two Sided section select the S...

Page 77: ... pop up menu and then select Paper Handling The Paper Handling options appear i In the Pages to Print pop up menu select Odd Only j Click Print Related Information Print from Your Computer Macintosh Print Options Macintosh 72 ...

Page 78: ...Brother XXX XXXX where XXXX is your model name 3 Click the application pop up menu and then select Layout The Layout setting options appear 4 Click the Pages per Sheet pop up menu and then select the number of pages to print on each sheet 5 Select the Layout Direction option 6 Click the Border pop up menu and then select your border line type 7 Change other printer settings if needed 8 Click Print...

Page 79: ...display the job and then press OK 10 Enter your four digit password To enter each digit press a or b to select a number and then press OK 11 Press a or b to select the Print option and then press OK 12 Press a or b to enter the number of copies you want 13 Press OK The machine prints the data After you print the secured data it will be cleared from the machine s memory HL L6400DW 1 From an applica...

Page 80: ...After you print the secured data it will be cleared from the machine s memory Related Information Print from Your Computer Macintosh 75 ...

Page 81: ...1 Make sure you have loaded the correct size paper in the paper tray 2 From an application such as Apple TextEdit click the File menu and then select Print 3 Select Brother XXX XXXX where XXXX is your model name 4 Type the number of copies you want in the Copies field 5 Click the Paper Size pop up menu and then select your paper size 6 Select the Orientation option that matches the way you want th...

Page 82: ...tton Status Monitor starts Troubleshooting Click the Troubleshooting button to access the troubleshooting website Visit the Genuine Supplies website Click the Visit the Genuine Supplies website button for more information on Brother genuine supplies Updating the machine s status To view the latest machine status while the Status Monitor window is open click the icon You can set the interval at whi...

Page 83: ...ither choose from standard paper sizes or create a custom paper size 2 Orientation Select the orientation portrait or landscape of your printout If your application contains a similar setting we recommend that you set the orientation using the application 3 Scale Type a value into the field to enlarge or reduce the pages in your document to fit the selected paper size 78 ...

Page 84: ...rder Select the type of border to use when printing multiple pages on a single sheet of paper 4 Two Sided Available only for certain models Select whether to print on both sides of the paper 5 Reverse page orientation Select this option to rotate the printed image 180 degrees 6 Flip horizontally Select this option to reverse the printed image on the page horizontally from left to right 79 ...

Page 85: ...es to Print Select which pages you want to print even pages or odd pages 3 Page Order Select the page order 4 Scale to fit paper size Select this option to enlarge or reduce the pages in your document to fit the selected paper size 5 Destination Paper Size Select the paper size to print on 6 Scale down only Select this option if you want to reduce the pages in your document when they are too large...

Page 86: ...ull the printer automatically selects the next available bin MX Sorter When you print multiple copies each copy is ejected onto a different bin from 1 to 4 Use Std Tray when full Select this option to continue printing even if the Mailbox bin is full When you select this option the machine continues the print job ejecting the remaining pages onto the machine s main output tray when the Mailbox bin...

Page 87: ...printing noise Other Print Options Skip Blank Page Select this option to allow the printer driver to automatically detect blank pages and exclude them from printing Secure Print 1 Secure Print This feature ensures that confidential or sensitive documents do not print until you enter a password on the machine s control panel 82 ...

Page 88: ...mputer Macintosh Print a Document Macintosh Print on Both Sides of the Paper Macintosh Print More Than One Page on a Single Sheet of Paper N in 1 Macintosh Use Standard Tray When Full Assign a Mailbox Bin to a User or Group Mailbox Unit 83 ...

Page 89: ...Press a or b to display the Carbon Copy option and then press OK 4 Press a or b to display the On option and then press OK 5 Press a or b to display the Copies option and then press OK 6 Press a or b to enter the number of copies you want and then press OK 7 Press a or b to display the Copy1 Tray option and then press OK 8 Press a or b to display the paper tray you want to configure as Copy1 Tray ...

Page 90: ...Related Information Print Use a Macro from Your Computer Windows 85 ...

Page 91: ...DW HL L6200DW HL L6400DW HL L5000D HL L5100DN HL L5200DW HL L6200DW 1 Press Cancel To cancel multiple print jobs press and hold Cancel for four seconds HL L6400DW 1 Press To cancel multiple print jobs press and hold for four seconds Related Information Print Printing Problems 86 ...

Page 92: ...00DW HL L6400DW HL L5000D HL L5100DN HL L5200DW HL L6200DW 1 Press a or b to display the Machine Info option and then press OK 2 Press a or b to display the Test Print option and then press OK The machine prints the test page HL L6400DW 1 Press Settings Machine Information Test Print 2 Press OK 3 Press Related Information Print Improve the Print Quality 87 ...

Page 93: ...twork and explains some useful network features of your Brother machine Network Management Software and Utilities Configure and change your Brother machine s network settings using a management utility Additional Methods of Configuring Your Brother Machine for a Wireless Network To connect your machine to your wireless network we recommend using the Installation CD ROM Advanced Network Features Te...

Page 94: ...ation about network connection types introduces various methods to manage your network and explains some useful network features of your Brother machine Supported Basic Network Features The print server supports various features depending on the operating system Use this table to see which network features and connections are supported by each operating system 89 ...

Page 95: ...08 2012 2012 R2 OS X v10 8 5 OS X v10 9 x OS X v10 10 x Printing Yes Yes Yes BRAdmin Light Yes Yes BRAdmin Professional 3 Yes Yes Web Based Management Yes Yes Yes Status Monitor Yes Yes Driver Deployment Wizard Yes Yes Vertical Pairing Windows 7 and Windows 8 only Yes Go to your model s Downloads page on the Brother Solutions Center at support brother com to download the latest version of Brother ...

Page 96: ... management utility Learn about Network Management Software and Utilities Change Machine Settings from Your Computer Change Machine Settings Using Web Based Management Web Based Management is a utility that uses a standard web browser to manage your machine using the Hyper Text Transfer Protocol HTTP or Hyper Text Transfer Protocol over Secure Socket Layer HTTPS 91 ...

Page 97: ...ork connected Brother devices This utility can search for Brother products on your network and view the device status from an easy to read Windows Explorer style screen that changes colour to identify the status of each device You can configure network and device settings and update device firmware from a Windows computer on your LAN BRAdmin Professional 3 can also log activity of Brother devices ...

Page 98: ...for a Wireless Network Configure Your Machine for a Wireless Network Using the One Push Method of Wi Fi Protected Setup WPS Configure Your Machine for a Wireless Network Using the PIN Method of Wi Fi Protected Setup WPS Configure Your Machine for a Wireless Network in Ad Hoc Mode For IEEE 802 11b g n Configure Your Machine for a Wireless Network Using the Machine s Control Panel Setup Wizard Confi...

Page 99: ...ss point router as possible with minimal obstructions Large objects and walls between the two devices and interference from other electronic devices can affect the data transfer speed of your documents Due to these factors wireless may not be the best method of connection for all types of documents and applications If you are printing large files such as multi page documents with mixed text and la...

Page 100: ...ter Double click the CD ROM icon and then double click start exe Windows Vista and Windows 7 If the Brother screen does not appear automatically go to Computer Double click the CD ROM icon and then double click start exe Windows 8 Click the File Explorer icon on the taskbar and then go to Computer This PC Double click the CD ROM icon and then double click start exe If the User Account Control scre...

Page 101: ... the WPS button on your wireless access point router Press a on the machine s control panel Your machine will automatically detect your wireless access point router and try to connect to your wireless network If your wireless device is connected successfully the machine s LCD displays Connected You have completed the wireless network setup To install drivers and software necessary for operating yo...

Page 102: ...er Installation CD ROM to your computer or go to your model s Downloads page on the Brother Solutions Center at support brother com to install drivers and software necessary for operating your device Related Information Additional Methods of Configuring Your Brother Machine for a Wireless Network Wireless LAN Report Error Codes 97 ...

Page 103: ... Identification Number PIN Method to configure your wireless network settings The PIN Method is one of the connection methods developed by the Wi Fi Alliance By submitting a PIN created by an Enrollee your machine to the Registrar a device that manages the wireless LAN you can set up the wireless network and security settings For more information on how to access WPS mode see the instructions prov...

Page 104: ...reless LAN access point router 6 Using a computer that is on the network type http access point s IP address in your browser where access point s IP address is the IP address of the device that is being used as the Registrar 7 Go to the WPS settings page and type the PIN and then follow the on screen instructions The Registrar is usually the wireless LAN access point router The settings page will ...

Page 105: ...ads page on the Brother Solutions Center at support brother com to install drivers and software necessary for operating your device HL L6400DW 1 Press Settings Network WLAN WPS w PIN Code 2 When Switch network interface to wireless appears press Yes This will start the wireless setup wizard To cancel press No 3 The LCD displays an eight digit PIN and the machine starts searching for a wireless LAN...

Page 106: ...lick Next 8 Type the PIN displayed on the machine s LCD and then click Next 9 Select your network and then click Next 10 Click Close If your wireless device is connected successfully the machine s LCD displays Connected You have completed the wireless network setup To install drivers and software necessary for operating your device insert the Brother Installation CD ROM to your computer or go to y...

Page 107: ... Hoc Mode For IEEE 802 11b g n Configure Your Machine for a Wireless Network in Ad Hoc Mode Using a New SSID You must connect to a new SSID from your computer when it is configured for Ad Hoc mode Configure Your Machine for a Wireless Network in Ad Hoc Mode Using an Existing SSID If you are trying to pair your Brother machine to a computer that is already in Ad Hoc mode and has a configured SSID u...

Page 108: ...ress a or b to select the Encryption Type None or WEP and then press OK 9 If you selected the WEP option for Encryption Type enter the WEP key and then press OK Your Brother machine supports the use of the first WEP key only 10 To apply the settings press a To cancel press b 11 The machine will attempt to connect to the wireless device you have selected If your wireless device is connected success...

Page 109: ...connected successfully the machine s LCD displays Connected You have completed the wireless network setup To install drivers and software necessary for operating your device insert the Brother Installation CD ROM to your computer or go to your model s Downloads page on the Brother Solutions Center at support brother com to install drivers and software necessary for operating your device Related In...

Page 110: ...u are connecting with must be set to Ad Hoc mode with an SSID already configured For more information on how to configure your computer in Ad Hoc mode see the instructions included with your computer or contact your network administrator Network Name SSID Communication Mode Encryption Mode Network Key Ad Hoc NONE WEP For example Network Name SSID HELLO Communication Mode Encryption Mode Network Ke...

Page 111: ...mmunication Mode Encryption Mode Network Key Ad Hoc NONE WEP For example Network Name SSID HELLO Communication Mode Encryption Mode Network Key Ad Hoc WEP 12345 Your Brother machine supports the use of the first WEP key only 2 Press Settings Network WLAN Setup Wizard 3 When Switch network interface to wireless appears press Yes This will start the wireless setup wizard To cancel press No 4 The mac...

Page 112: ...Related Information Configure Your Machine for a Wireless Network in Ad Hoc Mode For IEEE 802 11b g n How to Enter Text on Your Brother Machine Wireless LAN Report Error Codes 107 ...

Page 113: ...make sure you have your SSID Network Name and Network Key ready We cannot assist you in locating this information If you do not know this information SSID and Network Key you cannot continue the wireless setup How can I find this information Check the documentation provided with your wireless access point router The initial SSID could be the manufacturer s name or the model name If you do not know...

Page 114: ...le WEP keys however your Brother machine supports the use of the first WEP key only If you need assistance during setup and want to contact Brother customer service make sure you have your SSID Network Name and Network Key ready We cannot assist you in locating this information If you do not know this information SSID and Network Key you cannot continue the wireless setup How can I find this infor...

Page 115: ...e wireless network setup To install drivers and software necessary for operating your device insert the Brother Installation CD ROM to your computer or go to your model s Downloads page on the Brother Solutions Center at support brother com to install drivers and software necessary for operating your device Related Information Additional Methods of Configuring Your Brother Machine for a Wireless N...

Page 116: ...ation Mode Authentication Method Encryption Mode Network Key Infrastructure WPA2 PSK AES 12345678 If your router uses WEP encryption enter the key used as the first WEP key Your Brother machine supports the use of the first WEP key only 2 Press a or b to select the Network option and then press OK 3 Press a or b to select the WLAN option and then press OK 4 Press a or b to select the Setup Wizard ...

Page 117: ...ecessary for operating your device HL L6400DW Before configuring your machine we recommend writing down your wireless network settings You will need this information before you continue with the configuration 1 Check and record the current wireless network settings Network Name SSID Communication Mode Authentication Method Encryption Mode Network Key Infrastructure Open System NONE WEP Shared Key ...

Page 118: ...rother machine supports the use of the first WEP key only 11 To apply the settings press Yes To cancel press No 12 The machine will attempt to connect to the wireless device you have selected If your wireless device is connected successfully the machine s LCD displays Connected You have completed the wireless network setup To install drivers and software necessary for operating your device insert ...

Page 119: ...ting down your wireless network settings You will need this information before you continue with the configuration 1 Check and record the current wireless network settings Network Name SSID Communication Mode Authentication Method Encryption Mode User ID Password Infrastructure LEAP CKIP EAP FAST NONE AES TKIP EAP FAST MS CHAPv2 AES TKIP EAP FAST GTC AES TKIP PEAP MS CHAPv2 AES TKIP PEAP GTC AES T...

Page 120: ... a or b to select the Authentication Method you want and then press OK 10 Do one of the following If you selected the LEAP option enter the user ID and then press OK Enter the Password and then press OK If you selected the EAP FAST PEAP or EAP TTLS option press a or b to select the Inner Authentication Method NONE CHAP MS CHAP MS CHAPv2 PAP or GTC and then press OK Depending on your Authentication...

Page 121: ...n the Brother Solutions Center at support brother com to install drivers and software necessary for operating your device HL L6400DW Before configuring your machine we recommend writing down your wireless network settings You will need this information before you continue with the configuration 1 Check and record the current wireless network settings Network Name SSID Communication Mode Authentica...

Page 122: ... Method you want 10 Do one of the following If you selected the LEAP option enter the user ID and then press OK Enter the Password and then press OK If you selected the EAP FAST PEAP or EAP TTLS option press a or b to select the Inner Authentication Method NONE CHAP MS CHAP MS CHAPv2 GTC or PAP Depending on your Authentication Method the Inner Authentication Method selections differ Press a or b t...

Page 123: ... wireless network setup To install drivers and software necessary for operating your device insert the Brother Installation CD ROM to your computer or go to your model s Downloads page on the Brother Solutions Center at support brother com to install drivers and software necessary for operating your device Related Information Additional Methods of Configuring Your Brother Machine for a Wireless Ne...

Page 124: ...ireless Network Use Wi Fi Direct Use Wi Fi Direct Print from Your Mobile Device Using Wi Fi Direct Configure Your Wi Fi Direct Network Configure your Wi Fi Direct network settings from your machine s control panel I Cannot Complete the Wireless Network Setup Configuration 119 ...

Page 125: ...ally setting an SSID and password Your Brother machine s Wi Fi Direct feature supports WPA2 security with AES encryption 2 1 1 Mobile device 2 Your Brother machine Although the Brother machine can be used in both a wired and wireless network only one connection method can be used at a time However a wireless network connection and Wi Fi Direct connection or a wired network connection supported mod...

Page 126: ...following instructions offer five methods for configuring your Brother machine in a wireless network environment Select the method you prefer for your environment Configure Your Wi Fi Direct Network Using the One Push Method Configure Your Wi Fi Direct Network Using the One Push Method and Wi Fi Protected Setup WPS Configure Your Wi Fi Direct Network Using the PIN Method Configure Your Wi Fi Direc...

Page 127: ...rt Wi Fi Protected Setup WPS Option Description Yes Go to Step 4 No See Related Information Configure Your Wi Fi Direct Network Manually 4 Does your mobile device support one push configuration for Wi Fi Protected Setup WPS Option Description Yes See Related Information Configure Your Wi Fi Direct Network Using the One Push Method and Wi Fi Protected Setup WPS No See Related Information Configure ...

Page 128: ... Configure Your Wi Fi Direct Network Manually 123 ...

Page 129: ...es again by pressing Rescan 7 If your mobile device connects successfully the machine s LCD displays Connected You have completed the Wi Fi Direct network setup For information on printing from your mobile device go to your model s Manuals page on the Brother Solutions Center at support brother com to see the Mobile Print Scan Guide for Brother iPrint Scan HL L6400DW If your mobile device supports...

Page 130: ...Related Information Configure Your Wi Fi Direct Network Wi Fi Direct Network Configuration Overview 125 ...

Page 131: ...he Wi Fi Direct setup To cancel press Cancel 8 If your mobile device connects successfully the machine s LCD displays Connected You have completed the Wi Fi Direct network setup For information on printing from your mobile device go to your model s Manuals page on the Brother Solutions Center at support brother com to see the Mobile Print Scan Guide for Brother iPrint Scan HL L6400DW If your mobil...

Page 132: ... Wi Fi Direct Network Configuration Overview 127 ...

Page 133: ...r machine enter the PIN in your mobile device When your Brother machine is not the G O it will display available device names with which to configure a Wi Fi Direct network Press a or b to select the mobile device you want to connect to and press OK Search for available devices again by pressing Rescan and then go to the next step 7 Do one of the following Press a to display the PIN on your Brothe...

Page 134: ...and then go to the next step 5 Do one of the following Press Display PIN Code to display the PIN on your machine and enter the PIN in your mobile device Go to the next step Press Input PIN Code to enter a PIN displayed by your mobile device in the machine and then press OK Go to the next step If your mobile device does not display a PIN press on your Brother machine Go back to the first step and t...

Page 135: ...equest from your mobile device When Input PIN Code appears enter the PIN displayed on your mobile device in the machine 9 Press OK 10 If your mobile device connects successfully the machine s LCD displays Connected You have completed the Wi Fi Direct network setup For information on printing from your mobile device go to your model s Manuals page on the Brother Solutions Center at support brother ...

Page 136: ...e Brother Solutions Center at support brother com to see the Mobile Print Scan Guide for Brother iPrint Scan Related Information Configure Your Wi Fi Direct Network Wi Fi Direct Network Configuration Overview 131 ...

Page 137: ...lays Connected You have completed the Wi Fi Direct network setup For information on printing from your mobile device go to your model s Manuals page on the Brother Solutions Center at support brother com to see the Mobile Print Scan Guide for Brother iPrint Scan or the AirPrint Guide HL L6400DW If your mobile device does not support Wi Fi Direct or WPS you must configure a Wi Fi Direct network man...

Page 138: ...g the network print server settings Print the WLAN Report The WLAN Report reflects your machine s wireless status If the wireless connection fails check the error code on the printed report Configure the SNTP Protocol Using Web Based Management Configure the SNTP protocol to synchronize the time the machine uses for authentication with the time kept by the SNTP time server 133 ...

Page 139: ...ting it again You can find your machine s settings such as the IP address subnet mask node name and MAC Address on the report for example IP address 192 168 0 5 Subnet mask 255 255 255 0 Node name BRN000ca0000499 MAC Address 00 0c a0 00 04 99 HL L5100DN HL L5200DW HL L6200DW HL L6400DW HL L5100DN HL L5200DW HL L6200DW 1 Press a or b to select the Machine Info option and then press OK 2 Press a or ...

Page 140: ... OK 2 Press a or b to select the Print WLANReport option and then press OK The machine will print the WLAN Report HL L6400DW 1 Press Settings Machine Information Print WLANReport 2 Press OK The machine will print the WLAN Report 3 Press If the WLAN Report does not print check your machine for errors If there are no visible errors wait for one minute and then try to print the report again Related I...

Page 141: ...essary How to confirm wireless security information SSID authentication method encryption method Network Key a The Default security settings may be provided on a label attached to the WLAN access point router Or the manufacturer s name or model no of the WLAN access point router may be used as the default security settings b See the documentation provided with your WLAN access point router for inf...

Page 142: ...WEP key only TS 07 The machine cannot detect a WLAN access point router that has WPS enabled If you would like to connect with WPS you must operate both your machine and the WLAN access point router Confirm the connection method for WPS on WLAN access point router and try starting again If you do not know how to operate your WLAN access point router using WPS see the documentation provided with yo...

Page 143: ...ess For example http 192 168 1 2 3 No password is required by default Type a password if you have set one and then click 4 Click the Network tab 5 Click Protocol in the left navigation bar 6 Select the SNTP check box to activate the settings 7 Next to the SNTP check box click Advanced Settings and follow the instructions below Option Description Status Displays whether the SNTP protocol is enabled...

Page 144: ...ine will contact the secondary SNTP server Primary SNTP Server Port Secondary SNTP Server Port Type the port number 1 65535 The secondary SNTP server port is used as a backup to the primary SNTP server port If the primary port is unavailable the machine will contact the secondary SNTP port Synchronization Interval Type the number of hours between server synchronization attempts 1 168 hours 8 Click...

Page 145: ...on for Advanced Users Gigabit Ethernet Wired Network Only Reset the Network Settings to the Factory Settings You can use your machine s control panel to reset the print server to its default factory settings This resets all information such as the password and IP address 140 ...

Page 146: ...thernet link mode to Auto from the machine s control panel or Auto from Web Based Management web browser Use a straight through Category 5 or greater twisted pair cable for 10BASE T 100BASE TX Fast Ethernet Network or 1000BASE T Gigabit Ethernet Network When you connect the machine to a Gigabit Ethernet Network use the network devices complying with 1000BASE T Related Information Technical Informa...

Page 147: ... bar where machine s IP address is the machine s IP address For example http 192 168 1 2 3 No password is required by default Type a password if you have set one and then click 4 Click the Network tab 5 Click Wired 6 Click Ethernet in the left navigation bar 7 Select Auto from the Ethernet Mode drop down list 8 Click Submit 9 To enable the settings restart your machine You can confirm your setting...

Page 148: ...dels only and wireless network settings to the factory settings You can also reset the print server to its factory settings using BRAdmin Light BRAdmin Professional 3 or Web Based Management HL L5100DN HL L5200DW HL L6200DW HL L6400DW HL L5100DN HL L5200DW HL L6200DW 1 Press a or b to select the Network option and then press OK 2 Press a or b to select the Network Reset option and then press OK 3 ...

Page 149: ... Before turning on the machine s Access Lock make a careful note of your password If you forget the password you must reset all passwords stored in the machine by contacting your administrator or Brother customer service Network Security Features 144 ...

Page 150: ... s Access Lock make a careful note of your password If you forget the password you must reset all passwords stored in the machine by contacting your administrator or Brother customer service About Using Setting Lock Use the Setting Lock feature to block unauthorised access to machine settings 145 ...

Page 151: ...Setting Lock Use the Setting Lock feature to block unauthorised access to machine settings When Setting Lock is set to On you cannot access the machine settings without entering the password Set the Setting Lock Password Change the Setting Lock Password Turn Setting Lock On 146 ...

Page 152: ...OK 2 Press a or b to display the Setting Lock option and then press OK 3 Enter a four digit number for the password To enter each digit press a or b to select a number and then press OK 4 When the LCD displays Verify re enter the new password 5 Press Go HL L6400DW 1 Press Settings General Setup Setting Lock 2 Enter a four digit number for the password 3 Press OK 4 When the LCD displays Verify re e...

Page 153: ...ssword option and then press OK 4 Enter the current four digit password To enter each digit press a or b to select a number and then press OK 5 Enter a new four digit password To enter each digit press a or b to select a number and then press OK 6 When the LCD displays Verify re enter the new password 7 Press Go HL L6400DW 1 Press Settings General Setup Setting Lock Set Password 2 Enter the curren...

Page 154: ...ess OK when the LCD displays On 4 Enter the current four digit password To enter each digit press a or b to select a number and then press OK To turn Setting Lock Off press OK Press a to select Yes when the LCD displays Unlock enter the current four digit password and then press OK HL L6400DW 1 Press Settings General Setup Setting Lock Lock Off On 2 Enter the current four digit password 3 Press OK...

Page 155: ...to help protect your data and prevent unauthorised access to the machine Secure Function Lock 3 0 Brother s Secure Function Lock 3 0 increases security by restricting the functions available on your Brother machine Use Active Directory Authentication Use LDAP Authentication Manage Your Network Machine Securely Using SSL TLS Manage Your Network Machine Securely Using IPsec Send an Email Securely Us...

Page 156: ...ys some of the latest network security and encryption protocols available today These network features can be integrated into your overall network security plan to help protect your data and prevent unauthorised access to the machine We recommend disabling the Telnet FTP server and TFTP protocols Accessing the machine using these protocols is not secure Related Information Network Security Feature...

Page 157: ... 3 0 Using Web Based Management Configure Public Mode for Secure Function Lock 3 0 Use the Secure Function Lock screen to set up Public Mode which limits the functions available to public users Public users will not need to enter a password to access the features made available through Public Mode settings Additional Secure Function Lock 3 0 Features Configure the following features in the Secure ...

Page 158: ...0 settings using Web Based Management or BRAdmin Professional 3 Windows Print Print includes print jobs sent via AirPrint Google Cloud Print and Brother iPrint Scan If you register users login names in advance the users will not need to enter their passwords when they use the print function Page Limits Web Connect supported models only Apps supported models only Page Counters Card ID NFC ID suppor...

Page 159: ...me or user name alphanumeric up to 15 digits 9 In the Print and the other columns select a check box to allow or clear a check box to restrict the function listed 10 To configure the maximum page count select the On check box in the Page Limits column and then type the maximum number in the Max Pages field 11 Click Submit 12 Click the User List menu in the left navigation bar 13 In the User List f...

Page 160: ...lic Mode settings Public Mode includes print jobs sent via AirPrint Google Cloud Print and Brother iPrint Scan 1 Start your web browser 2 Type http machine s IP address in your browser s address bar where machine s IP address is the machine s IP address For example http 192 168 1 2 3 Click the Administrator tab 4 Click the User Restriction Function menu in the left navigation bar 5 Select Secure F...

Page 161: ... Export to CSV file to export the current page counter including User List Restricted Functions information as a CSV file Card ID NFC ID supported models only Click the User List menu and then type a users Card ID in the Card ID NFC ID field You can use your ID card for authentication Output available models only When the Mailbox unit is installed on your machine select the output tray for each us...

Page 162: ...d Models HL L6400DW 1 Touch the NFC logo on the machine s control panel with a registered ID Card 2 Press Register Card 3 Touch a new ID Card to the NFC logo The new ID Card s number is registered to the machine For the supported ID Card types go to the Brother Solutions Center at support brother com to see FAQs Troubleshooting Related Information Secure Function Lock 3 0 157 ...

Page 163: ...tication Use Active Directory Authentication Introduction to Active Directory Authentication Configure Active Directory Authentication Using Web Based Management Log On to Change the Machine Settings Using the Machine s Control Panel Active Directory Authentication 158 ...

Page 164: ...r Brother machine If Active Directory Authentication is enabled the machine s control panel will be locked You cannot change the machine s settings until you enter a User ID and password Active Directory Authentication offers the following feature Stores incoming print data You can change the Active Directory Authentication settings using Web Based Management or BRAdmin Professional 3 Windows Rela...

Page 165: ...Active Directory Authentication 6 Click Submit 7 Select Active Directory Authentication in the left navigation bar 8 Configure the following settings Option Description Storage PC Print Data Select this option to store incoming print data After you log on to the machine your PC print jobs will be printed automatically This feature is available only for print data created by a Brother native printe...

Page 166: ...ve Directory Authentication Related Models HL L6400DW When Active Directory Authentication is enabled the machine s control panel will be locked until you enter your User ID and password on the machine s control panel 1 On the machine s control panel enter your User ID 2 Press Login 3 Enter your password 4 Press OK 5 When authentication is successful the machine s control panel will be unlocked Re...

Page 167: ...es Use LDAP Authentication Use LDAP Authentication Introduction to LDAP Authentication Configure LDAP Authentication Using Web Based Management Log On to Change the Machine Settings Using the Machine s Control Panel LDAP Authentication 162 ...

Page 168: ...r Brother machine If LDAP Authentication is enabled the machine s control panel will be locked You cannot change the machine s settings until you enter a User ID and password LDAP Authentication offers the following feature Stores incoming print data You can change the LDAP Authentication settings using Web Based Management or BRAdmin Professional 3 Windows Related Information Use LDAP Authenticat...

Page 169: ... bar 5 Select LDAP Authentication 6 Click Submit 7 Click LDAP Authentication in the left navigation bar 8 Configure the following settings Option Description Storage PC Print Data Select this option to store incoming print data After you log on to the machine your PC print jobs will be printed automatically This feature is available only for print data created by a Brother native printer driver Re...

Page 170: ...ntrol Panel LDAP Authentication Related Models HL L6400DW When LDAP Authentication is enabled the machine s control panel will be locked until you enter your User ID and password on the machine s control panel 1 On the machine s control panel enter your User ID and Password 2 Press Login 3 When authentication is successful the machine s control panel will be unlocked Related Information Use LDAP A...

Page 171: ... securely using SSL TLS You must use Web Based Management to configure a certificate Manage Your Network Machine Securely Using Web Based Management To manage your network machine securely you must use management utilities with security protocols Manage Your Network Machine Securely Using BRAdmin Professional 3 Windows To use BRAdmin Professional 3 utility you must Print Documents Securely Using S...

Page 172: ...ive method of protecting data sent over a local or wide area network LAN or WAN It works by encrypting data such as a print job sent over a network so anyone trying to capture it will not be able to read it SSL TLS can be configured on both wired and wireless networks and will work with other forms of security such as WPA keys and firewalls Related Information Manage Your Network Machine Securely ...

Page 173: ...nternet Explorer for Internet Banking and you see https and the little padlock icon in the web browser you are using SSL SSL grew to work with additional applications such as Telnet printer and FTP software in order to become a universal solution for online security Its original design intentions are still being used today by many online retailers and banks to secure sensitive data such as credit ...

Page 174: ...an IP network by restricting unauthorised users from reading data sent to the machine SSL s key selling point is that it can be used to print confidential data securely For example an HR department in a large company may be printing wage slips on a regular basis Without encryption the data contained on these wages slips can be read by other network users However with SSL TLS anyone trying to captu...

Page 175: ...other machine securely using SSL TLS You must use Web Based Management to configure a certificate Supported Security Certificate Features Your Brother machine supports the use of multiple security certificates which allows secure management authentication and communication with the machine The following security certificate features can be used with the machine Create and Install a Certificate Man...

Page 176: ...ecurity Self signed certificate This print server issues its own certificate Using this certificate you can easily use the SSL TLS communication without creating or installing a different certificate from a CA Certificate from a Certificate Authority CA There are two methods for installing a certificate from a CA If you already have a certificate from a CA or if you want to use a certificate from ...

Page 177: ...tall a Certificate from a Certificate Authority CA If you already have a certificate from an external trusted CA you can store the certificate and private key on the machine and manage them by importing and exporting If you do not have a certificate from an external trusted CA create a Certificate Signing Request CSR send it to a CA for authentication and install the returned certificate on your m...

Page 178: ...e a self signed certificate or use a certificate from a Certificate Authority CA These are a brief summary of the actions required based on the option you choose Option 1 Self Signed Certificate 1 Create a self signed certificate using Web Based Management 2 Install the self signed certificate on your computer Option 2 Certificate from a CA 1 Create a Certificate Signing Request CSR using Web Base...

Page 179: ...Install a Self signed Certificate Create and Install a Self signed Certificate Create a Self signed Certificate Install the Self signed Certificate for Windows users with Administrator Rights Import and Export the Self signed Certificate on your Brother Machine You can store the self signed certificates on your Brother machine and manage them by importing and exporting 174 ...

Page 180: ...g the machine s icon on the Status Monitor screen 3 No password is required by default Type a password if you have set one and then click 4 Click the Network tab 5 Click Security 6 Click Certificate 7 Click Create Self Signed Certificate 8 Enter a Common Name and a Valid Date The length of the Common Name is less than 64 bytes Enter an identifier such as an IP address node name or domain name to u...

Page 181: ...rver The self signed certificate is created and saved in your machine s memory To use SSL TLS comunication the self signed certificate must be installed on your computer Related Information Create and Install a Self signed Certificate 176 ...

Page 182: ...alling certificates 1 Do one of the following Windows XP and Windows Server 2003 Start your web browser and then go to step 3 Windows Vista Windows 7 Windows Server 2008 Click Start All Programs Windows 8 Right click the Internet Explorer icon on the taskbar Windows Server 2012 and Windows Server 2012 R2 Click Internet Explorer and then right click the Internet Explorer icon that appears on the ta...

Page 183: ...ue to this website not recommended Windows XP and Windows Server 2003 When the following dialog box appears click View Certificate and then go to step 6 5 Click Certificate Error and then click View certificates 178 ...

Page 184: ...6 Click Install Certificate 7 When the Certificate Import Wizard appears click Next 8 Select Place all certificates in the following store and then click Browse 179 ...

Page 185: ...9 Select Trusted Root Certification Authorities and then click OK 10 Click Next 11 Click Finish 12 Click Yes if the fingerprint thumbprint is correct 180 ...

Page 186: ...is printed on the Network Configuration Report 13 Click OK The self signed certificate is now installed on your computer and SSL TLS communication is available Related Information Create and Install a Self signed Certificate 181 ...

Page 187: ...eate and Install a Self signed Certificate Import and Export the Self signed Certificate on your Brother Machine Import and Export the Self signed Certificate on your Brother Machine You can store the self signed certificates on your Brother machine and manage them by importing and exporting Import the Self signed Certificate Export the Self signed Certificate 182 ...

Page 188: ...ead of the IP address For example http SharedPrinter If you enable a NetBIOS name you can also use the node name For example http brnxxxxxxxxxxxx The NetBIOS name can be found in the Network Configuration Report For Macintosh access Web Based Management by clicking the machine s icon on the Status Monitor screen 3 No password is required by default Type a password if you have set one and then clic...

Page 189: ...edPrinter If you enable a NetBIOS name you can also use the node name For example http brnxxxxxxxxxxxx The NetBIOS name can be found in the Network Configuration Report For Macintosh access Web Based Management by clicking the machine s icon on the Status Monitor screen 3 No password is required by default Type a password if you have set one and then click 4 Click the Network tab 5 Click Security ...

Page 190: ...not have a certificate from an external trusted CA create a Certificate Signing Request CSR send it to a CA for authentication and install the returned certificate on your machine Create a Certificate Signing Request CSR A Certificate Signing Request CSR is a request sent to a Certificate Authority CA to authenticate the credentials contained within the certificate Install a Certificate on Your Br...

Page 191: ... by clicking the machine s icon on the Status Monitor screen 3 No password is required by default Type a password if you have set one and then click 4 Click the Network tab 5 Click Security 6 Click Certificate 7 Click Create CSR 8 Type a Common Name required and add other information about your Organization optional Your company details are required so that a CA can confirm your identity and verif...

Page 192: ...ver 2003 2008 2012 2012 R2 we recommend using the Web Server for the certificate template to securely create the Client Certificate If you are creating a Client Certificate for an IEEE 802 1x environment with EAP TLS authentication we recommend using User for the certificate template For more information go to your model s page on the Brother Solutions Center at support brother com Related Informa...

Page 193: ...r where machine s IP address is the machine s IP address For example http 192 168 1 2 If you are using a Domain Name System or enable a NetBIOS name you can type another name such as SharedPrinter instead of the IP address For example http SharedPrinter If you enable a NetBIOS name you can also use the node name For example http brnxxxxxxxxxxxx The NetBIOS name can be found in the Network Configur...

Page 194: ...tificate Create and Install a Certificate from a Certificate Authority CA Import and Export the Certificate and Private Key Import and Export the Certificate and Private Key Store the certificate and private key on your machine and manage them by importing and exporting them Import a Certificate and Private Key Export the Certificate and Private Key 189 ...

Page 195: ...er instead of the IP address For example http SharedPrinter If you enable a NetBIOS name you can also use the node name For example http brnxxxxxxxxxxxx The NetBIOS name can be found in the Network Configuration Report For Macintosh access Web Based Management by clicking the machine s icon on the Status Monitor screen 3 No password is required by default Type a password if you have set one and th...

Page 196: ...IP address For example http SharedPrinter If you enable a NetBIOS name you can also use the node name For example http brnxxxxxxxxxxxx The NetBIOS name can be found in the Network Configuration Report For Macintosh access Web Based Management by clicking the machine s icon on the Status Monitor screen 3 No password is required by default Type a password if you have set one and then click 4 Click t...

Page 197: ...Using SSL TLS Certificates and Web Based Management Create and Install a Certificate Import and Export a CA Certificate Import and Export a CA Certificate You can import export and store CA certificates on your Brother machine Import a CA Certificate Export a CA Certificate 192 ...

Page 198: ...a Domain Name System or enable a NetBIOS name you can type another name such as SharedPrinter instead of the IP address For example http SharedPrinter If you enable a NetBIOS name you can also use the node name For example http brnxxxxxxxxxxxx The NetBIOS name can be found in the Network Configuration Report For Macintosh access Web Based Management by clicking the machine s icon on the Status Mon...

Page 199: ...n type another name such as SharedPrinter instead of the IP address For example http SharedPrinter If you enable a NetBIOS name you can also use the node name For example http brnxxxxxxxxxxxx The NetBIOS name can be found in the Network Configuration Report For Macintosh access Web Based Management by clicking the machine s icon on the Status Monitor screen 3 No password is required by default Typ...

Page 200: ...ficates Maximum Number of Certificates Stored UP on Brother Machine Self signed Certificate or Certificate Issued by a CA 5 CA Certificate 6 We recommend storing one less certificate than allowed reserving an empty spot in case of certificate expiration When a certificate expires import a new certificate into the reserved spot and then delete the expired certificate This ensures that you avoid con...

Page 201: ...Based Management screen 1 Click the Network tab 2 Click the Protocol menu in the left navigation bar 3 Click HTTP Server Settings 1 Start your web browser 2 Type https Common Name in your browser s address bar where Common Name is the Common Name that you assigned to the certificate this could be your IP address node name or domain name 3 No password is required by default Type a password if you h...

Page 202: ...server do not work correctly since they authorize the read only access of version 1 and version 2c If you want to use all applications we recommend using SNMP v1 v2c read write access mode SNMPv3 read write access In this mode the print sever uses version 3 of the SNMP protocol If you want to manage the print server securely use this mode When you use SNMPv3 read write access mode note the followi...

Page 203: ...tion will not be secure Use Web Based Management with the HTTPS protocol if you use BRAdmin Professional 3 and Web Based Management together Use a different password in each group if you are managing a mixed group of older and newer print servers with BRAdmin Professional 3 This will ensure security is maintained on the newer print servers Older versions of BRAdmin refer to BRAdmin Professional ol...

Page 204: ...example http brnxxxxxxxxxxxx The NetBIOS name can be found in the Network Configuration Report For Macintosh access Web Based Management by clicking the machine s icon on the Status Monitor screen 3 No password is required by default Type a password if you have set one and then click 4 Click the Network tab 5 Click Protocol Make sure the IPP check box is selected If the IPP check box is not select...

Page 205: ...ets IPsec encrypts data carried over the network such as print data sent from computers to a printer Because the data is encrypted at the network layer applications that employ a higher level protocol use IPsec even if the user is not aware of its use Configure IPsec Using Web Based Management The IPsec connection conditions are comprised of two Template types Address and IPsec You can configure u...

Page 206: ...specified device using IPsec When the devices start communicating using IPsec keys are exchanged using Internet Key Exchange IKE first and then the encrypted data is transmitted using the keys In addition IPsec has two operation modes the Transport mode and Tunnel mode The Transport mode is used mainly for communication between devices and the Tunnel mode is used in environments such as a Virtual ...

Page 207: ...ress and IPsec You can configure up to 10 connection conditions 1 Start your web browser 2 Type http machine s IP address in your browser s address bar where machine s IP address is the machine s IP address For example http 192 168 1 2 3 No password is required by default Type a password if you have set one and then click 4 Click the Network tab 5 Click Security 6 Click the IPsec menu in the left ...

Page 208: ...le select the Enabled check box to activate the template When you select multiple check boxes the lower numbered check boxes have priority if the settings for the selected check boxes conflict 13 Click on the corresponding drop down list to select the Address Template that is used for the IPsec connection conditions To add an Address Template click Add Template 14 Click on the corresponding drop d...

Page 209: ...ying 10 Address Templates Click the Delete button to delete an Address Template When an Address Template is in use it cannot be deleted 7 Click the Address Template that you want to create The IPsec Address Template appears 8 In the Template Name field type a name for the template up to 16 characters 9 Select a Local IP Address option to specify the IP address conditions for the sender IP Address ...

Page 210: ...he starting and ending IP addresses for the IP address range If the starting and ending IP addresses are not standardized to IPv4 or IPv6 or the ending IP address is smaller than the starting address an error will occur IP Address Prefix Specify the IP address using CIDR notation For example 192 168 1 1 24 Because the prefix is specified in the form of a 24 bit subnet mask 255 255 255 0 for 192 16...

Page 211: ...ired by default Type a password if you have set one and then click 4 Click the Network tab 5 Click Security 6 Click IPsec Template in the left navigation bar The Template List appears displaying 10 IPsec Templates Click the Delete button to delete an IPsec Template When an IPsec Template is in use it cannot be deleted 7 Click IPsec Template that you want to create The IPsec Template screen appears...

Page 212: ...Related Information Manage Your Network Machine Securely Using IPsec IKEv1 Settings for an IPsec Template IKEv2 Settings for an IPsec Template 207 ...

Page 213: ... Manual Settings for an IPsec Template 208 ...

Page 214: ... Manage Your Network Machine Securely Using IPsec Configure an IPsec Template Using Web Based Management IKEv1 Settings for an IPsec Template IKEv1 Settings for an IPsec Template Related Models HL L5100DN HL L5200DW HL L6200DW HL L6400DW 209 ...

Page 215: ...ret key Select Group1 Group2 Group5 or Group14 Encryption Select DES 3DES AES CBC 128 or AES CBC 256 Hash Select MD5 SHA1 SHA256 SHA384 or SHA512 SA Lifetime Specify the IKE SA lifetime Type the time seconds and number of kilobytes KByte Encapsulating Security Protocol Select ESP AH ESP or AH ESP is a protocol for carrying out encrypted communication using IPsec ESP encrypts the payload communicat...

Page 216: ...as derived from a parent key that parent key is not used to derive other keys Therefore even if a key is compromised the damage will be limited only to the messages that were encrypted using that key Select Enabled or Disabled Authentication Method Select the authentication method Select Pre Shared Key or Certificates Pre Shared Key When encrypting communication the encryption key is exchanged and...

Page 217: ... Manage Your Network Machine Securely Using IPsec Configure an IPsec Template Using Web Based Management IKEv2 Settings for an IPsec Template IKEv2 Settings for an IPsec Template Related Models HL L5100DN HL L5200DW HL L6200DW HL L6400DW 212 ...

Page 218: ...t the secret key to send and receive open information that was generated using a random number and the secret key Select Group1 Group2 Group5 or Group14 Encryption Select DES 3DES AES CBC 128 or AES CBC 256 Hash Select MD5 SHA1 SHA256 SHA384 or SHA512 SA Lifetime Specify the IKE SA lifetime Type the time seconds and number of kilobytes KByte Encapsulating Security Protocol Select ESP ESP is a prot...

Page 219: ...nel If you selected Pre Shared Key for the Authentication Method type the Pre Shared Key up to 32 characters Local ID Type ID Select the sender s ID type and then type the ID Select IPv4 Address IPv6 Address FQDN E mail Address or Certificate for the type If you select Certificate type the common name of the certificate in the ID field Remote ID Type ID Select the recipient s ID type and then type...

Page 220: ...Related Information Configure an IPsec Template Using Web Based Management 215 ...

Page 221: ...c Template Related Models HL L5100DN HL L5200DW HL L6200DW HL L6400DW Template Name Type a name for the template up to 16 characters Use Prefixed Template Select Custom Internet Key Exchange IKE IKE is a communication protocol that is used to exchange encryption keys in order to carry out encrypted communication using IPsec To carry out encrypted communication for that time only the encryption alg...

Page 222: ...n Type the In Out values These settings are necessary when Custom is selected in Use Prefixed Template Manual is selected in Internet Key Exchange IKE and ESP is selected in Protocol in Encapsulating Security The number of characters you can set differs depending on the setting you chose for Encryption in the Encapsulating Security section If the length of the specified code key is different than ...

Page 223: ...ol Hash Select None MD5 SHA1 SHA256 SHA384 or SHA512 None can be selected only when ESP is selected in Protocol SA Lifetime Specify the IKE SA lifetime Type the time seconds and number of kilobytes KByte before the IPsec SA will expire Encapsulation Mode Select Transport or Tunnel Remote Router IP Address Specify the IP address IPv4 or IPv6 of the connection destination Enter this information only...

Page 224: ...curity Network Security Features Send an Email Securely Send an Email Securely Configure Email Sending Using Web Based Management Send an Email with User Authentication Send an Email Securely Using SSL TLS 219 ...

Page 225: ...IOS name you can also use the node name For example http brnxxxxxxxxxxxx The NetBIOS name can be found in the Network Configuration Report For Macintosh access Web Based Management by clicking the machine s icon on the Status Monitor screen 3 No password is required by default Type a password if you have set one and then click 4 Click the Network tab 5 Click Protocol in the left navigation bar 6 I...

Page 226: ... use the SMTP AUTH method for email notification and email reports available for certain models We recommend using Web Based Management to configure the SMTP authentication Email Server Settings You must configure your machine s SMTP authentication method to match the method used by your email server For details about your email server settings contact your network administrator or Internet Servic...

Page 227: ...n you must configure SMTP over SSL TLS We recommend using Web Based Management to configure SSL TLS Verify Server Certificate Under SSL TLS if you choose SSL or TLS the Verify Server Certificate check box will be selected automatically Before you verify the server certificate you must import the CA certificate issued by the CA that signed the server certificate Contact your network administrator o...

Page 228: ...configure your machine s SMTP communication method to match the method used by your email server For details about your email server settings contact your network administrator or your ISP In most cases the secured webmail services require the following settings SMTP Port 587 Server Authentication Method SMTP AUTH SSL TLS TLS Related Information Send an Email Securely 223 ...

Page 229: ... Wired or a Wireless Network Use IEEE 802 1x Authentication for a Wired or a Wireless Network What Is IEEE 802 1x Authentication Configure IEEE 802 1x Authentication for a Wired or a Wireless Network Using Web Based Management Web Browser IEEE 802 1x Authentication Methods 224 ...

Page 230: ...EEE 802 1x is an IEEE standard for wired and wireless networks that limits access from unauthorised network devices Your Brother machine supplicant sends an authentication request to a RADIUS server Authentication server through your access point or HUB After your request has been verified by the RADIUS server your machine can access the network Related Information Use IEEE 802 1x Authentication f...

Page 231: ...y You can also configure IEEE 802 1x authentication using BRAdmin Professional 3 Wired and wireless network Wireless setup wizard from the control panel Wireless network Wireless setup wizard on the CD ROM Wireless network 1 Start your web browser 2 Type http machine s IP address in your browser s address bar where machine s IP address is the machine s IP address For example http 192 168 1 2 If yo...

Page 232: ...f the server certificate using the CA certificate that has been issued by the CA that signed the server certificate CA Cert ServerID The verification method to check the common name 1 value of the server certificate in addition to the CA reliability of the server certificate 7 When finished with configuration click Submit For wired networks After configuring connect your machine to the IEEE 802 1x...

Page 233: ...ble Authentication Protocol PEAP is a version of EAP method developed by Cisco Systems Inc Microsoft Corporation and RSA Security PEAP creates an encrypted Secure Sockets Layer SSL Transport Layer Security TLS tunnel between a client and an authentication server for sending a user ID and password PEAP provides mutual authentication between the server and the client The Brother machine supports the...

Page 234: ...g to Network Overview Configure the Store Print Log to Network Settings Using Web Based Management Use the Store Print Log to Network s Error Detection Setting Use Error Detection Settings to determine the action that is taken when the print log cannot be stored to the server due to a network error 229 ...

Page 235: ... name user name date time and the number of printed pages for every print job CIFS is a protocol that runs over TCP IP allowing computers on a network to share files over an intranet or the Internet The following print functions are recorded in the print log Print jobs from your computer Web Connect Print The Store Print Log to Network feature supports Kerberos authentication and NTLMv2 authentica...

Page 236: ...uired for access to the CIFS server Auto Kerberos or NTLMv2 Kerberos is an authentication protocol which allows devices or individuals to securely prove their identity to network servers using a single sign on NTLMv2 is the authentication method used by Windows to log into servers Auto If you select Auto NTLMv2 will be used to the authentication method Kerberos Select the Kerberos option to use Ke...

Page 237: ...k Yes and then go to the next step To skip the test click No Your settings will be submitted automatically 10 The machine will test your settings 11 If your settings are accepted Test OK appears on the screen If Test Error appears check all settings and then click Submit to display the Test page again Related Information Store Print Log to Network 232 ...

Page 238: ...e cancelled when the print log cannot be stored to the server Ignore Log Print If you select the Ignore Log Print option the machine prints the documentation even if the print log cannot be stored to the server When the store print log function has recovered the print log is recorded as follows a If the log cannot be stored at the end of printing the print log except the number of printed pages wi...

Page 239: ... with AirPrint Print with Mopria Print from a Mobile Device Use Brother iPrint Scan to print from various mobile devices Print Using Near Field Communication NFC Near Field Communication NFC allows for simple transactions data exchange and wireless connections between two devices that are in close range of each other 234 ...

Page 240: ...our Brother machine can download and print images that are already uploaded to these services 1 Printing 2 Photos images documents and other files 3 Web Service The following services can be accessed from your Brother machine Google Drive Dropbox OneDrive and Box For more information see the Web Connect Guide Go to your model s Manuals page on the Brother Solutions Center at support brother com Re...

Page 241: ...to a printer registered to your Google account using a network compatible device such as a mobile phone or computer without installing the printer driver on the device 3 1 4 2 1 Print request 2 Internet 3 Google Cloud Print 4 Printing For more information see the Google Cloud Print Guide Go to your model s Manuals page on the Brother Solutions Center at support brother com Related Information Mobi...

Page 242: ...photos emails web pages and documents from your iPad iPhone and iPod touch without installing a printer driver on the device 1 2 1 Print request 2 Printed photos emails web pages and documents For more information see the AirPrint Guide Go to your model s Manuals page on the Brother Solutions Center at support brother com Related Information Mobile Web Connect 237 ...

Page 243: ... service you can connect to the same network as your machine and print without additional setup Many native Android apps including Google Chrome Gmail and Gallery support printing 1 2 3 1 Android 4 4 or later 2 Wi Fi Connection 3 Your Brother machine You must download the Mopria Print Service from the Google Play Store and install it on your Android device Be sure to turn the service on before usi...

Page 244: ...er iPrint Scan allows you to use features of your Brother machine directly from your iPhone iPod touch iPad and iPad mini Download and install Brother iPrint Scan from the App Store For Windows Phone Devices Brother iPrint Scan allows you to use features of your Brother machine directly from your Windows Phone without using a computer Download and install Brother iPrint Scan from the Windows Phone...

Page 245: ...droid device is NFC enabled you can print data photos PDF files text files web pages and email messages from the device by touching it to the NFC logo on the right side of your machine s control panel You must download and install Brother iPrint Scan on your Android device to use this feature For more information see the Mobile Print Scan Guide for Brother iPrint Scan Go to your model s Manuals pa...

Page 246: ...hine s power cord is connected correctly and the machine s power is on See the Quick Setup Guide All of the protective materials have been removed See the Quick Setup Guide Paper is loaded correctly in the paper tray The interface cables are securely connected to the machine and the computer or the wireless connection is set up on both the machine and your computer Error and maintenance messages I...

Page 247: ...e machine until it locks in the closed position The 2 sided tray is not installed completely Install the 2 sided tray firmly in the machine Access Denied The function you want to use is restricted by Secure Function Lock 3 0 Call your administrator to check your Secure Function Lock Settings Cartridge Error The toner cartridge is not installed correctly Remove the toner cartridge and drum unit ass...

Page 248: ... of the machine Open the fuser cover and remove all jammed paper Close the fuser cover Jam Tray 1 Jam Tray 2 Jam Tray 3 Jam Tray 4 The paper is jammed in the indicated paper tray Pull out the paper tray indicated on the LCD and remove all jammed paper Limit Exceeded The print limit set in Secure Function Lock 3 0 was reached Call your administrator to check your Secure Function Lock Settings Media...

Page 249: ...T4 The paper tray is not installed or not installed correctly Reinstall the paper tray indicated on the LCD Out of Memory The machine s memory is full Press Cancel and reduce the print resolution Print Data Full The machine s memory is full Press Cancel and delete the previously stored secure print data Print Unable The machine has a mechanical problem Press and hold to turn the machine off wait a...

Page 250: ...e back cover of the machine until it locks in the closed position The 2 sided tray is not installed completely Install the 2 sided tray firmly in the machine Access Denied The function you want to use is restricted by Secure Function Lock 3 0 Call your administrator to check your Secure Function Lock Settings Cartridge Error The toner cartridge is not installed correctly Remove the toner cartridge...

Page 251: ...jammed in the back of the machine Open the fuser cover and remove all jammed paper Close the fuser cover Jam Tray Jam Tray1 Jam Tray2 Jam Tray3 Jam Tray4 The paper is jammed in the indicated paper tray Pull out the paper tray and remove all jammed paper as shown in the animation on the LCD Limit Exceeded The print limit set in Secure Function Lock 3 0 was reached Call your administrator to check y...

Page 252: ... toner cartridge and drum unit assembly Remove the toner cartridge from the drum unit and reinstall the toner cartridge back in the drum unit Reinstall the toner cartridge and drum unit assembly back in the machine If the problem continues replace the toner cartridge with a new one No Tray T1 No Tray T2 No Tray T3 No Tray T4 The paper tray is not installed or not installed correctly Reinstall the ...

Page 253: ...automatic 2 sided printing are A4 Letter Legal Mexico Legal India Legal and Folio The paper in the tray is not the correct size and is not available for automatic 2 sided printing Size Mismatch The paper in the tray is not the correct size Load the correct size of paper in the tray indicated on the LCD and set the size of paper for the tray Press Retry Supplies Drum End Soon The drum unit is near ...

Page 254: ...Related Information Troubleshooting Replace Supplies Load and Print Using the Paper Tray Load and Print Using the Multi purpose Tray MP Tray Replace the Drum Unit Clean the Corona Wire 249 ...

Page 255: ... new paper This helps prevent multiple sheets of paper from feeding through the machine at one time and prevents paper jams Paper is Jammed in the MP tray Paper is Jammed in the Paper Tray Paper is Jammed in the Back of the Machine Paper is Jammed inside the Machine Paper is Jammed in the 2 sided Tray Paper is Jammed in the Mailbox Unit 250 ...

Page 256: ...per from the MP tray 2 Remove any jammed paper from in and around the MP tray 3 Fan the paper stack and then put it back in the MP tray 4 Reload paper in the MP tray and make sure the paper stays under the maximum paper height guides 1 on both sides of the tray 1 5 Do one of the following HL L5000D HL L5100DN HL L5200DW HL L6200DW Press Go to resume printing HL L6400DW Press Retry to resume printi...

Page 257: ...am in the paper tray follow these steps 1 Pull the paper tray completely out of the machine 2 Slowly pull out the jammed paper Pulling the jammed paper downward using both hands allows you to remove the paper more easily 3 Fan the stack of paper to prevent further jams and slide the paper guides to fit the paper size 4 Make sure the paper is below the maximum paper mark b b b 252 ...

Page 258: ...5 Put the paper tray firmly back in the machine Related Information Paper Jams 253 ...

Page 259: ...these steps 1 Leave the machine turned on for 10 minutes for the internal fan to cool the extremely hot parts inside the machine 2 Open the back cover 3 Pull the green levers at the left and right sides toward you to release the fuser cover WARNING HOT SURFACE The machine s internal parts will be extremely hot Wait for the machine to cool down before touching them 4 Use both hands to gently pull t...

Page 260: ...5 Close the fuser cover 6 Close the back cover until it locks in the closed position Related Information Paper Jams 255 ...

Page 261: ... Leave the machine turned on for 10 minutes for the internal fan to cool the extremely hot parts inside the machine 2 Open the front cover 3 Remove the toner cartridge and drum unit assembly WARNING HOT SURFACE The machine s internal parts will be extremely hot Wait for the machine to cool down before touching them 4 Pull out the jammed paper slowly 5 Install the toner cartridge and drum unit asse...

Page 262: ...6 Close the front cover Related Information Paper Jams 257 ...

Page 263: ...ow these steps 1 Leave the machine turned on for 10 minutes for the internal fan to cool the extremely hot parts inside the machine 2 Pull the paper tray completely out of the machine 3 At the back of the machine pull the 2 sided tray completely out of the machine 4 Pull the jammed paper out of the machine or out of the 2 sided tray 5 Remove paper that may have jammed under the machine due to stat...

Page 264: ...or the machine to cool down before touching them 7 Use both hands to gently pull the jammed paper out of the back of the machine 8 Close the back cover until it locks in the closed position 9 Put the 2 sided tray firmly back in the rear of the machine 10 Put the paper tray firmly back in the front of the machine Related Information Paper Jams 259 ...

Page 265: ... the Status Monitor indicates that there is a jam in the Mailbox unit follow these steps 1 Pull the jammed paper out of the Mailbox bin indicated on the LCD 2 If the error continues open the Mailbox s back cover 3 Pull the jammed paper out of the Mailbox unit 4 Close the Mailbox s back cover until it locks in the closed position Related Information Paper Jams 260 ...

Page 266: ...ardware and Sound View devices and printers Right click the Brother XXX XXXX Click See what s printing If printer driver options appear select your printer driver Click Printer in the menu bar and make sure that Use Printer Offline is not selected Windows Server 2012 R2 Click Control Panel on the Start screen In the Hardware group click View devices and printers Right click the Brother XXX XXXX Cl...

Page 267: ... paper that is 60 to 105 g m2 Print speed is too slow Try changing the printer driver setting The highest resolution needs longer data processing sending and printing time The machine does not feed paper If there is paper in the paper tray make sure it is straight If the paper is curled straighten it Sometimes it is helpful to remove the paper turn the stack over and put it back in the paper tray ...

Page 268: ...ner Save may be turned on Turn off Toner Save mode in the machine s menu settings or the printer driver Clean the drum unit Clean the corona wire on the drum unit Replace the toner cartridge with a new toner cartridge Replace the drum unit with a new drum unit Grey background Check the machine s environment Conditions such as high temperatures and high humidity can increase the amount of backgroun...

Page 269: ...self Print multiple blank pages to clear this problem especially if the machine has not been used for a long time Clean the drum unit The drum unit may be damaged Replace the drum unit with a new drum unit Lines across the page Clean the drum unit The drum unit may be damaged Replace the drum unit with a new drum unit White lines bands or ribbing across the page Check the machine s environment Con...

Page 270: ... cartridge may be damaged Replace the toner cartridge with a new toner cartridge The drum unit may be damaged Replace the drum unit with a new drum unit The fuser unit may be contaminated Contact Brother customer service White lines down the page Make sure foreign material such as a torn piece of paper sticky notes or dust is not inside the machine and around the toner cartridge and drum unit The ...

Page 271: ...ia Wrinkles or creases Make sure paper is loaded correctly Check the paper type and quality Turn over the stack of paper in the tray or rotate the paper 180 in the input tray Poor fixing Make sure the media type setting in the driver matches the type of paper you are using Choose Improve Toner Fixing mode in the printer driver If this selection does not provide enough improvement change the printe...

Page 272: ...etwork Connection Repair Tool Windows Use the Network Connection Repair Tool to fix the Brother machine s network settings It will assign the correct IP address and Subnet Mask Where Can I Find My Brother Machine s Network Settings I Cannot Complete the Wireless Network Setup Configuration My Brother Machine Cannot Print over the Network I Want to Check that My Network Devices are Working Correctl...

Page 273: ...IN File Access Error contact your administrator The Brother machine cannot access the destination folder for the Store Print Log to Network feature Make sure the stored directory name is correct Make sure the stored directory is write enabled Make sure the file is not locked Log Access Error In Web Based Management you have selected the Cancel Print option in the Error Detection Setting of Store P...

Page 274: ...the information on the Kerberos server settings Connection Error Other devices are trying to connect to the Wi Fi Direct network at the same time Make sure there are no other devices trying to connect to the Wi Fi Direct network and then try to configure the Wi Fi Direct settings again Connection Failed The Brother machine and your mobile device cannot communicate during the Wi Fi Direct network c...

Page 275: ...etwork The Brother machine cannot connect to the Active Directory server Make sure your server address is correct Make sure your server is connected to the network Make sure the machine is connected to the network Wrong Date Time contact your administrator The Brother machine does not obtain the time from the SNTP time server Make sure the settings to access the SNTP time server are configured cor...

Page 276: ...tart screen 2 Double click XXX C where XXX is the name of your local disk drive Program Files Browny02 Brother BrotherNetTool exe For 64 bit OS users double click XXX C where XXX is the name of your local disk drive Program Files x86 Browny02 Brother BrotherNetTool exe If the User Account Control screen appears do one of the following Windows Vista Click Allow Windows 7 Windows 8 Click Yes 3 Follo...

Page 277: ... I Want to Check that My Network Devices are Working Correctly 272 ...

Page 278: ...ine s Network Settings Where Can I Find My Brother Machine s Network Settings Print the Network Configuration Report The Network Configuration Report lists the network configuration including the network print server settings Change Machine Settings from Your Computer 273 ...

Page 279: ... allowed in the filter You can find the MAC Address on your Brother machine s control panel Wireless Your wireless LAN access point router is in stealth mode not broadcasting the SSID Enter the correct SSID name or Network Key manually Check the SSID name or the Network Key in the instructions supplied with your wireless LAN access point router and reconfigure the wireless network setup Wireless Y...

Page 280: ...tings again If you are using your Brother machine as a client confirm how many devices are allowed in the current Wi Fi Direct network and then check how many devices are connected Wi Fi Direct For Windows If your wireless connection has been interrupted and you have checked and tried all of the above we recommend using the Network Connection Repair Tool Related Information Network Problems Config...

Page 281: ...tion Repair Tool Wired Wireless The failed print job is still in your computer s print queue If the failed print job is still in your computer s print queue delete it Otherwise double click the printer icon in the following folder and cancel all documents Windows XP Windows Server 2003 Click Start Printers and Faxes Windows Vista Click Start Control Panel Hardware and Sound Printers Windows 7 Clic...

Page 282: ...rt Wireless If you have checked and tried all of the above but your Brother machine still cannot print uninstall the printer driver and reinstall it Related Information Network Problems Print the WLAN Report Wireless LAN Report Error Codes Use the Network Connection Repair Tool Windows I Want to Check that My Network Devices are Working Correctly 277 ...

Page 283: ...ping the Brother machine from your computer Ping the Brother machine from your computer using the IP address or the node name in the Windows command prompt or Macintosh Terminal application ping ipaddress or nodename Successful Your Brother machine is working correctly and connected to the same network as your computer Unsuccessful Your Brother machine is not connected to the same network as your ...

Page 284: ...Server 2012 Move your mouse to the lower right corner of your desktop When the menu bar appears click Settings Control Panel In the Hardware and Sound 1 group click View devices and printers For Windows Server 2012 R2 Click Control Panel on the Start screen In the Hardware group click View devices and printers 2 Right click the Brother XXX XXXX BR Script3 icon select Printer properties 3 From the ...

Page 285: ...Related Information Troubleshooting 280 ...

Page 286: ...f data saved in the memory Test Print Print a test page Drum Dot Print Print the Drum Dot Check Sheet Print Font Print a list of the machine s internal fonts Serial No Check your machine s serial number Version Check your machine s firmware version Page Count Check the number of total pages the machine has printed Parts Life Check the percentage of the supplies life that remains available 3 Press ...

Page 287: ...rial No Check your machine s serial number Version Check your machine s firmware version Page Count Check the number of total pages the machine has printed Parts Life Check the percentage of the supplies life that remains available 3 Press Related Information Troubleshooting 282 ...

Page 288: ...ork Reset Use the Network Reset function to restore the print server s network settings such as password and IP address back to its default factory settings Factory Reset Use the Factory Reset function to restore all settings back to the factory settings 283 ...

Page 289: ...elect Yes The machine will restart automatically HL L6400DW 1 Press Settings Reset Menu Network 2 Press the option in the table to reset the machine or to exit the process Option Description Yes Reset the machine No The machine will exit and cancel the reset menu 3 You will be asked to reboot the machine Press the option in the table to reboot the machine or to exit the process Option Description ...

Page 290: ...ss a to select Reset HL L6400DW 1 Press Settings Reset Menu Factory Reset 2 Press the option in the table to reset the machine or to exit the process Option Description Yes Reset the machine No The machine will exit and cancel the reset menu 3 You will be asked to reboot the machine Press the option in the table to reboot the machine or to exit the process Option Description Press Yes for 2 second...

Page 291: ...plies You must replace supplies when the machine indicates that the life of the supply is over Clean the Machine Clean the outside and inside of the machine regularly with a dry lint free cloth Check the Remaining Life of Parts Pack and Ship Your Machine 286 ...

Page 292: ...fe Toner Low Toner cartridge For Australia TN 3420 1 TN 3440 2 TN 3470 3 TN 3490 4 For New Zealand TN 3415 1 TN 3425 2 TN 3465 3 TN 3475 4 For Middle Eastern and African countries TN 3417 1 TN 3437 2 TN 3467 3 TN 3487 4 For Other countries TN 3428 1 TN 3448 2 TN 3478 3 TN 3498 4 Approximately 3 000 pages 1 5 6 Approximately 8 000 pages 2 5 6 Approximately 12 000 pages 3 5 6 Approximately 20 000 pa...

Page 293: ...ms according to local regulations keeping it separate from domestic waste If you have questions call your local waste disposal office Be sure to reseal the consumable items tightly so that the material inside does not spill We recommend placing used supplies on a piece of paper to prevent accidentally spilling or scattering the material inside If you use paper that is not a direct equivalent for t...

Page 294: ...Related Information Routine Maintenance Replace the Toner Cartridge Replace the Drum Unit Error and Maintenance Messages Supplies 289 ...

Page 295: ...on 2 Open the front cover 3 Remove the toner cartridge and drum unit assembly from the machine 4 Push down the green lock lever and take the toner cartridge out of the drum unit 5 Unpack the new toner cartridge 6 Remove the protective cover 7 Put the new toner cartridge firmly into the drum unit until you hear it lock into place 290 ...

Page 296: ...he green tab from left to right and right to left several times Be sure to return the tab to the Home position a The arrow on the tab must be aligned with the arrow on the drum unit If it is not printed pages may have a vertical stripe 9 Install the toner cartridge and drum unit assembly back into the machine 10 Close the front cover of the machine 291 ...

Page 297: ...ft unpacked for a long time the toner life will be shortened Brother strongly recommends you DO NOT refill the toner cartridge provided with your machine We also strongly recommend you continue to use only Brother Original replacement toner cartridges Use or attempted use of third party toner and or cartridges in the Brother machine may cause damage to the machine and or may result in unsatisfacto...

Page 298: ...e the toner cartridge and drum unit assembly from the machine 4 Push down the green lock lever and take the toner cartridge out of the drum unit 5 Unpack the new drum unit 6 Put the toner cartridge firmly into the new drum unit until you hear it lock into place Make sure you put the toner cartridge in correctly or it may separate from the drum unit 293 ...

Page 299: ...um unit is placed in direct sunlight or room light for long periods of time the unit may be damaged There are many factors that determine the actual drum life such as the temperature humidity type of paper type of toner used and so on Under ideal conditions the average drum life is estimated at approximately 30 000 pages based on 1 page per job and 50 000 pages based on 3 pages per job A4 letter s...

Page 300: ...th WARNING DO NOT use flammable substances any type of spray or an organic solvent liquid containing alcohol or ammonia to clean the inside or outside of the product Doing so could cause a fire Instead use only a dry lint free cloth IMPORTANT DO NOT use isopropyl alcohol to remove dirt from the control panel It may crack the panel To avoid print quality problems DO NOT touch the shaded parts shown...

Page 301: ... Clean the Drum Unit Clean the Paper Pick up Rollers 296 ...

Page 302: ... Touchscreen LCD Related Models HL L6400DW IMPORTANT DO NOT use any type of liquid cleaners including ethanol 1 Press and hold to turn the machine off 2 Clean the Touchscreen with a dry soft lint free cloth 3 Press to turn the machine on Related Information Clean the Machine 297 ...

Page 303: ...lean the corona wire inside the drum unit by gently sliding the green tab from left to right and right to left several times Be sure to return the tab to the Home position a The arrow on the tab must be aligned with the arrow on the drum unit If it is not printed pages may have a vertical stripe 4 Install the toner cartridge and drum unit assembly back into the machine 5 Close the front cover of t...

Page 304: ... Make sure the machine is in Ready Mode 2 Press a or b to display the Machine Info option and then press OK 3 Press a or b to select the Drum Dot Print option 4 Press OK The machine prints the Drum Dot Check Sheet 5 Press and hold to turn the machine off 6 Open the front cover l 7 Remove the toner cartridge and drum unit assembly from the machine 8 Push down the green lock lever and take the toner...

Page 305: ...rum region 2 11 Turn the edge of the drum unit toward you while looking at the drum surface to find the mark To avoid print quality problems DO NOT touch the surface of the drum unit only the edge You can turn the drum unit gear more easily by pulling down the black levers When you have finished turning the gear push the levers back to the original position 300 ...

Page 306: ...nto place Make sure you put the toner cartridge in correctly or it may separate from the drum unit 14 Install the toner cartridge and drum unit assembly back into the machine 15 Close the front cover of the machine 16 Press to turn the machine on HL L6400DW 1 Make sure the machine is in Ready Mode 2 Press Settings Machine Information Drum Dot Print 3 Press OK The machine prints the Drum Dot Check ...

Page 307: ...toner cartridge out of the drum unit 8 Turn the drum unit as shown in the illustration Make sure that the drum unit gear is on the left side 9 Use the numbered markers next to the drum roller to find the mark on the drum For example a dot in column 2 on the check sheet means that there is a mark in drum region 2 302 ...

Page 308: ...r more easily by pulling down the black levers When you have finished turning the gear push the levers back to the original position 11 Wipe the surface of the drum gently with a dry cotton swab until the mark on the surface comes off NOTE DO NOT clean the surface of the photosensitive drum with a sharp object or any liquids 12 Put the toner cartridge firmly into the drum unit until you hear it lo...

Page 309: ...or it may separate from the drum unit 13 Install the toner cartridge and drum unit assembly back into the machine 14 Close the front cover of the machine 15 Press to turn the machine on Related Information Clean the Machine Improve the Print Quality 304 ...

Page 310: ...o turn the machine off 2 Pull the paper tray completely out of the machine 3 If paper is loaded or something is stuck inside in the paper tray remove it 4 Tightly wring out a lint free cloth soaked in lukewarm water and then wipe the separator pad on the paper tray to remove dust 5 Wipe the two pick up rollers inside the machine to remove dust 6 Reload the paper and put the paper tray firmly back ...

Page 311: ...OK 2 Press a or b to select the Parts Life option and then press OK 3 Press a or b to select the machine part you want to check and then press OK The LCD displays the approximate remaining part life HL L6400DW 1 Press Settings Machine Information Parts Life 2 Press a or b to display the machine parts and then press the machine part you want to check The LCD displays the approximate remaining part ...

Page 312: ...r a toner pad If there is NO toner pad in the original carton see Related Information Pack the Machine and the Toner Cartridge Together If there is a toner pad in the original carton see Related Information Pack the Machine and the Toner Cartridge Separately Toner Pad Related Information Routine Maintenance Pack the Machine and the Toner Cartridge Together Pack the Machine and the Toner Cartridge ...

Page 313: ...ginal carton with original packing material If for any reason you must ship your machine carefully repack the machine in the original packaging to avoid any damage during transit The machine should be adequately insured with the carrier 1 Press and hold to turn the machine off Leave the machine off for at least 10 minutes to cool down 2 Disconnect all the cables and then unplug the power cord from...

Page 314: ...5 Close the carton and tape it shut 6 If you have a Lower Tray repack it as shown Related Information Pack and Ship Your Machine 309 ...

Page 315: ...carton with original packing material If for any reason you must ship your machine carefully repack the machine in the original packaging to avoid any damage during transit The machine should be adequately insured with the carrier 1 Press and hold to turn the machine off Leave the machine off for at least 10 minutes to cool down 2 Disconnect all the cables and then unplug the power cord from the e...

Page 316: ...t the machine into the bag it originally came in 9 Pack the machine the printed materials and the AC power cord if applicable in the original carton with the original packing material as shown 10 Close the carton and tape it shut 11 If you have a Lower Tray repack it as shown 311 ...

Page 317: ...Related Information Pack and Ship Your Machine 312 ...

Page 318: ...mise settings and features create shortcuts and work with options displayed on the machine s LCD to make your Brother machine a more efficient work tool Change Machine Settings from the Control Panel Change Machine Settings from Your Computer 313 ...

Page 319: ...ings from the Control Panel Change Machine Settings from the Control Panel General Settings Settings and Features Tables The Settings tables will help you understand the menu selections and options that are found in the machine s programs 314 ...

Page 320: ...rtain length of time based on your model and settings the machine will go into Power Off Mode automatically The machine does not go into Power Off Mode when the machine is connected to a network or has secure print data in the memory Adjust the LCD Backlight Brightness If you are having difficulty reading the LCD changing the brightness setting may help Change How Long the LCD Backlight Stays On S...

Page 321: ...l Settings Adjust the Machine s Volume Adjust the Machine s Volume Related Models HL L6400DW 1 Press Settings General Setup Volume Beep 2 Press a or b to display the Off Low Med or High option and then press the option you want 3 Press Related Information General Settings 316 ...

Page 322: ... set a time delay countdown before the machine enters Sleep Mode HL L5000D HL L5100DN HL L5200DW HL L6200DW HL L6400DW HL L5000D HL L5100DN HL L5200DW HL L6200DW 1 Press a or b to select the General Setup option and then press OK 2 Press a or b to select the Ecology option and then press OK 3 Press a or b to select the Sleep Time option and then press OK 4 Press a or b to enter the length of time ...

Page 323: ...gth of time is based on your specific model and settings Deep Sleep Mode uses less power than Sleep Mode Applicable Models Machine s LCD in Deep Sleep Mode Conditions That Will Wake the Machine 1 Line LCD models The LCD displays Deep Sleep The machine receives a job Someone presses a button on the control panel Touchscreen LCD models The LCD backlight turns off and blinks The machine receives a jo...

Page 324: ...job HL L5000D HL L5100DN HL L5200DW HL L6200DW HL L6400DW HL L5000D HL L5100DN HL L5200DW HL L6200DW Select how long the machine must be in Deep Sleep Mode before it goes into Auto Power Off Mode 1 Press a or b to display the General Setup option and then press OK 2 Press a or b to display the Ecology option and then press OK 3 Press a or b to select the Auto Power Off option and then press OK 4 P...

Page 325: ...Backlight Brightness Related Models HL L6400DW If you are having difficulty reading the LCD changing the brightness setting may help 1 Press Settings General Setup Panel Control LCD Settings Backlight 2 Press a or b to display the Light Med or Dark option and then press the option you want 3 Press Related Information General Settings 320 ...

Page 326: ...he LCD Backlight Stays On Related Models HL L6400DW Set how long the LCD backlight stays on after you return to the LCD s Home screen 1 Press Settings General Setup Panel Control LCD Settings Dim Timer 2 Press a or b to display the Off 10sec 20sec or 30sec option and then press the option you want 3 Press Related Information General Settings 321 ...

Page 327: ...ture for printing photo or greyscale images HL L5000D HL L5100DN HL L5200DW HL L6200DW HL L6400DW HL L5000D HL L5100DN HL L5200DW HL L6200DW 1 Press a or b to display the General Setup option and then press OK 2 Press a or b to display the Ecology option and then press OK 3 Press a or b to display the Toner Save option and then press OK 4 Press a or b to display On and then press Go HL L6400DW 1 P...

Page 328: ... HL L5100DN HL L5200DW HL L6200DW HL L6400DW HL L5000D HL L5100DN HL L5200DW HL L6200DW 1 Press a or b to display the General Setup option and then press OK 2 Press a or b to display the Ecology option and then press OK 3 Press a or b to select the Quiet Mode option and then press OK 4 Press a or b to display the On or Off option and then press Go HL L6400DW 1 Press Settings General Setup Ecology ...

Page 329: ...ries HL L5000D HL L5100DN HL L5200DW HL L6200DW HL L6400DW HL L5000D HL L5100DN HL L5200DW HL L6200DW 1 Press a or b to display the General Setup option and then press OK 2 Press a or b to display the Local Language option and then press OK 3 Press a or b to display your language and then press Go HL L6400DW 1 Press Settings General Setup Local Language 2 Press your language 3 Press Related Inform...

Page 330: ...t are found in the machine s programs Access Menus and Change Your Machine s Settings Use the control panel to access the machine s menus and change various settings Settings Tables 1 Line LCD models Use these tables to understand the various menus and options that you will use to set your preferences on the machine Settings Tables 1 8 inch Touchscreen models Features Tables 1 8 inch Touchscreen m...

Page 331: ...N HL L5200DW HL L6200DW Use the control panel to access the machine s menus and change various settings 1 Scroll through each menu level by pressing a or b 2 When the option you want appears on the LCD press OK The LCD displays the next menu level 3 Press a or b to scroll to your selection 4 Press OK or Go 5 When you have finished setting an option the LCD displays Accepted Related Information Set...

Page 332: ... number Version Main Version Display the main firmware version Sub1 Version Display the sub firmware version Page Count Display the total printed pages Parts Life 1 Toner Life Display the remaining life of the toner cartridge Drum Life Display the remaining life of the drum unit PF KitMP Life Display the remaining life of the PF kit MP PF Kit1 Life Display the remaining life of the PF Kit 1 PF Kit...

Page 333: ...ded in the Optional Tray Tray 3 Tray4 1 Select the size of paper you loaded in the Optional Tray Tray 4 Check Size Select whether to display a message telling you to check that the size of the paper in the machine and the machine s Paper Size setting match 1 Available if the Optional Tray s is installed General Setup Level 1 Level 2 Description Local Language Select the LCD language for your count...

Page 334: ...start position at the top left corner of pages vertically up to 500 up to 500 down dots in 300 dpi Auto FF Allow the machine to print any remaining data automatically HP LaserJet Font No Set the font number Font Pitch Set the font pitch The Font Pitch menu appears when you choose I012 to I018 I031 to I037 or I097 to I109 in Font No setting Font Point Set the font size The Font Point menu appears w...

Page 335: ...page IBM Proprinter Font No Set the font number Font Pitch Set the font pitch The Font Pitch menu appears when you choose I012 to I018 I031 to I037 or I097 to I109 in Font No setting Font Point Set the font size The Font Point menu appears when you choose I000 to I011 I019 to I030 or I038 to I096 in Font No setting Character Set Select the symbol or character set Table Print Print the code table A...

Page 336: ...ovides authentication and encryption services We recommend contacting your network administrator before changing this setting Network Reset Restore all network settings of your machine to the factory settings 1 On connection to the network if the machine s Boot Method is Auto the machine will attempt to set the IP address and Subnet Mask from a boot server such as DHCP If a boot server cannot be f...

Page 337: ... the wireless Ethernet link status Signal Display the signal condition Channel Display the channel in use when Status is Active Speed Display the connection speed when Status is Active SSID Display SSID Comm Mode Display the current Communication Mode MAC Address Display the MAC address of the machine Set to Default Restore wireless network settings of your machine to the factory settings WLAN Ena...

Page 338: ...pt to set the IP address and Subnet Mask from a boot server such as DHCP If a boot server cannot be found an APIPA IP address will be allocated such as 169 254 001 254 000 255 If the Boot Method of the machine is set to Static you must manually enter an IP address from the machine s control panel Factory Reset Available only for certain models Description Reset the machine and restore the printer ...

Page 339: ...sion Page Count Display the total printed pages Parts Life 1 Toner Life Display the remaining life of the toner cartridge Drum Life Display the remaining life of the drum unit PF KitMP Life Display the remaining life of the PF kit MP PF Kit1 Life Display the remaining life of the PF Kit 1 PF Kit2 Life 2 Display the remaining life of the PF Kit 2 PF Kit3 Life 2 Display the remaining life of the PF ...

Page 340: ...tandard paper tray Tray 2 2 Select the size of paper you loaded in the Optional Tray Tray 2 Tray 3 2 Select the size of paper you loaded in the Optional Tray Tray 3 Tray 4 2 Select the size of paper you loaded in the Optional Tray Tray 4 Paper Low Notice Paper Low Notice Select whether to display a message telling you that the paper tray is nearly empty Notice Level Select the minimum paper level ...

Page 341: ...Move the print start position at the top left corner of pages horizontally up to 500 left to 500 right dots in 300 dpi Y Offset Move the print start position at the top left corner of pages vertically up to 500 up to 500 down dots in 300 dpi Auto FF Allow the machine to print any remaining data automatically HP LaserJet Font No Set the font number Font Pitch Set the font pitch The Font Pitch menu ...

Page 342: ...in distance from the bottom edge of the paper Lines Set the number of lines on each page IBM Proprinter Font No Set the font number Font Pitch Set the font pitch The Font Pitch menu appears when you choose I012 to I018 I031 to I037 or I097 to I109 in Font No setting Font Point Set the font size The Font Point menu appears when you choose I000 to I011 I019 to I030 or I038 to I096 in Font No setting...

Page 343: ...er DNS Server Primary Specify the primary DNS server s IP address Secondary Specify the secondary DNS server s IP address IP Boot Tries Specify the number of attempts the machine will try to obtain an IP address when the Boot Method is set to any setting except Static APIPA Allocate the IP address from the link local address range automatically 1 IPv6 Enable or disable the IPv6 protocol Ethernet C...

Page 344: ...PIN code WLAN Status Status Display the wireless Ethernet link status Signal Display the signal condition SSID Display SSID Comm Mode Display the current Communication Mode MAC Address Display the MAC address of the machine Set to Default Restore wireless network settings of your machine to the factory settings WLAN Enable Turn the wireless interface on or off Wi Fi Direct Push Button Configure yo...

Page 345: ... network if the machine s Boot Method is Auto the machine will attempt to set the IP address and Subnet Mask from a boot server such as DHCP If a boot server cannot be found an APIPA IP address will be allocated such as 169 254 001 254 000 255 If the Boot Method of the machine is set to Static you must manually enter an IP address from the machine s control panel Settings Reset Menu Level 2 Level ...

Page 346: ...less network settings using the setup wizard WLAN Assistant Configure your wireless network settings using the Brother CD ROM WPS Configure your wireless network settings using the one button push method Web Level 2 Level 3 Descriptions Web OneDrive Connect the Brother machine to an Internet service Web services may have been added and service names may have been changed by the provider since this...

Page 347: ...nagement is a utility that uses a standard web browser to manage your machine using the Hyper Text Transfer Protocol HTTP or Hyper Text Transfer Protocol over Secure Socket Layer HTTPS Where Can I Find My Brother Machine s Network Settings Network Management Software and Utilities Configure and change your Brother machine s network settings using a management utility 342 ...

Page 348: ...ur machine using the Hyper Text Transfer Protocol HTTP or Hyper Text Transfer Protocol over Secure Socket Layer HTTPS What is Web Based Management Access Web Based Management Set a Login Password for Web Based Management We recommend setting a login password to prevent unauthorised access to Web Based Management Network Management Software and Utilities Configure and change your Brother machine s ...

Page 349: ...nt web browser make sure it is compatible with HTTP 1 0 and HTTP 1 1 You must use the TCP IP protocol on your network and have a valid IP address programmed into the print server and your computer The actual screen may differ from the screen shown above The following explanations are examples The available functions vary according to the model General Use this tab to confirm the current status of ...

Page 350: ...Related Information Change Machine Settings Using Web Based Management 345 ...

Page 351: ... 168 1 2 If you are using a Domain Name System or enable a NetBIOS name you can type another name such as SharedPrinter instead of the IP address For example http SharedPrinter If you enable a NetBIOS name you can also use the node name For example http brnxxxxxxxxxxxx The NetBIOS name can be found in the Network Configuration Report For Macintosh access Web Based Management by clicking the machin...

Page 352: ...able a NetBIOS name you can also use the node name For example http brnxxxxxxxxxxxx The NetBIOS name can be found in the Network Configuration Report For Macintosh access Web Based Management by clicking the machine s icon on the Status Monitor screen 3 No password is required by default Type a password if you have set one and then click 4 Click Administrator 5 Type the password you want to use in...

Page 353: ...Home Appendix Appendix Specifications How to Enter Text on Your Brother Machine Supplies Accessories 348 ...

Page 354: ...Colour Touchscreen LCD 1 Power Source For Taiwan 110 to 120 V AC 50 60Hz Except Taiwan 220 to 240 V AC 50 60Hz Power Consumption Average Peak 2 For Taiwan HL L5100DN Approximately 1 248 W HL L6400DW Approximately 1 368 W Except Taiwan Approximately 1 344 W Printing 2 For Australia and New Zealand HL L5100DN HL L5200DW Approximately 640 W at 25 C HL L6200DW Approximately 740 W at 25 C HL L6400DW Ap...

Page 355: ... 6 5 W HL L6400DW For Taiwan Approximately 7 2 W Except Taiwan Approximately 7 3 W Deep Sleep 2 HL L5000D HL L5100DN HL L5200DW HL L6200DW For Taiwan Approximately 1 3 W Except Taiwan Approximately 1 2 W HL L6400DW For Taiwan Approximately 1 3 W Except Taiwan Approximately 1 6 W Power Off 3 4 For Taiwan Approximately 0 03 W Except Taiwan Approximately 0 04 W Dimensions Unit mm HL L5000D HL L5100DN...

Page 356: ...5000D 11 1 kg HL L5100DN HL L5200DW For Australia and New Zealand 10 7 kg For Other countries 11 1 kg HL L6200DW For Australia and New Zealand 12 0 kg For Other countries 12 4 kg HL L6400DW For Australia and New Zealand 13 2 kg For Other countries 13 4 kg 351 ...

Page 357: ...ure Operating 10 to 32 C Storage 0 to 40 C Humidity Operating 20 to 80 without condensation Storage 35 to 85 without condensation Print Media Specifications Paper Input Paper Tray Standard Paper Type Plain Paper Letterhead Coloured Paper Thin Paper Recycled Paper Thick Paper 5 Paper Size For Taiwan A4 Letter B5 JIS A5 A5 Long Edge A6 Executive Legal Folio Mexico Legal India Legal Except Taiwan A4 ...

Page 358: ... the face down output paper tray HL L6400DW Up to 250 Sheets of 80 g m2 Plain Paper face down delivery to the face down output paper tray Face Up Output Tray HL L5000D HL L5100DN HL L5200DW HL L6200DW One sheet face up delivery to the face up output tray HL L6400DW Up to 10 sheets face up delivery to the face up output tray Mailbox MX 4000 Optional HL L6400DW 100 sheets x 4 bins of 80 g m2 400 she...

Page 359: ... minute Up to 12 sheets minute Letter or A4 size First Print Time 11 HL L5000D HL L5100DN HL L5200DW For Taiwan Less than 7 2 seconds at 23 C 115 V Except Taiwan Less than 7 2 seconds at 23 C 230 V HL L6200DW HL L6400DW For Taiwan Less than 7 5 seconds at 23 C 115 V Except Taiwan Less than 7 5 seconds at 23 C 230 V Interface Specifications Parallel 12 HL L5000D Compliant with IEEE1284 USB 13 14 Al...

Page 360: ...6 Web Services Print CIFS Client SNTP Client LDAP available only for certain models Network Security Wired SMTP AUTH SSL TLS IPPS HTTPS SMTP SNMP v3 802 1x EAP MD5 EAP FAST PEAP EAP TLS EAP TTLS Kerberos IPSec Network Security Wireless SMTP AUTH SSL TLS IPPS HTTPS SMTP SNMP v3 802 1x LEAP EAP FAST PEAP EAP TLS EAP TTLS Kerberos IPSec Wireless Network Security WEP 64 128 bit WPA PSK TKIP AES WPA2 P...

Page 361: ...10 8 5 N A Printing Int el Pr oc es sor 80 MB OS X v10 9 x OS X v10 10 x 1 HL L5000D 2 Third party USB ports are not supported 3 HL L5100DN HL L5200DW support 10Base T 100Base TX 4 HL L6200DW HL L6400DW support 10Base T 100Base TX 1000Base T 5 HL L5200DW HL L6200DW HL L6400DW For the latest driver updates go to your model s Downloads page on the Brother Solutions Center at support brother com All ...

Page 362: ... may differ depending on the operation you perform Press to cycle between letters numbers and special characters To move the cursor to the left or right press d or c Inserting spaces To enter a space press twice to choose special characters then press the space button Making corrections If you entered a character incorrectly and want to change it press d or c to move the cursor to the incorrect ch...

Page 363: ... Configure Your Machine for a Wireless Network When the SSID Is Not Broadcast 358 ...

Page 364: ...ustralia TN 3440 For New Zealand TN 3425 For Middle Eastern and African countries TN 3437 For Other countries TN 3448 Approximately 8 000 pages 1 A4 or Letter page HL L5000D HL L5100DN HL L5200DW HL L6200DW HL L6400DW Super High Yield Toner For Australia TN 3470 For New Zealand TN 3465 For Middle Eastern and African countries TN 3467 For Other countries TN 3478 Approximately 12 000 pages 1 A4 or L...

Page 365: ... For Australia DR 3425 For New Zealand DR 3415 For Middle Eastern and African countries DR 3405 For Other countries DR 3455 Approximately 30 000 pages 50 000 pages 2 HL L5000D HL L5100DN HL L5200DW HL L6200DW HL L6400DW 1 Approximate cartridge yield is declared in accordance with ISO IEC 19752 2 Approximately 30 000 pages based on 1 page per job and 50 000 pages based on 3 pages per job A4 letter ...

Page 366: ... html or contact your Brother dealer or Brother customer service Model Name Item Applicable Models LT 5500 Grey Lower Tray 250 sheets HL L5000D HL L5100DN HL L5200DW HL L6200DW LT 5505 White HL L6400DW LT 6500 Grey Lower Tray 520 sheets HL L5000D HL L5100DN HL L5200DW HL L6200DW LT 6505 White HL L6400DW MX 4000 Mailbox HL L6400DW PC 5000 Parallel I F cable HL L5000D Related Information Appendix Ma...

Page 367: ...ove bins 2 and 4 Sorter When printing multiple copies set the printer driver to eject each copy into a different bin Set your preferences for Stacker MX Stacker and Sorter MX Sorter in your printer driver or on your Brother machine s LCD To set MX Stacker or MX Sorter in your printer driver for Windows In your printer driver click the Advanced tab click the Output Tray drop down menu and select ei...

Page 368: ... Print Settings Windows Print Options Macintosh 363 ...

Page 369: ...full If you select this option in your printer driver the machine continues the print job ejecting the remaining pages onto the machine s main output tray when the Mailbox bins are full For more information on the printer driver settings see Related Information This setting s name is for Windows and may vary for Macintosh depending on your country Related Information Mailbox Unit Print Settings Wi...

Page 370: ...ove the printed pages from any of the printout locations Setting Description On Your machine resumes the print job using the first empty output tray or Mailbox bin Off You must remove the printed pages from the output tray and all Mailbox bins to resume the print job By default MX Continue is off To turn on MX Continue Press Settings Paper Tray MX Continue On Related Information Mailbox Unit Setti...

Page 371: ... machine s IP address in your browser s address bar where machine s IP address is the machine s IP address For example http 192 168 1 2 3 Click the Administrator tab 4 Click the User Restriction Function menu in the left navigation bar 5 Select Secure Function Lock 6 Click Submit 7 Click the User List menu in the left navigation bar 8 In the User List field type the user name 9 In the PIN Number f...

Page 372: ... C D E G H I L M N O P R S T V W A Active Directory Authentication Ad Hoc Mode AES APIPA ARP Authentication B BOOTP BRAdmin Light Windows BRAdmin Professional 3 Windows BRPrint Auditor Windows C CA CA Certificate Certificate Channels CIFS CSR Custom Raw Port D Density DHCP DNS Client DNS Server Driver Deployment Wizard E Encryption G Gateway Home Glossary 367 ...

Page 373: ... IPPS IPsec IPv6 L LEAP LLMNR LPD LPR M MAC Address mDNS N NetBIOS Name Resolution Network Configuration Report Network Connection Repair Tool Network Key Network Shared Printing Node Name O Open System P PEAP Peer to Peer Protocols Public Key Cryptosystem Home Glossary 368 ...

Page 374: ...ent SMTP over SSL SMTP AUTH SNMP SNMPv3 SNTP SSID SSL TLS Status Monitor Store Print Log to Network Subnet Mask T TCP IP TELNET TKIP V Vertical Pairing W Web Based Management Web Services WEP Wi Fi Direct WINS WINS Server WLAN Report WPA PSK WPA2 PSK Authentication Method WPS Home Glossary 369 ...

Page 375: ... not correctly specify these options when you are configuring your Brother wireless machine it will not be able to connect to the wireless network Therefore care must be taken when configuring these options Authentication Methods for a Personal Wireless Network A personal wireless network is a small network such as a home wireless network without IEEE 802 1x support Open system Wireless devices ar...

Page 376: ...r locally connected machines install the Print Auditor Client software on the client computer This utility allows you to use BRAdmin Professional 3 to monitor machines that are connected to a client computer via the USB interface Go to your model s Downloads page on the Brother Solutions Center at support brother com to download the software This utility is available only for Windows Go to your mo...

Page 377: ...individual The format is defined by the X 509 standard Channels Wireless networks use channels Each wireless channel is on a different frequency There are up to 14 different channels that can be used when using a wireless network However in many countries the number of channels available is restricted CIFS The Common Internet File System CIFS is the standard way that computer users share files and...

Page 378: ...is sent on the network If you do not correctly specify these options when you are configuring your Brother wireless machine it will not be able to connect to the wireless network Therefore care must be taken when configuring these options Encryption Methods for a Personal Wireless Network A personal wireless network is a small network such as a home wireless network without IEEE 802 1x support Non...

Page 379: ... transferred and displayed securely IEEE 802 1x IEEE 802 1x is a networking authentication standard used to connect to a wired or wireless LAN It restricts connections which are not authentic and only users authenticated by a central authority are allowed to be connected Infrastructure Mode The mode of operation in a wireless network in which all devices machines and computers are connected via an...

Page 380: ...ems Inc that uses a user ID and password for authentication LEAP is used in wireless networks LLMNR The Link Local Multicast Name Resolution LLMNR protocol resolves the names of neighboring computers if the network does not have a Domain Name System DNS server The LLMNR Responder feature works in both the IPv4 or IPv6 environment when using Windows Vista or greater LPD Line Printer Daemon LPD or L...

Page 381: ... 64 bit or a 128 bit value that must be entered in an ASCII or hexadecimal format ASCII Hexadecimal 64 40 bit Uses five text characters For example WSLAN case sensitive Uses 10 digits of hexadecimal data For example 71f2234aba not case sensitive 128 104 bit Uses 13 text characters For example Wirelesscomms case sensitive Uses 26 digits of hexadecimal data For example 71f2234ab56cd709e5412aa2ba not...

Page 382: ...entral server controlling access or machine sharing Protocols Protocols are the standardised sets of rules for transmitting data on a network Protocols allow users to gain access to network connected resources The print server used on your Brother machine supports the Transmission Control Protocol Internet Protocol TCP IP protocol Public Key Cryptosystem A Public Key Cryptosystem is a modern branc...

Page 383: ...is used to synchronize computer clocks on a TCP IP network You can configure the SNTP settings using Web Based Management SSID Each wireless network has its own unique network name and it is technically referred to as a Service Set Identifier SSID The SSID is a 32 byte or less value and is assigned to the access point The wireless network devices you want to associate to the wireless network shoul...

Page 384: ...net Mask 255 255 255 0 0 denotes that there is no limit to communication at this part of the address TCP IP Transmission Control Protocol Internet Protocol TCP IP is the most popular set of protocols used for communication such as Internet and email This protocol can be used in almost all operating systems including Windows Windows Server OS X and Linux TELNET The TELNET protocol allows you to con...

Page 385: ...all the drivers used for printing by right clicking on the machine icon in the Network folder Web Services also lets you check the current status of the machine from your computer WEP Wired Equivalent Privacy WEP is one of the encryption methods used in a wireless network When using WEP the data is transmitted and received with a secure key Wi Fi Direct Wi Fi Direct is one of the wireless configur...

Page 386: ... key WPA PSK WPA2 PSK which enables the Brother wireless machine to associate with access points using TKIP for WPA PSK or AES for WPA PSK and WPA2 PSK WPA Personal WPS Wi Fi Protected Setup WPS is a standard that allows the setup of secured wireless networks WPS was created by the Wi Fi Alliance in 2007 Home Glossary 381 ...

Page 387: ...Wide Web www brother com These machines are approved for use in the country of purchase only Local Brother companies or their dealers will support only machines purchased in their own countries OCE ASA SAF GLF TWN Version 0 ...

Reviews: