

4
Technical Reference
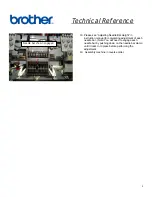
18.
Please see “Adjusting Needle Bar Height” in
instruction manual for completing adjustment of each
needle bar. (Note: You will need to engage each
needle bar by pushing down on the needle bar clamp
until it locks in to place before performing the
adjustment.
19.
Assembly machine in reverse order.
Needle bar shown engaged