Brocade FastIron X Series Chassis Hardware Installation Guide
183
53-1001723-02
Installation overview
A
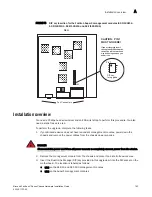
FIGURE 75
DIP key insertion for the FastIron SuperX management modules (SX-FI12GM-4,
SX-FI12GM2-4, SX-FI12GM-6 and SX-FI12GM2-6)
Installation overview
You need a Phillips-head screwdriver and an ESD wrist strap to perform this procedure. You also
need a static-free work area.
To perform the upgrade, complete the following tasks.
1. If your Brocade device does not have redundant management modules, power down the
chassis and remove the power cables from the chassis power supplies.
DANGER
Disconnect the power cord from all power sources to completely remove power from the device.
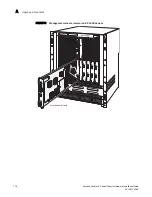
2. Remove the management module from the chassis and place it on a static-free work area.
3. Insert the Dual Inline Package (DIP) key provided in this upgrade kit into the DIP socket on the
motherboard. The location is labeled as follows:
•
U63 on the SX 800 and SX 1600 management modules
•
U53 on the SuperX management modules
Re
a
r
Port Connector
s
CAUTION: PIN 1
MU
S
T GO HERE
!
If you accidentally insert
the upgrade DIP backwards,
the device will not work and
may be damaged when you
power it on.
DIP key
for
u
pgr
a
de
Pin 1
U5
3

