- 5 -
3. PREPARE THE INSTALLATION
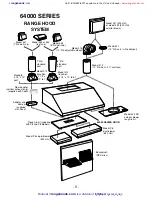
Make sure that the following items are included:
- Range hood
- Accessories:
• Filters
• Bag of parts including:
(4) lock nuts, (1) wire clamp, (8) 1/2” double thread screws, (2) wire connectors, (2) 1/2” standard screws, (6) 3/8 screws.
• Adapter 3-1/4” x 10”
• Flow deviator
Parts sold separately:
- Blower assembly P5 (500 cfm) or P8 (850 cfm) or exterior blower assembly 331 (600 cfm) or 332 (900 cfm)
- Halogen lights (120V, 50W, PAR 20)
- Heat lamps (120V, IR 175W, PAR 38)
- Backsplash (optional)
- Baffle filters (optional)
- Transition 3 1/4”x10” to 8” round (optional)
- Transition 3 1/4”x10” to 7” round (optional)
4. INSTALL BACKSPLASH (OPTIONAL)
Backsplash must be installed before the hood shell because the hood shell covers the backsplash top mounting
screws. In order to be able to install the backsplash, make sure you have at least 18’’ clearance between
bottom of hood and range control panel or cooktop. (See instructions packed with backsplash)
5. SELECT BLOWER OPTION (EXTERIOR OR INTERIOR)
INTERIOR BLOWER: Follow all subsequent steps of this manual.
EXTERIOR BLOWER: Refer to instructions packed with exterior blower and follow steps 9, 10, 12, 13 and 14 of
the present manual.
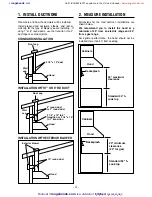
6. CHOOSE THE OPENING
Remove the knockout for the chosen opening (horizontal or vertical) at the back or on top of the hood and for
electric connection.
::
rangehoods
.
com
Call 1-800-667-8721 anywhere in the US and Canada
-
www.rangehoods.com
U N L I M I T E D
Broan at
::
rangehoods
.
com
is a division of
kitchen
::
accessories


