37
8.6
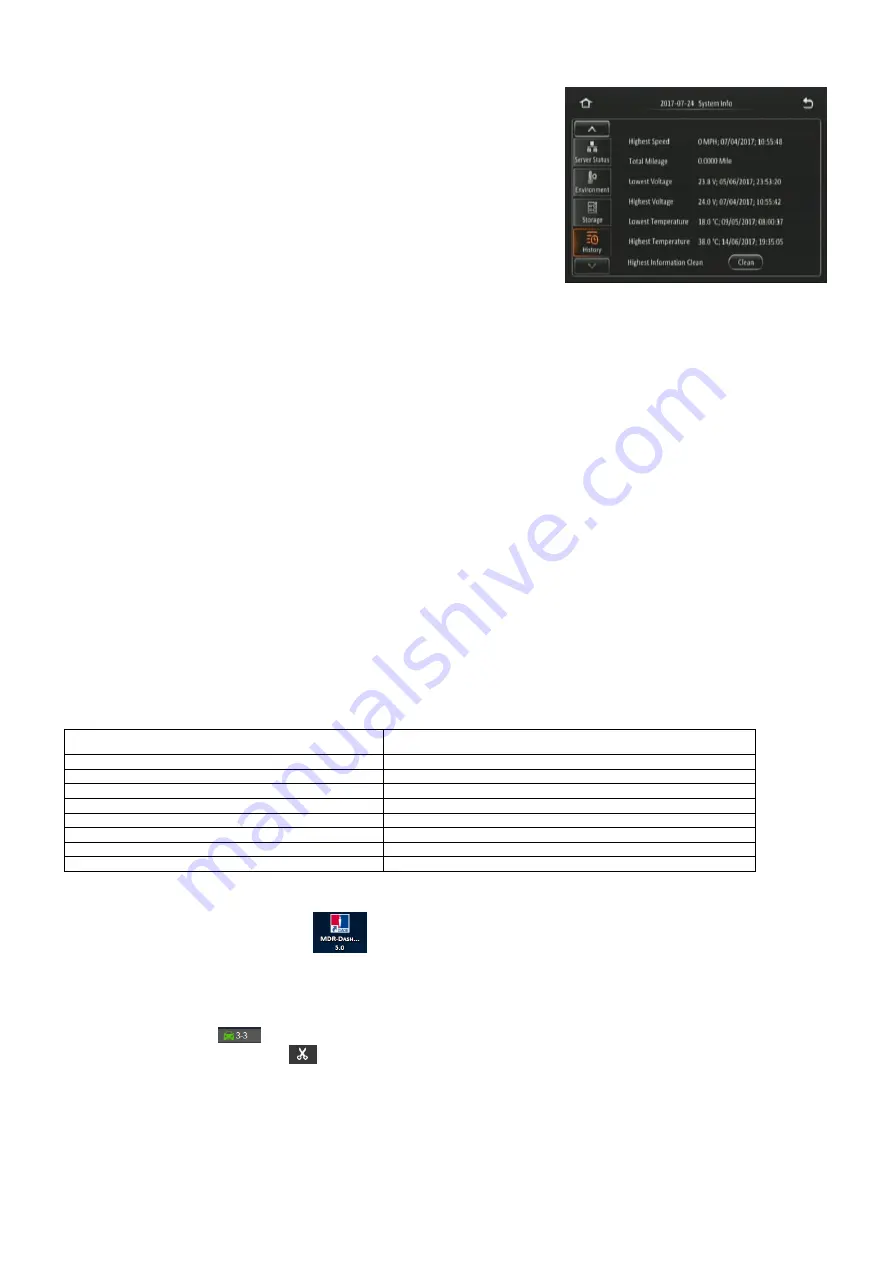
History
Highest Speed
is displayed with the relevant date and time.
Total Mileage
is an indication of the
vehicle’s mileage.
Lowest Voltage
is displayed with the relevant date and time.
Highest Voltage
is displayed with the relevant date and time.
Lowest Temperature
is displayed with the relevant date and time.
Highest Temperature
is displayed with the relevant date and time.
Highest Information Clean
is used to clear all historic information shown on
this page.
History Figure 126
9
MDR-Dashboard 5.0
MDR-Dashboard 5.0 software is used for local playback, analysis, clipping, GPS tracking, vehicle information and events/log display. Remote
Device and Server playback is possible with mobile network and/or Wi-Fi enabled MDR models. MDR-Dashboard 5.0 has the following features:
•
Real-time Preview (Depending on model)
•
Multi Vehicle Monitoring (Depending on model)
•
Playback of Server (Depending on model) and Local Video Data
•
Clipping and Downloading Data
•
Evidence Management (Depending on model)
•
Auto Download Scheduling (Depending on model)
•
Basic Data Management
•
Alarm Centre (Depending on model)
It allows exporting video clips in three different ways:
•
STANDARD
- proprietary format (readable only by MDR-Dashboard 5.0 and MDR-Player 5.0)
•
EXPORT
- an executable file containing an embedded version of the MDR-Player 5.0
•
AVI
– industry generic video format (without metadata)
Aside from exporting features and event/log display, the MDR-Dashboard 5.0 can read directly from the MCU (Mobile Caddy Unit) or the internal
SD card. These features are not available with MDR-Player 5.0.
9.1
PC System Requirements
The system requires a PC with a USB 2.0 Type-A connector, which will connect the MCU to the PC. A USB cable with USB standard type A
plug to standard B plug is provided with the MDR. The MDR-Dashboard 5.0
is compatible with Microsoft™ Windows™ 7, 8.x (32-bit or 64-bit
version) and 10.x operating systems.
Note: To use the maps feature, an internet connection is required.
MDR-Dashboard 5.0 minimum requirements:
COMPONENT
MINIMUM REQUIREMENTS
CPU
INTEL i3-3220 (3.30GHz) and above
Free Hard Disk Drive (HDD) space
4GB
Operating System
Windows 7 SP1
Web browser
Internet Explorer 10
Graphics Card
Independent graphics card
Software
Flash player (up to date)
Resolution
1280x760 (minimum)
RAM
2GB
9.2
Retrieving HDD Data (Quick Guide)
Open the software by right-clicking on the icon
. Select Run as administrator. This will allow the software to read information from the
MCU.
The default username: admin and “default password”: LEAVE BLANK. Once users have filled in username (this must be lower case) click
OK.
In Local mode you have two playback options, HDD and Directory. HDD - is active when the physical MCU (Mobile Caddy Unit) is connected to
your local PC. HDD - is active when the physical MCU (Mobile Caddy Unit) is connected to your local PC.
Double-click the vehicle icon
. This will display ALL calendar events. Double-click on the relevant calendar date this will display the pre-
playback screen. Click on the CLIP button
. Only accessible during while video is being played or paused. Click on the OK button.
The clip settings window will open. Double check start time and end time. Check the number of channels you want to download. The more
channels you choose the bigger the file size.
Choose an option to download your file. Standard is for backing up/for users with the software installed. As it clips and creates video files in
proprietary format (H264). Export will export the footage into an executable when playing back you do not need Dashboard software installed.
We recommend this option if you are sharing this file with a third party (file must not be larger than 1.5 GB). AVI files playable by common
players such as Windows Media Player (WMP™). Each channel is saved separately so unable to view all channels simultaneously. his solution
is the portability of the format. The disadvantage is the lack of protection and missing metadata information. Files can be played and edited by
anyone. We do not recommend this option as it is not secure. Choose the path where to save your file then click OK.
Summary of Contents for MDR-504-500
Page 9: ...9 3 5 MDR 504xx 500 Connection Diagram MDR 504xx 500 Connection Diagram Figure 8...
Page 10: ...10 3 6 MDR 508xx 1000 Connection Diagram MDR 508xx 1000 Connection Diagram Figure 9...
Page 89: ...89...
Page 90: ...90...
Page 91: ...91...
Page 92: ...92 18 10 2017 10 52 00 MDR 500 Series Installation Operation Guide v2 0 ENG 5145A docx...


