background image

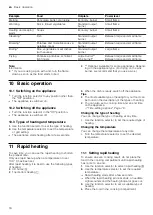
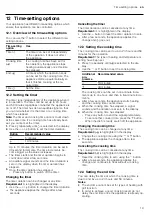
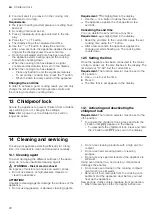
Cleaning aid

 en

23

14.5 Discoloration of the burners

After long use, the brass burner parts become darker
due to natural oxidation. This discolouration does not
affect their usability.

14.6 Cleaning the pan support manually

WARNING ‒ Risk of burns!

The appliance becomes hot during operation.

Allow the appliance to cool down before cleaning.

1.

Carefully remove the pan support.

2.

Soak the pan support in the sink.

3.

Clean the pan support using a scrubbing brush and
washing-up liquid.

4.

Rinse the pan support rinse with clean water.

5.

Dry the pan support with a kitchen towel.

14.7 Using cleaning gel for burnt-on dirt

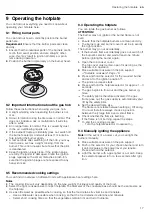
For hard-to-remove, burnt-on dirt, you can order a
cleaning gel from our online shop, from your specialist
retailer or via our after-sales service.

1.

Follow the instructions on the cleaning product.

2.

Remove the pan supports and the burner parts.

3. ATTENTION!

On the burner parts, the controls and the aluminium
surfaces, the cleaning gel leads to damage.

Only use the cleaning gel on the pan supports
and stainless steel surfaces.

Apply the cleaning gel to the burnt-on dirt.

4.

If necessary, let the dirt soak overnight.

14.8 Cleaning the stainless steel surfaces

1.

Observe the information regarding the cleaning
agents.

2.

Clean using a sponge cloth and hot soapy water in
the direction of the finish.

3.

Dry with a soft cloth.

4.

Apply a thin layer of the stainless steel cleaning
product with a soft cloth.

Tip: 

You can obtain stainless steel cleaning products

from after-sales service or the online shop.

14.9 Cleaning the burners

After long use, the brass burner parts become darker
due to natural oxidation. This discolouration does not
affect their usability.

WARNING ‒ Risk of burns!

The appliance becomes hot during operation.

Allow the appliance to cool down before cleaning.

1.

Carefully remove the pan support.

2.

Carefully remove the burner parts.

3.

Clean the burner parts using a scrubbing brush and
washing-up liquid.

4.

Rinse the burner parts with clean water.

5.

Ensure that the burner parts are completely dry be-
fore fitting them; otherwise, there may be ignition
problems or problems during operation.

14.10 Cleaning the cooking zone switch

Clean the cooking zone switch after use if it is dirty or
stained.

Note:

¡

Read the information on unsuitable cleaning agents.

¡

Do not use a glass scraper.

¡

Do not use a glass ceramic cleaner.

¡

Do not remove the cooking zone switch.

1.

Clean the cooking zone switch using hot soapy wa-
ter and a soft cloth.
– Wring out the cloth well. The cloth must not be

too wet.

– Wash new sponge cloths thoroughly before use.

2.

Dry with a soft cloth.

15  Cleaning aid

The cleaning aid is a fast alternative for occasionally
cleaning the cooking compartment. The cleaning aid
evaporates soapy water and therefore softens dirt. This
means that dirt can be removed more easily.

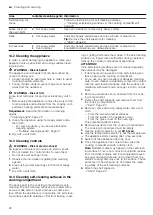
15.1 Setting the cleaning aid

WARNING ‒ Risk of scalding!

If there is water in the cooking compartment when it is
hot, this may create hot steam.

Never pour water into the cooking compartment
when the cooking compartment is hot.

Requirement:

 The cooking compartment must be

cooled down completely.

1.

Remove the accessories from the cooking compart-
ment.

2.

Add one drop of detergent to 0.4 l water and pour it
onto the centre of the cooking compartment floor.
Do not use distilled water.

3.

Use the function selector to set the 

Bottom

heating

  ​⁠ type of heating.

4.

Use the temperature selector to set 80 °C.

5.

Press  ​⁠ repeatedly until 

​⁠ is selected in the dis-

play.

6.

Use  ​⁠ or  ​⁠ to set the duration to four minutes.

a

After a few seconds, the appliance starts heating
and the duration counts down.

a

When the cooking time has counted down, a signal
sounds and the duration is at zero in the display.

7.

Switch off the appliance and leave it to cool for ap-
prox. 20 minutes.

15.2 Cleaning the cooking compartment
after using it

ATTENTION!

If the cooking compartment remains damp for too long,
this results in corrosion.

After using the cleaning aid, wipe the cooking com-
partment and allow it to dry completely.

Requirement:

 The cooking compartment has cooled

down.

Summary of Contents for HXC39AE50Q

Page 1: ...Register your new device on MyBosch now and get free benefits bosch home com welcome Free standing cooker HXC39AE50Q en User manual and installation instructions ...

Page 2: ...onal to connect the appliance and to convert the appliance to a different type of gas The appliance must be installed and the elec tric and gas connections must be implemen ted in accordance with the instruction and in stallation manual An incorrect connection or incorrect settings may lead to serious accidents and damage to the appliance The appliance manufacturer accepts no liabil ity for damage...

Page 3: ...rnor If you do not know what the gas pressure in your gas distributing pipes is please ask your local gas company Connection maintenance and setting of the gas governor must be carried out by an au thorised installation specialist WARNING Risk of suffocation Using the gas cooking appliance leads to a build up of heat moisture and combustion products in the room where the appliance is installed Ens...

Page 4: ...comes hot during operation Allow the appliance to cool down before cleaning When the cooking compartment is hot any al coholic vapours inside may catch fire Only use small quantities of drinks with a high alcohol content in food Open the appliance door carefully The appliance and its parts that can be touched become hot during use Caution should be exercised here in order to avoid touching heating...

Page 5: ...n people may bump into it resulting in injury Always keep the appliance door closed during and after operation WARNING Risk of scalding The accessible parts of the appliance become hot during operation Never touch these hot parts Keep children at a safe distance Hot steam may escape when you open the appliance door Steam may not be visible de pending on the temperature Open the appliance door care...

Page 6: ...n Allow the cooking compartment to dry after use Do not keep moist food in the cooking compartment for a long time with the door closed Do not store food in the cooking compartment Leaving the appliance to cool down with the door open will damage the front of neighbouring kitchen units over time Always allow the cooking compartment to cool down with the door closed after cooking at high temperatur...

Page 7: ...nteed The base of the pot or pan may be damaged Cookware that is used on the hotplate must be se curely in place Only use pots and pans with an even base Do not heat up empty pots or pans Damage may occur if hard or pointed objects fall on the hob Do not let hard or pointed objects fall onto the hob Do not hold and move the appliance at the gas pipe collector Damage to the gas pipe may lead to gas...

Page 8: ...an may install the appliance in accordance with the instructions specified under Gas connection and conversion to a different gas type The settings for configuring your appliance can be found on the rating plate on the rear of the appli ance The gas type set at the factory is marked with an asterisk Find out about the local supply conditions regarding the gas type and gas pressure before installin...

Page 9: ...e as this may be come damaged Fit the mains plug and socket together The mains plug can be accessed at all times The cross section of the cable is sufficient The mains cable is not kinked crushed modified or severed If required the mains cable must only be replaced by a qualified electrician A replacement mains cable is available from the after sales service Do not use any multiple plugs or multi ...

Page 10: ...rawer Adjacent units Any adjacent units must not be made of flammable ma terials The fronts of any adjacent units must be heat resistant up to at least 90 C Wall fixing To prevent the appliance from tipping over you must fix it to the wall using the enclosed brackets To secure the appliance to the wall follow the installation instruc tions ...

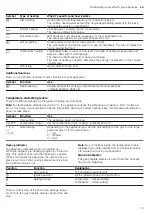
Page 11: ...pecific details such as col our and shape may differ from those pictured 1 2 3 Power kW Burner hotplate 1 1 7 kW Standard output burner 2 1 kW Economy burner 3 3 kW High output burner 5 3 Control panels You can use the control panel to configure all functions of your appliance and to obtain information about the operating status Controls You can use the controls to configure all functions of your ...

Page 12: ... and display You can use the buttons to set various functions for your appliance The display shows the settings If a function is active the corresponding symbol lights up on the display only lights up when you change the time Symbol Function Use Childproof lock Activate or deactivate the childproof lock Time setting options Select the time timer cooking time and the end time To select the individu...

Page 13: ...ferent settings for the types of heating and functions Note For temperature settings above 250 C the appliance reduces the temperature to approx 240 C after ap prox 10 minutes If your appliance has the top bottom heating or bottom heating types this temperature reduction does not take place Symbol Function Use Zero setting The appliance does not heat up 50 275 Temperature range Set the temperature...

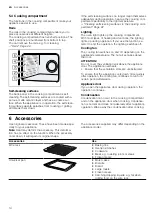
Page 14: ...tion the lighting switches off Cooling fan The cooling fan switches on and off depending on the appliance s temperature The hot air escapes above the door ATTENTION Do not cover the ventilation slot above the appliance door The appliance overheats Ensure that the ventilation slots are unobstructed To ensure that the appliance cools down more quickly after operation the cooling fan continues to run...

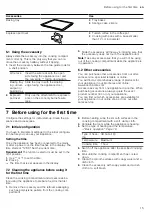
Page 15: ...e exact product number E no of your appliance You can find out which accessories are available for your appliance in our online shop or from our after sales service 7 Before using for the first time Configure the settings for initial start up Clean the ap pliance and accessories 7 1 Initial configuration You have to implement settings for the initial configura tion before you can use your applianc...

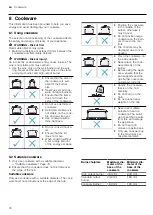
Page 16: ...nt of the energy escapes Position the cookware in the middle of the burner otherwise it may tip over Do not position large cookware on the burn ers close to the con trols The controls may be damaged due to over heating Place the cookware on the pan supports Never place the cook ware directly on the burner Before using the appli ance ensure that the pan supports and the gas burner covers are positi...

Page 17: ... the burner s selector and wait at least one minute before igniting the burner again 1 Open the top cooker cover The top cover must remain open for as long as the hotplate is in operation 2 Place suitable cookware on the pan support Suitable cookware Page 16 3 Press and hold the selector for the required burner and set it to the ignition position a The ignition process starts 4 Press and hold the ...

Page 18: ...of heating 2 Use the temperature selector to set the temperature or grill setting a The appliance starts heating after a few seconds 3 When the dish is ready switch off the appliance Tips The most suitable type of heating for your food can be found in the description of the types of heating You can also set a cooking time and an end time on the appliance Time setting options Page 19 Changing the t...

Page 19: ... is highlighted in the display Use the or button to change the timer duration a The appliance applies the change after a few seconds Cancelling the timer The timer duration can be cancelled at any time Requirement is highlighted in the display Use the button to reset the timer duration to zero a After a few seconds the appliance applies the change and goes out 12 3 Setting the cooking time The coo...

Page 20: ...time flashes in the display The time starts at 12 00 Set the current time Requirement The function selector must be set to the off position 1 Use or to set the time 2 Press a The time that is set appears in the display 13 Childproof lock Secure the appliance to prevent children from accident ally switching it on or changing the settings Note After a power cut the childproof lock will no longer be ...

Page 21: ...r panels Hot soapy water Do not use a glass scraper or stainless steel wool Tip Remove the door panels in order to clean them thoroughly Appliance door Page 25 Door panel Made of stainless steel Stainless steel cleaner Made of plastic Hot soapy water Do not use glass cleaner or a glass scraper Tip Remove the upper door panel for thorough cleaning Appliance door Page 25 Door handle Hot soapy water ...

Page 22: ...Cleaning self cleaning surfaces in the cooking compartment The back panel in the cooking compartment is self cleaning The self cleaning surfaces are coated with a porous matte ceramic layer and have a coarse sur face When the appliance is in operation the self clean ing surfaces absorb splashes of fat from baking roast ing or grilling and break them down If the self cleaning surfaces no longer cle...

Page 23: ...ng up liquid 4 Rinse the burner parts with clean water 5 Ensure that the burner parts are completely dry be fore fitting them otherwise there may be ignition problems or problems during operation 14 10 Cleaning the cooking zone switch Clean the cooking zone switch after use if it is dirty or stained Note Read the information on unsuitable cleaning agents Do not use a glass scraper Do not use a gla...

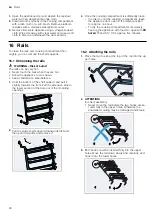
Page 24: ...To clean the rails and cooking compartment thor oughly you can remove the shelf supports 16 1 Unhooking the rails WARNING Risk of burns The rails can be very hot Never touch the rails when they are hot Allow the appliance to cool down Keep children at a safe distance 1 Hold the bottom of the shelf support and pull it slightly towards the front Pull the extension pins in the lower section of the ra...

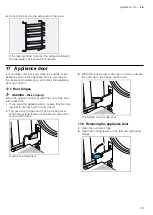
Page 25: ...oor hinges WARNING Risk of injury When the hinges are not secured they can snap shut with great force If you open the appliance door ensure that the lock ing levers are fully open or fully closed 1 The oven door hinges each have a locking lever When the locking levers are closed the oven door is secured in place It cannot be detached 2 When the locking levers are open in order to detach the oven d...

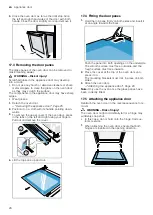
Page 26: ...he tabs on the left and right using your fingers Pull out and remove the cover 4 Lift the top pane up and out 17 4 Fitting the door panes 1 Hold the top pane firmly on both sides and insert it at an angle towards the back Push the pane into both openings on the underside The smooth surface must face outwards and the rough surface must face inwards 2 Place the cover at the top of the oven door and ...

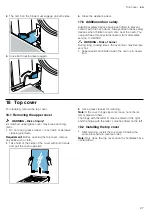
Page 27: ... remove the top cover 18 1 Removing the upper cover WARNING Risk of injury A scratched upper glass cover may break and frag ment Do not use a glass scraper or any harsh or abrasive cleaning products Requirement Before opening the top cover remove any spills with a cloth 1 Take hold of the sides of the cover with both hands and pull the cover upwards 2 Use a glass cleaner for cleaning Note If the c...

Page 28: ...g fan do not switch off For types of heating with air recirculation the fan continues to run in the back wall of the cooking compartment Turn the function selector to the off position a The appliance is switched off a The oven light and the fan in the back wall are switched off a The cooling fan switches off automatically as soon as the appliance has cooled down The time flashes in the display The...

Page 29: ... change the oven light bulb Note Heat resistant 25 watt 230 V halogen bulbs are available from the after sales service or specialist retail ers Only use these bulbs Hold the new halogen bulbs only with a clean dry towel This increases the service life of the bulb WARNING Risk of burns The appliance and its parts that can be touched be come hot during use Caution should be exercised here in order t...

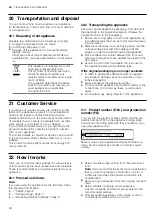
Page 30: ...nnections on the rear as these could be dam aged 4 Do not place any heavy objects on the appliance 21 Customer Service If you have any queries on use are unable to rectify faults on the appliance yourself or if your appliance needs to be repaired contact Customer Service Detailed information on the warranty period and terms of warranty in your country is available from our after sales service your...

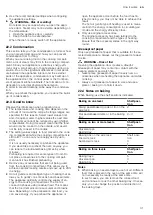
Page 31: ...ating Remove any accessories that are not being used from the cooking compartment This allows you to achieve optimal cooking results and save up to 20 in energy Hot air gentle is an intelligent type of heating that al lows you to gently cook meat fish and baked items The appliance optimally controls the supply of en ergy to the cooking compartment The food is cooked in phases using residual heat T...

Page 32: ...n all sides Determine whether the cake is ready Push a cocktail stick into the highest point on the cake If the cocktail stick comes out clean the cake is ready You want to bake accord ing to your own recipe Use similar items in the baking tables as a guide Use bakeware made of silicone glass plastic or ceramic The baking tin must be heat resistant up to 250 C Cakes in these types of bakeware brow...

Page 33: ...ted loaf plaited ring Universal pan 2 160 170 35 40 Swiss roll Universal pan 2 170 1901 15 20 Strudel sweet Universal pan 2 190 210 55 65 Strudel frozen Universal pan 3 180 200 35 45 1 Preheat the appliance Small yeast cakes Meal Accessory cookware Shelf posi tion Type of heating Temperature in C Cooking time minutes Muffins Muffin tray on wire rack 2 170 190 20 40 Muffins 2 levels Muffin tray on ...

Page 34: ...e whirls Universal pan 3 180 200 25 35 1 Preheat the appliance for 5 minutes For appliances with the rapid heating function do not use this function for preheating Tips for next time you bake If something goes wrong when baking you can find some tips here Topic Tip Your cake collapses Note the ingredients and preparation in structions that are given in the recipe Use less liquid Or Reduce the baki...

Page 35: ...kle it with breadcrumbs 22 6 Bread and bread rolls The values for bread dough apply to both dough placed on a tray and dough placed in a loaf tin ATTENTION When the cooking compartment is hot any water in side it will create steam The change in temperature may cause damage Never pour water into the cooking compartment when it is still hot Never place cookware containing water on the cooking compar...

Page 36: ...n thin base x 2 Universal pan Wire rack 3 1 190 210 20 25 Pizza frozen deep pan x 1 Wire rack 3 180 200 20 25 Pizza frozen deep pan x 2 Universal pan Wire rack 3 1 170 190 20 30 Mini pizzas frozen Universal pan 3 190 210 10 20 Savoury bakes in a tin Springform cake tin Ø 28 cm 2 170 190 40 50 Quiche flan Tart dish or tin 2 190 210 35 45 Pierogi Ovenproof dish 2 170 190 55 65 Empanadas Universal pa...

Page 37: ...Place the cookware onto the wire rack Check in advance whether the cookware fits in the cooking compartment Glass cookware is best Shiny roasting dishes made from stainless steel or aluminium are not ideal They reflect the heat like a mirror The food cooks more slowly and does not brown as well Increase the temperature accordingly and extend the cooking time Follow the manufacturer s instructions ...

Page 38: ... Fish You do not need to turn whole fish Place the whole fish into the cooking compartment in swimming position with the dorsal fin facing up wards Placing half a potato or a small ovenproof container in the stomach cavity of the fish provides stability You can tell when the fish is cooked because the dorsal fin can be removed easily When stewing add two to three tablespoons of li quid and a littl...

Page 39: ...out lid 2 170 190 70 804 Saddle of lamb on the bone medium 1 5 kg Cookware without lid 2 180 190 45 554 Grilled sausages Wire rack 3 3 20 251 Meat loaf 1 kg Cookware without lid 2 170 180 70 80 1 Slide the universal pan underneath the wire rack 2 At the start add liquid to the cookware so that at least 2 3 of the joint is covered in liquid 3 Turn the dish 2 3 of the way through the cooking time 4 ...

Page 40: ...al pan 5 3 10 20 Baked potatoes halved Universal pan 3 190 210 25 35 Potato products frozen e g chips cro quettes potato pockets rösti Universal pan 3 200 220 25 35 Chips 2 levels Universal pan Baking tray 3 1 190 210 30 40 22 11 Yoghurt You can also use your appliance to make your own yoghurt Making yoghurt 1 Remove the accessories and shelves from the cooking compartment 2 Heat 1 litre of milk 3...

Page 41: ...the dish with the sliced surfaces facing upwards Ensure that neither fruit nor mushrooms overlap on the wire rack 3 Grate vegetables and then blanch them Drain the excess water from the blanched vegetables and spread them evenly on the wire rack 4 Dry herbs on the stem Spread the herbs out evenly and slightly heaped on the wire rack 5 Turn very juicy fruit and vegetables several times After drying...

Page 42: ...er Do not place jars on cold or wet surfaces Protect the jars from draughts Place the jars on a clean cloth and cover them 8 Once the jars have cooled remove the clips Recommended settings Preserving food The specified times in the table are average values for preserving fruit and vegetables They may be influenced by room temperature the number of jars quantity heat and quality of the jar contents...

Page 43: ...he refrigerator Not suitable for cream cakes or cream gateaux When defrosting food use the following shelf positions 1 wire rack Shelf position 2 2 wire racks Shelf positions 3 1 Note Food that is frozen in thin layers or small portions defrosts more quickly than food frozen in larger blocks Take the food out of its packaging and place in a suitable dish on the wire rack Redistribute the food or t...

Page 44: ...ng tins on the wire rack Shelf position 2 Note Items that are placed in the oven on baking trays or in baking tins dishes at the same time will not ne cessarily be ready at the same time Shelf positions for baking on two levels Universal pan Shelf position 3 Baking tray Shelf position 1 Baking tins on the wire rack First wire rack Shelf position 3 Second wire rack Shelf position 1 Shelf positions ...

Page 45: ...instructions contain instructions for the gas connection and for the gas conversion s as sembly Note For after sales service only 23 1 General information Your appliance must only be converted from one gas type to another by authorised per sonnel who have received appropriate train ing The procedure must always be carried out in accordance with the instructions in this manual Incorrect connection ...

Page 46: ... sales service tele phone number Type of gas gas pressure The data can be found on the rating plate Type of gas gas pressure Data following gas con version 23 3 Selecting the gas connection side On many appliances you can carry out the gas con nection on the right or left hand side If necessary you can change the connection side Requirements Shut off the main gas line Seal the gas connecting piece...

Page 47: ...onnecting piece into the connecting piece using a 24 mm spanner 3 Secure the connecting piece using a 24 mm span ner Use a 24 mm spanner to place the threaded fit ting of the gas pipe or safety gas hose on the con necting piece and tighten it firmly 4 Open the gas connection shut off Carry out a leak test Page 51 Liquefied gas connection LPG If you use liquefied gas LPG establish the gas con necti...

Page 48: ... type of gas that is now set After converting the type of gas affix the label with the specification of the gas type and the star shape at the designated location on the appliance s rating plate Parts for the gas conversion The parts that you need for the gas conversion proced ure described here are listed below Note The accessories supplied may differ depending on the appliance model The gas conn...

Page 49: ...steps described in the section entitled Installing the control panel Page 51 Converting the appliance from liquid gas to natural gas If you convert the appliance from liquefied gas LPG G30 G31 to natural gas NG G20 G25 or if you already carried out this conversion and then undo this 1 Replace all of the bypass nozzles in the appliance You can find additional information about this in the section e...

Page 50: ...control panel clockwise slightly In order to access the bypass nozzles on the left side turn the control panel anti clockwise slightly Ensure that the cables are not damaged and the connections do not come loose Grip the panel with both hands and slowly pull it up wards Remove the panel from the fastening lugs Then carefully pull the panel forwards to remove it Ensure that the cables are not damag...

Page 51: ...connection a If dispersions and bubbles occur on the foamy sur face and these indicate that gas is escaping follow the instructions in the section entitled What to do if there is a gas leak Page 51 3 Follow the same instructions for the part that is sealed with the blind plug Checking the cooker burner nozzles Check the leak tightness of each nozzle 1 Open the gas connection shut off 2 To check ca...

Page 52: ...G20 G25 G20 G20 G25 G25 G25 3 G30 G31 G30 G30 G27 G2 350 Gas pressure mbar 20 25 20 25 20 25 25 28 30 37 50 37 20 13 Nozzle mm 0 97 0 97 0 91 1 0 94 0 94 0 65 0 58 0 62 1 1 31 Bypass nozzle1 mm 0 6 0 5 8 0 6 0 58 0 6 0 58 0 6 0 58 0 6 0 58 0 6 0 58 0 4 0 38 0 4 0 38 0 4 0 38 0 6 0 58 0 6 0 58 Max input power kW 1 75 1 75 1 75 1 75 1 75 1 75 1 75 1 75 1 75 1 75 1 75 Min input power kW 0 9 0 9 0 9 0...

Page 53: ... G25 3 G30 G31 G30 G30 G27 G2 350 Gas flow at 15 C and 1013 mbar m3 h 0 285 0 332 0 285 0 285 0 332 0 332 0 325 0 348 0 397 Gas flow at 15 C and 1013 mbar g h 218 21 4 218 218 1 Use the bypass nozzle with the appropriate diameter that is included in the set ...

Page 54: ......

Page 55: ......

Page 56: ...e Free and easy registration also on mobile phones www bosch home com welcome Looking for help You ll find it here Expert advice for your Bosch home appliances help with problems or a repair from Bosch experts Find out everything about the many ways Bosch can support you www bosch home com service Contact data of all countries are listed in the attached service directory 9001685933 9001685933 0202...

Reviews: