


22
| English
1 609 92A 08W | (29.5.13)
Bosch Power Tools
Clamping the Workpiece (see figure G)
To ensure optimum working safety, the workpiece must al-
ways be firmly clamped.
Do not saw workpieces that are too small to clamp.
Long workpieces must be underlaid or supported at their free
end.
– Place the workpiece against the angle stop
6
.
– Slide the clamping spindle
7
against the workpiece and
firmly clamp the workpiece with the spindle handle
9
.
Loosening the Workpiece
– Loosen the spindle handle
9
.
– Tilt up the quick release
8
and pull the clamping spindle
7
away from the workpiece.
Working Advice
General Sawing Instructions
Protect the saw blade against impact and shock. Do not sub-
ject the saw blade to lateral pressure.
Do not saw warped/bent workpieces. The workpiece must al-
ways have a straight edge to face against the fence.
Long workpieces must be underlaid or supported at their free
end.
Permissible Workpiece Dimensions
Maximal
workpiece sizes:
Minimal
workpiece sizes
(= all workpieces that can be clamped via the clamping spin-
dle
7
):
Length 80 mm
Cutting depth, max.
(0°/0°): 115 mm
Dust- / Chip Disposal (see figure H)
Dusts from materials such lead-containing coatings, minerals
and metal can be harmful to one’s health. Contact with or in-
haling the dusts can trigger allergic reactions to the operator
or bystanders and/or lead to respiratory infections.
Certain metal dusts are considered hazardous, especially in
conjunction with alloys such as zinc, aluminium or chromium.
Materials containing asbestos may only be worked by special-
ists.
– Provide for good ventilation of the working place.
– It is recommended to wear a P2 filter-class respirator.
Observe the relevant regulations in your country for the mate-
rials to be worked.
The saw blade
31
can become blocked by dust, chips or work-
piece fragments in the slot of the saw table
25
.
– Switch the machine off and pull the mains plug from the
socket outlet.
– Wait until the saw blade has come to a complete stop.
– Pull out the chip drawer
24
and empty if completely.
Prevent dust accumulation at the workplace.
Dusts can
easily ignite.
Starting Operation
Observe the mains voltage!
The voltage of the power
source must correspond with the data on the type plate of
the machine.
Position of the Operator (see figure I)
Do not stand in a line with the saw blade in front of the
machine. Always stand aside of the saw blade.
This pro-
tects your body against possible kickback.
– Keep hands, fingers and arms away from the rotating saw
blade.
– Do not cross your arms when operating the tool arm.
Switching On (see figure J)
To save energy, only switch the power tool on when using it.
– To
start
the machine, press the On/Off switch
17
and keep
it pressed.
Note:
For safety reasons, the On/Off switch
17
cannot be
locked; it must remain pressed during the entire operation.
The tool arm can be guided down only after pushing the lock-
ing lever
1
.
– For
sawing
, the locking lever
1
must be pushed in addition
to pressing the On/Off switch.
Soft starting
The electronic soft starting feature limits the torque upon
switching on and increases the working life of the motor.
Switching Off
– To
switch off
the machine, release the On/Off switch
17
.
Sawing
– Firmly clamp the workpiece as appropriate for its dimen-
sions.
– Set the desired mitre angle.
– Switch on the machine.
– Push the locking lever
1
and guide the tool arm slowly
downward with the tool handle
16
.
– Saw through the workpiece applying uniform feed.
– Switch off the machine and wait until the saw blade has
come to a complete stop.
– Guide the tool arm slowly upward.
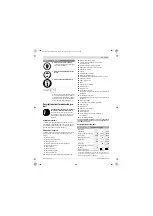
Mitre/Bevel Angle
Workpiece Form
0°
45°
115 Ø
90 Ø
100 x 100
85 x 85
158 x 80
85 x 85
110 x 110
85 x 85
OBJ_BUCH-1938-001.book Page 22 Wednesday, May 29, 2013 1:42 PM