EN
WWW.BORMANNTOOLS.COM
9
Note: To prevent accidental starting in a situation of power failure to the grinder, the 'ON/OFF' switch G) is fitted with a pro
-
tective device that prevents the angle grinder from starting up automatically when the power is re-established. In this case,
and with the power
re-established, release the switch to the 'OFF' position, then switch to 'ON' as normal.
Warning! Do not set the machine down until the spindle has completely stopped.
Note: During use, keep clothing out of the line of any sparks formed. Sparks from metal grinding can set fire to many types of
clothing in a short time. The risk is less if your outer clothing is made of wool, or flame retardant treated cotton.
Dust
A correctly fitted dust mask, suitable for the activity and in accordance to the relevant standard, must be worn.
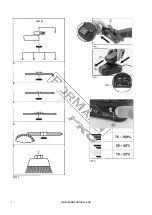
Grinding (Fig.11)
When performing grinding operations maintain an angle of approximately 30° between the work surface and the disc face.
Only use abrasives specifically designed for this task.
Cutting
Warning
- Cutting operations should only be attempted with the "cutting" guard fitted to this grinder.
- This guard must be fitted for your safety.
- When performing cutting-off operations do not incline the machine as this can lead to the abrasive wheel becoming
jammed, damaged or excessively and abnormally worn.
- Only use abrasives specifically designed for this task.
As the abrasive disk wears during use, its diameter reduces. This reduces the peripheral speed and the machine's efficiency.
This results in increased load on the grinding machine which if continued will damage the motor. Ensure that the diameter of
the wheel is within 25% of its original size.
Important: Excessive pressure on the machine does not result in a higher abrasive efficiency. Excessive pressure increases
wear and tear on the accessory and will damage the angle grinder which is not covered under the guarantee.
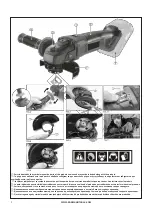
Battery Pack Charging (Fig.1-2)
Warning: Use only the genuine charger, for charging the batteries, supplied separately by the manufacturer. Only Bormann
designated battery packs and chargers can be used in conjunction with this product.
Use of any other third party battery packs/chargers with this product is considered misuse and will invalidate the produces
warranty.
Once connected to the mains supply recharging of the battery pack can be left generally unsupervised requiring minimal
attention. Complex circuit construction monitors the battery pack condition adjusting the recharge current to suit. When the
recharge cycle is complete and to maintain the full capacity a low output current will continue as required.
Warning!
• Check the condition of the charger and battery prior to each charge. If there is any sign of damage then do not commence
charging, seek advice from an authorised supplier.
To charge the battery pack (5) , it must first be removed from the tool.
To release the battery pack:
Press the battery pack release button (5.1) and gently slide the battery pack off (Fig.1).
Plug the battery charger unit (9) into a 230V/AC 13amp socket.
The green LED (9.1) will stay it to show the charger has power.
Slide the battery pack into place ensuring the battery terminals and the charger terminals make a good connection Fig.2.
After a few seconds delay the red LED (9.2) will light to show the battery pack is being charged and the green LED will turn off.
Warning!
• Ensure battery pack is connected correctly (Fig.2). Sliding the battery pack on incorrectly may cause damage to the battery/
charger.
When the battery pack is fully charged, the green LED (9.1) will light on.
Warning!
• If the indicator lights fail to illuminate during the charging cycle, the charger from the power supply socket outlet and
replace the battery pack.
Summary of Contents for 027614
Page 3: ...WWW BORMANNTOOLS COM 3 M14 A B C D E...
Page 12: ...WWW BORMANNTOOLS COM 12 EL 1 2 Off...
Page 13: ...WWW BORMANNTOOLS COM 13 EL Bormann 30...
Page 14: ...WWW BORMANNTOOLS COM 14 EL D 80 mm 1 On Off 2 3 4 5 20V 6 7 4 6 5 6...
Page 15: ...WWW BORMANNTOOLS COM 15 EL 7 9 B C D 6 3 4 8 4 1 7 4 4 On Off 10 1 ON 1 ON OFF OFF ON...
Page 17: ...WWW BORMANNTOOLS COM 17 EL 15 0 2 3 50C 300C...
Page 18: ...WWW BORMANNTOOLS COM 18 EL...
Page 31: ...WWW BORMANNTOOLS COM 31 BG 1 2 3 1 2 1 2 3 4 5 1 2 3 4 5 6 7...
Page 32: ...WWW BORMANNTOOLS COM 32 BG Bormann 30...
Page 33: ...WWW BORMANNTOOLS COM 33 BG D 80 mm 1 2 3 4 5 20V 6 7 4 6 5 6 7 9...
Page 34: ...WWW BORMANNTOOLS COM 34 BG B C D 6 3 4 8 4 1 7 4 4 10 1 1 ON OFF G 11 30 25...
Page 35: ...WWW BORMANNTOOLS COM 35 BG 1 2 Bormann 5 5 1 1 9 230 V AC 13amp 9 1 2 9 2 2 9 1 15 0 2 3 5 2...
Page 36: ...WWW BORMANNTOOLS COM 36 BG 1 2 3 1 1 2 2 1 2 3 50C 300C...
Page 37: ...WWW BORMANNTOOLS COM 37 BG...
Page 38: ...WWW BORMANNTOOLS COM 38 SRB 1 2 3 1 2 1 2 3 4 5 1 2 3 4 5 6 7...
Page 39: ...WWW BORMANNTOOLS COM 39 SRB 30...
Page 40: ...WWW BORMANNTOOLS COM 40 SRB 1 2 3 4 5 20 6 7 4 6 5 6 7 9 6 3 4 8 4 1 7 80...
Page 41: ...WWW BORMANNTOOLS COM 41 SRB 4 4 10 1 1 11 30 25 1 2 5 5 1 1...
Page 42: ...WWW BORMANNTOOLS COM 42 SRB 15 0 2 3 5 2 5 30 9 230 13 9 1 2 9 2 2 9 1...
Page 43: ...WWW BORMANNTOOLS COM 43 SRB 1 2 3 1 2 3 1 2 1 2 1 2 1 2...
Page 44: ...WWW BORMANNTOOLS COM 44 1 2 3 1 2 1 2 3 4 5 1 2 3 4 5 6 7 m...
Page 45: ...WWW BORMANNTOOLS COM 45 Bormann 30...
Page 46: ...WWW BORMANNTOOLS COM 46 1 2 3 4 5 20V Li ion 6 7 4 6 5 6 7 9 6 D 80 mm...
Page 47: ...WWW BORMANNTOOLS COM 47 3 4 8 4 1 7 4 4 10 1 ON 1 ON OFF G OFF ON retardant 11 30 25...
Page 49: ...WWW BORMANNTOOLS COM 49 1 2 3 1 2 3 1 2 1 2 1 2 1 2 50 300C WEEE...
Page 56: ......

