


EN
24
Operation
www.bora.com
Activating the childproofing feature
X
X
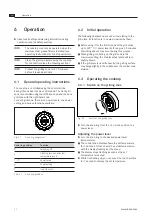
Press the touch surface of one of the control knob for
5 seconds.
Q
Q
An acoustic signal can be heard and the display on the
control knob switches to
L
. After 10 seconds, another
acoustic signal sounds and the display goes out. The
childproofing feature is activated.
Permanently deactivating the childproofing
feature
X
X
Press the touch surface of one of the control knob for
5 seconds.
Q
Q
A beep can be heard and the display on the control
knob switches to
0
. After 10 seconds, another beep
sounds and the display goes out. The childproofing
feature is permanently deactivated.
Deactivating the childproofing feature for a
cooking session
X
X
Turn the knob ring from the 12 o-clock position to a
power level.
Q
Q
L
appears in the control knob display.
X
X
Press the touch surface of one of the control knob for
5 seconds.
Q
Q
An acoustic signal can be heard and the control knob
display shows the power level selected.
Q
Q
The childproofing feature is only deactivated for this
cooking session and you can set the power level you
want.
Q
Q
The childproofing feature is reactivated next time you
switch on.
6.3.6 Using the timer function
INFO
You can set a time range of between 1 and
120 minutes for the timer functions.
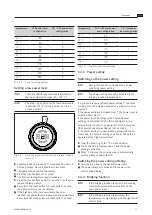
Set time
X
X
Twist the knob ring to the 11 o’clock position.
Q
Q
t
appears on the control knob display.
X
X
Press the touch surface for one second.
Q
Q
A beep can be heard and the control knob display
switches to
0 0 0
.
X
X
Within 3 seconds, twist the knob ring to set the timer
time.
Q
Q
Turning clockwise increases the time (starting at
0 minutes), while turning anticlockwise reduces the
time (starting at 120 minutes).
Q
Q
In the range from 0 to 20 minutes, the time reduces/
increases in both directions by one minute at a time,
while the increments are 5 minutes for the rest of the
range.
Q
Q
If no time is set within 3 seconds, the timer is
deactivated and the control knob display switches to
t
.
X
X
Press the touch-surface within 3 seconds to confirm
the time set.
Q
Q
A beep sounds and the set value starts to flash on the
control knob display.
Switching on the bridging function
Both control knobs are in the 12 o’clock position.
X
X
Press the touch surface on both control knobs at the
same time for at least 1 second.
Q
Q
The left-hand control knob display shows
%
, the right-
hand one shows
0
.
X
X
Within 3 seconds, twist the knob ring on the right hand
control knob to the power level you want.
Q
Q
The power level (for both grill zones) is shown in the
display on the right-hand control knob.
Q
Q
The right-hand control knob can now be used to
control the power levels for both grill zones.
Q
Q
If the right-hand control knob is not twisted to a power
level within 3 seconds of the bridging function being
activated, the bridging function is deactivated ad the
cooktop is switched off.
Switching off bridging function
X
X
Twist the right-hand control knob to the 12 o’clock
position.
Q
Q
The bridging function and the cooktop are now
switched off.
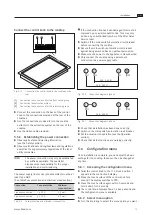
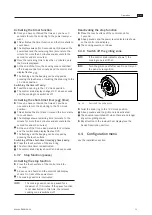
6.3.4 Cleaning function
INFO
The knob ring position for the cleaning function
is between the 12 o’clock position and the 1
o’clock position (see low power levels).
X
X
Twist the knob rings on both control knobs around 15°
clockwise from the 12 o’clock position, where they
should slot into place.
Q
Q
c
appears in the control knob displays.
Q
Q
The half-moon shaped grill zones displays flash while
the unit is warming up or cooling down.
X
X
Wait for the grill zone displays to stop flashing.
Q
Q
As soon as the optimum cleaning temperature of 70°
is reached, the grill zone displays stop flashing.
X
X
Clean the Tepan stainless steel grill as described in the
Cleaning and maintenance section.
INFO
It is crucial that the cleaning function is
activated for both grill zones, as otherwise
there is a risk of burns!
INFO
Only start cleaning once the optimum cleaning
temperature has been reached (see also
Cleaning section).
6.3.5 Childproofing feature
INFO
The childproofing feature can only be activated
or permanently deactivated if the knob ring
is in the 12 o’clock position and there are no
active functions.
Summary of Contents for PKT11
Page 31: ......