background image

Telep

h

oning

156

Preparation with mobile phone

6.

Additional operations must be carried out 
on the mobile phone and differ depending 
on the model, refer to the operating instruc-
tions of your mobile phone, e.g. find, con-
nect or link under Bluetooth device.

Logging on

Depending on your mobile phone, you will first 
be requested consecutively via the display of 
your mobile phone or the Control Display to 
enter the Bluetooth passkey you specified.
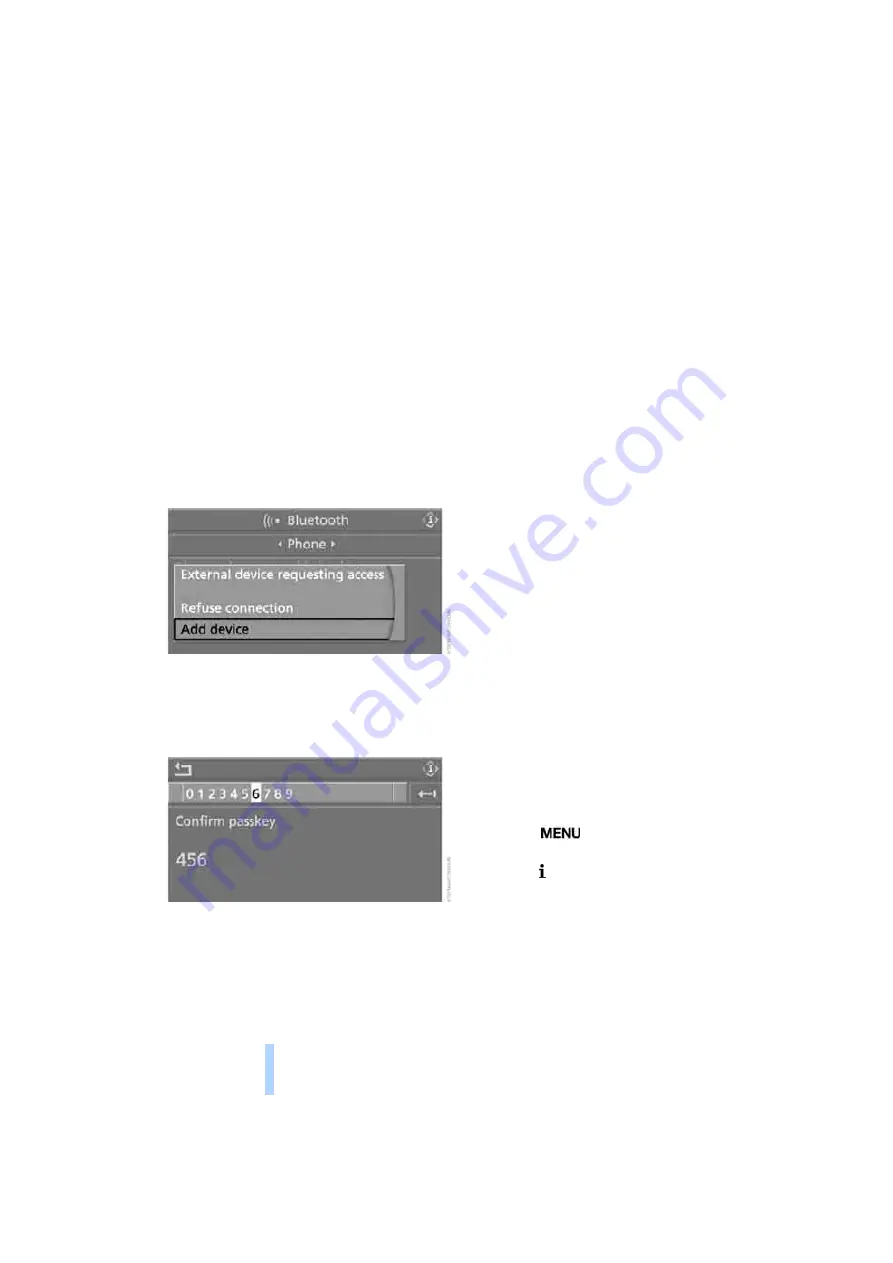
Display on the Control Display if the Bluetooth 
passkey can be entered with iDrive:

7.

Select "Add device" and press the control-
ler.

8.

Enter the Bluetooth passkey.
Depending on the mobile phone, approx. 
30 seconds are available for entering the 
Bluetooth passkey on the mobile phone 
and on the Control Display.

9.

Select "Confirm passkey" and press the 
controller.

10.

Wait a few seconds until the list of the 
logged-on mobile phones is shown on the 
Control Display and "Phone" is selected.

To cancel the logon of the mobile phone on the 
vehicle:
Select "Refuse connection" and press the con-
troller.
The next time you use the mobile phone in the 
vehicle interior, it will be detected within a max-
imum of 2 minutes with the engine running or 
the ignition switched on.
As soon as a mobile phone is detected by the 
vehicle, the phone book entries stored on the 
SIM card or on your mobile phone are trans-
ferred to your vehicle, refer to the operating 
instructions of your mobile phone if necessary. 
This transfer is dependent on your mobile 
phone, refer to the operating instructions of 
your mobile phone if necessary, and can take 
several minutes.
Up to four mobile phones can be logged on 
consecutively. If you log on a fifth mobile phone, 
the logon data of the last mobile phone in the 
list will be deleted, refer to below.

List of logged-on mobile phones

All mobile phones for which the vehicle has 
stored the logon data can be displayed. If sev-
eral logged-on mobile phones are detected by 
the vehicle simultaneously, you can operate the 
mobile phone highest up in the list via the vehi-
cle.
You can change the order of the mobile phones 
in the list. As long as a mobile phone is selected 
in this list, the mobile phones cannot be oper-
ated via the vehicle.
iDrive, for explanation of principle, refer to 
page

16

.

1.

Press the 

 button to open the start 

menu.

2.

Open the   menu by pressing the controller.

3.

Select "Communication settings" and 
press the controller.

4.

Select "Bluetooth" and press the controller.

5.

Select "Phone" and press the controller.

Online Edition for Part No. 01 41 0 012 213 - © 02/06 BMW AG

Summary of Contents for 2006 M5

Page 1: ...Owner s Manual for Vehicle The Ultimate Driving Machine Contents A Z Online Edition for Part No 01 41 0 012 213 02 06 BMW AG ...

Page 2: ...Online Edition for Part No 01 41 0 012 213 02 06 BMW AG ...

Page 3: ...ntains important data and instructions intended to assist you in gaining maximum use and satisfaction from your BMW M5 s unique range of technical features The manual also contains information on maintenance designed to enhance operating safety and contribute to main taining the value of your BMW M5 throughout an extended ser vice life This manual is supplemented by a Service and Warranty Informa ...

Page 4: ...luding excerpts only with the written consent of BMW AG Munich Order No 01 41 0 012 113 US English II 06 06 03 500 Printed in Germany Printed on environmentally friendly paper bleached without chlorine suitable for recycling Online Edition for Part No 01 41 0 012 213 02 06 BMW AG ...

Page 5: ...ty 83 Lamps 87 Climate 93 Practical interior accessories Driving tips 104 Things to remember when driving Navigation 112 Starting navigation system 113 Destination entry 124 Destination guidance 129 What to do if Entertainment 132 On off and tone 136 Radio 145 CD player and CD changer 151 External audio device Communications 154 Telephoning 167 TeleService BMW Assist Mobility 174 Refueling 176 Whe...

Page 6: ...hat must be fol lowed precisely in order to avoid the pos sibility of personal injury and serious damage to the vehicle Indicates information that will assist you in gaining the optimum benefit from your vehicle and enable you to care more effectively for your vehicle Refers to measures that can be taken to help protect the environment Marks the end of a specific item of informa tion Indicates spe...

Page 7: ... accom panying Supplementary Owner s Manuals Editorial notice BMW pursues a policy of continuous ongoing development that is conceived to ensure that our vehicles continue to embody the highest quality and safety standards combined with advanced state of the art technology For this reason it is possible that the features described in this Owner s Manual could differ from those on your vehicle For ...

Page 8: ...r equipment for instance CBs walkie talkies ham radios or similar accessories may cause extensive dam age to the vehicle compromise its safety inter fere with the vehicle s electrical system or affect the validity of the BMW Limited Warranty See your BMW center for additional information Maintenance replacement or repair of the emission control devices and sys tems may be performed by any automoti...

Page 9: ...ation NHTSA in addition to notifying BMW of North America LLC P O Box 1227 Westwood New Jersey 07675 1227 Telephone 1 800 831 1117 If NHTSA receives similar complaints it may open an investigation and if it finds that a safety defect exists in a group of vehicles it may order a recall and remedy campaign However NHTSA cannot become involved in individual problems between you your dealer or BMW of ...

Page 10: ...Online Edition for Part No 01 41 0 012 213 02 06 BMW AG ...

Page 11: ...ed to familiarize you with your vehicle s operating environment The section will also assist you in becoming acquainted with the control concepts and options available for operating the various systems At a glance Online Edition for Part No 01 41 0 012 213 02 06 BMW AG ...

Page 12: ...tch 38 3 Opening and closing windows 37 4 Folding exterior mirrors in and out 46 5 Adjusting exterior mirrors 45 Automatic parking function 46 6 Turn signal 59 High beams headlamp flasher 84 High beam assistant 84 Roadside parking lamps 84 Check Control 67 Computer 63 Online Edition for Part No 01 41 0 012 213 02 06 BMW AG ...

Page 13: ... longer redialing Volume Activating deactivating voice command system 22 Changing radio station Selecting music track Scrolling in phone book and in lists with stored phone numbers MDrive call up individual settings 48 Individually programmable 47 10 Windshield wipers 59 Rain sensor 60 11 Starting stopping engine and switching ignition on off 53 14 Steering wheel adjustment 47 15 Cruise control 61...

Page 14: ...e oil level 182 Indicator and warning lamps 67 Speed of cruise control 61 7 Displays for Sequential Manual Transmission with Drivelogic 55 Check Control message present 67 Odometer and trip odometer 62 Date and remaining travel distance for service requirements 66 High beam assistant 85 8 Fuel gauge 63 9 Resetting trip odometer 62 Online Edition for Part No 01 41 0 012 213 02 06 BMW AG ...

Page 15: ...ning lamps Additional information e g on the cause of a malfunction and on the corresponding need to take action can be displayed via the Check Con trol refer to page 67 In the case of corresponding urgency this infor mation is displayed immediately when the related lamp lights up Indicator lamps without text messages The following indicator lamps in the display area 1indicate that the associated ...

Page 16: ...Cockpit 14 Around the center console controls and displays Online Edition for Part No 01 41 0 012 213 02 06 BMW AG ...

Page 17: ...d adjusting volume 132 17 Controller 16 Turn press or move horizontally in four directions 18 Activating voice command system 22 19 Opening start menu on Control Display 17 20 Drivelogic of Sequential Manual Transmission 57 21 EDC Electronic Damping Control 76 22 DSC Dynamic Stability Control 75 23 M Engine Dynamic Control POWER 58 Temperature setting left right 88 Automatic air distribution and v...

Page 18: ...with the rele vant equipment Controls 1 Control Display 2 button Opening start menu 3 Controller With the controller you can select menu items and make settings move in four directions arrows 4 turn arrow 5 press arrow 6 To avoid posing an unnecessary hazard due to inattention both to your own vehi cle s occupants and to other road users never attempt to use the controls or make entries unless tra...

Page 19: ... Settings for your vehicle e g for MDrive or for the central locking system Display of service requirements and dates for statutory emission and vehicle inspec tions Settings for telephone Operating principle From radio readiness refer to page 53 the fol lowing message is shown on the Control Dis play To clear the message Press the controller This displays the start menu On vehicles with a single ...

Page 20: ...ut pressing the button For this purpose move the controller in the cor responding direction and hold it for longer than approx 2 seconds Displays in menu 1 Each menu is divided into fields The respective active field is highlighted 2 A symbol indicates the last selected menu item of the start menu 1 Menu items are usually grouped in horizon tal or vertical lists 2 In these lists arrows indicate th...

Page 21: ...ighlight moves Menu items shown in white can be selected by highlighting 2 Activating menu item Press the controller New menu items are displayed or the function is carried out 3 Selecting menu item refer to 1 4 Changing between fields Briefly move the controller left right forward or back Release controller Active field appears lighter 5 Adjusting settings Turn controller Graphic display numerica...

Page 22: ...ork with strong reception display dependent on mobile phone 5 Time Other displays The status information is temporarily hidden when there are Check Control instructions or inputs via the voice command system Assistance window Additional information can be displayed in the assistance window The computer or the trip computer The arrow or map view with a navigation system The current position Selecti...

Page 23: ...and press the con troller 2 Select Assist window off and press the controller To switch on change to the assistance window and press the controller Switching Control Display off on 1 Press the button This opens the start menu 2 Press the controller to open the menu 3 Select Display off and press the control ler To switch on press the controller Online Edition for Part No 01 41 0 012 213 02 06 BMW ...

Page 24: ...area of the interior rearview mirror refer to page 14 Precondition Via iDrive set the language that applies for the voice command system in order to enable iden tification of the spoken commands To set the language of iDrive refer to page 72 Symbols in Owner s Manual Voice commands Activating voice command system 1 Press the button This symbol on the Control Display and an acoustic signal tell you...

Page 25: ...ing the CD player and the CD changer Opening help Using alternative commands There are often a number of commands to run a function e g Running functions directly with short commands With short commands you can carry out certain functions directly regardless of which menu item is selected refer to page 205 Opening start menu Example selecting a track 1 Switch on Entertainment sound output if neces...

Page 26: ...g the destination Always issue commands in the language of the voice command system When selecting a radio station use the common pronunciation of the station name For entries in the voice activated phone book only use names in the language of the voice command system and no abbrevia tions Keep the doors windows and glass sun roof closed to prevent interference from ambient noise Avoid making othe...

Page 27: ...At a glance 25 Reference Controls Driving tips Communications Navigation Entertainment Mobility Online Edition for Part No 01 41 0 012 213 02 06 BMW AG ...

Page 28: ...Online Edition for Part No 01 41 0 012 213 02 06 BMW AG ...

Page 29: ...with information for complete control of your vehicle Its extensive array of features and accessories both for driving and for your own safety comfort and convenience are described here Controls Online Edition for Part No 01 41 0 012 213 02 06 BMW AG ...

Page 30: ...vehicle refer to Personal Profile page 29 Information on the required maintenance is also stored in the remote control refer to Service data in remote control page 186 Integrated key Press the button 1 to unlock the key The integrated key fits the following locks Glove compartment refer to page 95 Driver s door refer to page 32 New remote controls To obtain additional or replace lost keys new remo...

Page 31: ...steering wheel refer to page 47 Individual settings for MDrive refer to page 48 Settings for the display on the Control Dis play Brightness of the Control Display refer to page 72 Measuring units for consumption route distances temperature and pressure refer to page 72 Language on Control Display refer to page 72 12h 24h mode of the clock refer to page 71 Date format refer to page 72 Drivelogic dr...

Page 32: ...nded in a parked vehicle could lock the doors from the inside you should always keep the remote control with you this precaution ensures that you will remain able to unlock the vehicle from the outside at all times Unlocking Press the button This unlocks the vehicle You can set how the vehicle is unlocked The setting is stored for the remote control currently in use iDrive for explanation of princ...

Page 33: ... the controller to open the menu 3 Select Vehicle settings and press the controller 4 Select Door locks and press the control ler 5 Select Confirmation and press the con troller 6 Select the desired signal 7 Press the controller The signal is activated Malfunctions The remote control may malfunction due to local radio waves Should the remote control fail to operate owing to interference of this ki...

Page 34: ...tion you can turn a key all the way to the right or left in the door lock to lock or unlock the driver s door Opening and closing from inside This button serves to unlock or lock doors and the luggage compartment lid with the front doors closed but does not activate the anti theft system The fuel filler door remains unlocked You can also set the situations in which the vehicle is locked iDrive for...

Page 35: ...ons or animals left unat tended in a parked vehicle could lock the doors from the inside you should always keep the remote control with you this precaution ensures that you will remain able to unlock the vehicle from the outside at all times Doors Automatic soft closing To close the doors merely press it closed gen tly The closing process will then be carried out automatically Make sure that the c...

Page 36: ...herwise injuries can occur Reinstalling rear seat 1 Position the rear seat in the vehicle Guide the two outer belt buckles 3 through the seat bench and slide the seat bench com pletely under the backrest The middle belt buckle 4 must be guided between the seat bench and the backrest when doing so Do not twist the center belt buckle as otherwise correct operation of this safety equipment is not ens...

Page 37: ...r the remaining areas and the indicator lamp flashes continuously after approx 10 seconds However the interior motion sensor is not activated The indicator lamp goes out after unlocking your vehicle has not been disturbed while you were away The indicator lamp flashes after unlocking until the remote control is inserted into the ignition lock however for a maximum of approx 5 minutes your vehicle ...

Page 38: ... described in the following Should a short delay occur when opening or closing the windows or the glass sun roof the system is checking whether a remote control is located in the vehicle Please repeat opening or closing if necessary Releasing Completely grasp a door handle arrow 1 This corresponds to pressing the button If a remote control is detected in the interior after unlocking the electric s...

Page 39: ...ey To start the engine following this insert the remote control in the ignition lock Replacing battery The remote control for comfort access contains a battery which must be replaced if necessary 1 Remove integrated key from remote con trol refer to page 28 2 Remove cover 3 Lay in new battery with positive side facing upward 4 Press cover closed Return used battery to a recycling collec tion point...

Page 40: ...ing opened or closed via the switches in the rear passenger area by chil dren for example The LED lights up when this safety feature is activated Always press the safety switch when children ride in the rear otherwise unchecked closing of the windows could lead to injuries Glass sunroof electric The glass sunroof is ready for operation with the ignition switched on refer to page 53 To prevent inju...

Page 41: ...sing from the raised posi tion the closing action is interrupted and the glass sunroof reopens a short way Despite the pinch protection system inspect the sunroof s travel path prior to closing it as the safety system might fail to detect certain kinds of obstructions such as very thin objects and the sunroof would con tinue closing Pressing the switch beyond the resistance point and holding it th...

Page 42: ... is usually only tem porary For airbag locations and additional information on airbags refer to page 78 Head restraints A correctly adjusted head restraint reduces the risk of spinal injury in the event of an accident Adjust the head restraint so that its center is approx at ear level Otherwise there is increased danger of injury in the event of an accident Head restraints refer to page 43 Safety ...

Page 43: ...r support 8 Thigh support 9 Lumbar support Shoulder support the adjustable upper back rest also supports the back in the shoulder region This provides a relaxed driving position and helps relieve stress on the shoulder mus cles Adjusting lumbar support You can also adjust the contour of the backrest to obtain additional support in the lumbar region The upper hips and spinal column receive sup plem...

Page 44: ...Requesting Do not request a position from the mem ory while the vehicle is moving There is a risk of accident from unexpected movement of the seat or steering wheel Convenience mode 1 Open the driver s door after unlocking or switch on radio readiness 2 Briefly press the desired memory button 1 or 2 The system immediately cancels the adjustment procedure when you briefly press one of the seat adju...

Page 45: ...evel Otherwise there is increased danger of injury in the event of an accident Front seats height adjustment You can adjust the height of the head restraints electrically Front seats angle adjustment Swivel the head restraint The distance to the back of the head is adjusted with the shoulder support Adjusting side extensions You can fold the side extensions on the head restraint forward for increa...

Page 46: ...n also be acti vated if objects are placed on the passenger seat Releasing 1 Grasp the belt firmly 2 Press the red button in the buckle 3 Guide the belt into its reel The shoulder strap s anchorage point will be correct for adult seat occupants of every build if the seat is correctly adjusted refer to page 40 The two rear safety belt buckles integrated into the rear seat are for passengers sitting...

Page 47: ... the controller to the left or right to select Driver or Passenger 5 Turn the controller The adjustment is applied the field can be changed Rear Operation as for front seat heating two temper ature settings Active seat ventilation The system progresses one step through the control sequence each time you press the but ton To switch off press the button longer The highest position with three LEDs is...

Page 48: ...he mirrors inward manually or with button 3 otherwise they could be damaged depending on the width of the car wash system Automatic heating Below a certain outdoor temperature both exterior mirrors are automatically heated when the motor is running or the ignition is switched on Tilting down passenger side exterior mirror automatic parking function Activating 1 Slide switch into the driver s side ...

Page 49: ...inciple refer to page 16 1 Press the button This opens the start menu 2 Press the controller to open the menu 3 Select Vehicle settings and press the controller 4 Change to upper field if necessary Turn the controller until Steering wheel button is selected and press the controller A list of different functions appears Navigation voice instructions Voice instructions for the navigation system Air ...

Page 50: ...ng is located in the upper field Turn the controller until MDrive is selected and press the controller The functions contained in MDrive are dis played SMG Drivelogic Sequential Manual Transmission with Drivelogic shifting modes and Drive logic driving programs refer to page 57 EDC Programs of the Electronic Damping Control refer to page 76 DSC Dynamic Stability Control and M Dynamic Mode refer to...

Page 51: ...Control Display for the functions contained in MDrive are active Pressing the button again deactivates MDrive If the indicator lamp flashes after pressing the button MDrive was unable to react as the ABS Antilock Brake System or DSC Dynamic Stability Control is currently control ling the vehicle stability Press the button again when the indicator lamp no longer flashes Even with MDrive activated y...

Page 52: ...rwise there is an increased risk of injury for the child if the air bags are triggered even with a child restraint system Your BMW center will be glad to advise you For more information on automatic deactivation of the front passenger airbags refer to page 79 Installing child restraint systems Observe the child restraint system manu facturer s instructions for selection installation and use of the...

Page 53: ...1 Pull the head restraint upward 2 Guide the tether strap through the bracket of the head restraint 3 Slide the head restraint into the bottom position 4 Hook in the tether strap on the mounting point Center seat 1 Fold the center armrest somewhat toward the front 2 Guide the tether strap through the opening 3 Fold back the center armrest 4 Hook in the tether strap on the mounting point LATCH chil...

Page 54: ... vehicle is equipped with rear side airbags make sure that children do not lean out of the child s seat towards the door panels Otherwise injuries can be caused if the side airbags are triggered Child safety locks for rear doors Slide down the safety lever on the rear doors the door can now be opened from the outside only Safety switch for power windows Always press the safety switch for the power...

Page 55: ...hes the radio readiness or the igni tion on and off Briefly pressing the Start Stop button with the brake pedal depressed and the selector lever in position N starts the engine Radio readiness Some current consumers are ready for opera tion The last information of the computer selected is displayed in the instrument cluster Radio readiness is automatically switched off when the remote control is r...

Page 56: ...selector lever position selected refer to the instrument cluster display or the selector lever Then select the position N You cannot start off with the hood open When the engine is cold the exhaust system has a slightly metallic undertone due to the sys tem design Avoid frequent starting in quick succes sion or repeated starting attempts in which the engine does not start Otherwise the fuel is not...

Page 57: ... a stop if the traffic conditions are suitable The brake lamps do not light up when the hand brake is applied Sequential Manual Transmission with Drivelogic The concept The SMG Sequential Manual Transmission with Drivelogic is an automated manual trans mission in which an electrohydraulic system handles the clutching and gear changes The Sequential Manual Transmission is oper ated with the selecto...

Page 58: ...us for example a downshift that would cause the engine to overrev will not be executed by the system When the vehicle is stationary the trans mission automatically downshifts into first gear Shortly before dropping below a gear dependent minimum speed the transmis sion downshifts automatically even without your intervention D Drive mode In the Drive mode all forward gears are shifted automatically...

Page 59: ...ty Con trol deactivated refer to page 75 When DSC is activated the system switches from driving program 6 to 5 To maintain vehicle stability always drive with the DSC switched on when possi ble Selecting driving program with button in center console Press the button repeatedly until the desired driving program is displayed in the instrument cluster refer to page 56 Selecting driving program via bu...

Page 60: ...influ ence how sporty the reaction of your vehicle to accelerator pedal movements is to be Three programs are available for engine control P 400 program In the P 400 program the engine reacts gently to the movement of the accelerator pedal This is for example ideal for city driving or driving on snow In the process the fuel consumption is minimal and the engine output is reduced P 500 program The ...

Page 61: ... for explanation of principle refer to page 16 1 Open the start menu 2 Press the controller to open the menu 3 Select Vehicle settings and press the controller 4 Select Lighting and press the controller 5 Select Triple turn signal activation and press the controller Triple turn signaling is activated Wiper system 1 Switching on wipers 2 Switching off wipers or brief wipe 3 Activating deactivating ...

Page 62: ...ed at appropriate intervals Do not use the washers if there is any danger that the fluid will freeze on the windshield If you do so your vision could be obscured To avoid freezing use a washer fluid antifreeze refer to Washer fluid Do not use washing mechanisms when the washer fluid reservoir is empty otherwise you will damage the washer pump Windshield washer nozzles Both windshield washer nozzle...

Page 63: ... the lever the vehicle s speed increases by roughly 1 mph 1 km h Press lever to resistance point for a longer time The vehicle accelerates without pressure on the accelerator pedal The system maintains and stores your current speed as soon as you release the lever Press the lever beyond the resistance point increase speed by 5 mph 10 km h If on a downhill grade the engine s braking effect is not s...

Page 64: ... depending on the engine temperature As the engine temper ature rises the permissible engine speed also increases Avoid allowing the engine speed to rise as far as the orange warning sector when ever possible Be sure to avoid engine speeds in the red warn ing field In this range the fuel supply is inter rupted to protect the engine Coolant temperature Should the coolant and with it the engine beco...

Page 65: ...the Control Display Refuel as soon as possible once your cruising range falls below 30 miles 50 km otherwise engine functions are not ensured and damage can occur Computer Displays in instrument cluster To display the information press the BC button in the turn signal lever from radio readiness The following information is displayed in the specified order Time and outside temperature Cruising rang...

Page 66: ...rinciple refer to page 16 1 Press the button This opens the start menu 2 Move the controller to the right to open Navigation Without navigation system Open Car Data 3 Select Car Data and press the controller 4 Select Onboard info and press the con troller Estimated time of arrival at destination Entering a distance manually in the com puter see below Entering a destination in the navigation system...

Page 67: ...on trip 1 Open the start menu 2 Open Navigation Without navigation system Open Car Data 3 Select Car Data and press the controller 4 Select Trip computer and press the con troller Departure time Driving time Distance traveled Average speed Average fuel consumption Starting or stopping the trip computer or reset ting all values 1 Select Set and press the controller 2 Select the desired menu item 3 ...

Page 68: ... and press the controller 4 Select Service requirements and press the controller 5 Select Status and press the controller The display shows a list of selected service and maintenance procedures as well as legally mandated inspections You can request more detailed information on every entry Select the entry and press the controller To exit from the menu Select the arrow and press the controller Sym...

Page 69: ...stored To exit the menu Select the arrow and press the controller Check Control The concept The Check Control monitors functions in the vehicle and issues a message if there is a mal function in the monitored systems This kind of Check Control message consists of indicator and warning lamps in the instrument cluster and if necessary an acoustic signal and text messages at the bottom of the Control...

Page 70: ...the malfunctions have been corrected They cannot be deleted If a number of malfunctions occur simultaneously they are displayed in succession Less important messages disappear after approx 20 seconds but remain in memory To hide these Check Control messages Press the CHECK button on turn signal lever Displaying stored Check Control messages 1 Hold the button down The first stored message is displa...

Page 71: ...ition Before the display disappears you can display the messages once again Press the CHECK button for approx 2 seconds If several mes sages are present you can continue to press the CHECK button to view them in succession The display goes out automatically after a brief period when you press the CHECK button again for approximately 2 seconds Speed limit You can enter a speed and a Check Control m...

Page 72: ...ss the controller 4 Select Stopwatch and press the control ler Starting stopping or resetting Select Start and press the controller The stopwatch starts at the displayed time Select Reset and press the controller The stopwatch is reset and it restarts if it was running beforehand Select Stop and press the controller This stops the timer Taking an intermediate time reading Select Interim time and p...

Page 73: ...ontroller Making settings 1 Turn the controller to set the hours and press the controller 2 Turn the controller to set the minutes and press the controller The changed time is stored Switching on hour signal You will hear three tones just before each full hour Select Hour memo and press the controller The hour signal is activated Setting time format 1 Select Time format and press the control ler 2...

Page 74: ...nd press the control ler 2 If necessary move the controller to the right to select Display 3 Turn the controller until the desired setting is selected The setting is stored for the remote control cur rently in use Units of measure You can change the units of measure for con sumption distances temperature and pres sure 1 Select Units and press the controller 2 Select the menu item to be set and pre...

Page 75: ... 50 m or at over approx 20 mph 30 km h the system is switched off and the LED goes out You can reactivate the system manually as needed Signal tones When nearing an object the position is corre spondingly indicated by an interval tone Thus an object detected to the left rear of the vehicle will be indicated by a signal tone from the left rear speaker etc As the distance between vehicle and object ...

Page 76: ...MW is equipped with an extended array of systems designed to enhance and maintain vehicle stability under extreme conditions ABS Antilock Brake System ABS prevents locking of the wheels during braking Safe steering response is maintained even during full braking Active safety is thus increased The ABS is operational every time you start the engine Braking safely refer to page 106 CBC Cornering Bra...

Page 77: ...enever possible MDM indicator lamp The indicator lamp goes out shortly after the engine is started The indica tor lamp stays lit M Dynamic Mode is activated The indicator lamp lights up continuously and the DSC indicator lamp flashes the M Dynamic Mode is active and controls the drive and brak ing forces Activating MDM You activate the M Dynamic Mode with the button on the steering wheel refer to ...

Page 78: ...f shock absorb ers and steering Selecting program Press the EDC button repeatedly Comfort no LED lights up in the button Normal one LED lights up in the button Sport both LEDs light up in the button The last selected program is active each time the engine is started You can also activate your preferred program with the button on the steering wheel refer to MDrive on page 48 Flat Tire Monitor FTM T...

Page 79: ...tton the warning lamp in the instrument cluster lights up yellow for a few seconds Warning lamp refer to Indica tion of a flat tire The message Initializing FTM appears on the Control Display for a few seconds 3 Start to drive The initialization finishes dur ing driving without feedback Using iDrive for explanation of principle refer to page 16 1 Press the button This opens the start menu 2 Press ...

Page 80: ...e head and side airbags help provide protection in the event of side impact The relevant side air bag supports the side upper body area The head air bag supports the head The airbags are deliberately not triggered in every impact situation e g less severe acci dents or rear end collisions Do not apply adhesive materials to the cover panels of the airbags cover them or modify them in any other way ...

Page 81: ...ases change the seat position so that the front passenger airbags are activated and the indicator lamp goes out If the desired status cannot be produced by changing the seat position transport the corresponding per son on the rear seat Do not fit seat covers seat cushion padding ball mats or other items onto the front passenger seat unless they are specif ically recommended by BMW Do not lay objec...

Page 82: ...n an accident despite an impact of corresponding intensity Head Up Display The concept With the Head Up Display important informa tion is projected into the driver s field of view e g navigation instructions This enables you to take in this information without looking away from the road Switching on off With the engine running or the ignition switched on Press the button to activate or deactivate ...

Page 83: ...2 Stored desired speed of cruise control 3 Speed M view 1 Current engine speed highlighted 2 Advance warning field of tachometer 3 Red warning field of tachometer also refer to Tachometer on page 62 4 Speed 5 Gear display For information on the shift lights in the tachometer refer to page 58 Setting brightness The brightness of the display is automatically adapted to the ambient lighting condition...

Page 84: ...d at a BMW center Special windshield The windshield is part of the system The shape of the windshield complies with the require ments of the Head Up Display to enable a pre cise display A film in the windshield prevents the double images from being displayed Windshield replacement should be carried out by a BMW center or a workshop that works according to BMW repair procedures with cor respondingl...

Page 85: ...D next to the symbol is illuminated when the low beams are on When driving into a tunnel with bright overhead lighting switching on of the lights may be delayed A blue sky with the sun low on the horizon can cause the lights to be switched on If desired the light switch can be left in the position 3 The exterior lighting is automatically switched off after switching off the vehicle The automatic h...

Page 86: ...to the symbol for automatic head lamp control flashes Adaptive Head Light is malfunctioning or has failed Have the system checked as soon as possible High beams roadside parking lamps 1 High beams 2 Headlamp flasher 3 Roadside parking lamps Roadside parking lamps left or right You also enjoy the option of lighting up just one side of your vehicle when parking When using this function comply with n...

Page 87: ... manner The system is deactivated in the process and you must switch to the low beams manually To reactivate the system briefly press the turn signal lever in the high beam direction again You use the headlamp flasher as usual with low beams System limits The high beam assistant cannot replace personal decisions on the benefits of using the high beams In situations which require this you should th...

Page 88: ...efore the doors To protect the battery all lamps in the vehicle are switched off approx 15 min utes after radio readiness is switched off refer to Start Stop button on page 53 Switching interior lamps on and off manually Press the button If you want the interior lamps to remain off con tinuously maintain pressure on the button for approx 3 seconds Reading lamps Reading lamps are located in the fro...

Page 89: ...t 5 Maximum cooling 6 Defrosting windows and removing condensation 7 Air volume manual 8 Switching off automatic climate control 9 Switching cooling function on and off manually 10 Temperature right side of passenger compartment 11 Residual heat mode 12 AUTO program 13 AUC Automatic recirculated air control recirculated air mode 14 LED for parked car ventilation 15 Rear window defroster 16 Air gri...

Page 90: ...at window condensation is prevented as much as possible Intensity of AUTO program To meet your individual needs you can weaken or strengthen the intensity of the automatic cli mate control iDrive for explanation of principle refer to page 16 1 Press the button This opens the start menu 2 Move the controller to the left to open Cli mate 3 Select Automatic programs and press the controller 4 Select ...

Page 91: ...lect the desired field by moving the con troller 6 Turn the controller to adjust the air distribu tion Driver s side 1 Airflow directed toward the windshield and side windows 2 Airflow for the upper body 3 Air to footwell Front passenger side 4 Airflow for the upper body 5 Air to footwell Pressing the AUTO button cancels the air distribution settings on the Control Dis play and vice versa Switchin...

Page 92: ... The heat stored in the engine is used to heat the passenger com partment e g while stopped at a school to pick up a child The function can be switched on when the fol lowing conditions are met up to 15 minutes after switching off the engine with engine at operating temperature with sufficient battery voltage at an outside temperature below 777 256 The LED lights up when the function is switched o...

Page 93: ...tched on and off directly It remains switched on for 30 minutes Since the system uses a substantial amount of electrical current you should refrain from acti vating it twice in succession without allowing the battery to be recharged in normal operation between use The air emerges through the upper body region vent outlets in the instrument panel These vent outlets must be open for the system to op...

Page 94: ...stment the time is stored Activating activation time Move the controller to the left or right to select Timer 1 or Timer 2 and press the controller The activation time is activated The symbol on the display of the automatic climate control lights up The symbol on the display of the automatic climate control flashes when the parked car ventilation has switched on The parked car ventilation is only ...

Page 95: ... this symbol on the packaging or in the manual supplied with the orig inal hand held transmitter it is safe to assume that it is compatible with the integrated universal remote control If you have additional questions please contact your BMW center or call 1 800 355 3515 Information is also provided on the Internet at www bmwusa com or www homelink com HomeLink is a registered trademark of Johnson...

Page 96: ...ilities for synchroniza tion When programming hand held transmitters that employ an alternating code please observe the following supplementary instructions Programming will be easier with the aid of a second person 1 Park your vehicle within the range of the remote controlled device 2 Program the integrated universal remote control as described above in the section Fixed code hand held transmitte...

Page 97: ...argeable flashlight The flashlight is located on the left side of the glove compartment The flashlight can remain plugged in continu ously Pull the flashlight out of the socket when needed To avoid possibly damaging the lamp always ensure that it is switched off before inserting it in the socket Front center armrest The compartment is the center armrest is divided into two sections Opening cover P...

Page 98: ...re are other storage compartments in the doors as well as in the front and rear center con sole Storage nets are located on the backrests of the front seats and a net is provided in the front passenger footwell Do not stow hard or sharp edged objects in the storage nets or the net otherwise there is an increased risk of injury in an acci dent Clothes hooks Clothes hooks are located near the grab h...

Page 99: ...e along the remote control when you leave the vehicle otherwise children could for example use the lighter and burn themselves Ashtray rear Emptying Press the entire cover down The ashtray rises and can be removed Cigarette lighter rear Refer to Cigarette lighter front Connecting electrical devices Sockets With the engine running or the ignition switched on the cigarette lighter socket can be used...

Page 100: ... lighter In luggage compartment Access to socket Fold open the cover Center armrest rear Storage tray Pull the cover upward arrow 1 Access to cup holders Press the button 2 and open the cover Through loading system Opening 1 Open the buckle of the center safety belt in the rear and insert the latch plate at the end of the belt into the fixture on the rear win dow shelf 2 Push the corresponding hea...

Page 101: ...th a way to attach luggage com partment nets or flexible straps for securing suitcases and luggage refer to page 108 Ski bag Designed for safe clean transport of up to 4 pairs of standard skis or up to 2 snowboards With the ski bag you can stow skis with a length of up to 6 9 ft 2 10 m When skis of 6 9 ft 2 10 m in length are loaded the ski bag will tend to con tract reducing its overall capacity ...

Page 102: ... or evasive maneuvers To store the ski bag perform the above steps in reverse order Removing ski bag The ski bag can be completely removed e g for faster drying or to allow you to put it to other uses 1 Pull the handle forward and pull the ski bag up and out 2 Close the cover in the luggage compart ment Your BMW center will be glad to provide you with more detailed information on the various items...

Page 103: ...Controls 101 Reference At a glance Driving tips Communications Navigation Entertainment Mobility Online Edition for Part No 01 41 0 012 213 02 06 BMW AG ...

Page 104: ...Online Edition for Part No 01 41 0 012 213 02 06 BMW AG ...

Page 105: ...his section is designed to provide you with extra support by supplying information useful in dealing with specific driving and operating conditions Driving tips Online Edition for Part No 01 41 0 012 213 02 06 BMW AG ...

Page 106: ... drive reservedly during the first 200 miles 300 km Brake system Brakes require an initial break in period of approx 300 miles 500 km to achieve optimized contact and wear patterns between brake pads and rotors Drive in a reserved manner during this break in period Clutch The function of the clutch is only at its opti mized level after a distance driven of approx 300 miles 500 km Following part re...

Page 107: ... hydroplaning increases as the tread depth of the tires decreases refer also to Mini mum tire tread on page 178 Driving through water Do not drive through water on the road if it is deeper than 1 ft 30 cm and then only at walking speed at the most Otherwise the vehi cle s engine the electrical systems and the transmission may be damaged Starting off On slopes The starting assistant enables startin...

Page 108: ... floor mats carpets or any other objects to protrude into the area of movement of the pedals and impair their operation Corrosion on brake rotors When the vehicle is driven only occasionally during extended periods when the vehicle is not used at all and in operating conditions where brake applications are less frequent there is an increased tendency for corrosion to form on rotors while contamina...

Page 109: ...s 1 400 lbs minus 750 lbs 650 lbs 5 Determine the combined weight of luggage and cargo being loaded on the vehicle That weight may not safely exceed the available cargo and luggage load capacity calculated in step 4 6 If your vehicle will be towing a trailer part of the load from your trailer will be transferred to your vehicle Consult the manual for transporting a trailer to determine how this ma...

Page 110: ...y around and pose a safety hazard to the vehicle s occupants during abrupt braking or evasive maneuvers Roof mounted luggage rack A special rack system is available as an option for your BMW Please comply with the precau tions included with the installation instructions Mounting points The mounting points are located in the door openings Loading roof mounted luggage rack Because roof racks raise t...

Page 111: ...Driving tips 109 Reference At a glance Controls Communications Navigation Entertainment Mobility Online Edition for Part No 01 41 0 012 213 02 06 BMW AG ...

Page 112: ...Online Edition for Part No 01 41 0 012 213 02 06 BMW AG ...

Page 113: ...his chapter describes how you can enter destinations and specify your route so that your navigation system guides you reliably to your destination Navigation Online Edition for Part No 01 41 0 012 213 02 06 BMW AG ...

Page 114: ...tem to scan the data from the DVD Removing navigation DVD 1 Press button 1 The DVD emerges slightly from the drive 2 Remove the DVD If the DVD is not ejected from the drive it is pos sible that it is blocked A message appears on the Control Display Display in assistance window You can display the route or the current position in the assistance window This display remains visible even if you change...

Page 115: ...regulations in the event of any contradiction between traffic and road condi tions and the instructions issued by the naviga tion system If you do not observe this precau tion you may be in violation of the law and can endanger vehicle occupants and other road users iDrive for explanation of principle refer to page 16 1 Press the button This opens the start menu 2 Move the controller to the right ...

Page 116: ...of destination and press the controller In order to be able to start the destination guid ance at least the town city of the destination or its zip code must be entered Entering destination via town city name 1 Select Town City or the displayed town city and press the controller 2 Select the starting letter and press control ler A list of all towns cities starting with this let ter appears on the ...

Page 117: ... and press the controller Delete all numbers or letters Move the controller toward the right to select and hold the controller down 3 Select the zip code and press the controller The corresponding destination is displayed 4 Change into the third field from the top Turn the controller until the destination is selected and press the controller Entering street house number and intersection After the ...

Page 118: ...into the third field from the top Turn the controller until the house number is selected and press the controller Starting destination guidance with manual destination entry Select Start guidance and press the con troller Destination guidance starts immediately If the destination guidance does not need to be started immediately Select Add to destination list and press the controller The destinatio...

Page 119: ...idance starts immediately Saving destination The destination is added to the destination list or can be saved in the address book Map guided destination selection If you only know the location of the town or street of the destination then you can input the destination by using a map You can use the cursor to select the destination on the map and then adopt it into the destination guidance 1 Select...

Page 120: ...re displayed 6 Select the desired menu item Start route guidance starts destination guidance Show current position places the cur rent position in the center of the map Show destination position places the current destination in the center of the map Return to map changes back to the Input map Exit the menu 7 Press the controller The map for the destination entry can also be displayed in the map d...

Page 121: ...ss the controller Destination list The last 20 entered destinations are shown in the destination list You can display these desti nations and apply them in the destination guid ance system For example to plan a longer route you can store all destinations you want to drive to in advance in the destination list refer to Entering a destination manually on page 113 Select Navigation and press the cont...

Page 122: ...can store approx 100 destinations in the address book 1 Select Address book and press the con troller 2 Select New address and press the con troller 3 Select Enter address and press the con troller 4 Enter name and address 5 Select Store in address book and press the controller The entry is stored in the address book You can also save a destination from the desti nation list into the address book ...

Page 123: ...idance Select Start guidance and press the control ler Changing destinations from address book 1 Select Address book and press the con troller 2 Select the entry and press the controller 3 Select Edit address and press the con troller 4 Change entry For operation refer to Entering a destina tion manually page 113 Deleting individual destinations from address book 1 Select Address book and press th...

Page 124: ...elect Home address and press the con troller 2 Select Edit address and press the con troller For operation refer to Entering a destination manually page 113 Selecting route You can influence the calculated route by choosing certain route criteria You can change the route criteria as often as you like while entering the destination and whenever the des tination guidance is active The route is plann...

Page 125: ...oute criterion and press the controller 2 Select a route criterion and press the con troller Word matching principle The system supports the word matching princi ple to make it easier for you to enter the names of streets or towns The system runs ongoing checks comparing your destination entries with the data stored on the navigation DVD as the basis for instant response The user bene fits include...

Page 126: ...p dis play on the Control Display The destination guidance can also be started in the arrow or map display Select the symbol and press the controller During destination guidance you can operate other equipment using the iDrive at any time You will be punctually notified of a change of direction by spoken instructions and the display of the direction arrow Terminating continuing destination guidanc...

Page 127: ...e controller until Arrow display is selected and press the controller The arrow display is shown 1 Switching voice instructions on off 2 Selecting route criteria 3 Starting ending destination guidance 4 Arrow to destination from a bird s eye view 5 Distance to the next change of direction 6 Current position 7 Direction of travel Outline arrow Destination guidance on the calculated route Solid arro...

Page 128: ...rspective 6 Changing route criteria 7 Arrow to destination from a bird s eye view The estimated time of arrival and the distance to the destination are shown in the bottom line of the Control Display To exit the menu Select the arrow and press the controller At scales of less than 250 miles 500 km you have the option of deciding whether to orient the map to north toward your current direction of t...

Page 129: ... menu 2 Press the controller to open the menu 3 Turn the controller until Display settings is selected and press the controller 4 Change to upper field if necessary Turn the controller until Languages is selected and press the controller 5 Select Navigation voice instructions on and press the controller The voice instructions are switched on The setting is stored for the remote control cur rently ...

Page 130: ...elected and press the controller 3 Turn the controller to enter the desired number and press the controller The route is recalculated To exit from the menu without changing the route Select the arrow and press the controller Displaying current position You can have your current position displayed even when the destination guidance is switched off 1 Select Navigation and press the control ler 2 Cha...

Page 131: ... name On the navigation DVD no downtown area can be determined for the city or town entered Enter any street or a destination such as the railway station in the selected town and then start the destination guid ance you want to enter a destination for the des tination guidance but it is not possible to select the letters for your desired entry The data of the destination is not stored on the navig...

Page 132: ...Online Edition for Part No 01 41 0 012 213 02 06 BMW AG ...

Page 133: ...Entertainment Operation of the radio and CD as well as their tone settings are described in this chapter Entertainment Online Edition for Part No 01 41 0 012 213 02 06 BMW AG ...

Page 134: ... track is played Turn adjust volume 2 Drive for audio CDs 3 Eject CD 4 Station scan track search Change radio station Select track for CD player and CD changer 5 Drive for navigation DVDs Operation via iDrive iDrive for explanation of principle refer to page 16 1 Press the button This opens the start menu 2 Move the controller backwards to open Entertainment You have the following choices FM and A...

Page 135: ... player until the desired volume is set You can also adjust the volume with buttons on the steering wheel refer to page 11 The setting is stored for the remote control cur rently in use Tone control You can alter various tone settings e g treble and bass or the speed dependent volume increase The tone settings are set for all audio sources at once The settings are stored for the remote key cur ren...

Page 136: ...stages for the increase in volume 1 Select Speed volume and press the con troller 2 Turn the controller The adjustment is applied the field can be changed Professional LOGIC7 HiFi System You can select a spatial sound effect that improves the spatial acoustics in all frequency ranges 1 Select Surround Settings and press the controller 2 Select Concert hall or Theater 3 Press the controller LOGIC7 ...

Page 137: ...ight to select the desired frequency range 3 Turn the controller until the desired setting is selected Resetting tone settings You can reset all tone settings to the default settings 1 Open the start menu 2 Press the controller to open the menu 3 Select Entertainment settings and press the controller 4 Select Audio and press the controller 5 Select Reset and press the controller Online Edition for...

Page 138: ...o longer be received to update the station with the stron gest signal refer to page 137 Changing stations Turn the controller In addition to the stations currently displayed you can have stations with another selection criterion displayed Professional radio You can choose from the following selection criteria All stations Stations that can currently be received in the FM waveband Autostore The sta...

Page 139: ...mpling 1 Press the controller 2 Select Scan and press the controller This cancels sampling of the stations and the radio remains on the current station Buttons next to CD player To sample the stations press and hold the button for the corresponding direction To stop scanning press the button again Selecting frequency manually With Manual you can select stations that are received in addition to tho...

Page 140: ...Turn the controller until the desired selec tion criterion is selected and press the con troller 3 Select the desired frequency or station Set is selected 4 Press the controller Other menu items are displayed 5 Select Store and press the controller Presets is displayed 6 Turn the controller until the desired mem ory position is selected 7 Press the controller The station is stored The channels of ...

Page 141: ...s are displayed Switching RDS on off 1 Select FM or AM and press the control ler Set is selected 2 Press the controller Other menu items are displayed 3 Select RDS and press the controller RDS is activated Automatically sorting stations For the All stations selection criterion you can set whether the most frequently used sta tions are displayed at the beginning 1 Select All stations and press the ...

Page 142: ...on iDrive for explanation of principle refer to page 16 1 Press the button This opens the start menu 2 Press the controller to open the menu 3 Select Entertainment settings and press the controller 4 Select HD radio and press the controller 5 Select Off and press the controller The reception of digital stations is deac tivated This symbol is displayed when a sender is being received digitally With...

Page 143: ...ted This can take up to 2 min utes Displaying additional information With the digital stations additional information on the current track is displayed e g the name of the artist 1 Select a station and press the controller 2 Select Details and press the controller The information is displayed If a digital station is received again when the station is changed the additional information will be disp...

Page 144: ... serial number ESN are displayed The electronic serial number is required for enabling or disabling 2 To enable the channels Dial the phone number Disabling 1 Select an enabled channel and press the controller 2 Select ESN and press the controller The electronic serial number ESN is dis played The electronic serial number is required for disabling 3 To disable the channels Dial the phone number Se...

Page 145: ...ress the controller The channels of this category are displayed 5 Select a channel marked with this sym bol 6 Press the controller Other menu items are displayed 7 Select Play and press the controller Additional information The name of the channel and additional infor mation on the current track are displayed e g the name of the artist 1 Artist 2 Track Storing channel 1 Select desired channel 2 Pr...

Page 146: ...el Notes If no signal can be received for more than 4 sec onds a message is displayed on the Control Display Reception may not be possible for certain reasons e g environmental influences or topographical conditions The satellite radio has no influence on this The signal may not be available in tunnels or underground garages next to tall buildings near trees mountains or other sources of radio int...

Page 147: ...ation of principle refer to page 16 1 Press the button This opens the start menu 2 Move the controller backwards to open Entertainment 3 Change to upper field if necessary Turn the controller until CD is selected and press the controller 4 On vehicles with a CD changer change to the second field from the top and turn the controller until CD is selected and press the controller The CD player is sta...

Page 148: ...o CD player Press the button for the corresponding direction repeatedly until you reach the desired track The CD will start play at the start of the track The track is displayed on the Control Display You can also change the track with buttons on the steering wheel refer to page 11 Via iDrive Select a track by turning the controller Compressed audio files 1 Select the directory if necessary and pr...

Page 149: ...s on the current CD 1 Select Set and press the controller Other menu items are displayed 2 Select Scan and press the controller To end sampling 1 Press the controller 2 Select Scan and press the controller This cancels sampling of the tracks and the player remains on the current track Compressed audio files 1 Select the current track and press the con troller 2 Select the desired menu item To samp...

Page 150: ...track or Repeat directory and press the controller Random play sequence In this mode the tracks on the current CD are played once in a random sequence 1 Select Set and press the controller Other menu items are displayed 2 Select Random and press the controller To stop random function 1 Press the controller 2 Select Random and press the controller Compressed audio files 1 Select the current track a...

Page 151: ...st 2 seconds before pushing in the magazine again so that the inserted CDs can be read in again Inserting removing CDs into from CD magazine When inserting or removing CDs remember to hold them by their edges taking care to avoid touching the data side with its reflective CD memory surface Inserting CDs Insert one CD into each compartment of the magazine with the labeled side up Removing CDs Pull ...

Page 152: ...gh levels of humidity can lead to condensa tion on the CD DVD or the laser s scan lens and temporarily prevent playback Malfunctions with individual CDs DVDs If malfunctions only occur with individual CDs DVDs one of the following factors may be the cause Self recorded CDs DVDs Possible reasons for malfunctions with self recorded CDs DVDs are e g inconsistent data creation or recording processes o...

Page 153: ...le cap 2 Connection for audio playback Jacks ε in 3 5 mm For audio playback via the vehicle loudspeak ers connect the headphone or Line Out con nection of the device to the connection 2 Starting audio playback The audio device must be switched on iDrive for explanation of principle refer to page 16 1 Press the button This opens the start menu 2 Move the controller backwards to open Entertainment 3...

Page 154: ...Online Edition for Part No 01 41 0 012 213 02 06 BMW AG ...

Page 155: ...ications This chapter summarizes how to operate your mobile phone using iDrive or voice control and how to use BMW Assist or TeleService Communications Online Edition for Part No 01 41 0 012 213 02 06 BMW AG ...

Page 156: ...ansmission will be dissipated from the vehicle interior Avoid operating a mobile phone detected by the vehicle with the keypad of the mobile phone otherwise malfunctions can occur For your safety A car phone makes life more convenient in many ways and can even save lives in an emer gency While you should consult your mobile phone s separate operating instructions for a detailed description of safe...

Page 157: ...he mobile phone preset tings on the mobile phone are necessary e g via the menu item Bluetooth activated or the menu item Connection not with con firmation For logging on specify any desired number as the Bluetooth passkey e g 1 This Blue tooth passkey is no longer required follow ing successful logon The ignition is switched on Only log on the mobile phone with the vehicle stopped otherwise the p...

Page 158: ...ne running or the ignition switched on As soon as a mobile phone is detected by the vehicle the phone book entries stored on the SIM card or on your mobile phone are trans ferred to your vehicle refer to the operating instructions of your mobile phone if necessary This transfer is dependent on your mobile phone refer to the operating instructions of your mobile phone if necessary and can take seve...

Page 159: ...one and press the controller 7 Select Delete device and press the con troller The logged off mobile phone is deleted from the list The phone book entries you have trans ferred from your mobile phone to your vehi cle are also deleted in the process Activating deactivating Bluetooth link Bluetooth technology is not approved in all countries Observe the applicable local regulations Temporarily discon...

Page 160: ...iDrive You can operate the following functions via iDrive Dial phone numbers Dial phone numbers from the phone book Dial stored phone numbers e g from the list of accepted calls Hang up With the ignition switched off and radio readi ness e g after removing the remote control you can continue an ongoing call for a maximum of 25 minutes via the handsfree system Requirements The logon data of the mob...

Page 161: ...d phone number The letters correspond to the digits on the keypad of the mobile phone To delete an incorrect character Move the controller toward the right to select and press the controller 4 Select Dial number and press the control ler Ending a call 1 Select the phone number and press the controller 2 Select End call and press the controller Dialing a phone number from phone book or a phone numb...

Page 162: ...he Control Display 1 Select Phone and press the controller 2 Select A Z and press the controller 3 To limit the number of displayed entries select the first letter of the desired entry and press the controller 4 Select the desired entry and press the con troller 5 Select Call and press the controller The system dials the number If different phone numbers are stored in the mobile phone under one na...

Page 163: ...3 Select Yes and press the controller The list is deleted BMW Contact If you are not activated for BMW Assist you can display several service phone numbers Roadside Assistance of the BMW Group when you require breakdown assistance BMW center e g when you want to make an appointment for service BMW Hotline for information on all aspects of your vehicle If BMW Assist is activated refer to page 168 Y...

Page 164: ...controller 3 Select Keypad and press the controller 4 Select the desired character and press the controller Each character is sent immediately and confirmed by a tone depending the mobile phone model Changing between mobile phone and hands free system From mobile phone to handsfree system You can continue calls begun outside the Blue tooth range of the vehicle via the handsfree sys tem when the mo...

Page 165: ...ive apply refer to page 158 Symbols in Owner s Manual Voice commands Activating system 1 Press the button on the steering wheel An acoustic signal indicates that you can say commands 2 Say the command The text or numbers that the voice com mand system has registered will appear on the Control Display Ending canceling operation by voice Press the button on the steering wheel or In dialogs where tex...

Page 166: ...ok Operating by voice command requires a per sonal voice phone book On vehicles with combined drives for audio CDs and navigation DVDs the entries are automatically adopted from your mobile phone s memory On vehicles with a single drive the entries must be entered by voice and are indepen dent of your mobile phone s memory In this case it is not possible to use voice com mand either to call phone ...

Page 167: ...r voice commands keep the following in mind Issue the commands smoothly and at nor mal volume avoiding excessive emphasis and pauses Keep the doors windows and glass sunroof closed to prevent interference from ambi ent noise Avoid making other noise in the vehicle while speaking 1 Save name The dialog for storing a name is opened 2 Speak name and repeat entry upon request The spoken length of the ...

Page 168: ...rom the mobile phone s antenna connector if necessary so that the mobile phone can engage in the snap in adapter 2 Push the mobile phone with the keys facing upward toward the electrical connections and press down until it engages The mobile phone s battery is charged from radio readiness or with the steering unlocked To protect the vehicle s batteries avoid using the phone when the ignition is sw...

Page 169: ...rom country to country The contract of participation with BMW Assist and the activation must be completed before you can use BMW Assist When the contract expires the car phone can be deactivated by a BMW center without having to visit a BMW center Following deactivation of the car phone no emergency calls can be made The car phone can be reactivated after signing a new contract with a BMW center Y...

Page 170: ...ry specific Voice contact is established or data are transferred depending on the equipment and the country In some countries it is possible to do both The data transferred can be the vehicle data your current position or the data of the CBS Condition Based Service Automatic service notification The data on the service status of your vehicle or on legally mandated inspections is transmitted automa...

Page 171: ...ice and press the con troller Contact to Roadside Assistance will be estab lished Setting up contact to your BMW center or BMW Customer Relations You can contact your BMW center e g to arrange a service appointment For information related to your vehicle call the BMW Customer Relations This requires your mobile phone to be logged on in the vehicle iDrive for explanation of principle refer to page ...

Page 172: ...W Service settings and press the controller 5 Select Service Status and press the con troller 6 Select Options and press the controller 7 Select Terminate services and press the controller The use of TeleService or BMW Assist is blocked and the current vehicle position will not be transferred during an emergency call To deactivate the blocking function enabling must be carried out again refer to p...

Page 173: ...171 Entertainment Reference At a glance Controls Driving tips Communications Navigation Mobility Online Edition for Part No 01 41 0 012 213 02 06 BMW AG ...

Page 174: ...Online Edition for Part No 01 41 0 012 213 02 06 BMW AG ...

Page 175: ... maintain your mobility by supplying important information on vital topics including fuels and lubricants wheels and tires service maintenance and breakdown assistance Mobility Online Edition for Part No 01 41 0 012 213 02 06 BMW AG ...

Page 176: ...g fuels always observe any safety guidelines posted at the service station Place the fuel filler cap in the bracket attached to the fuel filler door When refueling insert the filler nozzle com pletely into the filler pipe Avoid raising the filler nozzle during refueling as otherwise this leads to premature pump shutoff a reduced efficiency of the fuel vapor recovery system The fuel tank is full wh...

Page 177: ...tes and Canada Fuels contain ing up to and including 10 ethanol or other oxygenates with up to 2 8 oxygen by weight that is 15 MTBE or 3 methanol plus an equivalent amount of co solvent will not void the applicable warranties with respect to defects in materials or workmanship The use of poor quality fuels may result in drivability starting and stalling problems especially under certain environmen...

Page 178: ...onitor refer to page 77 Pressure specifications The tables below provide all the correct inflation pressures for the specified tire sizes at ambient temperature The inflation pressures apply to the tire sizes and tire brands respectively approved and recommended by BMW a list of these is available from your BMW center For correct identification of the right tire infla tion pressure for your tires ...

Page 179: ... years This also concerns the tire of the spare wheel Uniform Tire Quality Grading Quality grades can be found where applicable on the tire sidewall between tread shoulder and maximum section width For example Tread wear 200 Traction AA Temperature A Tire size Pressure specifications in psi kPa Traveling speeds up to max of 100 mph 160 km h Traveling speeds including those exceeding 100 mph 160 km...

Page 180: ...er controlled conditions on a specified indoor laboratory test wheel Sustained high temperature can cause the material of the tire to degenerate and reduce tire life and excessive temperature can lead to sudden tire failure The grade C corresponds to a level of performance which all passenger car tires must meet under the Federal Motor Vehi cle Safety Standard No 109 Grades B and A represent highe...

Page 181: ...y trained personnel If this work is not carried out properly there is a dan ger of subsequent damage and related safety hazards Make sure that the new wheels are bal anced Retreaded tires BMW does not recommend that you use retreaded tires as driving safety may be impaired The causes for this include the possi bly different tire casing structures and the often wide variations in their age which ca...

Page 182: ...not carry out initialization the system will automatically learn the changed state grad ually during driving This may be noticeable from the clutch opening and closing briefly Storage Always store wheels and tires in a cool dry place with as little exposure to light as possible Always protect tires against all contact with oil grease and fuels Do not exceed the maximum tire inflation pressure indi...

Page 183: ...ly trained personnel If this work is not carried out properly there is a danger of subsequent damage and related safety haz ards Hood Releasing Pull lever Opening Press the release handle and open the hood You cannot start off with the hood open Closing Close the hood from a height of approx 16 in 40 cm with momentum It must be clearly heard to engage Make sure that the closing path of the hood is...

Page 184: ... and windshield cleaning systems refer to page 60 Engine oil The engine oil consumption is dependent on driving style and driving conditions Checking engine oil level Your vehicle is equipped with an electronic oil level check You can display the oil level in the instrument cluster 1 Oil level 2 Maximum marking 3 Minimum marking Press the BC button in the turn signal lever repeatedly until the oil...

Page 185: ... oil level display is shown in the instrument cluster 4 Press the BC button in the turn signal lever for at least 2 seconds The oil level is determined A clock symbol is displayed during the measurement 5 After approx 1 minute the current oil level is displayed If not all measuring conditions are met e g with the engine cold is dis played The requested measurement is carried out as soon as possibl...

Page 186: ...y is a measure of an oil s flow rating and is specified in SAE grades Approved oils belong to the SAE grade 10W 60 Alternative oil types If BMW High Performance Synthetic Oil is unavailable you can add small quantities of other synthetic oils between oil changes Only use oils with the following specifications Viscosity preferred SAE 10W 60 alternative SAE 10W 40 SAE 5W 50 or SAE 10W 50 Specificati...

Page 187: ...rake pedal travel may be noticeable Have the system thoroughly checked Display of the previously described malfunction on Canadian models When you continue driving an increased brake pedal path can be necessary and significantly longer braking distances might be required Please adapt your driving style accordingly Brake pads The warning lamp lights red up in spite of the handbrake being released a...

Page 188: ... Legally mandated inspections depending on local regulations Service data in remote control Your vehicle stores the information required maintenance continuously in the remote con trol during driving After accessing the data stored in the remote control your BMW Service Advisor can suggest precisely the right array of service procedures for your own individual vehi cle You should therefore hand ov...

Page 189: ... to the nearest BMW center as soon as possible Heavy engine misfiring led to serious damage to the emission relevant components espe cially the catalytic converter within a short time If the fuel filler cap is not properly tight ened the OBD system can close when fuel vapor escapes Then a display light up If the cap is then tightened the display will go out within a few days Event Data Recorders Y...

Page 190: ...d to prevent short circuits from occur ring To avoid possible injury or equipment damage when replacing bulbs observe any instructions provided by the bulb manufac turer For care and maintenance of the headlamps please follow the instructions in the separate Caring for your vehicle brochure For bulbs for which changing is not described and for checking and adjusting headlamp aim please contact you...

Page 191: ...to the left and remove 3 Remove the bulb for replacement Side marker lamps front and rear To replace please go to your BMW center or a workshop that works according to BMW repair procedures with correspondingly trained per sonnel Tail lamps Turn signals bulb 21 watts PY 21 W Backup lamps bulb 16 watts W 16 W Other lamps bulb 21 watts P 21 W 1 Turn signal 2 Tail lamp and brake lamp 3 Tail lamp and ...

Page 192: ...ground Switch on the hazard warning flashers Lock the steering wheel in straight ahead set ting of the wheels Set the handbrake and engage the first or reverse gear Have all vehicle occupants get out of the vehicle and ensure that they remain outside the immediate area in a safe place such as behind a guardrail If a warning triangle or portable hazard warning lamp is required set it up on the road...

Page 193: ...ble for lighter socket 4 Mounting for sealing bottle 5 Compressor 6 On Off switch 7 Pressure gauge for indicating tire inflation pressure 8 Button for reducing tire inflation pressure 9 Connecting hose for connecting compres sor and sealant bottle or compressor and wheel Connector cable and connecting hose are stored on underside of compressor Using M Mobility System To repair a flat tire with the...

Page 194: ...To check cur rently set inflation pressure briefly switch off device Do not allow compressor to run longer than 10 minutes otherwise the device will overheat and may be dam aged Reduce inflation pressure press button 8 or turn screw 8 on pressure gauge If the inflation pressure is not held drive the vehicle again refer to Distributing sealant Then repeat steps 1 to 4 once Using the M Mobility Syst...

Page 195: ... is supported by the jack What you will need To avoid rattling noises later on note the posi tions of the tools before removing them then return them to their initial positions after com pleting work 1 Chock 2 Vehicle jack 3 Lug wrench The tools are located in the hollow of the spare wheel Spare wheel 1 Pull back lock 1 fold open clamp lock 2 completely and loosen the belt 3 2 Remove the cover 4 3...

Page 196: ...ire inflation pressure at the earliest opportunity Protect valve stems and valve stem seal caps against dirt and contamina tion Dirt in valve stems is a frequent source of gradual air loss 3 Initialize the Flat Tire Monitor refer to page 77 and the Sequential Manual Trans mission refer to After changing wheels tires on page 180 4 Replace the damaged tire as soon as possi ble and have the new wheel...

Page 197: ... some equipment may be limited and require reinitialization Individual settings are also lost and must be updated Seat mirror and steering wheel memory The positions must be stored again refer to page 42 Time and Date The values must be updated refer to page 71 Radio Stations must be stored again if necessary refer to page 138 Navigation system Wait until the system starts refer to page 129 Fuses ...

Page 198: ...W Assist response center has been established the LED flashes If conditions allow remain in the vehicle until the connection has been established You will then be able to provide a detailed description of the situation If the current position of your vehicle can be determined it will be forwarded to the BMW Assist response center If the LED flashes but you are unable to hear the BMW Assist respons...

Page 199: ...inst possible personal injuries Preparation 1 Check whether the battery of the other vehicle has a voltage of 12 Volts and approximately the same capacitance in Ah This information can be found on the bat tery 2 Switch off the engine of the assisting vehi cle 3 Switch off any electrical systems and com ponents in both vehicles There must not be any contact between the bodies of the two vehicles ot...

Page 200: ...Using tow fitting The screw on tow fitting must always be car ried in the vehicle It can be screwed in at the front or rear of the BMW M5 It is located in the toolkit in the luggage com partment lid refer to page 188 Use only the tow fitting provided with the vehicle and screw it all the way in Use the tow fitting for towing only on roads Avoid lateral loading of the tow fitting e g do not lift th...

Page 201: ... tow fittings as attachment to other vehicle parts can lead to damage With tow rope When starting off in the towing vehicle make sure that the tow rope is taut To avoid jerking and the associated stresses on vehicle components when towing always use nylon ropes or nylon straps Only attach tow ropes to the tow fittings as attachment to other vehicle parts can lead to damage With tow truck Have the ...

Page 202: ...Online Edition for Part No 01 41 0 012 213 02 06 BMW AG ...

Page 203: ...ns the technical data the short commands of the voice command system and the index that will direct you as quickly as possible to the information you are looking for Reference Online Edition for Part No 01 41 0 012 213 02 06 BMW AG ...

Page 204: ...ta Engine data M5 Displacement cu in cmµ 305 1 4 999 No of cylinders 10 Maximum output hp 500 at engine speed rpm 7 750 Maximum torque lb ft Nm 383 520 at engine speed rpm 6 100 Online Edition for Part No 01 41 0 012 213 02 06 BMW AG ...

Page 205: ...lance Controls Driving tips Communications Navigation Entertainment Mobility Dimensions All dimensions given in inches mm Smallest turning circle diam 40 7 ft 12 4 m Online Edition for Part No 01 41 0 012 213 02 06 BMW AG ...

Page 206: ...090 Approved rear axle load lbs kg 2 800 1 270 Approved roof load capacity lbs kg 220 100 Luggage compartment capacity cu ft l 17 7 500 Notes Fuel tank gal liters approx 18 5 70 Fuel grade page 175 of that reserve gal liters approx 4 15 Window and headlamp washer system US quarts liters approx 5 3 5 For more details page 59 Engine with oil filter change US quarts liters 9 8 9 25 Oil grades page 18...

Page 207: ...stance window perspective Assistance window current position Assistance window trip computer or Assistance window onboard info To change scale in assistance window 126 Assistance window scale feet or Assistance window scale miles Function Command To open phone 155 Phone To dial phone number 159 Dial number To display phone book 159 A to Z To select from the phone book 159 Call or Dial name To disp...

Page 208: ...splay To display map display 126 Map Map facing north Map direction of travel or Perspective To change scale 126 Scale miles or Scale feet To display roads or towns cities along route 126 Route list To switch on voice instructions 127 Navigation info on To switch off voice instructions 127 Navigation info off To repeat voice instructions 127 Repeat navigation info To open route 122 126 Route To op...

Page 209: ... radio stations 137 AM Autostore To open WB 140 Weatherband menu To switch on weatherband 140 Weatherband on To select a weatherband station 140 Choose weatherband station To open SAT 142 SAT radio menu To switch on satellite radio 142 SAT radio To open Presets of satellite radio 143 SAT radio presets To open All channels of satellite radio 142 SAT radio all channels To open Categories of satellit...

Page 210: ...ting To open Communication settings 167 Communication settings To open BMW Service settings 167 BMW Service settings To open BMW Service 169 BMW service To open Service requirements 66 168 Service requirements To open Service 66 168 Service To display Check Control messages 68 Check Control messages To open Display settings 70 Display settings To open Head Up Display 80 Head up display To activate...

Page 211: ...Reference 209 At a glance Controls Driving tips Communications Navigation Entertainment Mobility Online Edition for Part No 01 41 0 012 213 02 06 BMW AG ...

Page 212: ...ion 90 Air recirculation AUC Automatic recircu lated air control 90 recirculated air mode 90 Air recirculation on off 47 Air vents 87 refer to Ventilation 90 Air volume 89 AKI refer to Fuel quality 175 Alarm system 34 avoiding unintentional alarms 35 interior motion sensor 35 switching off alarm 35 switching off tilt alarm sensor and interior motion sensor 35 tilt alarm sensor 35 All channels 143 ...

Page 213: ...Average speed refer to Computer 63 Avoid ferries for navigation system 123 Avoid highways for navigation system 123 Avoiding freeways for navigation 122 Avoiding unintentional alarms 35 Avoid tollroads for navigation system 123 Axle loads refer to Weights 204 A Z 160 B Backrest contour refer to Lumbar support 41 Backrests refer to Seats 40 Backrest width 41 Back seats refer to Rear seats Backup la...

Page 214: ... for leather refer to Caring for your vehicle brochure Caring for light alloy wheels refer to Caring for your vehicle brochure Caring for the carpet refer to Caring for your vehicle brochure Caring for the vehicle finish refer to Caring for your vehicle brochure Car key refer to Keys remote control 28 Car phone 154 installation location refer to Center armrest 95 refer to Mobile phone 154 refer to...

Page 215: ...ion Based Service CBS 186 Confirmation 31 Connecting car vacuum cleaner refer to Connecting electrical devices 97 Consumption refer to Average fuel consumption 64 Consumption statistics refer to Average fuel consumption 64 Continue guidance to destination 125 Control Center refer to iDrive 16 Control Display refer to iDrive 16 setting brightness 72 Controller refer to iDrive 16 Controls refer to C...

Page 216: ...ield refer to Head Up Display 80 Disposal battery of remote control with comfort access 37 vehicle battery 195 Distance refer to Computer 64 Distance to dest 65 Distance to destination refer to Computer 64 Distance warning refer to PDC Park Distance Control 73 Divided rear seat back refer to Through loading system 98 Door entry lighting 86 Door key refer to Keys remote control 28 Door lock 32 Door...

Page 217: ...14 Entering zip code for navigation 115 Entertainment 132 Entertainment settings 133 140 Entertainment sound output on off 133 Entry map for destination 117 Equalizer refer to Tone control 135 Equalizer refer to Tone control 135 ESN 142 ESP Electronic Stability Program refer to DSC Dynamic Stability Control 74 Event Data Recorders 187 Exhaust system refer to Hot exhaust system 104 Exterior mirrors...

Page 218: ...r to Weights 204 Ground clearance 106 H Handbrake 55 indicator lamp 13 55 Hand lamp refer to Rechargeable flashlight 95 Hands free system refer to Microphone 14 Hazard warning flashers 15 HD refer to High Definition Radio 140 Head airbags 78 Headlamp control automatic 83 Headlamp flasher 59 Headlamps 83 care refer to Caring for your vehicle brochure cleaning refer to Wiper system 60 Head Light ref...

Page 219: ...r to Flat Tire Monitor 76 Information on another location 118 on current position 118 on destination location 118 Information for navigation system 118 Information on destination 120 Initializing 77 Initializing Flat Tire Monitor 77 radio refer to Storing stations 138 refer to Power failure 195 refer to Setting time and date 71 seat mirror and steering wheel memory 42 Input map 118 Installation lo...

Page 220: ...ing with remote control 31 opening from inside 33 opening from outside 33 opening with remote control 31 unlocking and locking from inside 32 Luggage rack refer to Roof mounted luggage rack 108 Lumbar support 41 LW waveband 136 M M Dynamic Mode MDM 75 indicator lamp 13 75 M Engine Dynamic Control 58 P 400 58 P 500 58 P 500 Sport 58 M Mobility System 190 M S tires refer to Winter tires 180 Maintena...

Page 221: ...y 113 destination guidance in assistance window 112 destination list 119 displaying current position 128 entering a destination manually 113 entering destination via voice 116 last destinations 119 opening 113 route display 125 route list 126 searching for a special destination 118 selecting destination using information 118 selecting destination via map 117 selecting route criteria 122 starting d...

Page 222: ... display on 74 PDC Park Distance Control 73 Personal Profile 29 Perspective 126 Phone 159 Phone book 158 Phone numbers deleting from phone book 161 dialing 159 most recent numbers 160 selecting in phone book 160 Top 8 160 Pinch protection system glass sunroof electric 39 power windows 38 Plasters refer to First aid kit 196 Play in audio mode 146 on the radio 143 Plug in unit for remote control ref...

Page 223: ...lfunction 31 37 Removing condensation on the windows 89 Repeat directory in audio mode 148 Repeat in audio mode 148 Repeat track in audio mode 148 Replacement fuses 195 Replacement of tires refer to Changing wheels 192 Replacing bulbs refer to Lamps and bulbs 188 Replacing tires 179 Replacing wheels tires refer to New wheels and tires 179 Reporting an accident refer Initiating an emergency call 19...

Page 224: ...ever positions 55 Sequential Manual Trans mission with Drivelogic 55 Drivelogic driving programs 57 idle 56 initializing system refer to After changing wheels tires 180 reverse gear 56 Sequential mode 56 shift lights 58 shiftlock 55 Sequential mode 56 Service 66 168 Service refer to Roadside Assistance 197 Service and Warranty Infor mation Booklet for US models 186 Service interval indicator refer...

Page 225: ...ssistant refer to Starting off on slopes 105 Starting difficulties jump starting 197 refer to Special starting conditions 54 Starting off on a slippery surface 105 on slopes 105 Start menu iDrive 17 Start route guidance 118 Start service 169 State Province for desti nation entry 114 State inspection 67 Station refer to Radio 136 Stations presets 143 Status 66 Status of this Owner s Manual at time ...

Page 226: ...g in 104 changing 179 condition 178 damage 179 flat tire refer to Changing wheels 192 inflation pressure 176 M Mobility System 190 new wheels and tires 179 pressure monitoring 76 replacing 192 retreaded tires 179 size 177 tread 178 wear indicators 178 wheel tire combination 179 winter tires 180 Tone 133 Tone dialing method 162 Tone in audio mode adjusting 133 middle setting 135 Tone on locking unl...

Page 227: ... stationary 91 Venting refer to Ventilation 90 Vents refer to Ventilation 90 Vent settings 89 Voice refer to Destination guidance with voice instructions 127 Voice command system 22 short commands 205 Voice instructions for navigation system 127 muting 47 repeating 47 127 switching on off 47 127 volume 127 Voice phone book 164 Volume 132 audio sources 132 mobile phone 158 setting speed dependent 1...

Page 228: ...ade replacement 188 Wiper system 59 rain sensor 60 washer fluid 60 windshield washer nozzles 60 With highways for navigation system 123 Word matching principle for navigation 123 Working in the engine compartment 181 Wrenches screwdrivers refer to Onboard toolkit 188 X Xenon lamps 188 replacing bulbs 188 Online Edition for Part No 01 41 0 012 213 02 06 BMW AG ...

Page 229: ... tables with data which apply to your vehicle Consult the index for individual specifications Fuel Engine oil Tire inflation pressure Designation Please enter your preferred fuel here Quality Summer tires Front Rear Winter tires Front Rear Up to 4 persons 5 persons or 4 plus luggage Online Edition for Part No 01 41 0 012 213 02 06 BMW AG ...

Page 230: ...01 41 0 012 113 ue BL0012113000 The Ultimate Driving Machine More about BMW bmwusa com Online Edition for Part No 01 41 0 012 213 02 06 BMW AG ...

Page 231: ...M5 US En Online Edition for Part No 01 41 0 012 213 02 06 BMW AG ...

Reviews: