background image

Lit. No. 40688, Rev. 04 

29 

May 1, 2012

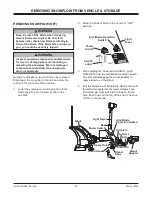
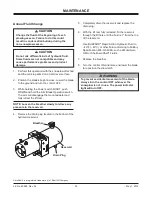
5.  Repeat Step 4 on the passenger's side.

6.  Push and hold the Power switch RIGHT and push 

UP the Arm/Blade Operation switch. The arm will 
engage the mount adapter and pull the snowplow 
tightly to the vehicle.

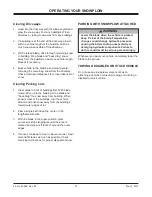
7.  Rotate and pull the hitch pin. Rotate the hitch pin 

into the retracted position.

8.  Repeat Step 7 on the passenger's side.

9.  While holding the Power switch RIGHT, push 

DOWN and hold the Arm/Blade Operation switch 
to fully lower the arm.

10.  Unplug the electrical harnesses.

NOTE: After each use of the snowplow, reapply 
dielectric grease to the electrical plugs to 
maintain the protective coating on the terminals.

11.  Place the electrical plugs in storage position. The 

plugs are equipped with plug covers.

 CAUTION

On 2-plug electrical systems, plug covers 
shall be used whenever the snowplow is 
disconnected. Vehicle Battery Cable is 12-volt 
unfused source.

REMOVING SNOWPLOW FROM VEHICLE & STORAGE

Hitch

Pin

Pin
Handle

Mount

Adapter

Pin
Guide Plate

Summary of Contents for 57520-1

Page 1: ...er s Manual May 1 2012 Lit No 40688 Rev 04 CAUTION Read this manual before operating or servicing snowplow A DIVISION OF DOUGLAS DYNAMICS L L C This Owner s Manual is for BLIZZARD SPEEDWING snowplows...

Page 2: ......

Page 3: ...ress _____________________________________________________________________________ Vehicle Model Year _________________________________________________________________________ Snowplow Model Year ____...

Page 4: ......

Page 5: ...Hydraulic System 23 Blade Drop Speed Adjustment 24 Transporting Snowplow 25 Driving and Plowing on Snow and Ice 25 Plowing Snow 26 General Instructions 26 Hard Packed Snow 26 Deep Snow 26 Clearing Dri...

Page 6: ...Lit No 40688 Rev 04 6 May 1 2012...

Page 7: ...ge When service is necessary your local BLIZZARD distributor knows your snowplow best Contact your BLIZZARD outlet for maintenance service or any other assistance you may require If you have not alrea...

Page 8: ...ead to damage to your snowplow and vehicle or other property Other useful information can also be described WARNING Indicates a potentially hazardous situation that if not avoided could result in deat...

Page 9: ...k DO NOT use your hand to locate it Use a piece of cardboard or wood FUSES The BLIZZARD electrical and hydraulic systems contain several automotive blade style fuses If a problem should occur and fuse...

Page 10: ...ank and lines Wipe up any spilled gasoline immediately WARNING Vehicle exhaust contains lethal fumes Breathing these fumes even in low concentrations can cause death Never operate a vehicle in an encl...

Page 11: ...cle GVWR or GAWR In some cases there may be additional limitations and requirements Installation modification and addition of accessories must comply with published BLIZZARD recommendations and instru...

Page 12: ...tomatically switch to vehicle headlamps when they are turned ON Replacement parts are available through your local BLIZZARD dealer VEHICLE MOUNT Blizzard has designed custom mounts for most vehicles D...

Page 13: ...equipped with one of two special controls the POWER GRIP hand held control or a joystick style control Each control has its own ON OFF switch with an indicator light to show when the control is power...

Page 14: ...an significantly enhance the operation and performance of the hydraulic system BLIZZARD zinc free hydraulic fluid maintains its viscosity to temperatures as low as 40 F 40 C BLIZZARD hydraulic fluid i...

Page 15: ...equired it is important that it be secured properly behind the rear axle A ballast retainer kit is available from your BLIZZARD outlet PN 62849 NOTE The ballast retainer kit is for snowplow vehicles r...

Page 16: ...d components could allow the snowplow to drop unexpectedly 5 Rotate and release the hitch pin The hitch pin is fully engaged when the pin handle is against the pin guide plate 6 Repeat Step 5 on the p...

Page 17: ...and the power switch on the light tower is in the PLOWING position If the power switch is in the OFF position the power indicator light will flash The ON OFF switch operates as an emergency stop if re...

Page 18: ...l lever to LOWER position and hold for 3 4 second to activate this mode FLOAT light in upper right corner of control face will illuminate Blade will lower to ground surface and follow contour of surfa...

Page 19: ...results in smoother operation reduces the shock to the hydraulic system and increases hose and valve life Control Functions Raise Lower Float Angle The four diamond shaped buttons in the center of the...

Page 20: ...reached its maximum raised position when the blade stops lifting C Angled Right To angle your blade to the right move the control lever toward R or push the R button on the hand held control To stop a...

Page 21: ...s transfer to the snowplow headlamps On some DRL systems both the vehicle and snowplow headlamps will function OPERATING YOUR SNOWPLOW Aiming the Headlamps Aim the snowplow headlamps with the snowplow...

Page 22: ...the cutting edge For hard surfaces concrete or asphalt The bottom surface of the shoe should be even with the cutting edge 1 Raise the blade one foot off the road surface turn the control OFF and fro...

Page 23: ...anifold OPERATING YOUR SNOWPLOW Drop Speed Adjustment CW Slower Hose Ports Lift Ram Rod End Lift Ram Base End DS Angle Ram PS Angle Ram Pressure Test Port SAE 4 ORB S1 S1 S2 E S3 C S2C2 S2C1 S3C1 Some...

Page 24: ...d adjustment 2 Lower the blade to the ground before making adjustment OPERATING YOUR SNOWPLOW WARNING Keep 8 clear of the blade when it is being raised lowered or angled Do not stand between the vehic...

Page 25: ...for driving in snow and ice conditions Remember when you drive on snow or ice your wheels will not get good traction You cannot accelerate as quickly turning is more difficult and you will need longer...

Page 26: ...ding objects could cause personal injury CAUTION Plowing speed should not exceed 10 mph 16 km h 3 Do not exceed 10 mph 16 km h when plowing snow 4 When you are stacking snow begin raising the blade as...

Page 27: ...snow is clear of the buildings turn the vehicle around and push snow away from the buildings toward outer edges of lot 2 Plow a single path down the center in the lengthwise direction 3 With the blad...

Page 28: ...unting or removing the snowplow Worn or damaged components could allow the snowplow to drop unexpectedly 2 Move the Power switch to the center or OFF position 3 While holding the Power switch RIGHT pu...

Page 29: ...witch RIGHT push DOWN and hold the Arm Blade Operation switch to fully lower the arm 10 Unplug the electrical harnesses NOTE After each use of the snowplow reapply dielectric grease to the electrical...

Page 30: ...driver and ballast as specified in the Undercarriage Selection Guide e Check functioning of any automatic vehicle leveling systems and specific manufacturer s instructions pertaining to vehicle prepa...

Page 31: ...e and visibility in accordance with local regulations Check headlamps auxiliary lights heater and windshield wipers for proper operation Inspect and test your battery Recharge or replace as necessary...

Page 32: ...is mounted it needs regular care and maintenance Check the following before and frequently during the plowing season 1 Make sure all fasteners mounting bolts and hydraulic connections are tight Pay p...

Page 33: ...servoir 1 With the snowplow attached to the vehicle and the blade on the ground turn the control OFF 2 Move the Power switch to the center or OFF position 3 While holding the Power switch RIGHT push D...

Page 34: ...d and turn the control OFF 3 While holding the Power switch RIGHT push DOWN and hold the Arm Blade Operation switch The arm will disengage the mount adapter and fully retract the lift ram NOTE Loosen...

Page 35: ...tions Balance of parts made of plastic shall be disposed of in a customary manner BLADE FINISH If the powder coated finish is nicked or scratched repair the blade surface with BLIZZARD white or black...

Page 36: ...Cartridge Cylinders Angle Cylinders 2 Stroke 11 3 8 Rod Diameter 1 3 4 Raise Lower Cylinders 1 Stroke 5 1 2 Rod Diameter 1 1 2 Bore Diameter 3 1 2 Snowplow Headlamps Type Low Profile w Turn Signals Me...

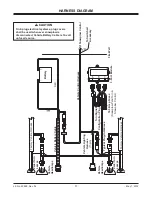
Page 37: ...pin Vehicle Control Harness Vehicle Headlamps Park Turn Lamps Vehicle Headlamps Park Turn Lamps Factory Vehicle Harness Factory Vehicle Harness Vehicle Battery Cable To Snowplow Control To Switched Ac...

Page 38: ...Lit No 40688 Rev 04 38 May 1 2012 NOTES...

Page 39: ......

Page 40: ...cturer may require or recommend optional equipment for snow removal Do not exceed vehicle ratings with a snowplow This product is manufactured under the following U S patents 5 420 480 5 638 618 5 899...

Reviews: