37
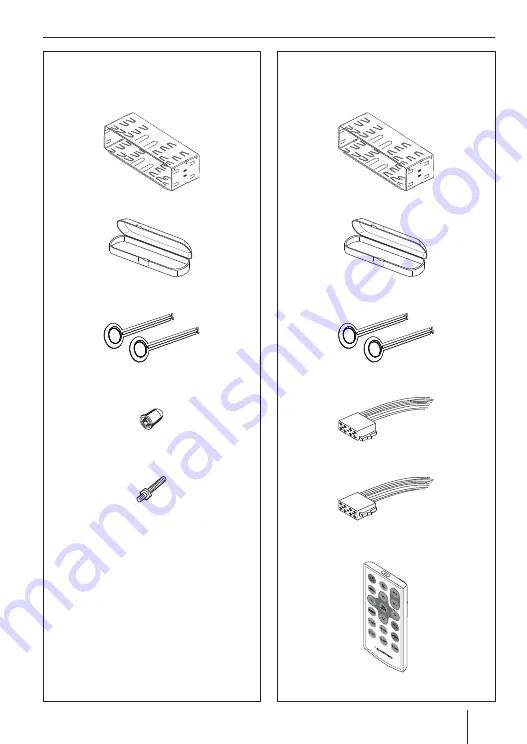
Installation instructions
Supplied mounting hardware
1 011 502 440 001:
1 011 502 441 001:
Page 1: ...Operating and installation instructions CAR RADIO TORONTO 440 Enjoyit...
Page 2: ...D MP3 WMA iPod mode Track selection fast forward reverse Browse mode in MP3 WMA iPod mode ID3 category iPod only select folder and track 8 button Eject Eject a CD 9 Microphone Front USB port Front AUX...
Page 3: ...rectories 13 Configuring the display 14 Browse mode 14 Searching by track names not in iPod mode 15 Pandora mode 1 011 502 441 001 only 15 Requirements 15 Connecting the iPod iPhone device 16 Connecti...
Page 4: ...ocation and operate your device while the vehicle is standing Remove or attach the control panel only while the vehicle is standing Always listen at a moderate volume to pro tect your hearing and to b...
Page 5: ...crew 1 Rubber cap 1 011 502 441 001 only 1 Handheld remote control incl battery 1 Connecting cable chamber A 1 Connecting cable chamber B Optional equipment not part of the scope of delivery Use only...
Page 6: ...ble reception area first for the radio reception in the user menu see the chapter User settings section Making settings in the TUNER menu menu item TUNER AREA Switching on off Switching on off with th...
Page 7: ...menu menu item TRAFFICINFO Notes The volume is increased for the duration of the switched through traffic announce ment Youcanadjusttheminimumvolume for traffic announcements see the chapter User set...
Page 8: ...ection Making settings in the TUNER menu menu item SENSITIVITY Tuning into stations manually Press the rotary button 7 once to activate manual station tuning The display briefly shows SEARCH MANUAL Tu...
Page 9: ...nu item BAND SELECTION it is automatically reactivated if you initiate the Travelstore function PTY In the reception areas EUROPE and NORTH AMERICA an FM station can transmit its current programme typ...
Page 10: ...the file exten sion mp3 or wma the use of more characters reduces the number of tracks and folders that the car sound system can recognise No umlauts or special characters CD formats CD R RW 12 cm CD...
Page 11: ...ive that may occur as a result of the use of unsuitable CDs Note You must not hinder or assist the drive as it automatically draws in the CD Insert the CD with its printed side up into the CD tray 5 u...
Page 12: ...annot be played SD ERROR is briefly displayed The time required for reading the card depends on the design and size of the memory card Removing the memory card Detach the control panel Push on the mem...
Page 13: ...areintermittentlyshownonthedisplay Note The scan time can be adjusted see the chap ter User settings section Making settings in the VARIOUS menu menu item SCAN TIME Playing tracks in random order Pres...
Page 14: ...current playback Browse mode in MP3 WMA mode In MP3 WMA mode you can select and play a track from a directory of the data carrier Briefly press the 1 button to call up the browse mode in MP3 WMA mode...
Page 15: ...file name and select the desired track from the list of tracks found Youcanexitthesearchfunctionatanytime by briefly pressing the 1 button Turn the rotary control 7 to select a charac ter for the resp...
Page 16: ...account prior to connecting your iPod iPhone or Android device to the car sound system You can exit the stations menu at any time by pressing the 1 button Shuffle mode Press the 1 button to display th...
Page 17: ...ed the cell phone outside the range the connection is automatically re established as soon as you are back within range You can connect 2 Bluetooth devices with the car sound system at the same time T...
Page 18: ...can be established the dis play briefly shows CONNECT FAILED Pairing and connecting a Bluetooth streaming device Note If a connection with a streaming device cur rently exists this connection is autom...
Page 19: ...can access only the phone book of the master telephone You can select the other connected tel ephone as master telephone at any time Telephone functions Answering rejecting an incoming phone call Wit...
Page 20: ...ol 7 toopenthephone book The display shows the first phone book entry Note If the phone book has not yet been trans ferred the display briefly shows PHONE BOOK NOT AVAILABLE or IntheBluetooth menu sel...
Page 21: ...to select a charac ter for the respective position Press the rotary control 7 to go to the next position Note To return to the previous position in the entry menu turn the rotary control 7 until the o...
Page 22: ...phone supports voice dial if the speed dial is set for voice dial see the chapter Additional functions in the Blue tooth menu section Setting the button function for speed dial To activate the voice...
Page 23: ...and A2DP Advanced Audio Distribution Profile A list of Android cell phones with verified compatibility is located on the Internet under www blaupunkt com Blaupunkt cannot guarantee the flawless funct...
Page 24: ...m Press the rotary control 7 The display shows PLEASE CONFIRM Press the rotary control 7 again The display briefly shows EMPTY LIST Additional functions in the Bluetooth menu Activating deactivating t...
Page 25: ...The DISCONNECT menu item is shown only if the device is connected Press the rotary control 7 The display briefly shows DISCONNECTED and you are returned to the device list Note If the device was not c...
Page 26: ...announcements of the connected cell phone are played back si multaneously with the respective active internal audio source of the car sound system e g radio or CD In the Bluetooth menu select the BT...
Page 27: ...e returned to the display of the current audio source To go back to the next higher level menu turn the rotary control 7 until the optionisselectedandpresstherotarycon trol 7 Making settings in the AU...
Page 28: ...Settings 0 5 1 0 1 5 2 0 2 5seconds and OFF no delay Press the rotary control 7 to change the setting Turn the rotary control 7 until the desired delay is set Press the rotary control 7 to confirm the...
Page 29: ...ol 7 to set the level frequency or Q factor Press the rotary control 7 to confirm the setting EQ BASS Adjusting bass frequency and level of the equal izer Press the rotary control 7 to open the menu T...
Page 30: ...for traffic announcements on or off Settings ON OFF Press the rotary control 7 to change the setting Turn the rotary control 7 to change be tween the settings Press the rotary control 7 to confirm th...
Page 31: ...ing PTYTYPES Only possible with activated PTY function Select a programme type Note Assoonasaprogrammetypehasbeenselect ed this programme type is shown as menu item in the menu instead of PTY TYPES Pr...
Page 32: ...DEUTSCH German Press the rotary control 7 to change the setting Turn the rotary control 7 to change be tween the settings Press the rotary control 7 to confirm the setting Making settings in the VOLUM...
Page 33: ...The display of the respective audio source is shown only after pressing a button Approximately 15 seconds af ter the button is pressed last the time is displayed again HOUR MODE Selecting the 12 or 2...
Page 34: ...function VERSION Displaying the current software version of the radio Press the rotary control 7 to open the menu Turn the rotary control 7 to display the version number of the current software NORMSE...
Page 35: ...com If you want to take advantage of this service you may request a pick up service for your car sound system via the Internet Technical data Voltage supply Operating voltage 10 5 14 4 V Current consu...
Page 36: ...the radio You can obtain the adapter cable required for your vehicle type from any BLAUPUNKT dealer Depending on the model your vehicle may differ from the description provided here We accept no respo...
Page 37: ...37 Installation instructions Supplied mounting hardware Supplied mounting hardware 1 011 502 440 001 1 011 502 441 001...
Page 38: ...38 1 12V 2 3 0 30 10 10 7 608 Installation instructions Available as an optional accessory Installation kits 7 607 621...
Page 39: ...stallation instructions 6 Removal 4 5 53 182 165 1 20 1 Microphone In 2 Steering wheel remote control 3 Rear USB 4 Preamp Out Front 5 Preamp Out Rear 6 Sub Out Subwoofer 7 Radio antenna 2 3 6 7 6 1 5...
Page 40: ...R 2 Telephone Mute 2 Speaker out RR 3 NC 3 Speaker out RF 4 Permanent 12V 4 Speaker out RF 5 Auto antenna 5 Speaker out LF 6 Illumination 6 Speaker out LF 7 Kl 15 Ignition 7 Speaker out LR 8 Ground 8...
Page 41: ...41 Installation instructions Subject to changes 12V 12V Kl 15 12V 1 3 5 2 4 8 7 4 ohms Relais Telephone Mute 4 ohms 4 ohms 4 ohms 6 12V...
Page 42: ...compliance with safety and regulatory standards Please note that the use of this accessory with iPod iPhone may affect wireless performance iPhone iPod are trademarks of Apple Inc registered in the U...
Page 43: ...43 Please keep the filled in radio pass in a safe place...
Page 44: ...Blaupunkt Technology GmbH Robert Bosch Stra e 200 D 31139 Hildesheim http www blaupunkt com 09 15 Name Type Serial no BP TORONTO 440 1 011 502 _ _ _ 001 Passport...