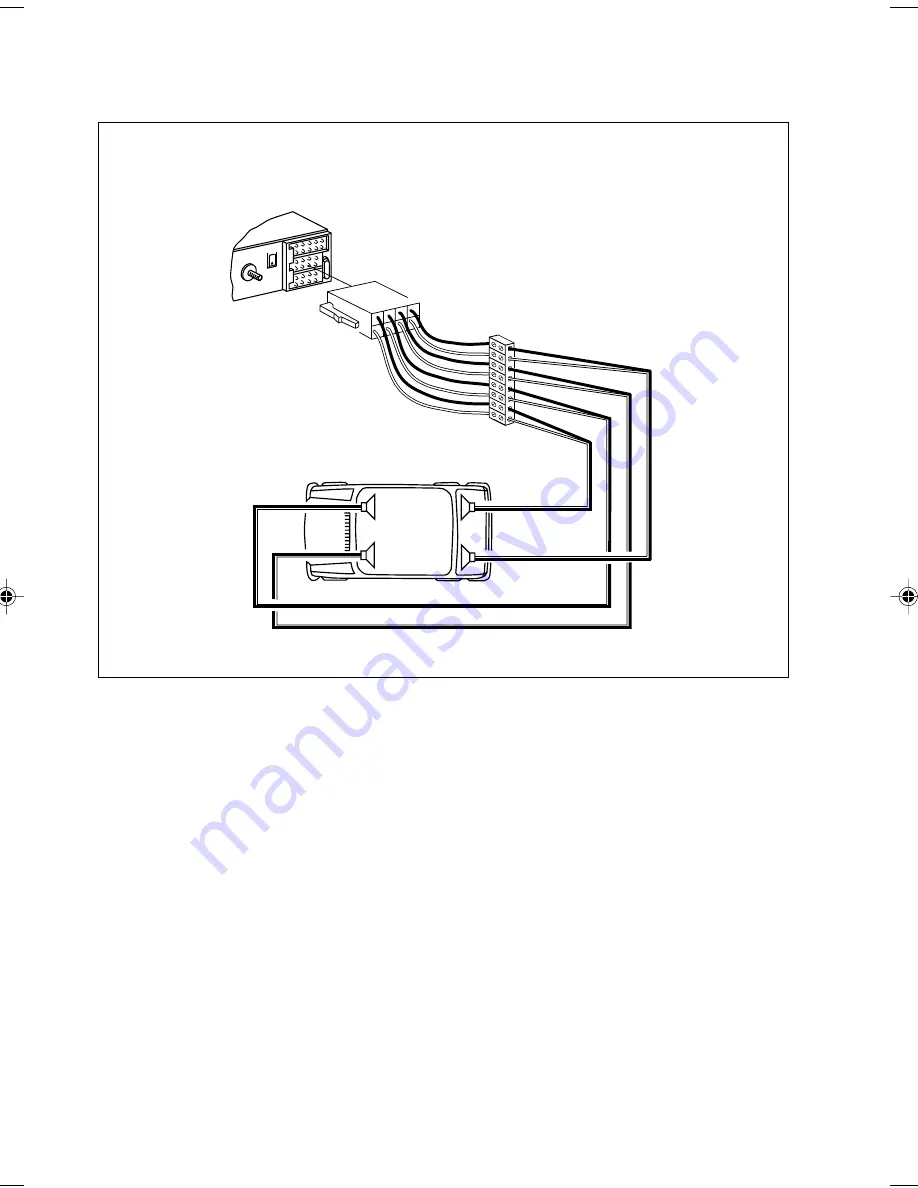
Blaupunkt SANTIAGO CR 87 Operating Instructions Manual Download Page 6

22

Speaker Connections

Attach the faceplate and test the unit.

Once the connections have been successfully made, you can begin to mount the unit.

5A

LR

RR

RF

LF

RR R

F LF

LR

+

-

+

-

+

-

+

-

Speaker Connections

 Santiago CR87 gb®

28.05.2002, 16:36 Uhr

22

Summary of Contents for SANTIAGO CR 87

Page 1: ...Santiago CR 87 Radio Cassette Operating instructions...

Page 2: ...ections 21 Installation 23 Maintenance 25 Location of Controls 26 Instructions General Operation 27 Audio Operation 28 Radio Operation 29 Cassette Tape Player Operation 30 Auxiliary Input Jack cable c...

Page 3: ...hassis Detachable Wire Harness Snap In DIN Sleeve and Mounting Hardware Your unit s detachable front faceplate makes the unit useless to would be thieves Designed Engineered and Manufactured By Blaupu...

Page 4: ...a humid place Attaching the Face Apply the right hand side of the face to the chassis by sliding part B of the face to part A at the front of the chassis Gently push the left side of the face against...

Page 5: ...the antenna motor trigger input terminal if you have one The total amperage required of the antenna lead must not exceed 100 mA Do not connect the antenna lead to the antenna s power supply input 4 Co...

Page 6: ...22 Speaker Connections Attach the faceplate and test the unit Once the connections have been successfully made you can begin to mount the unit 5A LR RR RF LF RR RF LF LR Speaker Connections...

Page 7: ...installation depending on the unit If you have questions or need additional installation hardware consult your Blaupunkt dealer Make sure the unit is firmly anchored and does not vibrate Mounting Hard...

Page 8: ...back of the front trim ring unscrew the two side screws and separate it from the unit Save the trim ring and related hardware in case you ever want to install the unit in another vehicle 2 Use the veh...

Page 9: ...ow Keep them in a safe place in case you need them in the future Fuse Replacement When replacing the fuse be sure to use one with the correct amperage which will be stated on the fuse case Never use a...

Page 10: ...ing Sensitivity 8 Cassette Insertion Slot 9 CLK Clock Recall DISP Display Change 10 11 PROG Tape Program Change reverse 10 FR Fast Rewind 11 FF Fast Forward 12 Volume Bass Treble Balance Left Fade to...

Page 11: ...Press ON for more than 1 2 second to turn the unit off Unit stores current settings for source station or track etc Setting the Clock Turn the unit on Press the CLK Button for four seconds until the c...

Page 12: ...tervals between 7 and 7 Treble Hold down the AUDIO Button until BASS appears Then press AUDIO once again so that TREb appears Now press immediately or to increase or decrease treble in intervals betwe...

Page 13: ...on Storage After tuning to the desired radio station on the desired band press and hold a Preset Button for more than 2 seconds to store the current frequency Audio is muted during the storage the pre...

Page 14: ...nual Change To manually reverse tape direction press both PROG program Buttons FR and FF at the same time The change in direction and in tape program will be confirmed in the display 1 or 2 Fast Windi...

Page 15: ...ORTUGU S Auxiliary Input Jack cable connection with 3 5 mm pigtail coupler Connect other audio equipment such as a portable CD or DAT player through a 3 5 mm pigtail connector Press SRC until InP appe...

Page 16: ...ns Also make sure that antenna is connected and extended If the above mentioned solutions do not help to improve the situation consult your nearest Blaupunkt dealer Blaupunkt Telephone Hotline Address...

Page 17: ...ignal to Noise Ratio 55 dB Dolby B NR 65 dB Tape Wow and Flutter 0 3 Tape Frequency Response 35 15000 Hz Audio Speaker Impedance 4 8 ohms Maximum Amp Power 4 x 20 watts at 4 ohms RMS Power 4 x 13 watt...

Page 18: ...18 Blaupunkt Werke GmbH Bosch Gruppe 02 97 K7 VKD 8 622 400 896...

Reviews: