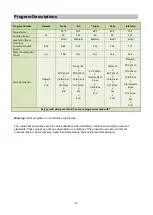
Blanco BDW6345W Instruction Manual Download Page 12


Loading Your Dishwasher 

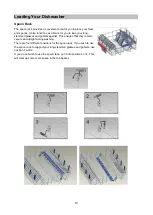
Placing dishes into the machine properly will allow it to operate with the highest efficiency and performance. 

There are two separate baskets for you to load your dishes into your machine. The lower basket has been 
designed to hold items such as round and deep items like pots with long handles, pot lids, plates, salad 
plates and cutlery sets. The upper basket has been designed for tea plates, dessert plates, salad bowls, 
cups and glasses. 

When placing long-stem glasses and goblets, make sure to lean them against the basket edge, rack or glass 
wire support. Do not lean long glasses against one another as they cannot remain steady and may be 
damaged. It is best appropriate to place the stem in the middle section of the baskets. 

It is recommended to use the cutlery grid for cutlery in order to obtain the best cleaning result. To avoid any 
possible injuries, always place cutlery with sharp points facing down or horizontally on the baskets. 

Warning

: Ensure that you do not obstruct the spinning arms when placing dishes into your machine. 

Obstructing the arms will decrease the cleaning performance. 
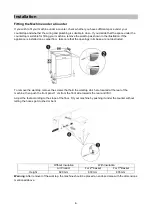
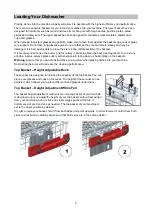
Top Basket 

– Height Adjustable Rack 

These racks are designed to increase the capacity of the top basket. You can 
place your glasses and cups on the racks. The height of these racks can be 
adjusted, which allows you to place different sized glasses under them. 

Top Basket 

– Height Adjustment While Full 

The basket height adjustment mechanism on the top basket of your machine 
is designed to let you adjust the height of your top basket, without removing it 
from your machine when it is full, and create large spaces at the top or 
bottom area of your machine as needed. The top basket of your machine is 
set to the upper position by default. 

In order to raise your basket, hold it from both sides and pull it upwards. In order to lower it, hold it from both 
sides and let it down carefully. Make sure that both sides are in the same position. 


Summary of Contents for BDW6345W

Page 1: ...INSTRUCTION MANUAL FOR BLANCO DISHWASHER BDW6345W...

Page 2: ...th your kitchen d cor It is easy to use and performs to a high standard Blanco makes a range of products that will enhance your kitchen such as ovens cooktops range hoods dishwashers microwaves sinks...

Page 3: ...ents Safety Information 1 2 Specifications 3 Installation 4 6 Usage 7 8 Loading Your Dishwasher 9 12 Program Descriptions 13 Operating Instructions 14 16 Maintenance and Cleaning 17 18 Responding to P...

Page 4: ...ch the values indicated on the rating plate Ensure that the machine does not rest on the electricity supply cable Never use an extension cord or a multiple socket for connecting the machine to the ele...

Page 5: ...aterial is out of reach of children Do not allow children to play with or start the machine Keep children away from detergents and rinse aids Keep children away from the machine while it is open as th...

Page 6: ...W Heating Power 1800 W Pump Power 100 W Drain Pump Power 30 W Water Supply Pressure 0 03 MPa 0 3 bar 1 MPa 10 bar Current 10 A 1 Worktop 8 Control panel 2 Upper basket with racks 9 Detergent and rins...

Page 7: ...lation is suitable for a dishwasher It is recommended that you fit a filter on the inlet hose to the machine as this can reduce the risk of damage to the machine due to contaminants in the water sand...

Page 8: ...a competent electrician carry out an earthing installation In the case of usage without proper earthing Blanco will not be responsible for damage that might occur The indoor fuse current value should...

Page 9: ...that the openings in its base are not obstructed To remove the worktop remove the screws that hold the worktop which are located at the rear of the machine then push the front panel 1 cm from the fro...

Page 10: ...r as shown in the image The detergent compartment has level lines inside It is possible to measure the right detergent amount using these lines The detergent container can take a total of 40 cm 3 of d...

Page 11: ...blem which you have not encountered before arise with the use of this type of detergent contact the detergent manufacturer directly Filling with Rinse Aid Rinse aid is used to prevent white water drop...

Page 12: ...juries always place cutlery with sharp points facing down or horizontally on the baskets Warning Ensure that you do not obstruct the spinning arms when placing dishes into your machine Obstructing the...

Page 13: ...mmed glasses and goblets against This ensures that they remain secure and upright during washing There are four different positions for the spoon rack If you wish to use the spoon rack to support your...

Page 14: ...d Modular Cutlery Basket The cutlery basket can be separated into two parts and placed in different locations inside your machine To separate the two halves move each half in an opposite direction To...

Page 15: ...ing performance ensure that you do not overload the machine obstruct the spinning arms or place dishes on top of one another Items which hold fluids such as bowls pots and glasses should be placed fac...

Page 16: ...0 C Wash Cold Rinse Hot Rinse Dry End 65 C Wash Intermediate Rinse Hot Rinse End Prewash 60 C Wash Cold Rinse Hot Rinse Dry End Prewash 55 C Wash 70 C Wash Cold Rinse Intermediate Rinse Hot Rinse Dry...

Page 17: ...elector button will start running and the status indicator light Wash will light up 8 Rinse Aid Indicator This light will come on when the machine has run out of rinse aid 9 Program Monitor Lights The...

Page 18: ...lector button 3 If you prefer you can choose additional functions 4 Start the program by pressing the Start Pause button Tracking the Cycle Progress You can follow the progress of the wash cycle by us...

Page 19: ...eady begun Switching the Machine Off Note Leaving the door slightly open during the drying stage will result in your dishes drying faster Note If the door is opened or the power is cut whilst the mach...

Page 20: ...ened cloth Filters Check if any food wastes have remained on the coarse and fine filters If there are any food scraps on the filters remove and clean them thoroughly under the tap a Micro Filter b Coa...

Page 21: ...r spray arm Hose Filter Contaminants from the water inlet hose sand clay rust etc which might occasionally be carried through the water mains are captured by the inlet filter so as to avoid any damage...

Page 22: ...ed service agent FE Faulty electronic circuit Contact an authorised service agent F7 Overheating Contact an authorised service agent F9 Divisor position error Contact an authorised service agent F6 Fa...

Page 23: ...prayed water did not reach related places Basket overly loaded Dishes leaning against one another Very small amount of detergent added An unsuitable rather weak wash program selected Spray arm clogged...

Page 24: ...e other than the DOMESTIC use for which it has been designed If the appliance is used in commercial applications or for rental purposes Our Warranty is limited to a warranty of Twelve 12 months coveri...

Page 25: ...We appreciate your feedback Please review our products at www blanco australia com...

Reviews: