background image

 28 

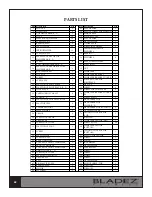
PARTS LIST

NO Description

Qty

NO Description

Qty

1

END CAP       

2

49 FLAT WASHER

2

2

FOAM GRIP      

2

50 M6 NUT SCREW WITH NYLON

2

3

TOP HANDLEBAR(R

L)

1

51 MAIN FRAME

1

4

NUT8

18

52 MAGNETIC SET

1

5

HALF ROUND WASHER

14

53 FLAT WASHER

1

6

SCREW M8*-45L

4

54 WAVE WASHER

1

7

BEARING(6002)

8

55 C-SHAPE CLIP

1

8

FLAT WASHER 

20

56 SCREW IDLE WHEEL

2

9

SPRINGWASHER

16

57 SPRING WASHER FOR 

FLYWHEEL

1

10 SCREW M8-25L

4

58 BEARING

2

11

PLASTIC COVER FOR TOP 
HANDLEBAR(R

L)

2

59 FLYWHEEL

4

12 SCREW

4

60 AXLE FOR FLYWHEEL

2

13 BOTTOM HANDLEBAR(R

L)

1

61 STEEL BUSH

1

14

PLASTIC COVER FOR BOTTOM 
HANDLEBAR(R

L)

2

62 NUT

1

15 M10-100L SCREW

2

63 COMPUTER

1

16 NUT M10

2

64 COMPUTER BRACKET

1

17 SCREW

4

65 COMPUTER BRACKET COVER

1

18 STEEL AXLE

2

66 PULSE END CAP FOR 

FOOTPLATE

2

19 PLASTIC FOR FOOT PLATE 

4

67 PIPE CAP

2

20 PLASTIC FOR  FOOT PLATE (R

L)

2

68 SCREW

4

21 FOOT PLATE 

2

69 SCREW FOR COMPUTER

4

22 CARRIAGE BOLT M8-60L

4

70 COMPUTER BRACKET COVER 

RL

1

23 PEDAL(R

L)

1

71 SCREW M8-15L

4

24 PLASTIC FOR UNIVERSAL JOINT

2

72 HANDLEBAR POST

1

25 PLASTIC BUSH 

4

73

HANDLEBAR POST 
COVER(R

L)

1

26 UNIVERSAL JOINT

2

74 HANDLEBAR POST BUSHING

2

27 WAVE WASHER

4

75 UP CHAIN COVER

1

28 CRANK

2

76 TENSION CONTROL FOR 

(TOP)

1

29 SCREW FOR CRANK

2

77 BUSHING

2

30 CRANK CAP

5

78 COMPUTER SENSOR (MID)

1

31 SCREW FOR COVER

6

79 SCREW M5-12L

20

32 PLASTIC FOR FOOT 

2

80 COMPUTER SENSOR 

(BOTTUM)

33 SCREW

6

81 TENSION CONTROL FOR 

(BOTTOM)

1

34 FLAT WASHER

6

82 PLASTIC FOR SENSOR

1

35 SCREW M8-20L

8

83 SCREW

2

36 REAR STABILIZER

1

84 SPRING

1

37 COVER FOR FRONT STABILIZER

1

85 IDLE WHEEL

1

38 FRONT STABILIZER

1

86 WAVE WASHER

1

39 COVER FOR FRONT STABILIZER

4

87 LDLER SHAFT

1

40 CHAIN COVER(R

L)

2

88 SCREW

1

41 SCREW FOR COVER

7

89 SCREW

2

42 M8 ALLEN HEAD BOLT

3

90 WHEEL

2

43 CRANK AXIS

3

91 SCREW

2

44 BELT

1

92 WAVE WASHER

4

45 BIG PLASTIC PULLY

1

93 MOTOR CABLE (TOP)

1

46 BEARING(6004)

2

94 WRENCH

2

47 MOTOR

1

95 WRENCH

1

48 M6 SCREW

2

Summary of Contents for Brazil

Page 1: ...t Read all instructions carefully before using this product Retain this owner s manual for future reference BH North America 20155 Ellipse Foothill Ranch California 92610 p 949 206 0330 f 949 206 0013...

Page 2: ...Warnings and Labels 04 Safety Information 05 Exercise Instruction 06 Training Guidelines 07 Suggested Stretches 11 Overview 13 Assembly Instructions 14 Exploded View Drawing 21 Console Overview 22 Co...

Page 3: ...estions concerns or product issues do not return the equipment to the retail store Instead please call our Customer Service at 1 866 325 2339 or email us at CustomerSupport BHNorthAmerica com Carefull...

Page 4: ...is area Misuse of this machine may result in serious injury Read User s Manual prior to use and follow all warnings and instructions Do not allow children on or around the machine Pedals continue to s...

Page 5: ...commended by Bladez Fitness 7 Do not place sharp objects near the machine 8 Any person with physical or coordination limitations should not use the machine without the assistance of a qualified person...

Page 6: ...f you feel any pain or discomfort stop exercising immediately and consult your doctor 4 Wear appropriate clothing and footwear for the exercise do not use loose clothing do not wear leather soled shoe...

Page 7: ...you 10 km without stopping FLEXIBILITY The range of motion of your joints Improving flexibility involves the stretching of muscles and tendons to maintain or increase suppleness and it provides incre...

Page 8: ...ng used and to the energy source involved There is little transfer of the effects of exercise i e from strength training to cardiovascular fitness That is why it is important to have an exercise progr...

Page 9: ...ken a few seconds after you stop exercising This is for two reasons a 10 seconds is long enough for accuracy b the pulse count is to approximate your BPM rate at the time you are exercising Since hear...

Page 10: ...sive clothing that causes you to perspire more than you normally would gives you no advantage The extra weight you lose is body fluid and will be replaced with the next glass of water you drink It is...

Page 11: ...r one count Then lift your right shoulder up for one count as you lower your left shoulder Side Stretches Open your arms to the side and continue lifting them until they are over your head Reach your...

Page 12: ...d hold for 15 counts Hamstring Stretches Sit with your right leg extended Rest the soles of your left foot against your right inner thigh Stretch toward your toes as far as possible Hold for 15 counts...

Page 13: ...13 OVERVIEW...

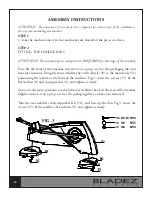
Page 14: ...51 positioning the wheels at the front of the machine Fig 3 insert the screws 35 fit the flat washers 8 and spring washer 9 and tighten securely Carry out the same operation to attach the rear stabili...

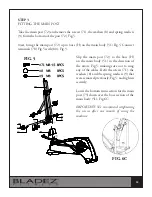
Page 15: ...g 5 Slip the main post 72 to the boss H on the main body 51 in the direction of the arrow Fig 5 making sure not to snag any of the cables Refit the screws 71 the washers 8 and the spring washers 9 tha...

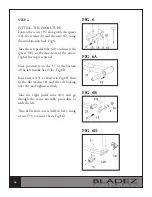
Page 16: ...f the arrow Fig 6A leaving it centered Next position it on the U at the bottom of the left handle bar 13L Fig 6B Insert screw 15 as shown in Fig 6B then fit the flat washer 8 and the self locking nut...

Page 17: ...R on top of the right pedal tube 83 refit the screws 22 the washers 8 and the nuts 4 removed previously and tighten securely STEP 6 FITTING THE MONITOR SUPPORT Plug connector 93 coming out of the con...

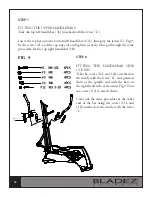
Page 18: ...o through the same procedure for the top right handlebar 3R STEP 8 FITTING THE HANDLEBAR SIDE COVERS Take the covers 11L and 11R marked on the inside with the letter R and position them at the spindle...

Page 19: ...he monitor onto the plate on top of the main post 64 in the direction of the arrow Fig 10 tuck the cables down into the main post making sure not to pinch any of the cables Replace the screws 69 remov...

Page 20: ...uipment in a dry place preferably not subject to changes in temperature Insert the plug Z for the AC adaptor into the jack R on the main body bottom rear of the machine and then plug 96 into a 110 V w...

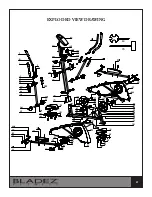
Page 21: ...21 EXPLODED VIEW DRAWING...

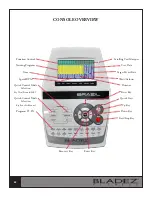
Page 22: ...Quick Control Mode Selection Key Watt Personal H R C Quick Control Mode Selection Key Body Fat Manual Programs P1 P12 Enter Key Recovery Key Scrolling Text Marquee User Data Target Heart Rate Watts C...

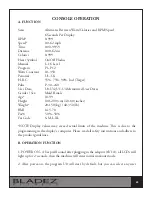
Page 23: ...r Sex Male Female Age 10 99 Height 100 200 cm 40 80 inches Weight 20 150 kg 40 350 lb BMI 14 5 70 Fat 5 0 50 Fat Code S M L XL NOTE Display values may exceed actual limits of the machine This is due t...

Page 24: ...during your workout 2 SELECT MANUAL PROGRAMS WATT CONSTANT PERSONAL H R C User can choose different control modes to start their work out 3 EXECUTE MANUAL PROGRAMS WATT CONSTANT PERSONAL H R C Execute...

Page 25: ...gram profile using U1 U4 by setting the resistance level for each individual segment Then the program will automatically save for future use The program U0 can be set the same as U1 U4 but this progra...

Page 26: ...will show the user 1 user 4 s body fat percent E OPERATION 1 The function control display will flash indicating you can select the Programs P1 P12 by pressing the UP DOWN button and then pressing the...

Page 27: ...tion Reset Key Reset All Displays To Default Values Start Stop Key Start Stop Key Quick Start Quick Start Key Recovery Key Fitness Test By Measuring Your Recovery Rate G TIPS 1 When working out keep l...

Page 28: ...ATE 2 69 SCREW FOR COMPUTER 4 22 CARRIAGE BOLT M8 60L 4 70 COMPUTER BRACKET COVER RL 1 23 PEDAL R L 1 71 SCREW M8 15L 4 24 PLASTIC FOR UNIVERSAL JOINT 2 72 HANDLEBAR POST 1 25 PLASTIC BUSH 4 73 HANDLE...

Page 29: ...s the warranty is void THIS WARRANTY DOES NOT COVER Pre delivery set up Components that require replacement due to dirt or lack of regular maintenance Expendable items which become worn during normal...

Reviews: