background image

Installation and User’s Guide

Composing and sending messages  —  Attaching Address Book entries

66

Attaching Address Book entries

You can send an Address Book entry as an attachment.

1.

In the Home screen, scroll to the COMPOSE icon and click.

2.

While you are composing your message, click the trackwheel to
view the menu. Scroll to Attach Address and click.

3.

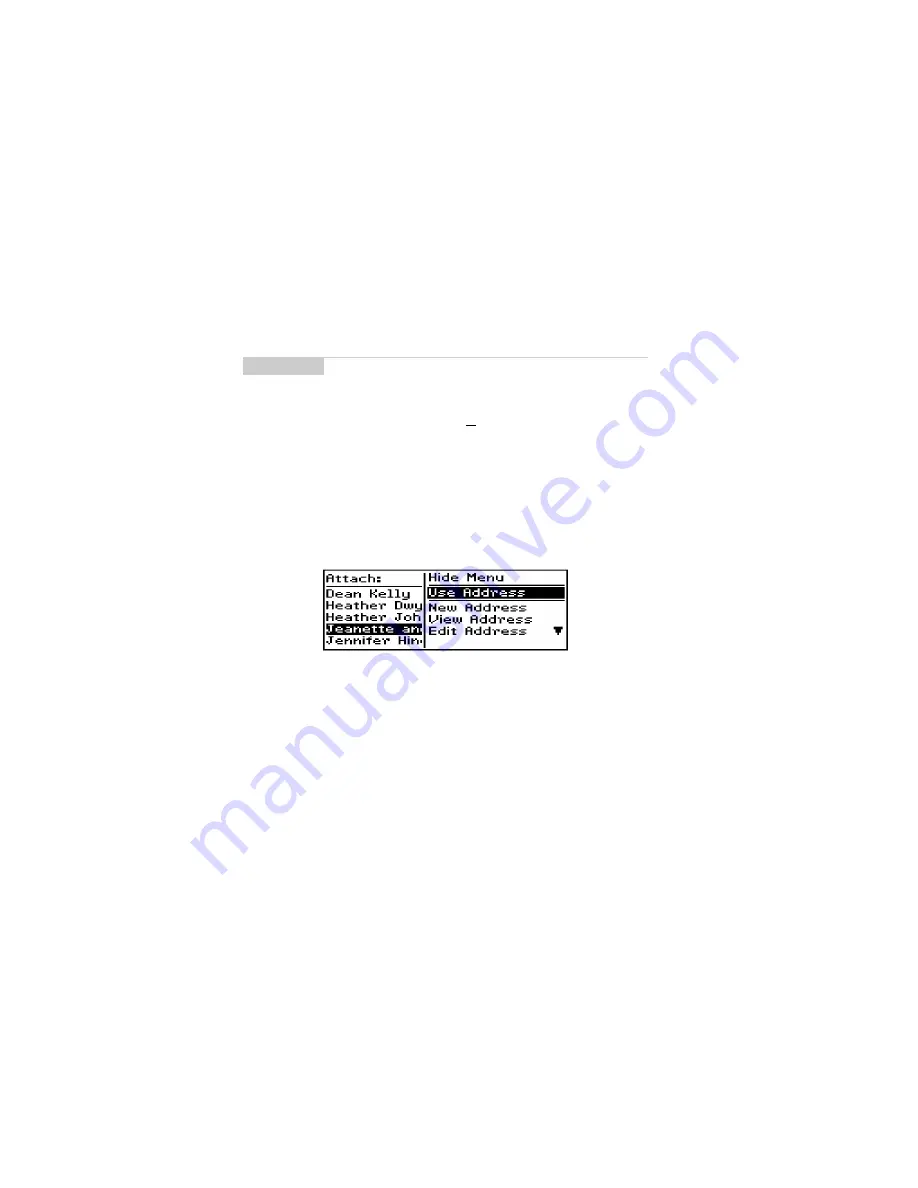
The Attach: screen appears, listing all of your contacts’ names.
Scroll to a contact and click to view the menu. Scroll to Use
Address and click.

4.

You return to the To: screen and you can see that your message
now contains an Address Book attachment. Click the
trackwheel to view the menu. Scroll to Send Message and click. 

See page 102 for information on how to add a new Address Book
entry.

Note

Please contact your service provider to determine if this
functionality is supported.

Summary of Contents for RIM 850

Page 1: ...Installation and User s Guide RIM 850 Wireless HandheldTM ...

Page 2: ...dictions DataTAC is a trademark of Motorola Inc that may be registered in some jurisdictions Windows 95 98 2000 Exchange and Outlook are either trademarks or registered trademarks of Microsoft Corporation All other brands product names company names trademarks and service marks used herein are the property of their respective owners Warning This document is for the use of licensed users only Any u...

Page 3: ...f not installed and used in accordance with the manufacturer s instructions may cause interference harmful to radio communications There is no guarantee however that interference will not occur in a particular installation If this equipment does cause harmful interference to radio or television reception which can be determined by turning the equipment off and on the user is encouraged to try to c...

Page 4: ...This device complies with Industry Canada RSS 119 under certification number 2503 195 5551A DOC Class B compliance This device complies with the Class B limits for radio noise emissions as set out in the interference causing equipment standard entitled Digital Apparatus ICES 003 of Industry Canada ...

Page 5: ...our handheld 19 Handheld components 19 Installing the battery 22 Turning on your handheld 25 Turning the radio on and off 26 Description of keys 27 Setting the date and time 39 Setting message notification 39 Using password protection 40 Summary and tips 45 Start sending email 47 Registering with the network 47 Installing the Desktop Software 48 Connect the handheld to your PC 49 Sending a message...

Page 6: ...symbols 73 Summary and tips 74 Receiving and reading messages 77 Received message options 77 Receiving long messages 79 Sending file attachments 80 Managing Address Book attachments 81 Adding contacts to Address Book 82 Summary and tips 82 Managing messages 85 Saving messages 85 Searching messages 88 Deleting messages 93 Editing messages 96 Resending messages 97 Marking a message as unread 97 Mark...

Page 7: ...lator function 129 Summary and tips 130 Customizing your handheld s options 133 Setting the alarm 133 Customizing handheld options 134 Handheld options 135 Summary 142 Frequently asked questions 145 Alarm 145 Battery 145 Storage 147 Charging Cradle 148 Home screen 150 LCD screen 150 Messages 151 Punctuation 153 Desktop Software 153 Resetting the handheld 153 Specifications 155 Research In Motion L...

Page 8: ......

Page 9: ...ts fuel storage and distribution areas chemical plants where blasting operations are in progress or in any other area in which restrictions on radio transmissions are imposed In addition the RIM 850 Wireless Handheld should not be used in locations that may be hazardous including without limitation locations in which hazardous or combustible gases may be present The RIM 850 Wireless Handheld is no...

Page 10: ...eld or its charging cradle on any unstable surface such as a cart stand tripod bracket or table It may fall causing serious injury to a child or adult and serious damage to the handheld RIM recommends that you use only single use alkaline or rechargeable NiMH batteries in this unit There is a list on page 22 of recommended brands of rechargeable NiMH batteries The use of any other battery may disa...

Page 11: ...rds or integral convenience receptacles as this can result in a risk of fire or electric shock Never push objects of any kind into the RIM 850 Wireless Handheld through openings as they may short out parts that could result in a fire or electric shock Never spill liquid of any kind on the handheld Do not use the handheld near water for example near a bathtub or a sink in a wet basement near a swim...

Page 12: ...those controls that are covered in this manual An improper adjustment of other controls may result in damage and will often require extensive work by a qualified technician to restore the handheld or charging cradle to its normal operation Unplug the charging cradle from the wall before cleaning Do not use liquid or aerosol cleaners Rather use a damp cloth to clean the unit Failure to observe all ...

Page 13: ...h as Messages Receive read reply to compose forward save and delete messages Compose Create and send messages to Internet email addresses Depending on your service provider you may also be able to send messages directly to other handhelds and fax machines Saved Messages Store messages for future viewing Search Messages Locate messages in seconds with the powerful search tool Address Book Store you...

Page 14: ...io off when it may interfere with other radio communications such as during a flight Turn on the radio again to send and receive messages Power Off Turn off the handheld at night or on weekends if you wish New for version 2 0 The handheld pre installed with version 2 0 software has an updated Search Messages function which lets you create and save pre defined searches on the handheld You can use t...

Page 15: ...kup and Restore online help for instructions on performing a backup Once you have backed up your handheld information to your PC follow the instructions on page 48 to install Contents of your package Your package should contain the following Handheld Charging Cradle Holster This Installation and User s Guide Handheld Getting Started Card Installation CD ROM If something from this package is missin...

Page 16: ...nline help select Help from any active window About Research In Motion RIM is a world leader in the mobile communications market Our current product portfolio includes mobile email solutions wireless handhelds and wireless modems RIM has a history of developing breakthrough wireless data solutions Our products are based on industry leading technologies providing superior radio coverage small size ...

Page 17: ...ur wireless solution Customer support Installation and User s Guide 17 to address their needs and help them discover new frontiers in wireless data Customer support For customer support contact your service provider ...

Page 18: ......

Page 19: ... Here are some details on the handheld s main components LCD screen The LCD screen is your interface with functions such as composing and reading messages setting tasks and appointments viewing and editing contact information customizing device options and performing basic mathematical calculations The Home screen displays the current signal strength and battery level of the handheld ...

Page 20: ... in both hands and use your thumbs Roll and click the trackwheel for navigation and selection A trackwheel that clicks The trackwheel on the handheld has a unique feature for greater usability and performance it clicks Pressing down on the trackwheel with your thumb is comparable to the clicking function of your PC mouse Click to open menus and to select functions and menu options Battery compartm...

Page 21: ...standard USB to serial port converters See Chapter 3 Using the Desktop Software for more information on installation procedures and serial connection details Charging cradle The charging cradle provides a link between the handheld and your PC so that you may use the Desktop Software provided with your package See Chapter 3 Using the Desktop Software for more information on the cradle and the capab...

Page 22: ... than the Sanyo battery so it will need to be recharged more frequently It is however readily available from many retail locations RIM has also performed limited testing on NiMH batteries from Gold Peak Group and Radio Shack Tandy While not certified for general use in the RIM 850 Wireless Handheld you may wish to try them as substitutes for the Sanyo or Energizer cells If you encounter any diffic...

Page 23: ...or the correct polarity The handheld will vibrate and beep if the battery has not been inserted properly Note If your handheld does not turn on after you have inserted the battery then either the battery is too low or the internal lithium battery is discharged Allow the battery to recharge the internal lithium battery by leaving the handheld turned off for 6 to 8 hours See page 145 for answers to ...

Page 24: ...cle 3 The green LED on the charging cradle will flash continually and the battery power indicator on the handheld s Home screen will be replaced with the charging indicator to show that the battery is being charged 4 When charging is complete the green LED returns to a solid green light If the green LED turns off at any point during the charging cycle there may be a problem with the battery the ch...

Page 25: ... such as an Alkaline cell unplug the AC adapter from the charging cradle while synchronizing to ensure that the cradle does not attempt to charge the alkaline battery Only recharge your handheld when the battery level indicator on the handheld s Home screen shows one or two bars Do not recharge when the battery level is at three or more bars Turning on your handheld 1 Click press down on the track...

Page 26: ...andheld cannot communicate over the network You must turn on the radio before you can send and receive messages In the Home screen scroll to the TURN WIRELESS ON icon and click You will notice that the TURN WIRELESS ON icon was an antenna but when you select the icon the function name changes to TURN WIRELESS OFF and the icon changes to an airplane The airplane icon is a reminder to turn off your ...

Page 27: ...and trackwheel combinations that will help you navigate compose messages and configure options on the handheld Note You should turn off your handheld s radio if you are going to be out of coverage for an extended period of time Turning off the radio will greatly improve battery life See page 145 for more information on battery life Key Function TRACKWHEEL Scrolling and selecting Roll the trackwhee...

Page 28: ...ctivates the numeric and symbol characters printed in orange above the alphabetic keys Press the ALT key once to affect the next character you type Press and hold the ALT key while you type to affect all characters Press the ALT key three times to activate backlighting An A icon appears in the top right corner of your screen when the ALT key is active Horizontal scroll and changing options Hold th...

Page 29: ...lpha characters Press the SHIFT key once to capitalize the next character that you type Press and hold the SHIFT key while you type so that all letters are capitalized Press and hold the letter to capitalize it This feature only works when Key Rate is set to Slow or Fast in the Screen Keyboard screen An up arrow icon appears in the top right corner of your screen when the SHIFT key is activated CA...

Page 30: ...sert a regular carriage return moving your cursor to a new line Press the ENTER key to select the highlighted item Instead of clicking the trackwheel to select the item you can press the ENTER key to perform your task BACKSPACE key Delete previous characters ESC function Press the BACKSPACE key to move the cursor backwards and delete characters to the left of the cursor position The key also enabl...

Page 31: ...ACKSPACE in the Messages screen to delete the selected message If you scroll to a date in the Messages screen and press ALT BACKSPACE a message appears asking if you wish to delete all messages prior to that date SPACE key Insert a space scroll through field options Press the SPACE key to insert a space between characters while you type Press the SPACE key to insert the and characters in Email fie...

Page 32: ...een and menus within each function Icons are used throughout for message status handheld status and navigational aid The following sections provide details on the handheld s screens menus and icons Backlighting Press the ALT key three times to activate backlighting Backlighting is disabled after 10 seconds if you do not press a key or move the trackwheel Function screens The functions list appears...

Page 33: ...to Internet email addresses Saved Messages Store important messages for future reference Search Messages Locate messages in seconds with the powerful search tool Address Book Store your personal directory of contact information such as multiple phone fax numbers and email addresses Use the search function to locate a specific contact Calendar Keep track of appointments using one of the four calend...

Page 34: ...he handheld with a password security screen so that only you can gain access to it This icon will only appear on the Home screen after you have set a password Turn Wireless Off Turn Wireless On Turn the handheld s radio off when it may interfere with other radio communications such as during flight You will not be able to send or receive messages until you turn the radio on again Power Off Turn of...

Page 35: ...nu appears on top and covers approximately half of the screen s width Address Book function menu Icons and graphical tools Home screen components The Home screen appears when you turn on the handheld It is your starting point for using the handheld s functions Home screen display In any of the function screens press the BACKSPACE key repeatedly to return to this Home screen For a description of ea...

Page 36: ...n the handheld s LCD screen to indicate battery power coverage levels and keyboard modes Icon Description Battery power indicator Coverage strength indicator Charging indicator Data is being sent Data is being received ALT key mode is activated SHIFT key mode is activated NUM lock mode is activated Unread messages waiting ...

Page 37: ... of performing the same function e g using hotkeys instead of the trackwheel In particular there are four ways to change the configurable options on your Icon Description Message is being sent Message has been sent out to the network Message pending will be sent later Composed message has been saved not sent yet Unread message transmission error Message returned message transmission error New unre...

Page 38: ...rackwheel to scroll through the options Release the ALT key once you reach your desired setting Use the keyboard You can press the letter or number which represents your choice For example if you are in a time field press the first number of the hour you want to specify Use the SPACE key You can use the SPACE key to scroll through your options Release the SPACE key once you have set the field to y...

Page 39: ...ss the SPACE key to scroll through your options 3 Click the trackwheel to view the menu Scroll to Save Options and click You return to the Device Options screen Setting message notification You can customize the way the handheld notifies you when you receive a message 1 In the Home screen scroll to the OPTIONS icon and click You can scroll the trackwheel up or down to view more screen or menu item...

Page 40: ...n options Using password protection By setting a password for your handheld you ensure greater security against others using the handheld You can specify the length of time that the handheld is idle before the password security screen appears Once the handheld is left idle for that amount of time you will need to type your password to use the handheld You can also manually activate the password se...

Page 41: ...shed You will have to enter your password again to verify it Note If you have entered information in the Owner screen of the Options function it will appear on the password security screen We recommend that you include your own or your company s contact information in case the handheld is lost If an incorrect password is entered 10 times all information could be erased from the handheld for securi...

Page 42: ... handheld to your PC for use with the Desktop Manager With the handheld in the cradle you must type your password before you can use the Desktop Manager tools Note The password security screen will show your contact information if you have entered it in the Owner screen or it will prompt you to Press any key Type the first letter of your password to gain access to the Enter Password dialog box Typ...

Page 43: ...e OPTIONS icon and click 2 In the Device Options screen scroll to Security and click A dialog box appears asking you to type your password Once you do so press ENTER to open the Security screen 3 Click to view the menu Scroll to Change Password and click 4 A dialog box appears prompting you to enter a new password minimum 4 characters Press ENTER when you are finished You will have to enter your n...

Page 44: ...ur password the password security screen will no longer appear 1 In the Home screen scroll to the OPTIONS icon and click 2 In the Device Options screen scroll to Security and click A dialog box appears asking you to type your password Once you do so press ENTER to open the Security screen 3 While in the Password field of the Security screen press the SPACE key to change the password option to Disa...

Page 45: ... enabling password protection You re now ready to start sending email Getting to know your handheld Tips Press the first letter of an item in an options list menu or choice list to jump directly to the item Press Y to select Yes in a pop up dialog box Press N to select No in a pop up dialog box Press C or BACKSPACE to select Cancel in a pop up dialog box Press ALT and click the trackwheel to selec...

Page 46: ......

Page 47: ... using the cradle 5 Send a test message 6 Read the test message Registering with the network After you turn on the wireless radio a Registration message should arrive In the rare case that the Registration message does not arrive check the Home screen to ensure you are in coverage You are in coverage if you have one or more bars beside the coverage indicator in the top right corner of the Home scr...

Page 48: ...stalling the Desktop Software You must install the Desktop Software in order to synchronize your Personal Information Management data and use the other Desktop Software tools 1 Insert the CD ROM into the appropriate drive The Setup program starts automatically Follow the instructions on your screen using the default paths and names recommended for the Desktop Software Note If the Status field in t...

Page 49: ...leave unplugged Insert the end of the charging cradle cable into a COM port on the back of your PC 3 Secure the handheld in the cradle by inserting the connector port on the bottom edge of the handheld into the connector prongs of the cradle and press firmly in place Note When connecting the handheld to the PC use only the charging cradle provided by Research In Motion Limited When you first recei...

Page 50: ...Settings window The Desktop Manager will show the handheld s PIN and Current Status in the status bar Note The message Handheld not found will appear if the PC cannot detect the handheld on a serial port If the handheld and charging cradle cable both appear to be connected securely ensure that no other devices are sharing the serial port such as a PCMCIA card or IrDA unit Ensure that there is no o...

Page 51: ...your own email address information and press ENTER after each field 4 Click the trackwheel to view the menu Select Save Address by clicking again You return to the To screen with your new contact selected Click the trackwheel to view the menu where you select Email as your send method 5 Type a subject line and press ENTER to begin typing your message When you are finished composing your message cl...

Page 52: ...the following icons to the left of the message header to indicate the message s status See Chapter 4 for more information on composing and sending messages Reading a message When you receive your test message follow these steps to read it 1 In the Home screen scroll to the MESSAGES icon and click Message is being sent Message has been sent out to the network Message is pending will be sent later T...

Page 53: ...e new message appears on your screen Scroll down to read the entire message Scroll up past the subject line of the message to view the message status the recipient s the sender and the date 4 Press BACKSPACE to return to the Messages screen or click the trackwheel to view the menu then scroll to select your next option See Chapter 5 for more information on receiving and reading messages Tip Open m...

Page 54: ...nnect the handheld to your PC Read on to learn more about the Desktop Software Note If you slide the handheld out of the holster within five seconds of notification the notification stops and the most recently received message will be open If you pull the handheld out of the holster and quickly replace it notification stops but the message will remain closed and marked unread See page 39 for more ...

Page 55: ...ld all using the Desktop Software s convenient Windows interface Installation and setup The previous chapter Start sending email described installing the Desktop Software and connecting your handheld to the PC for using the Desktop Software tools This chapter shows you how to use the Desktop Software to get the most from your handheld Note You will find basic instructions in this chapter for using...

Page 56: ...plication Loader is connecting to your handheld and is reading your handheld s configuration At the same time your handheld s LCD will read Loader activity Wait until initialization is complete and the dialog box disappears The Optional Application Selection window appears displaying the applications that you can choose to download to your handheld 3 Select the check boxes next to the names of the...

Page 57: ...rify that the information is correct and click Finish 6 The Load Progress dialog box appears and the new files are added to your handheld 7 When loading is complete the Loader dialog box will indicate whether loading was successful If loading was not successful make sure that your handheld is in the cradle and the cradle is connected to your PC properly Then repeat these steps Click OK to return t...

Page 58: ...log box will chart the progress of the data transfer from the handheld to your PC Once the information has been saved to your PC you return to the Backup and Restore window To restore files back to the handheld 1 Place your handheld in the cradle and connect it to your PC In the Desktop Manager double click Backup and Restore The Backup and Restore window appears Note Before updating your handheld...

Page 59: ...held you return to the Backup and Restore window Synchronizing PIM Using the Intellisync tool you can synchronize your PIM applications If you choose to use an AA alkaline cell in the charging cradle when synchronizing with your PC we recommend that you unplug the AC adapter This will ensure that the charging cradle does not attempt to charge the alkaline cell Note You can restore only specific da...

Page 60: ... PC program called the translator that you use and click OK 4 You can configure other options in these windows such as field mapping synchronization filters and conflict resolution settings depending on the translator that you have selected See the online help for more information 5 Once you have configured all the PIM applications ensure the the check box next to Synchronize PIM is selected in th...

Page 61: ...anced composing and sending capabilities Setting message options You can change the message options for all message types received saved and sent You can choose Display Time shows the time the message was sent or received Display Name shows the name of the sender or the recipient Confirm Delete confirms deletion of messages To set message options 1 In the Home screen scroll to the MESSAGES icon an...

Page 62: ...menu Scroll to Save Options and click You return to the Messages screen Setting level of importance You can change the level of importance of a message that you are composing 1 In the Home screen scroll to the COMPOSE icon and click 2 In the To screen while composing a message click to view the menu Scroll to Options and click 3 The Current Message Options screen appears In the Importance field pr...

Page 63: ...e Fax select the contact s fax number To choose a send method 1 In the Home screen scroll to the COMPOSE icon and click 2 The To screen appears Scroll to a contact s name and click A menu appears listing the send methods available for that contact 3 Scroll to either Use Email or Use Fax and click Note An exclamation mark appears beside the sent message in the Messages screen to indicate that the m...

Page 64: ...l screen appears and you can type your contact s email address Click the trackwheel to view the menu and select Continue by clicking again 4 Type a subject and press ENTER to begin composing your message When you are ready to send the message click the trackwheel to view the menu Scroll to Send Message and click From the Messages screen you can view the sent message s status Sending messages to ma...

Page 65: ... you can type the first letters of your contact s name to start a search and then scroll to the name Click the trackwheel to view the menu then scroll to Continue and click 4 You return to the To screen where the additional recipient appears in the list Type your subject in the Subject field and press ENTER to begin composing your message 5 When you have finished composing your message click to vi...

Page 66: ...nu Scroll to Attach Address and click 3 The Attach screen appears listing all of your contacts names Scroll to a contact and click to view the menu Scroll to Use Address and click 4 You return to the To screen and you can see that your message now contains an Address Book attachment Click the trackwheel to view the menu Scroll to Send Message and click See page 102 for information on how to add a ...

Page 67: ...utomatically enter commonly used strings of words into a message by typing only one keyword Automatically insert punctuation and symbols into your message without using the ALT key or symbols library How AutoText works 1 In the Home screen scroll to the COMPOSE icon and click 2 While composing your message in the To screen type the text hte The text hte is a default AutoText entry that tells the h...

Page 68: ...d click 2 The Device Options screen appears Scroll to AutoText and click The AutoText screen appears with a list of default AutoText entries Click to view the menu Scroll to New Item and click You will be prompted with two fields When I type for the keyword and Replace it with for what should appear instead 3 Type the keyword and replacement text in each field then click the trackwheel to view the...

Page 69: ...and Replace it with for what should appear instead 2 For this example enter a short form for the date in the When I type field Scroll to the Replace it with field and click to view the menu 3 Scroll to Insert Macro and click In the Insert Macro screen scroll to a macro and click The list of macros includes Short date Long date Short time Long time Owner name Owner info Backspace Delete and 4 Once ...

Page 70: ...oll horizontally while you make your edits Make your changes to the current entry 4 Click the trackwheel to view the menu Scroll to Save Item and click You will return to the AutoText screen where you can view your recent changes To delete an AutoText entry If you do not wish to keep an AutoText entry either a default entry or one that you added you can delete it 1 In the Home screen scroll to the...

Page 71: ...ather than scrolling through your list of AutoText entries you can perform a search to find an entry quickly 1 In the Home screen scroll to the OPTIONS icon and click 2 The Device Options screen appears Scroll to AutoText and click In the AutoText screen type the first letter or first few letters of the entry you would like to find For this example type the letter t The screen header will display ...

Page 72: ...g of a new sentence and does the work for you If you want any other characters to be capitalized press and hold the character key until it becomes capitalized You must have the Key Rate Options Screen Keyboard option set to either Slow or Fast for this feature to work See page 140 for details on setting the Screen Keyboard options Auto punctuation You can insert a period automatically at the end o...

Page 73: ... without pressing the ALT key Number lock You can activate number lock num lock mode to type numbers without holding down the ALT key Press SHIFT ALT Num lock mode is activated and you can enter numbers in any screen Press SHIFT or ALT again to turn off num lock mode Inserting symbols You can enhance your messages by inserting symbols from the handheld s symbols library 1 In the Home screen scroll...

Page 74: ... under the desired symbol 5 You return to your message in the To screen and the symbol has been inserted Summary and tips In this chapter you learned more about composing and sending email Not only have you learned about sending methods but you have also been introduced to the time saving features such as Tip You can also insert international characters characters with accents into your messages W...

Page 75: ...ing a message the letter following the period will automatically be capitalized Type the first letters of the name or the initials separated by a space to find a specific contact in the To field Press ALT SHIFT to turn on caps lock mode press SHIFT again to turn it off Press SHIFT ALT to turn on num lock mode press SHIFT again to turn it off Press and hold a letter to capitalize it only works with...

Page 76: ......

Page 77: ... options Received message options Once you have read a new message click the trackwheel to view your options Mark Unread Mark the current message as unread Save Message Save the open message A copy of the message will be placed in the Saved Messages screen See page 85 for more information on saving messages Reply to Message Send a reply to the sender of the open message without including the origi...

Page 78: ... This option is only available when you have your cursor in the From or To field of the open message Show Friendly Name Show the first and last name of the sender or the recipient This option is only available when you have your cursor in the From or To field of the open message with the Qualified Address showing Add to Address Book Add the sender of the message to your Address Book This option is...

Page 79: ...nd The remaining number of bytes in the message is also listed Click to view the menu Scroll to More and click 3 Once you have selected More the remaining part of the message will be sent to you It will appear at the end of the existing part of the message Press G to resume reading the message where you last left off Note Please contact your service provider to determine if this functionality is s...

Page 80: ...tachment If there are attachments to the message the number of attachments is displayed at the top of the message The name of the attachment and the size of the file will appear at the end of the message 3 Click the trackwheel to view the menu Scroll to Forward Message and click Select a recipient and a send method 4 You can type a message before you click to view the menu and select Send Message ...

Page 81: ...2 Open a received message and read it If there are attachments to the message the number of attachments is displayed at the top of the message Scroll to the end of the message if there is an Address Book attachment for you to open you will see its name and size 3 With your cursor in the name of the Address Book attachment click the trackwheel to view the menu Click Open Attachment The Address Atta...

Page 82: ... and click 2 Open a received message and read it Scroll to the top of the message Place your cursor in the From field and click to view the menu 3 Scroll to Add to Address Book and click The new contact s information will be shown in the Edit Address screen Add any information you would like to include for this contact 4 Click to view the menu and select Save Address by clicking again The contact ...

Page 83: ...ssages screen Press T to go to the top of a list or open message Press B to go to the bottom of a list or open message Press ALT and roll the trackwheel to scroll horizontally in any field where you can enter or view text Press ALT ENTER to page up in an open message Press ENTER to page down in an open message Press G to return to the last cursor position if you choose to close a message before yo...

Page 84: ......

Page 85: ... to keep for future reference If the handheld needs to delete old messages to free memory space saved messages are not deleted To save a received or sent message You may wish to save a received or sent message to retain it for future use 1 In the Home screen scroll to the MESSAGES icon and click 2 In the Messages screen scroll to a received or sent message and click to view the menu Scroll to Open...

Page 86: ...lling to and clicking Close Exit to the Home screen In the Home screen scroll to the SAVED MESSAGES icon and click 5 The Saved Messages screen appears and you can see that the message has been copied to this folder Now that the message has been saved you can delete the message from the Messages screen See page 93 for more information on deleting messages To remove messages from the Saved Messages ...

Page 87: ...n and click 2 While composing a message in the To screen click the trackwheel to view the menu Scroll to Save Message and click 3 The Messages screen appears An icon beside the message indicates that the message is saved but has not been sent The message you save while composing is saved in the Messages screen not in the Saved Messages screen 4 To resume composing scroll to the saved message and c...

Page 88: ... the Name Subject or Message fields type the keywords for which you want to search Note You can also search for messages while in the Messages and Saved Messages screens You do not need to complete all the fields in the Search Messages screen The more fields you complete the more narrow the search will be Note If you forget an exact spelling you can search for a name stored in your Address Book wh...

Page 89: ...t is to show all sent and received messages You can view only the sent messages only the received messages or only the saved messages which match your search terms 5 After you have set the terms of your search click the trackwheel to view the menu 6 To perform a one time search without saving any of the terms that you have specified scroll to Search and click To save the terms of your search scrol...

Page 90: ... Search and click Note Once you saved a search and have specified a hotkey you can use ALT the hotkey to carry out the search in the Messages or Saved Messages screens When you enter text in the Subject or Message field the Search Messages function will search for phrases containing these characters in the subject line and the body of your messages You can clear a field by clicking to view the men...

Page 91: ...it a search once 1 In the Home screen scroll to the SEARCH MESSAGES icon and click 2 The Search Messages screen appears Click the trackwheel to view the menu Scroll to Recall Search and click 3 Your saved searches are listed Select the search that you want to edit then click to view the menu Scroll to Select Search and click 4 The details of the search you have selected are displayed and you can e...

Page 92: ...the menu Scroll to Delete Search and click 4 A dialog box appears asking if you are sure you want to delete the selected searches Click Yes to delete the search You return to the Search Messages screen and you can see that the search is no longer listed To search for the sender When you have a received message selected in the Messages screen you can search for all messages received from that conta...

Page 93: ... screen Deleting messages Although the handheld has ample memory for storing messages you should delete unnecessary messages in order to manage the list more efficiently To delete a message from the Messages screen If you are in the Messages screen you can delete a message without opening it This procedure also applies for deleting messages from the Saved Messages screen 1 In the Home screen scrol...

Page 94: ... List Options screen You return to the Messages screen and you can see that the message is no longer listed To delete an open message You can delete a message while it is open without returning to the Messages screen 1 In the Home screen scroll to the MESSAGES icon and click 2 Open the message you want to delete by clicking to view the menu scrolling to Open Message and clicking Note If you reques...

Page 95: ... return to the Messages screen and you can see that the message is no longer listed To delete multiple messages You can delete all messages prior to a particular date by selecting a date field 1 In the Home screen scroll to the MESSAGES icon and click In the Messages screen scroll to a date field 2 With the date field selected click to view the menu Scroll to Delete Prior and click 3 A dialog box ...

Page 96: ... click to view the menu Scroll to Open Message and click In the open message click to view the menu Scroll to Edit Message and click 3 The text of the message will appear where you can make your changes Once you have finished making changes click to view the menu Scroll to Send Message and click You return to the Messages screen Tip You can also delete multiple messages that aren t date specific I...

Page 97: ...hat you want to resend and click to view the menu Select Open Message by clicking again 3 The text of the message will appear Click to view the menu Scroll to Resend Message and click You return to the Messages screen and your message will be sent again Marking a message as unread You can mark any message on the handheld unread When you synchronize your handheld with the Desktop Software the Note ...

Page 98: ...our desktop you may wish to mark all messages read 1 In the Home screen scroll to the MESSAGES icon and click 2 Scroll to the top of the list and select the date field Note You can also mark an open message unread by clicking to view the menu scrolling to Mark Unread and clicking again You can also mark multiple messages as unread In the Messages screen hold the SHIFT key while rolling the trackwh...

Page 99: ...ddress Book Tip You can also mark a set of messages as read In the Messages screen hold the SHIFT key while rolling the trackwheel to select more than one message Click the trackwheel to view the menu Scroll to Mark Read and click Managing messages Tips Press ALT I to view all Inbox messages in the Messages or Saved Messages screens Press ALT O to view Outbox messages Press ALT a hotkey to carry o...

Page 100: ......

Page 101: ...de how you want to sort your addresses whether or not you want confirmation of deleted addresses and whether or not you want to allow duplicate names 1 In the Home screen scroll to the ADDRESS BOOK icon and click 2 In the Address Book screen click to view the menu Scroll to Options and click 3 The Address Book Options screen appears displaying the following three options Sort By Select how you wan...

Page 102: ... SPACE key once you have set the option to your preference 5 Click the trackwheel to view the menu Scroll to Save Options and click You return to the Address Book screen Adding addresses To add an individual contact s information to the Address Book follow this procedure 1 In the Home screen scroll to the ADDRESS BOOK icon and click 2 In the Address Book screen click to view the menu Scroll to New...

Page 103: ...Save Address and click Your new contact s name will appear in alphabetical order in your Address Book Address Book fields The New Address screen has the following fields Note You can have up to three email addresses for the same Address Book entry To add more than one email address click to view the menu scroll to Add Email and click An additional field appears in the New Address screen and you ar...

Page 104: ...ess data network service Title Type your contact s job title position This field supports alpha numeric and symbol characters Company Type the name of the company for which your contact works This field supports alpha numeric and symbol characters Work Type your contact s business phone number This field supports numeric characters and the x and characters without having to hold down the ALT key Y...

Page 105: ...mbols library press ALT SPACE to insert parentheses Address 1 Type your contact s street address This field supports alpha numeric and symbol characters Address 2 Type any further information for the address A second address field is provided for long addresses This field supports alpha numeric and symbol characters City Type your contact s city This field supports alpha numeric and symbol charact...

Page 106: ...dit the information in any of the fields of an address entry Some Address Book fields are limited to numeric characters and only a few alpha characters 1 In the Home screen scroll to the ADDRESS BOOK icon and click 2 In the Address Book screen select the Address Book entry that you want to edit and click to view the menu Scroll to Edit Address and click 3 In the Edit Address screen use the trackwh...

Page 107: ...asking if you want to delete the address Select Yes by clicking the trackwheel This dialog box will appear only if Confirm Task Delete is enabled in the Address Book Options screen You return to the Address Book screen and you can see that the entry is no longer listed Searching addresses The handheld s powerful search tool enables you to go directly to a specific contact so you do not have to scr...

Page 108: ...ny that you might want to contact Not only are you familiar with the various address book fields but you can also add view edit delete and search for addresses In the next chapter you will learn about managing your tasks and appointments Note The handheld searches the First Last and Company names of contacts to find the first instance of your search As you type more letters for your search fewer m...

Page 109: ...pointment the location and any additional notes Using the Tasks function The handheld s Tasks function allows you to keep a list of tasks to be completed Tasks can be sorted by subject priority due date or status To set task options 1 In the Home screen scroll to the TASKS icon and click 2 In the Tasks screen click to view the menu Scroll to Options and click Note You can copy Task and Calendar en...

Page 110: ...s set to Yes 4 Scroll to the field you would like to set then press the SPACE key to scroll through your options Release the SPACE key once you have set the option to your preference 5 Click the trackwheel to view the menu Scroll to Save Options and click You return to the Tasks screen To add tasks 1 In the Home screen scroll to the TASKS icon and click 2 In the Tasks screen click the trackwheel t...

Page 111: ...ns beside it depending on the task s status Task fields The Tasks screen contains the following fields Task Type the subject of the task Status Choose the status of the task Your options are Not Started In Progress Completed Waiting and Deferred The default is Not Started Priority Choose the priority of the task Your options are Normal Low and High The default is Normal Icon Description The task h...

Page 112: ...o view or edit then click to view the menu Select Open Task by clicking again 3 The Edit Task screen appears with the task details listed Edit the task by changing the fields in this screen 4 Once you have finished viewing or editing the task click to view the menu Scroll to Save Task and click You return to the Tasks screen To delete tasks 1 In the Home screen scroll to the TASKS icon and click 2...

Page 113: ...ess and click The task s status is changed Using the Calendar function The handheld s Calendar function displays appointments in either Month Week Day or Agenda view Although the default is Day view you can change the view at any time Note Delete all completed tasks by scrolling to Delete Completed and clicking You can also delete tasks in the Edit Task screen Note You can only change the status o...

Page 114: ... of week Set on which day your week starts By default this option is set to Sunday Start of day Set the time at which your day starts By default this option is set to 9 00 a m End of day Set the time at which your day ends By default this option is set to 5 00 p m 4 Scroll to the field you would like to set then press the SPACE key to scroll through your options Release the SPACE key once you have...

Page 115: ... you open the function Day view This view displays all appointments for the given day The subject of the appointment appears beside the start hour and a sidebar spans the length of the appointment Week view This view displays all appointments for the current week you can scroll vertically through them All appointments are marked with an outlined box spanning the length of the appointment If the ap...

Page 116: ...nt is an all day appointment the day will be in bold text The position of the bar depends on the start time set for the appointment For example the bar for afternoon appointments will typically appear near the bottom of the date Agenda view This view displays only the days on which you have appointments allowing you to see your agenda The appointments appear in chronological order starting with th...

Page 117: ...field adding information for the appointment Press ENTER to go to the next field 4 In the Reminder field select how early you want to be notified of the appointment If you do not wish to be reminded of the appointment set this field to None 5 If the appointment will occur regularly set the Recurrence field to reflect how often the appointment should appear in your calendar See page 119 for more in...

Page 118: ...ect the end date of the appointment The default is today s date End Time Select the end time for the appointment The default is an hour after the start time You can change the hour and minutes settings by pressing the SPACE key Reminder Select how early you want to be notified of the appointment The default is 15 minutes in advance of the start time Recurrence Set whether or not the appointment is...

Page 119: ...ck 2 In the New Appointment screen add the information for your appointment 3 In the Recurrence field press the SPACE key The Set Recurrence screen appears 4 In the Recur field press the SPACE key until the desired option appears on screen Your options are Day Week Month and Year For this example select Day to set an appointment recurring on a daily basis 5 In the Every field press the SPACE key u...

Page 120: ...and click You return to the New Appointment screen with your recurring appointment settings entered Save your appointment by clicking to view the menu scrolling to Save Appointment and clicking To view appointments In Day Week or Agenda view you can see the specifics for an appointment by selecting the appointment clicking to view the menu scrolling to View Appointment and clicking Note If you set...

Page 121: ... the Calendar screen select a day that has appointments and click to view the menu Scroll to View Appointments and click The appointments for the selected day are listed 3 If you want to view the details of the appointment edit it or delete it click to view the menu Scroll to View Appointment Edit Appointment or Delete Appointment and click 4 Press BACKSPACE to return to Month view Note When you v...

Page 122: ...own To view the appointments for a specific date 1 In the Home screen scroll to the CALENDAR icon and click 2 In the Calendar screen click the trackwheel to view the menu Scroll to Go to Date and click In the dialog box that appears use the SPACE key to select the date for which you would like to view appointments and click Note In Agenda view if you do not have appointments for the current date t...

Page 123: ... you can edit only the selected appointment choose Edit this 3 The Edit Appointment screen appears displaying all of the details for the appointment Edit the information in any of the fields To edit the Start Date Start Time End Date End Time or Reminder fields press SPACE key to scroll between options Release the SPACE key once you have set the field to your preference 4 If you are editing a recu...

Page 124: ... you have selected You return to the Calendar screen and you can see that the appointment is no longer listed Summary and tips In this chapter you learned how you can organize your time and projects using the Tasks and Calendar functions You can add view edit delete and set options for both tasks and appointments In the Tasks screen you can modify the status of your tasks so that you know which of...

Page 125: ... to Day view Press W to switch to Week view Press M to switch to Month view Press A to switch to Agenda view Press S to scroll through all the possible calendar s views Press T to go to Today in the Calendar screen Press P to go to the previous day week month in the Calendar screen Press N to go to the next day week month in the Calendar screen Press ALT and roll the trackwheel in Day view to view...

Page 126: ......

Page 127: ...messages A Calculator function is also included which helps you to perform simple mathematical operations Using the MemoPad function You can use the MemoPad function to add edit view and delete important memos To add memos 1 In the Home screen scroll to the MEMOPAD icon and click 2 In the MemoPad screen click to view the menu Scroll to New Memo and click ...

Page 128: ...to the MEMOPAD icon and click 2 In the MemoPad screen select the name of the memo that you want to view Click to view the menu Scroll to View Memo and click The full memo appears on the screen To edit memos 1 In the Home screen scroll to the MEMOPAD icon and click 2 In the MemoPad screen select the memo you want to edit and click to view the menu Scroll to Edit Memo and click 3 In the Memo screen ...

Page 129: ...oPad screen and you can see that the memo is no longer listed Using the Calculator function Use the handheld s calculator function to perform simple mathematical operations and conversions To perform mathematical operations 1 In the Home screen scroll to the CALCULATOR icon and click Note You can clear the Title field and the entire body of a memo Scroll to the field that you want to clear either ...

Page 130: ... appears To exit the calculator In the Calculator screen scroll to Exit and click Summary and tips In this chapter you learned how to use the MemoPad function and the Calculator function You can add edit and view memos in the MemoPad screen and you can also perform mathematical Note You can add recall and clear the calculator s memory if you want to save the results of a particular calculation The...

Page 131: ...o go to the bottom memo in the list Press BACKSPACE to exit the MemoPad screen Press ALT BACKSPACE to delete a memo Press ENTER to view a memo Calculator Press D to add Press F to subtract Press X or A to multiply Press S to divide Press Z or SPACE key to change the sign Press V to find the square root of a number Press J to recall the memory Press K to clear the memory Press L to add the number i...

Page 132: ......

Page 133: ...t your specific needs Setting the alarm The handheld has an Alarm function that you can set to tone at the same time every day Choose from six different tone settings and three volume levels 1 In the Home screen scroll to the ALARM icon and click 2 The Daily Alarm screen appears Scroll to the field you would like to set then press the SPACE key to scroll through your options Release the SPACE key ...

Page 134: ...ou can hear each tune by scrolling through the options The default is Tune 3 Volume Select the volume at which you wish to hear the alarm Your options are Low Medium and High The default is Low Customizing handheld options You can customize any of the handheld s options by following this general procedure 1 In the Home screen scroll to the OPTIONS icon and click 2 The Device Options screen appears...

Page 135: ...andheld options The following pages list the handheld s options and provide page references for further information About The About screen contains handheld copyright information You cannot change the information in this screen Press the BACKSPACE key twice to return to the Device Options screen Auto On Off Use the automatic on off feature to maximize battery life and to maintain optimal extended ...

Page 136: ...depending on the time zone The default is the Eastern 5 time zone Daylight Savings Select whether or not you want daylight savings time to be adjusted automatically By default the handheld is set to adjust for daylight savings time Support The setting only needs to be set once It should only be set to Ignore if you live in a state or province that does not recognize daylight savings time When this...

Page 137: ...o on or off In certain situations such as travelling by plane it is important to turn off the radio in your handheld to prevent radio frequency interference See page 26 for a shortcut for turning your radio on and off Note The information that you set in the Time Format and Date fields will represent how the date and time appear on the handheld s Home screen and in the password security screen Not...

Page 138: ...message while it is in the holster Your options are Tone Vibrate Vibrate Tone or None The default notification setting is Vibrate Tone Out of Holster Customize the way that the handheld notifies you of a new message when it is out of the holster Choose from Tone Vibrate Vibrate Tone or None The default notification setting is Tone Tune Select the tune you wish to hear when you are notified of a ne...

Page 139: ...l tone or vibrate once every 15 minutes for 30 minutes Medium the handheld will tone or vibrate once every 10 minutes for an hour High the handheld will tone or vibrate once every 5 minutes for 2 hours Off you will not be reminded Level 1 Notify Only Select whether or not you want to be notified of all messages or only those with a level 1 priority Choose from either Yes or No Owner This informati...

Page 140: ...ace If you are using the handheld in low light try the backlighting feature instead Font Size Set the size of the font to be used on the screen Choose from Small Font or Large Font The default is Large Font Key Tone Set the key tone field to On if you want the handheld to emit a tone each time a key is pressed Key Rate Set the speed Slow Fast or Off at which your cursor moves whenever the BACKSPAC...

Page 141: ...File Free Shows the amount in bytes of available memory to store messages address entries and AutoText entries PIN Shows the handheld s address number or LLI Depending on your service provider other handheld users may be able to use this address number to send messages directly to you ESN Shows the handheld s serial number O S Shows the version of the Operating System Note The password security sc...

Page 142: ...t version of the Database DLL MemoPad Shows the current version of the MemoPad function Message List Shows the current version of the Messages function Ribbon Shows the current version of the functions list on the Home screen Secure Transport Shows the current version of the Secure Transport DLL Serial Db Access Shows the current version of the Backup and Restore protocol DLL UI Shows the current ...

Page 143: ...Customizing your handheld s options Summary Installation and User s Guide 143 Knowing how to customize these options allows you to personalize your handheld and optimize its performance ...

Page 144: ......

Page 145: ...eable alkaline or any other non NiMH cell in my handheld in conjunction with the charging cradle It is not recommended to use a NiCd rechargeable alkaline or any other non NiMH cell We suggest using the Sanyo NiMH model HR 3U or the other cells indicated in this manual See page 22 for more information on installing the battery How can I conserve battery life Following these suggestions will help y...

Page 146: ...y place the handheld in the charging cradle and allow the cradle to perform a complete charging cycle If using an AA alkaline cell replace it with a fresh battery See page 22 for information on inserting the battery If your NiMH needs to be recharged but it is a not convenient time to recharge temporarily replace the NiHM with an AA alkaline cell What should I do if my handheld does not turn on Ma...

Page 147: ... battery from the unit The handheld shuts down and after approximately 24 hours enters a special storage state You should store the handheld in a cool dry place When you press any keys or click the trackwheel while the handheld is in this state the unit will not respond To reactivate the handheld you must install a new AA battery or a fully charged rechargeable NiMH A partially charged NiMH batter...

Page 148: ...e to the power source and reinsert the handheld How warm will the charging cradle get when I recharge the battery The charging cradle will feel warm to the touch while it is recharging the NiMH battery in the handheld However it should not get hot enough to burn If it does become overly warm to the touch return it to your service provider While the handheld is in the cradle the green light is some...

Page 149: ...dle is unable to detect the battery Is the AC adapter attached to the charging cradle If the adapter is not connected the charging cradle will not detect the battery nor charge it Does the handheld contain a rechargeable battery The charging cradle will not begin charging if the battery is not a rechargeable cell If you would like to use the recharge capabilities of the charging cradle you should ...

Page 150: ...k LCD screen What can I do if my LCD screen seems faint Check the Screen Keyboard option in the Device Options screen In Options Screen Keyboard scroll to the Screen Contrast field Press and hold the ALT key while rolling the trackwheel to select a higher contrast Once you have set the field to your preference click the trackwheel to view the menu Scroll to Save Options and click Activate backligh...

Page 151: ...icator in the Home screen See page 26 for more information I am not being notified when new messages arrive even though I have set the handheld to notify me Ensure that the volume setting of the notification options is set to either Low Medium High or Escalating rather than Off With the volume set to Off the beeper will not sound when new messages arrive Ensure that the Level 1 Only setting in you...

Page 152: ...ast response Click the trackwheel to view the menu Scroll to Send Message and click How do I respond to a message which contains a list of responses When you receive a message containing a list of responses you can choose one of the responses as your reply message In the Home screen scroll to the MESSAGES icon and click In the Messages screen scroll to the new message and click The message contain...

Page 153: ...ressing ALT SPACE See page 73 for information on how to insert a symbol You can also insert international accented characters into your messages When composing a message or entering text press and hold a letter key while rolling the trackwheel to scroll through international characters characters with accents When the desired character appears release the letter key Desktop Software For a complete...

Page 154: ...nserted into this hole to press the reset button restarting and restoring the handheld to normal operation Messages and other information stored on the handheld will not be lost If you were in the process of composing a message however the message will be lost If you reset your handheld you will not lose the connection with your PC After you reset your handheld synchronize with the Desktop Manager...

Page 155: ...ry R850 2 2 MB Flash memory 304 kB RAM R850 4 4 MB Flash memory 512 kB RAM Display Full graphic LCD with custom annunciators and backlighting 132 x 65 pixels and 8 line by 25 character text graphics display Controls Trackwheel for scrolling and selecting menus 31 key QWERTY style keyboard Message Notification Audible beeper and mechanical vibrator user configurable alert options ...

Page 156: ... baud Input voltage from 5V p p to 30 V Maximum data rate 115 200 baud Port impedance 5kΩ nominal input 300Ω minimum impedance output Battery One AA alkaline cell and one internal rechargeable Lithium Ion cell Power Supply Internal rechargeable Lithium Ion cell Operating 10 C to 60 C Storage 40 C to 70 C Relative Humidity 5 95 Non condensing Network Support 800 MHz DataTAC networks Air Protocol Su...

Page 157: ... Protocol Transmitting 806 to 825 MHz Receiving 851 to 870 MHz Weight 6 7 oz 191g cradle and serial cable 1 5 oz 42 g AC adapter Size LXWXH 2 9 X 2 7 X 1 4 Serial cable 78 7 2 m serial cable 3 wire serial interface RS 232 AC adapter input 110V 60 Hz output 12V DC 500 mA Straight plug in 4 2 mm OD 1 7 mm ID centre positive Operating temperature 0 C to 45 C ...

Page 158: ...FCC ID L6AR800D 2 PW Industry Canada RSS 119 Cradle complies with FCC part 15 FCC Class B Part 15 Declaration of Conformity DoC AC Adapter Complies with UL Direct Plug in and Cord Connected Class 2 Power Units E117924 H CSA Direct Plug in Class 2 Transformer Certification Record No 098962 0 000 Class No 531101 ...

Page 159: ...t 2 GRANT OF LICENSE 2 1 This RIM Software License Agreement LICENSE hereby grants You a non exclusive non transferable right to use the SOFTWARE in conjunction with the Product This does not imply any rights Research In Motion Limited Software License Agreement Terms and Conditions This is a legal agreement between you the Customer You and Research In Motion Limited RIM BY INSTALLING USING OR MAK...

Page 160: ...erials accompanying the SOFTWARE if any such materials are included 3 4 You may not decompile disassemble or otherwise reverse engineer the SOFTWARE or any part of it You do not have the right to obtain or use any source code for the SOFTWARE 4 WARRANTY AND DISCLAIMERS U S GOVERNMENT RIGHTS 4 1 RIM warrants that any disk or other media that the SOFTWARE is recorded on if provided by RIM will be fr...

Page 161: ...ay not allow the exclusion or limitation of incidental or consequential damages nor allow limitations on how long an implied warranty lasts Thus the above limitations or exclusions may not apply to You 4 5 IN NO EVENT SHALL RIM BE LIABLE FOR ANY OTHER DAMAGES WHATSOEVER INCLUDING WITHOUT LIMITATION DAMAGES FOR LOSS OF BUSINESS PROFITS BUSINESS INTERRUPTION LOSS OF BUSINESS INFORMATION OR OTHER PEC...

Page 162: ...rnment is subject to restrictions as set forth in DFARS 227 7202 or in FAR 52 227 19 as applicable Contractor is Research In Motion 295 Phillip Street Waterloo Ontario N2L 3W8 4 7 This Limited Warranty is to be construed in Canada under the laws of the Province of Ontario and in the United States under the laws of the State of Texas except for any body of law governing conflicts of law ...

Page 163: ...ss Handheld Hardware or component thereof is repaired or replaced during the Applicable Warranty Period the Applicable Warranty Period will expire upon the later of the 91st day after repair or replacement or the end of the Applicable Warranty Period PLEASE CONSULT YOUR SERVICE PROVIDER FOR INSTRUCTIONS ON HOW TO OBTAIN CUSTOMER SUPPORT FOR YOUR RIM 850 WIRELESS HANDHELD This Limited Warranty does...

Page 164: ...or damaged during the servicing of this RIM 850 Wireless Handheld Hardware or through the use of synchronization software The wireless data service provided for the RIM 850 Wireless Handheld is provided from a third party provider and therefore RIM cannot guarantee or warrant that the wireless data service will always be available or will always function properly For this and other reasons the RIM...

Page 165: ...USINESS PROFITS BUSINESS INTERRUPTION LOSS OF BUSINESS INFORMATION AND THE LIKE AND PERSONAL INJURY OR WRONGFUL DEATH DAMAGES ARISING FROM OR IN CONNECTION WITH THE USE OR PERFORMANCE OF THE RIM 850 WIRELESS HANDHELD HARDWARE EVEN IF RIM IS AWARE OF THE POSSIBILITY OF SUCH DAMAGES THIS LIMITATION IS INTENDED TO APPLY AND DOES APPLY WITHOUT REGARD TO WHETHER SUCH DAMAGES ARE CLAIMED ASSERTED OR BRO...

Page 166: ...IDE This limited warranty gives YOU specific legal rights and YOU may also have other rights that vary from state to state Some states may not allow the exclusion of limitation of incidental or consequential damages may not allow limitations on how long an implied warranty or condition lasts or allow provisions that permit the warranty to be voided Thus the above limitations or exclusions may not ...

Page 167: ...options 101 deleting entries 107 description of 13 33 editing entries 106 fields 103 searching 107 setting options 101 summary 108 tips 108 using 101 viewing entries 106 agenda see calendar alarm description of 14 34 FAQs 145 fields 134 setting 133 ALT key functions 27 application loader using 56 appointments adding 117 deleting 124 editing 123 fields 118 managing 109 recurring 119 viewing 120 att...

Page 168: ...ng 24 recommended cells 22 C calculator description of 14 34 exiting 130 performing mathematical operations 129 summary 130 tips 130 using 129 calendar adding appointments 117 agenda view 116 appointment fields 118 day view 115 deleting appointments 124 description of 13 33 editing appointments 123 month view 116 notification of appointments 139 recurring appointments 119 setting options 114 summa...

Page 169: ...tomer support 17 customizing address book options 101 calendar options 114 handheld options 133 level of importance 62 message options 61 task options 109 D date and time setting 39 136 deleting addresses 107 appointments 124 autotext entries 70 memos 129 messages 93 multiple messages 95 open messages 94 searches 92 tasks 112 description address book 13 33 alarm 14 34 autotext 67 calculator 14 34 ...

Page 170: ...133 password security screen 41 F FCC compliance 3 file attachments receiving 80 formatting automatic capitalization 72 automatic punctuation 72 messages automatically 72 frequently asked questions alarm 145 battery 145 charging cradle 148 desktop software 153 home screen 150 LCD screen 150 messages 151 punctuation 153 functions description of 13 icons 35 menus 35 screens 32 G getting customer sup...

Page 171: ...tus 141 holster description of 20 home screen description of 35 FAQs 150 icons 35 moving icons in 45 hot keys 27 I icons function 33 handheld status 36 message status 37 moving in home screen 45 navigational 38 task status 111 Industry Canada certification 4 inserting symbols 73 installing battery 22 desktop software 48 55 K key assignment chart 27 key rate 140 keyboard description 20 hot keys 27 ...

Page 172: ...ddress book entries 66 automatic capitalization 72 automatic punctuation 72 composing 51 composing and sending tips 74 deleting 93 deleting multiple messages 95 deleting open messages 94 description of 13 33 editing sent 96 FAQs 151 formatting automatically 72 managing 85 managing address book attachments 81 managing tips 99 marking as read 98 marking as unread 97 options for received messages 77 ...

Page 173: ... O one time messages sending 64 options description of 14 34 handheld 133 received messages 77 scrolling through 37 setting for address book 101 setting for calendar 114 setting for messages 61 setting for tasks 109 setting level of importance 62 P password security screen changing password 43 disabling 44 enabling 41 43 PC connecting to your handheld 49 performing mathematical operations 129 one ...

Page 174: ... 94 searches 92 tasks 112 replying to response lists 152 resending messages 97 resetting the handheld 153 response lists creating 152 replying to 152 S safety information 9 saved messages description of 13 33 removing 86 saving address book attachments 81 messages 85 messages while composing 87 received messages 85 sent messages 85 searches deleting 92 description of 13 33 editing 90 editing once ...

Page 175: ...age notification options 39 138 message options 61 password security screen 43 recurring appointments 119 task options 109 specifications 155 charging cradle 157 specifying search terms 88 storing received or saved messages 85 style conventions 16 symbols inserting 73 synchronizing email 59 PIM 59 system requirements 15 T tasks adding 110 changing status 113 deleting 112 description of 13 33 editi...

Page 176: ...ges marking 97 upgrading to version 2 0 15 using address book 101 application loader 56 autotext 67 autotext to compose a message 67 backup and restore 57 calculator 129 calendar 113 desktop software 55 intellisync 59 lock 43 macro to add an autotext entry 69 memopad 127 password protection 40 tasks 109 V viewing addresses 106 appointments 120 appointments for a specific date 122 memos 128 message...

Reviews: