background image

32

AV Setup

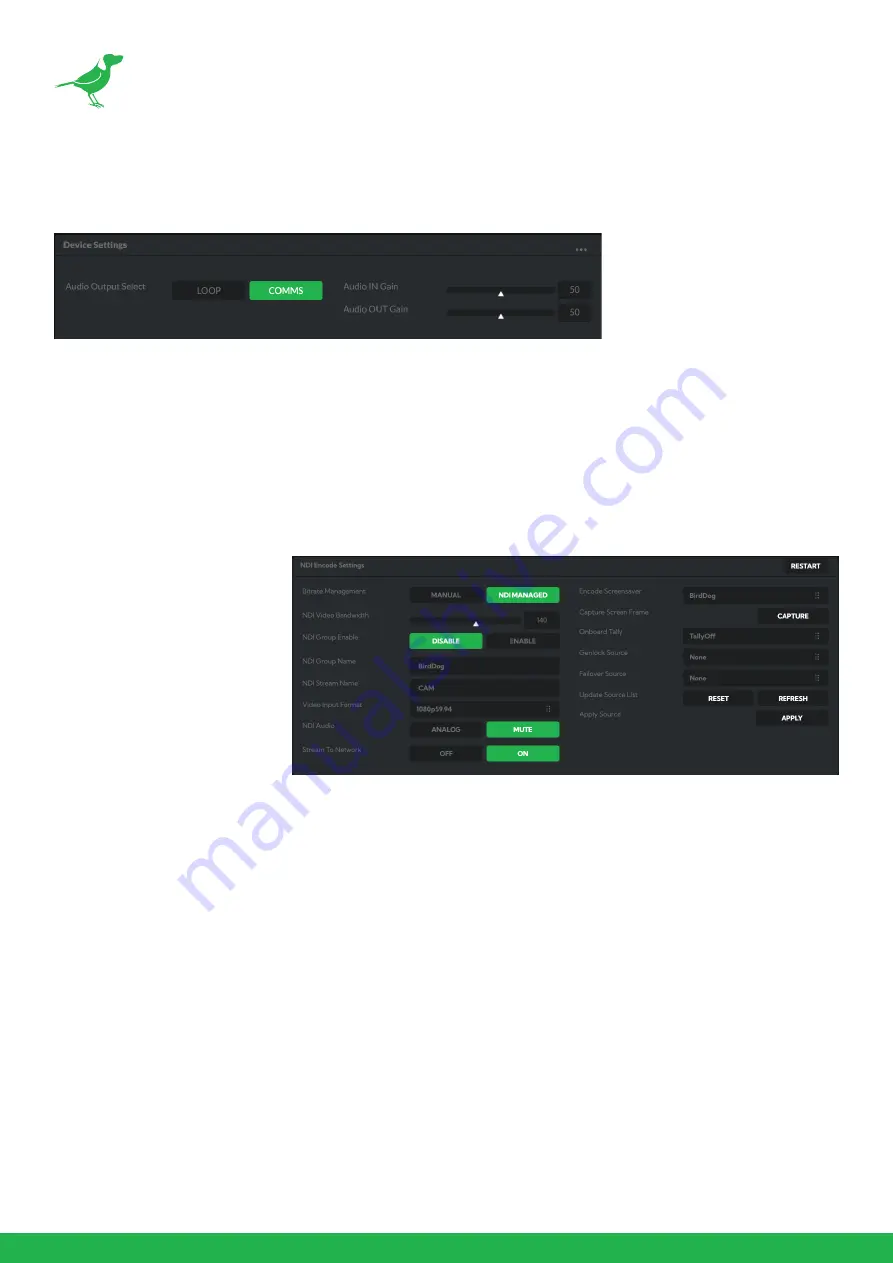
Device Settings

Audio Output Select

Loop: Audio from the Audio In port, for example, from a connected microphone, is directed to the Audio Out port 

for monitoring.

Comms: Audio from NDI stream is directed to the audio out for camera operator comms. 

Audio In / Out Gain

Controls for adjusting the audio in/out gain.

NDI Encode Settings

Bitrate Management

Birddog Devices allow you to 

set your target NDI® output 

bitrate. This allows you to 

select a compression ratio 

that  is  more  efficient  for  your 

networking infrastructure 

(lower bandwidth) or higher 

image quality for critical 

footage. The scale allows you to 

select the range of 60 Mbps - 

360 Mbps. 

By setting Bitrate Management to NDI MANAGED, the target bitrate will be set in accordance with the NDI® 

standard. By selecting MANUAL you are able to manually select a target bitrate. Select MANUAL with care, as you 

will need to account for the capacity of the network and the receiving device.

NDI Groups

NDI® supports Grouping which allows you to hide the visibility of video sources to viewers that are not part of the 

group. If disabled (default), the video source is public and viewable by any receiver on your network. Click on the 

field and type a group name. Receivers can then scan for, and select your group.

Stream Name

You can give the camera NDI output stream a meaningful name to make identification easier on on any NDI-

capable receiver, particularly on networks where there are a large amount of NDI streams.

NDI Video Format 

Your camera is capable of outputting independent video formats for both NDI® and SDI/HDMI. This setting affects 

only the NDI® video output. Please note that the video rate you select here must be of the same family as the SDI/

HDMI video output, for example 720p50 aligns with 1080i50/1080p50 but will not co-exist with any 29.97/30fps 

based camera setting. 

NDI Audio

Select MUTE to disable the NDI® audio. Select ANALOG to receive audio from the rear mounted USB connector.

Summary of Contents for NDI A200

Page 1: ...USER GUIDE NDI 5 2022...

Page 2: ...7 Power Up 7 Basic Configuration 7 Camera External Features 11 Camera Connections 11 Installing Your Camera 12 Mounting the camera 13 Powering A200 14 Starting the Camera 14 Video Output 15 Interactin...

Page 3: ...ystem 30 System Update 31 Access Manager Configuration 31 System Reboot 31 AV Setup 32 NDI Encode Settings 32 CamControl 33 FreeD Tab 34 Preset Tab 34 Exposure Tab 34 White Balance Tab 35 Picture 1 Ta...

Page 4: ...oducts or procedures described in the manual Best effort has been made to verify the integrity and correctness of the contents in this document but no statement information or recommendation in this m...

Page 5: ...f the FCC Rules These limits are designed to provide reasonable protection against harmful interference when the equipment is operated in a commercial environment This equipment generates uses and can...

Page 6: ...r or PDF reader to increase the page size when viewing the diagrams to reveal much more detail First Step Firmware Upgrade Before you use your new camera it s a good idea to upgrade to the latest firm...

Page 7: ...Meters IR ON OFF is available Outdoor Environmental Rating IP67 Corrosion Resistant Treatment Various Image Functionalities WDR BLC Defog Day Night Supports 120 tilt 360 pan range adaptive speed up to...

Page 8: ...nt over this same cable If you have a Gigabit network you have the potential for a streamlined interconnected video production environment With the introduction of NDI 5 you can now securely share net...

Page 9: ...may need to purchase these optional accessories Please browse to this page on our website for all your accessory needs 1x BirdDog EyesA200 1x Accessories BD A200 WM Wall Mount BD A200 CM Ceiling Mount...

Page 10: ...econds of waiting for an automatically assigned IP address your camera will fall back to a default address of 192 168 100 100 To ensure that you can always reach your camera it is recommended that you...

Page 11: ...ows Streaming and take note of the frame rate that is currently output from the camera displayed under Stream Info This frame rate should be set identically for all cameras according to the requiremen...

Page 12: ...rmined alternative NDI source Select an available NDI source for the failover function from the Available NDI Sources dropdown list Clicking the REFRESH button will add new sources to the list whereas...

Page 13: ...ces on the network should have the same name The name can be any combination of a z 0 9 and After renaming your camera navigate back to the SYSTEM menu and click the REBOOT button The camera will re i...

Page 14: ...uction and mounting style connections to A200 are made via the breakout cable NOTE All cables are tagged separately to indicate their functions Use a water proof IP67 rated junction box connection box...

Page 15: ...at the mounted position meets the bearing requirements Otherwise you are advised to reinforce the mounted position for the device weight For more information see the product datasheet Verify lightning...

Page 16: ...Cabling Requirements The eight wires in the network cable need to be inserted in parallel into the top of the cable connector The cable connector needs to be crimped in position When the cable connec...

Page 17: ...inguished for phoenix connectors of red and black cables 2 GND yellow green color GND is used to ground the camera so ensure that GND is connected to a reliable grounding point Starting the Camera Aft...

Page 18: ...ra To control and configure your camera you need to connect with control system or control keyboard for communication by RS 485 RS422 Set up the protocol of communication by control keyboard the camer...

Page 19: ...an image of these settings for use in setting the control keyboard Set the keyboard or control system to match the camera ID baud rate setting with the camera 1 Camera supports VISCA and PELCO D proto...

Page 20: ...e 8 On the IP control side use a browser to login go into the camera BirdUI default set to 192 168 100 100 go to Setup System Port Devices setting page set the Baud Rate camera ID Protocol to the same...

Page 21: ...OMP Manual Allows manual adjustment of the GAIN shutter speed SPEED and iris IRIS Iris Pri Iris Priority mode This mode allows you to set a fixed IRIS and EX COMP with exposure achieved by automatic s...

Page 22: ...1 5 3 4 5 6 7 5 9 10 5 If you set the level to 0 exposure compensation will be disabled Level 10 5 is the brightest and 10 5 is the darkest compensation value When EX COMP is set to OFF exposure compe...

Page 23: ...ble with sodium vapor lamps Exit Push the joystick to the right to exit this level menu Picture Menu Aperture The aperture is used to adjust the image edge sharpness The value of the aperture is high...

Page 24: ...ht condition Night The camera will stay in Night mode Black White no matter how bright the lighting condition is the camera illuminator will be turned on all the time The image will be stay in Black W...

Page 25: ...video output format from the following 1080p 60 59 94 50 29 97 25 1080i 60 59 94 50 720p 60 59 94 50 29 97 25 Pan Direction Normal Invert Supports normal and inverted directions on Pan movement Tilt...

Page 26: ...still store camera positions and image parameters but 17 128 presets will only store camera positions You can set the presets to number 17 128 if you don t want the preset to memorize the image param...

Page 27: ...s Total of 4 patterns can be managed Pattern Number The current pattern number that you are managing Record New Pattern Set up the above pattern 1 Push the joystick to the right to enter this setting...

Page 28: ...idle for the designated IDLE Time the camera will take action automatically The menu is used to set the IDLE time and value can be selected from 0 to 255 sec Idle Action After the IDLE time the camer...

Page 29: ...not have a DHCP server After 30 seconds of searching for an automatically assigned IP address your camera will fall back to a default address which is 192 168 100 100 In order to access the BirdUI on...

Page 30: ...ress details timeout fallback address and camera network name as well as NDI specific network settings 3 System System admin functions such as updates password change designation of group access and c...

Page 31: ...ils a Camera Name b Network Details c Online status of the camera d MAC address and current firmware version of the camera Network Network Details Most computer networks provide for both automatic and...

Page 32: ...ake identification easier when viewing NDI sources on a receiver such as a TriCaster vMix or Studio Monitor Be sure to make the name unique as no two devices on the network should have the same name T...

Page 33: ...nt for discovery The primary benefits of using mDNS is that it requires little or no administration to set up Unless the network is specifically configured to not allow mDNS NDI sources will be discov...

Page 34: ...r sharing with other cameras To upload a list 1 Click the CHOOSE FILE button to load your Remote IP List in UTF 8 encoded string format 2 Click the UPDATE button Do not upload a blank list NDI Group L...

Page 35: ...to account for the capacity of the network and the receiving device NDI Groups NDI supports Grouping which allows you to hide the visibility of video sources to viewers that are not part of the group...

Page 36: ...ply your failover source change Device Restart Restarts the NDI stream This may be necessary when changing key image settings e g resolution CamControl Camera Control Tab Menu On Off To adjust cameras...

Page 37: ...m Preset Memory is enabled in the camera Menu via the OSD image parameters such as picture white balance exposure focus mode zoom positions will also be saved with the Preset Exposure Tab Mode Full Au...

Page 38: ...PENSATION is set to OFF exposure compensation is disabled Iris Select the iris from CLOSE F1 8 Shutter Speed When video format is set to 720P25 1080P50 1080i50 1080P25 or 720P50 shutter speed can be s...

Page 39: ...following parameters are available depending on the chosen mode Speed white balance speed You can adjust the speed at which the camera reaches the white convergence point when AUTO1 or AUTO2 is chose...

Page 40: ...be particularly noticeable You can set the brightness from OFF LOW MID HIGH in each mode of the variable gamma modes Highlight Light Compensation HLC Attempts to adjust AE and AF to compensate for wh...

Page 41: ...The Color Hue option adjusts the temperature or phase in which any color is represented When looking at the color spectrum beyond the true color points Red Green Blue Cyan Magenta and Yellow there are...

Page 42: ...tting informs the camera where your desired level of enhancement should be focused If your image has large amounts of dark areas that need to be enhanced then set Brightness Compensation to Dark If yo...

Page 43: ...Waveform or RGB Parade scope the Histogram does not indicate the left to right physical position of the luminance values in the image Waveform The Waveform scope shows the distribution of luminance in...

Page 44: ...41 Camera Dimensions Unit mm Weight 5 5 kg 30 333 176 6 47 2 211 R75...

Page 45: ...rules formats and address scheme for exchanging datagrams or packets between a source computer or device and a destination computer or device LAN LAN Local Area Network is a network that connects comp...

Page 46: ...Protocol is a network communications protocol UDP UDP User Datagram Protocol is an alternative protocol to TCP that is used when reliable delivery of data packets in not required VISCA VISCA is a came...

Page 47: ...WELCOME TO THE FUTURE...

Page 48: ...birddog tv hello birddog tv...

Reviews: