


Electromyography (EMG)
User Manual
7 of 19
2.
Sensor Application Notes
The
biosignalsplux
EMG is designed to acquire muscular activity along a muscle fibre of interest.
Muscle activations are triggered by bioelectrical signals of very low amplitude sent from motor control
neurons on our brain to the muscle fibres. Electromyography (EMG) enables the translation of these
electrical signals into numerical values, enabling them to be used in a wide array of applications.
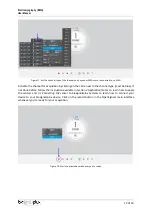
The two measuring electrodes must be placed along the muscle fibre and on the muscle hill. The
reference electrode must be placed in a region of low muscular activity, optimally on a bone such as
the elbow or the clavicle.
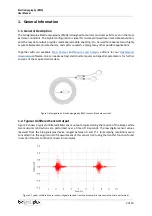
An example is the measurement of the muscular activity of the muscle
biceps brachii
(see muscle
highlighted in red in Figure 4). The electrode positioning for this muscle is shown in Figure 4 in which
the two measuring electrodes are placed on the muscle and the reference electrode on the bone.
Figure 4: Electrode positioning (I) to measure signals from the muscle biceps brachii (marked in red).
Possible electrode positions are listed in Table 1. The positive and the negative measuring electrodes
can be positioned in either way but along the muscle fibre and on the muscle belly. The reference
electrode must always be positioned on a bone.
Table 1: Possible electrode positions.
Positive Electrode (+)
(red sleeve)
Negative Electrode (-)
(black sleeve)
Reference Electrode
(white sleeve)
I
Muscle position 1
Muscle position 2
Bone
II
Muscle position 2
Muscle position 1
Bone


