background image


KBF / KBF P (E5.2) 02/2012 

page 25/103 


4.  Installation and connections 

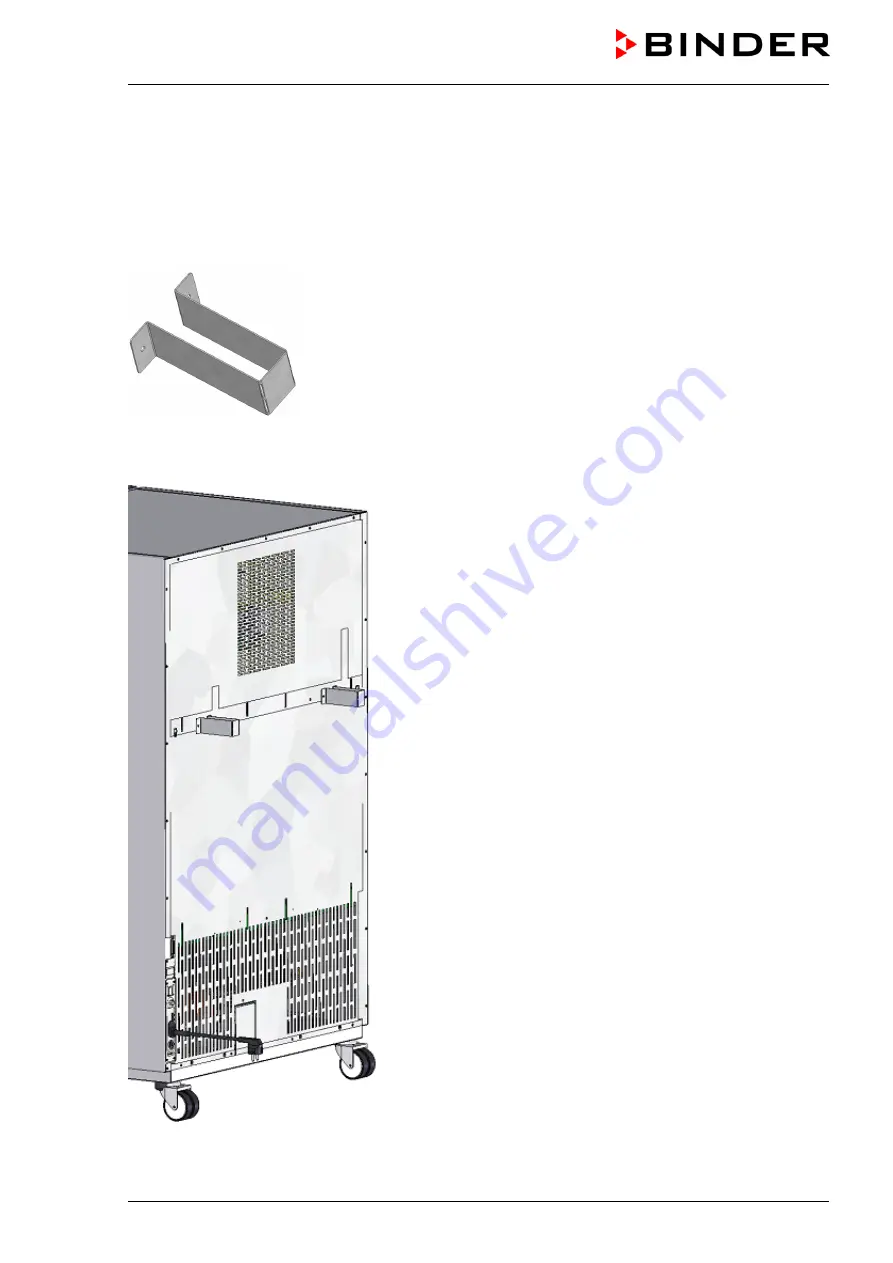
4.1  Spacers for rear wall distance 

Please fix both spacers with the supplied screws at the unit rear. This serves to ensure the prescribed 

minimum distance to the rear wall of 100 mm / 

3.94 in

.  


Figure 9: Spacer for rear wall distance 


Figure 10: Rear KBF / KBF P  

with mounted spacers 

Summary of Contents for KBF 115 (E5.2)

Page 1: ... light cassettes Model Art No KBF P 240 E5 2 9020 0160 9120 0160 9020 0244 9120 0244 KBF P 240 UL E5 2 9020 0106 9120 0106 KBF P 720 E5 2 9020 0143 9120 0143 9020 0246 9120 0246 KBF P 720 UL E5 2 9020 0169 9120 0169 BINDER GmbH Address Post office box 102 D 78502 Tuttlingen Tel 49 7462 2005 0 Fax 49 7462 2005 100 Internet http www binder world com E mail info binder world com Service Hotline 49 74...

Page 2: ...December 2006 on the harmoniza tion of the laws of Member States relating to electrical equipment de signed for use within certain voltage limits Directive 2006 95 CE du Parlement Européen et du Conseil du 12 dé cembre 2006 concernant le rapprochement des législations des États membres relatives au matériel électrique destiné à être employé dans certaines limites de tension EMV Richtlinie 2004 108...

Page 3: ...ent des matières CEI 61010 2 10 2003 NF EN 61010 2 10 2005 EMV EMC CEM EN 61326 1 2006 Corr 1 2008 Corr 2 2010 Elektrische Mess Steuer Regel und Laborgeräte EMV Anforderungen Teil 1 Allgemeine Anforderungen DIN EN 61326 1 2006 Berichtigung 1 2008 Berichtigung 2 2011 Electrical equipment for measurement control and laboratory use EMC requirements Part 1 General requirements IEC 61326 1 2005 Corr 1 ...

Page 4: ...P E5 2 02 2012 page 4 103 D 78532 Tuttlingen 25 07 2011 BINDER GmbH P M Binder Geschäftsführender Gesellschafter Managing Director Directeur général Dr H von Both Leiter F E Director R D Chef de service R D 3 3 ...

Page 5: ...KBF KBF P E5 2 02 2012 page 5 103 Product registration ...

Page 6: ...livery 21 3 2 Guidelines for safe lifting and transportation 22 3 3 Storage 23 3 4 Location of installation and ambient conditions 23 4 INSTALLATION AND CONNECTIONS 25 4 1 Spacers for rear wall distance 25 4 2 Wastewater connection 26 4 3 Freshwater supply 27 4 3 1 Automatic freshwater supply via water pipe 27 4 3 2 Manual freshwater supply via external freshwater can option 28 4 3 3 Connection ki...

Page 7: ...EMPERATURE SAFETY DEVICES 59 10 1 Over temperature protective device class 1 59 10 2 Safety controller temperature safety device class 3 1 59 10 2 1 Safety controller set point types 59 10 2 2 Checking and setting safety controller set point type and safety controller set point 60 10 3 Temperature safety device class 3 3 DIN 12880 option 61 10 3 1 Temperature safety device class 3 1 61 10 3 2 Temp...

Page 8: ...sposal of the transport packing 84 17 2 Decommissioning 84 17 3 Disposal of the unit in the Federal Republic of Germany 84 17 4 Disposal of the unit in the member states of the EC except for the Federal Republic of Germany 85 17 5 Disposal of the unit in non member states of the EC 87 18 TROUBLESHOOTING 87 19 TECHNICAL DESCRIPTION 90 19 1 Factory calibration and adjustment 90 19 2 Over current pro...

Page 9: ... manual are prerequisites for hazard free use and safety during operation and maintenance In no event shall BINDER be held liable for any dam ages direct or incidental arising out of or related to the use of this manual This operating manual cannot cover all conceivable applications If you would like additional information or if special problems arise that are not sufficiently addressed in this ma...

Page 10: ...r of a property in its proximity 1 2 2 Safety alert symbol Use of the safety alert symbol indicates a risk of injury Observe all measures that are marked with the safety alert symbol in order to avoid death or injury 1 2 3 Pictograms Warning signs Electrical hazard Hot surface Explosive atmosphere Stability hazard Lifting hazard Scalding hazard High humidity UV light hazard Pollution Hazard Harmfu...

Page 11: ...e hazard prohibition Instruction how to avoid the hazard mandatory action Observe all other notes and information not necessarily emphasized in the same way in order to avoid disruptions that could result in direct or indirect injury or property damage 1 3 Localization position of safety labels on the unit The following labels are located on the unit Pictograms warning signs Hot surface Risk of in...

Page 12: ...KBF KBF P E5 2 02 2012 page 12 103 Figure 1 Position of labels on the unit front KBF KBF P Figure 2 Position of labels on the unit front KBF UL KBF P UL ...

Page 13: ...ass 3 1 Art No 9020 0150 Art No 9020 0150 Project No Special application acc to project no 2 10 kW Nominal power 2 10 kW 200 240 V 1 N Nominal voltage 200 240 V 10 single phase unit 9 5 A Nominal current 9 5 Amp 50 60 Hz Power frequency 50 60 Hz Max operating pressure 15 bar Max operating pressure 15 bar 218 PSI in the refrigerating system R 134a 0 17 kg Refrigerant type R 134 A filling weight 0 1...

Page 14: ...rating the climatic cham ber With regard to operating the climatic chamber KBF KBF P and to the installation location please observe the guideline BGI GUV I 850 0 on safe working in laboratories formerly BGR GUV R 120 or ZH 1 119 laboratory guidelines issued by the employers liability insurance association for Germany BINDER GmbH is only responsible for the safety features of the unit provided ski...

Page 15: ...on of heat energy and humidity Familiarize yourself with any potential health risks caused by the charging material the contained moisture constituent or by reaction products that may arise during the temperature process Take adequate measures to exclude such risks prior to putting the climatic chamber into operation DANGER Electrical hazard Danger of death The unit must NOT become wet during oper...

Page 16: ...nclude any other materials incorporated in the unit or prohibited substances in relation to explosion protection Some gases especially clean gases do not have any influence on the humidity sensor Others do have a very small influence whereas others may influence the sensor to a larger extent The following gases do not influence the sensor and the humidity measurement Argon Ar carbon dioxide CO2 he...

Page 17: ...ests acc to ICH guideline CPMP ICH 279 95 Q1B KBF P Furthermore it permits simulating exactly and over long periods constant conditions for other applications such as sample conditioning for material testing of paper textiles plastics building materials etc A resistance humidifying system humidifies the air For this purpose use deionized demineralized water The option BINDER Pure Aqua Service allo...

Page 18: ...F P E5 2 02 2012 page 18 103 2 1 Unit overview Figure 5 KBF 240 A Instrument panel with MB1 display program controller B Door handle C Outer door D Refrigerating machine and humidity generation module A B C D ...

Page 19: ...le with options analog outputs alarm contact and additional Pt 100 sensor 3 Main power switch ON OFF 4 Humidity switch ON OFF 5 DIN socket additional Pt 100 temperature sensor option 6 DIN socket analog outputs option 7 DIN socket alarm contact option 8 Ethernet interface with indication of the MAC address for computer communication 9 RS422 interface for service purpose only ...

Page 20: ...y module with option temperature safety device class 3 3 10 Switch for ICH compliant illumination cool white KBF P 11 Switch for ICH compliant illumination BINDER Q1B Synergy Light UVA cool white KBF P 12 Not used 13 Not used 14 Temperature safety device class 3 1 part of option safety device class 3 3 15 Temperature safety device class 3 2 part of option safety device class 3 3 ...

Page 21: ...se remove any transportation protection devices and adhesives in on the unit and on the doors and take out the operating manuals and accessory equipment CAUTION Sliding or tilting of the unit Damage to the unit Risk of injury by lifting heavy loads Do NOT lift or transport the unit using the door the handle or the lower housing Lift units size 115 from the pallet at the four lower corners with the...

Page 22: ... climatic chamber with transport straps Do NOT lift or transport the unit using the door the handle or the lower housing Lift units size 115 at the four lower corners with the aid of 4 people Lift units size 240 corners with the aid of 6 people or with a fork lifter Set the fork lifter only from the front or rear in the middle of the unit Lift units size 720 using technical devices fork lifter Set...

Page 23: ...ance completely before shut down Set the humidity to 0 r H and turn on humidity switch 4 Set the temperature set point to 60 C 140 F for approx 2 hours Manual mode Only then shut down the unit at the main power switch 3 and close the tap of the water supply When after storage in a cold location you transfer the unit to its warmer installation site condensation may form Before start up wait at leas...

Page 24: ...ap 15 9 When placing several units of the same size side by side maintain a minimum distance of 250 mm 9 84 in between each unit Wall distances rear 100 mm 3 94 in sides 160 mm 6 29 in Spacing above the unit of at least 100 mm 3 94 in must also be accounted for CAUTION Danger by stacking Damage to the units Do NOT place climatic chambers on top of each other To completely separate the unit from th...

Page 25: ... Spacers for rear wall distance Please fix both spacers with the supplied screws at the unit rear This serves to ensure the prescribed minimum distance to the rear wall of 100 mm 3 94 in Figure 9 Spacer for rear wall distance Figure 10 Rear KBF KBF P with mounted spacers ...

Page 26: ...e inclination of 1 m 3 28 ft and a maximum total length of 3 m 9 8 ft Protect both ends of the drainage hose with two of the four supplied hose clamps Wastewater is collected in an internal can with a volume of approx 0 5 liters It is pumped off only when required thus there is no continuous wastewater flow 15 18 17 15 Power cable 16 not used 17 Freshwater connection IN with screw thread for hose ...

Page 27: ...uality is excluded from liability by BINDER GmbH The warranty becomes void in the event of use of water of deviating quality 4 3 1 Automatic freshwater supply via water pipe An enclosure inside the unit contains the connection kit for freshwater and wastewater Install the freshwa ter connection using either the enclosed water hose or another pressure resistant one To accomplish this remove the cov...

Page 28: ...y now re mains shut until it is manually released Assembly Screw the hose burst protection device onto a water tap with a G inch right turning thread connection The connection is self sealing Establish the connection between the safety kit and the chamber with a part of the supplied hose Protect both ends of the hose by the supplied hose clamps We recommend connecting the hose as the last step in ...

Page 29: ...stem drained off charging material could be sucked out of the chamber via the steam generator into the tap water system and therefore contaminate the drinking water According to standard DIN 1988 part 4 the safety kit with a reflux protection device provides security in case of short term utilization of substances with low risk po tential When using substances bearing a higher risk potential insta...

Page 30: ...of hose burst protection and reflux protection devices Calcification can impair the function of both valves We recommend an annual inspection by a skilled plumber The plumber should remove the safety kit with the reflux protection device to check both valves by hand for proper function calcification or blockage CAUTION Danger of calcification Impairment of valve function Have a plumber inspect the...

Page 31: ...ree acc to IEC 61010 1 2 Installation category acc to IEC 61010 1 II CAUTION Danger of incorrect power supply voltage Damage to the equipment Check the power supply voltage before connection and start up Compare the power supply voltage with the data indicated on the type plate See also electrical data chap 19 4 To completely separate the unit from the power supply you must disconnect the power pl...

Page 32: ...es Use the covers supplied to protect any unused connection socket Do not place any charging material directly onto the light cassettes because those are heated by the fluo rescent tubes which would lead to exposing the charging material to undefined temperatures The tem perature directly below or on the light cassettes is not equal to the temperature displayed at the tempera ture controller Place...

Page 33: ...iew of the MB1display program controller W X CONFIG HAND VIEW EXIT W 08 43 55 20 12 05 TEMP C 25 0 36 8 HUMID rH 50 0 58 6 Pilot lamp Ready for operation EXIT button to exit a menu point AUTOMATIC button to start a previously entered program ENTER button to confirm a selection Navigation buttons functions are assigned by the menu Figure 15 Temperature and humidity program controller MB1 The 2 chan...

Page 34: ...actual power failure had occurred In Manual Mode HAND the controller regulates tempera ture and humidity to the last entered set points while in Program Mode AUTO it regulates temperature and humidity to their set points that were reached during the program operation The power failure is not ed in the event list chap 6 2 however no error message is displayed indicating that a power failure has tak...

Page 35: ... of buttons below the display is context sensitive The inscription above the buttons on the display defines the button s function Do NOT change the temperature unit from C to F User Level Date and time Summer time Language Temperature unit Buzzer Safety controller User code No English C 1 Active Sollwert Art Offset Language English User settings Instrument data Contrast Displ Power down Contin ope...

Page 36: ...0 0 58 6 rH HAND or W X 08 43 55 15 12 09 CONFIG VIEW PGM FAN SPEED 50 HAND X TEMP 26 8 C X HUMID 58 6 rH No heating or refrigeration no humidification or dehumidification The actual values X approximate ambi ent temperature and humidity Fan operates at a 50 rate NORMAL DISPLAY Manual Mode W X 08 43 55 15 12 09 CONFIG VIEW PGM TEMP 40 0 36 8 C HUMID 65 0 58 6 rH HAND Temperature and humidity value...

Page 37: ...ined in menu Contin operation Contin operation Enter an operation time to determine the period of display activity Outside the defined time the display is automatically turned off Pressing down any key will reactivate the display After the time set in menu Displ power down the display will turn off again when the actual time is not within the operation time fixed in menu Cont operation User Level ...

Page 38: ...dividually Automatic The summer time arrangement for central Europe is enabled summer time from last Sunday of March until last Sunday of October Language Select the menu language as German English or French chap 6 1 Temperature unit Do NOT change the temperature unit from C to F Buzzer Audible alarm buzzer Inactive No audible alarm will sound if an alarm event happens chap 11 Active An audible al...

Page 39: ... until this procedure History display with cursor Select button H History A pink line appears on the display marking as a cursor the selected moment You can now recall the recorded data of any defined mo ment Top left Date and time of the selected cursor position are displayed Below The corresponding temperature and humidity val ues of this instance are numerically and graphically dis played Scrol...

Page 40: ...lues of this moment are numerically and graphically displayed The cursor line marks the corresponding moment The available presentation depends on the pre selected storage rate This means the higher the storage rate the more precisely but shorter the data representation will be see table below Storage rate Storage duration hours days 5 sec 60 2 5 10 sec 120 5 1 min 720 30 5 min 3600 150 10 min 720...

Page 41: ...talogging Interface Analog view Time div Sollwert Art Storage rate EXIT Datalogging Normal operation Event operation Timed operation Normal operation Store status Store value s Storage rate Actual val 60s On CONFIG User Settings Configuration 2 Configuration 1 Parameters Choose variation Parameters Choose variation 2 X 3 X 11 44 17 20 12 09 11 44 17 20 12 09 2 X User Settings Configuration 2 Confi...

Page 42: ...igerating function no humidification Fan working at 50 rate factory setting Toggling to Manual Mode Change of page Toggling between temperature set point humidity set point and fan speed Arrow buttons to select the operation lines no function Arrow buttons to enter the value Button to move the decimal point 08 43 55 15 12 09 HAND 08 43 55 15 12 09 Operating contacts Contact 1 Contact 2 Contact 3 C...

Page 43: ...dity see temperature humidity diagram chap 12 With set point type Limit adapt the safety controller chap 10 2 or the temperature safety device class 3 3 option chap 10 3 always when you changed the temperature set point Set the safety controller set point or the set point of temperature safety device class 3 3 option by approx 2 C to 5 C above the controller temperature set point Recommended setti...

Page 44: ...n Manual Mode In Manual Mode HAND all functions return exactly to the same status the chamber had before power failure The set points are immediately resumed No error message indicating that a power failure has taken place is displayed However the power failure will appear in the event list 9 Program operation The 2 channel program controller MB1 permits programming temperature and humidity cycles...

Page 45: ...TP Program 2 Entry of humidity values TP Program 3 no function 9 2 Entry of temperature values and fan speed 08 43 57 15 12 09 Prog Select Prog 1 PROG 01 Prog 2 PROG 02 Prog 3 PROG 03 Prog 4 PROG 04 Prog 5 PROG 05 Prog 6 PROG 06 Prog 7 PROG 07 Prog 8 PROG 08 Prog 9 PROG 09 Prog 10 PROG 10 Prog 11 PROG 11 Prog 1 PROG 01 TP Program 2 TP Program 3 TP Program 1 Select the first subroutine TP Program 1...

Page 46: ...f repeat cycles You can enter Program sections into this program table Hit the PGM button An inquiry display appears allowing you to enter or delete individual program sec tions ZP Abschnitt Abs Nr 5 insert delete In this view new program lines can be entered or deleted new New lines are added below in the table insert New lines are added above a previously selected line delete Individual lines th...

Page 47: ...ture safety device class 3 3 option chap 10 3 to the highest temperature set point value of the program actually used Check the safety device for each temperature program and change it if necessary Set the safety controller set point or the set point of the temperature safety device class 3 3 option by approx 2 C to 5 C above the controller temperature set point Recommended setting Set point type ...

Page 48: ... equivalent to the temperature value entry described in chap 9 2 Time course of the subroutines When starting the overall program both subroutines TP Program 1 and TP Program 2 will run synchro nously They should be of the same duration because each of the subroutines becomes inactive after run off i e no heating or refrigeration and 50 fan speed after ZP 1 is completed no humidification after ZP ...

Page 49: ... or humidity value X follows the con tinually moving set point W at any time Program sections with constant temperature humidity The initial values of two subsequent program sections are identical so the temperature or humidity remains constant during the whole time of the first program section Sudden temperature humidity changes set point step Steps are temperature or humidity changes ramps that ...

Page 50: ...ram section Program entry as set point ramp example of a temperature program W C t min 01 02 03 04 0 20 40 60 80 100 30 120 180 380 05 Tolerance maximum Tolerance maximum Program table corresponding to the diagram above Program section Set point temp Fan Section time Operation lines Target section No of cycles Min tolerance Max tolerance 01 40 100 00 30 00 Off 1 0 1999 9999 02 60 100 01 30 00 Off ...

Page 51: ... Max tolerance 01 40 100 00 30 00 Off 1 0 1999 9999 02 40 100 00 00 01 Off 1 0 1999 9999 03 60 100 01 30 00 Off 1 0 5 5 04 60 100 00 00 01 Off 1 0 1999 9999 05 80 100 01 00 00 Off 1 0 2 2 06 80 100 00 00 01 Off 1 0 1999 9999 07 20 100 03 20 00 Off 1 0 1999 9999 08 20 100 00 00 01 Off 1 0 1999 9999 Now enter the values of the above program table into one of the 25 program places of the controller M...

Page 52: ...own for at least 5 seconds Programming of tolerances can extend program duration The number 1999 for the tolerance minimum means and the number 9999 for the tolerance max imum means Entry of these numbers will never lead to program interruption When leaving the tolerance bandwidth in one of the subroutines the course of time of the whole pro gram i e of both subroutines is halted During the rapid ...

Page 53: ...ad ed Program section Set point temp Fan Section time Operation lines Target section No of cycles Min tolerance Max tolerance 01 40 100 00 30 00 Off 1 0 1999 9999 02 60 100 01 30 00 Off 1 0 5 5 03 90 100 01 00 00 Off 2 30 2 2 04 90 100 03 20 00 Off 1 0 1999 9999 05 20 100 00 00 01 Off 1 0 1999 9999 Sections 02 and 03 will be executed in total 31 times only then will the program continue Entry of t...

Page 54: ...ram To delete individual program sections table lines use the inquiry display for adding or deleting program sections chap 9 1 DEL PGM 09 13 47 15 12 09 Prog Select Fr Abs 372 Prog 1 PROG 01 Prog 2 PROG 02 Prog 3 PROG 03 Prog 4 PROG 04 Prog 5 PROG 05 Prog 6 PROG 06 Prog 7 PROG 07 Prog 8 PROG 08 Prog 9 PROG 09 Prog10 PROG 10 Prog11 PROG 11 Prog12 PROG 12 Prog13 PROG 13 Prog14 PROG 14 Prog15 PROG 15...

Page 55: ...KBF P E5 2 02 2012 page 55 103 9 11 Template for temperature profile Programmer Program No 1 to 25 Date Program title Operation lines are without function Project Time 10 20 30 40 60 70 80 90 100 50 C 10 0 ...

Page 56: ...F KBF P E5 2 02 2012 page 56 103 9 12 Template for humidity profile Programmer Program No 1 to 25 Date Program title Operation lines are without function Project Time 10 20 30 40 60 70 80 90 100 50 r H 0 ...

Page 57: ...ction Project Section No Set point Temperature W 1 Fan speed FAN Section time Time Operation lines no function Sk Start section for repeat cycles No Number of re peat cycles Cy Tolerance minimum Temperature Tmin Tolerance maximum Temperature Tmax Parameter set Pa 01 1 02 1 03 1 04 1 05 1 06 1 07 1 08 1 09 1 10 1 11 1 12 1 13 1 14 1 15 1 16 1 17 1 18 1 19 1 20 1 Default setting ...

Page 58: ... function Sk Start section for repeat cycles No Number of repeat cycles Cy Toler minimum Humidity Tmin Toler maximum Humidity Tmax Parameter set Pa 01 00000000 1 02 00000000 1 03 00000000 1 04 00000000 1 05 00000000 1 06 00000000 1 07 00000000 1 08 00000000 1 09 00000000 1 10 00000000 1 11 00000000 1 12 00000000 1 13 00000000 1 14 00000000 1 15 00000000 1 16 00000000 1 17 00000000 1 18 00000000 1 ...

Page 59: ...t extremely high temperatures With option safety device class 3 3 chap 10 3 the safety controller is not used In this case do NOT change the pre set value of 100 C 212 F The message TEMPERATURE LIMIT on the controller display indicates safety controller activity The safety controller controls the climatic chamber to the entered safety controller set point until the tempera ture inside the chamber ...

Page 60: ...Level Date and time Summer time Language Temperature unit Buzzer Safety controller User code No English C 1 Active Safety Controller Setpoint type Setpoint 42 0 Limit Sollwert Art Grenzwer Offset Setpoint 0042 0 Sollwert Art Grenzwer Offset Setpoint type Limit Offset In the menu User Level select the submenu Safety controller Select the safety controller set point type Limit or Offset in the field...

Page 61: ... regulatory function of the safety device class 3 2 This protection against excessively low tem peratures can for example serve to protect sensitive loads from under cooling Both safety devices are functionally and electrically independent of the temperature control system If an error occurs they perform a regulatory function Safety devices class 3 1 14 and class 3 2 15 are located in the left lat...

Page 62: ...nimum position 1 the safety de vice class 3 2 has no effect If it is set to a temperature somewhat lower than that selected by means of the controller it functions as a protective device for the material under treatment If the temperature safety device class 3 2 has assumed regulation identifiable by the red alarm lamp 15a lighting up the message TEMP ALARM on the controller display and the buzzer...

Page 63: ... the unit is defective In case of freshwater supply via freshwater can option chap 15 9 Water can is empty Humidification is turned off In case of refrigerating operation the interior is strongly dehumidified When the water sup ply is functional again the humidity system restarts or the unit is defec tive HUMID ALARM after 60 sec Temperature deviation of more than 2 C of the entered set point TEMP...

Page 64: ... button does not cancel the notification or alarm indication the reason for the disturbance was not removed correctly Contact BINDER Service The RESET button allows resetting the notification or alarm messages regarding temperature and humidity only within a tolerance sector of 2 C resp 5 r H With values outside this range contact BINDER service If the humidity deviates by more than 5 r H from the...

Page 65: ...nge in Figure 21 Only within this area will the unit not be exposed to excessive moisture due to condensation In the short term set points outside the optimum range can also be targeted The control accu racies of 3 r H however cannot be guaranteed in this case 0 10 20 30 40 50 60 70 80 90 100 10 20 30 40 50 60 70 80 90 100 r H C A B 0 10 20 30 40 50 60 70 80 90 100 10 20 30 40 50 60 70 80 90 100 r...

Page 66: ...ating at humidity values 70 r H for a long period Dry the appliance completely before shut down Set the humidity to 0 r H and turn on humidity switch 4 Set the temperature set point to 60 C 140 F for approx 2 hours Manual mode Only then shut down the unit at the main power switch 3 and close the tap of the water supply Having turned off the unit by the main power switch 3 always close the water su...

Page 67: ...OT responsible for the water quality provided by the customer Any problems and malfunctions that might arise following use of water of deviating quality is excluded from liability by BINDER GmbH Automatic freshwater supply via water pipe With this type of supply the humidity system is continuously functional Manual freshwater supply via freshwater can option chap 15 9 With this type of supply the ...

Page 68: ...s possible Defrost the unit manually With temperature set points 5 C 41 F regularly defrost the unit manually Set the humidity to 0 r H and turn on the humidifying system at humidity switch 4 Set the temperature to 40 C 104 F Manual Mode Let the unit operate for about 30 minutes with the door closed Too much ice on the evaporator is noticeable by reduced refrigerating performance When turning off ...

Page 69: ... BINDER Q1B Synergy Light fluorescent tubes which contain a UVA portion independently from the cool white fluorescent tubes emitting in the visible spectral range Optimum homogeneity of the spectral distribution and the intensities in LUX and UVA on the shelf sur face even with high intensity values obtained by the BINDER ICH light and the special lens of the headlight This guarantees that all sam...

Page 70: ...ght cassettes The KBF P is equipped with fluorescent tubes for UVA and the visible spectral range Special reflector material in the cassettes ensures optimum light diffusion and efficient utilization of the high light intensity The lens of the headlight leads to a homogeneous intensity distribution even with a short distance to the shelf The fluorescent tubes are built in light cassettes that can ...

Page 71: ...e 25 Opposite arrangement of two fluorescent tubes When replacing the fluorescent tubes observe tube orientation inscription How to replace the fluorescent tubes is described in chap 16 2 Operation with light cassettes and illumination on Maximum temperature 60 C 140 F Operation with light cassettes and illumination off Do also NOT operate the unit at tempera tures 60 C 140 F Otherwise the lifetim...

Page 72: ...suring system for temperature and humidi ty available for different temperature ranges According to the selected kit the Data Logger can measure and record also the ambient temperature and humidity values via a second multi function sensor BINDER Data Loggers are equipped with a keyboard and a large LCD display alarm functions and a real time function Measurement data are recorded in the Data Logg...

Page 73: ...nfiguration of the DIN socket 7 Temperature contact Humidity contact Pin 1 Pin Pin 2 Make Pin 3 Pin Pin 4 Make In case of a temperature alarm pins 1 and 2 are open with humidity alarm pins 3 and 4 are open This happens simultaneously with the alarm message shown on the controller display In case of power failure both contacts are open Maximum loading capacity of the switching contacts 24V AC DC 2 ...

Page 74: ...Maximum permitted operating temperature with this option 50 C 122 F WARNING Exceeding the permitted maximum temperature Electrical hazard Danger of death Damage to the internal socket Do NOT exceed the temperature set point of 50 C 122 F Set the safety controller to 50 C 122 F With optional temperature safety device class 3 3 set the mechanical thermostat class 3 1 to 50 C 122 F Heat emission of e...

Page 75: ... KEY LOCK is displayed on the controller MB1 display chap 11 15 8 Additional flexible Pt 100 temperature sensor option An additional flexible Pt 100 temperature sensor allows measuring the temperature of the charging mate rial by means of an independent measuring system utilizing Pt 100 entry The Pt 100 sensor s top protec tive tube can be immersed into liquid substances Pt 100 Sensor PIN 1 Pt 100...

Page 76: ...water Volume 20 liters 0 71 cu ft The cans are placed in holding devices You can affix them directly at the rear of the unit or place them next to the unit Figure 30 Rear view KBF KBF P with installed external water cans option 15 9 1 Mounting the freshwater can 1 Fixing if required Hang the can with its holding device on its 4 carriers You can install it either at the left or the right side Cable...

Page 77: ...ose clamp You can use a part of the standard supplied water hose Screw the hose nozzle brass to the free edge of the hose and screw it directly onto the freshwater connection IN 17 at the rear of the unit When the freshwater can is empty within 60 seconds the alarm message HUMID ALARM will be dis played on the controller the buzzer sounds chap 11 and the humidity system turns off To guarantee humi...

Page 78: ...Wastewater hose connection 23 Figure 33 Wastewater can option Plug the free hose edge to the wastewater connection OUT 18 at the rear of the unit and secure it with a hose clamp You can remove the wastewater can with its holding device for emptying disconnect the hose first before emptying CAUTION Overflow of the wastewater can Damage to the surrounding Empty the wastewater can in a timely manner ...

Page 79: ...reshwater can if required Hang the can with its holding device on its 4 carriers You can install it either at the left or the right side 2 Cable connections of the freshwater can Connect the plug of the cable to the socket 22 at the rear of the unit as described in chap 15 9 1 3 Hose connections Plug the wastewater hose into the hose connection 24 of the freshwater can and secure it with a hose cl...

Page 80: ...ystem must only be conducted by qualified personnel who underwent training in accordance with EN 13313 2010 e g a refrigera tion technician with certified expert knowledge acc to regulation 303 2008 EC Follow the national statutory regulations Ensure regular maintenance work is performed at least once a year and that the legal requirements are met regarding the qualifications of service personnel ...

Page 81: ...butor 16 2 Replacement of the fluorescent tubes The average life expectancy of the fluorescent tubes is about 10 000 hours We recommend replacing the tubes every year in order to ensure full light intensity To replace the fluorescent tubes unscrew and remove the clamping strips resting against the glass plate Allen screwdriver Then lift the plate from the cassette Rotate the tubes by 90 and pull t...

Page 82: ...faces with a moistened towel Let the unit dry Soapsuds may contain chlorides and must therefore NOT be used for cleaning Following cleaning leave the unit door open or remove the access port plugs Decontamination Disconnect the chamber from the power supply prior to decontamination Disconnect the power plug You can use the following disinfectants Inner chamber Standard commercial surface disinfect...

Page 83: ...ued to you An authorization number will be issued after receiving your complaint either in writing or by telephone prior to your sending the BINDER product back to us The authorization number will be issued following receipt of the information below BINDER product type and serial number Date of purchase Name and address of the dealer from which you bought the BINDER product Exact description of th...

Page 84: ... the unit as described in chap 17 3 to 17 5 17 3 Disposal of the unit in the Federal Republic of Germany According to directive 2002 96 EC of the European Parliament and of the Council on waste electrical and electronic equipment WEEE BINDER devices are classified as monitoring and control instruments category 9 only intended for professional use They must not be disposed of at public collecting p...

Page 85: ... toxic substances and sources of infection from the unit dispose of it as special waste according to national law Fill out the contamination clearance certificate chap 20 and enclose it with the unit WARNING Contamination of the device with toxic infectious or radioactive substances Danger of intoxication Danger of infection NEVER take a unit contaminated with toxic substances or sources of infect...

Page 86: ...or radioactive substances in order to eliminate any health hazards to the employees of the recycling companies Prior to handing the unit over to a recycling company it is the user s responsibility that it is free from toxic infectious or radioactive substances Prior to disposal clean all introduced or residual toxic substances from the unit Prior to disposal disinfect the unit from all sources of ...

Page 87: ...ating Chamber heating permanently set point not maintained Controller defective Contact BINDER service Semiconductor relay defective Controller not well adjusted or adjustment interval exceeded Calibrate and adjust controller Chamber doesn t heat up Pt 100 sensor defective Contact BINDER service Heating element defective Semiconductor relay defective Chamber doesn t heat up when turned on Safety c...

Page 88: ...ice Electro valves defective No or not enough refrigerant Too much external heat load Reduce heat load Humidity Humidity fluctuation Control accuracy of 3 r H is not reached Door gasket defective Replace door gasket Door opened very frequently Open doors less frequently Humidity fluctuation together with temperature fluctuation 1 C with a set point approx 3 C above ambient temperature Place of ins...

Page 89: ...m heating refrigerating or humidification speed Program stops one section too early Program line is incomplete When programming define the end value of the desired cycle by adding an additional section with a section time of at least one second Ramp temperature transitions are only realized as steps When using the Program Editor of the software APT COM 3 DataControlSystem the setting step has been...

Page 90: ...t to the administration of measurement and test equipment that is also a constituent part of the BINDER QM DIN EN ISO 9001 systems They are controlled and calibrated to a DKD Standard at regular intervals 19 2 Over current protection The devices are equipped with an internal fuse not accessible from outside If this fuse is blown please contact an electronic engineer or BINDER service 19 3 Definiti...

Page 91: ...dard max 2 5 2 9 2 15 Load per rack kg lbs 30 66 30 66 45 99 Permitted total load kg lbs 100 220 100 220 150 331 Weight empty kg lbs 129 284 184 406 309 681 Temperature data without humidity Temperature range 1 C F 0 to 70 32 to 158 0 to 70 32 to 158 0 to 70 32 to 158 Temperature fluctuation K 0 1 0 1 0 1 Temperature uniformity variation at 25 C 77 F K 0 2 0 2 0 2 at 40 C 104 F K 0 2 0 3 0 2 Max h...

Page 92: ...ion degree acc to IEC 61010 1 2 2 2 Over current release category B 2 poles Amp 16 16 16 1 Lower values are valid at an ambient temperature of max 25 C 77 F 2 to 98 of the set value 3 Use this value for sizing air condition systems All technical data is specified for unloaded units with standard equipment at an ambient temperature of 25 C 77 F and a power supply voltage fluctuation of 10 The tempe...

Page 93: ...ht cassettes 1 C F 0 to 70 32 to 158 Temperature range with light cassettes with illumination 1 C F 10 to 60 50 to 140 Max heat compensation up to 40 C 104 F with illumi nation W 400 1000 Climatic data with humidity Temperature range without light cassettes 1 C F 10 to 70 50 to 158 10 to 70 50 to 158 Temperature range with light cassettes with illumination 1 C F 10 to 60 50 to 140 20 to 60 68 to 1...

Page 94: ...r current release category B 2 poles Amp 16 16 1 Lower values are valid at an ambient temperature of max 25 C 77 F 2 to 98 of the set value 3 Average value measured at 25 C 77 F with a spherical sensor 10 by 12 cm 4 7 in below the light cassette 4 Use this value for sizing air condition systems All technical data is specified for unloaded units with standard equipment at an ambient temperature of ...

Page 95: ... Light for 1 light cas sette KBF P Temperature safety device class 3 3 acc to DIN 12880 Zero voltage relay alarm outputs for temperature and humidity with DIN plug 6 poles Interior lighting not for UL units Keyboard locking BINDER INDIVIDUAL customized solutions Lockable door Interface RS422 BINDER Data Logger kit for temperature humidity TH 70 chamber values or TH 70 70 chamber and ambient values...

Page 96: ...012 0620 8012 0620 Door gasket for glass door 6005 0204 6005 0149 6005 0198 Door gasket silicone kettle 6005 0207 6005 0147 6005 0196 Door gasket silicone outer door 6005 0203 6005 0161 6005 0197 Intermediate door gasket silicone 6005 0192 Light cassette KBF P 8009 0610 8009 0495 Set fluorescent tubes ICH light light color 640 cool white BINDER Q1B Synergy Light for 1 light cassette KBF P 8012 065...

Page 97: ...to DIN 12880 including certificate 27 measuring points temperature 9 measuring points humidity DL014026 Calibration service KBF P Art Nr Calibration of temperature and humidity including certificate DL015021 Spatial temperature and humidity measurement including certificate 2 5 measuring points temperature 1 measuring point humidity DL015022 Spatial temperature and humidity measurement including c...

Page 98: ...KBF KBF P E5 2 02 2012 page 98 103 19 7 Dimensions KBF 115 ...

Page 99: ...KBF KBF P E5 2 02 2012 page 99 103 19 8 Dimensions KBF 240 KBF P 240 ...

Page 100: ...KBF KBF P E5 2 02 2012 page 100 103 19 9 Dimensions KBF 720 KBF P 720 ...

Page 101: ... bevor das Gerät Bauteil eintrifft Eine weitere Ko pie soll dem Gerät Bauteil beigefügt sein Ggf ist die Spedition zu informieren Incomplete information or non conformity with this procedure will inevitably lead to substantial delays in processing We hope you will have understanding for this measure which lies outside of our area of in fluence and that you will help us to speed up this procedure U...

Page 102: ...rdous substances weder giftige noch sonstige gefährliche Stoffe enthält oder solche anhaften That eventually generated reaction products are non toxic and also do not represent a hazard auch evtl entstandene Reaktionsprodukte weder giftig sind noch sonst eine Gefährdung darstellen Eventual residues of hazardous substances have been removed evtl Rückstände von Gefahrstoffen entfernt wurden 4 2 For ...

Page 103: ...Angaben entsteht haften und BINDER gegen eventuell entstehende Schadenansprüche Dritter freistellen We are aware that in accordance with Article 823 of the German Civil Code BGB we are directly liable with regard to third parties in this instance especially the employees of BINDER GmbH who have been entrusted with the handling repair of the unit component Es ist uns bekannt dass wir gegenüber Drit...

Reviews:

Related manuals for KBF 115 (E5.2)