Bernina Bernette b70 Workbook Download Page 11

1.

  Use the fabric and stabilizer hooped in the Large Hoop 

from Page 6. 

2. 

Place the hoop’s plastic template into the inner ring of the 
hoop. 

3. 

Attach the hoop to the machine. Refer to Page 7.

4. 

Touch the Setup Program icon.

5. 

Select the Embroidery Settings icon. 

6. 

Select Calibrate the Hoop icon. The machine will automat-
ically recognize the hoop that is attached.
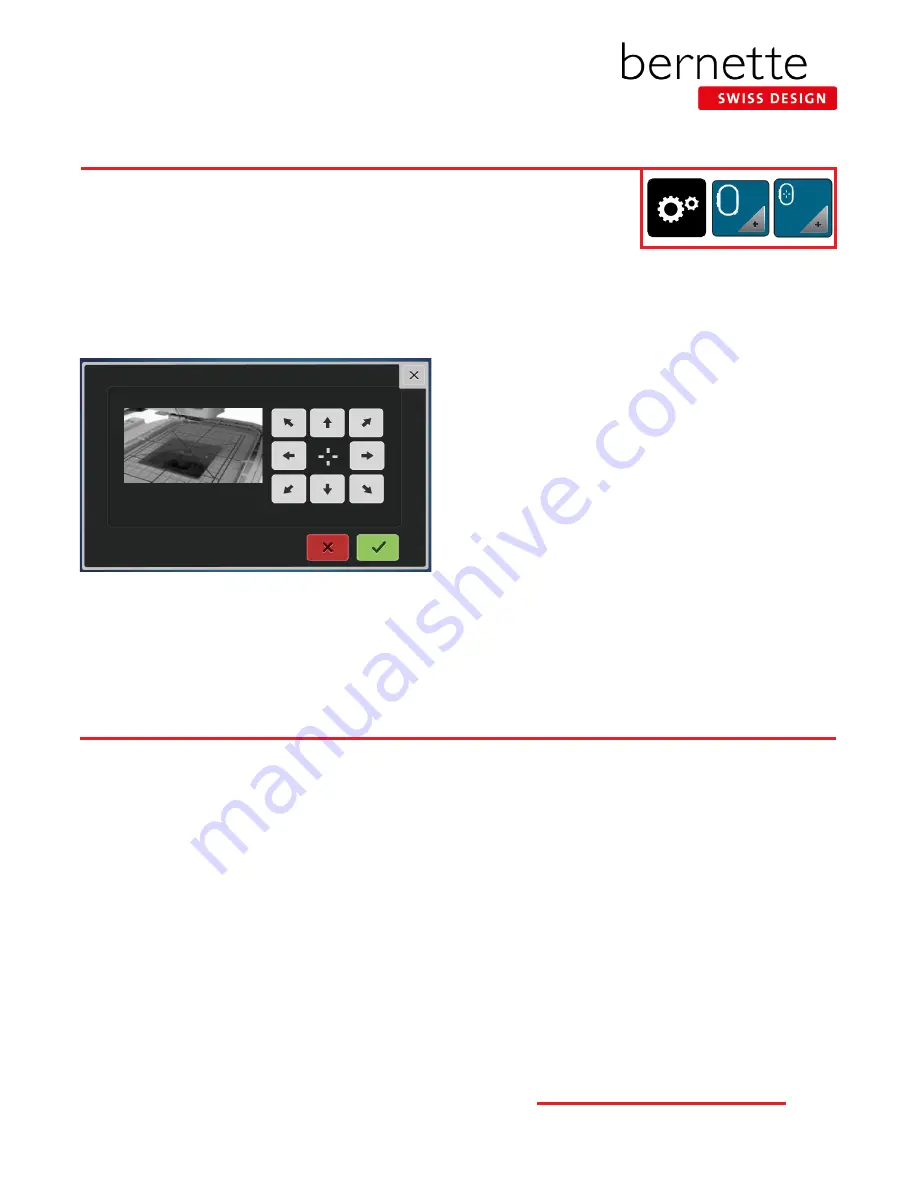
7. 

If the needle is not positioned exactly in the center of the 
template, it must be centered using the arrow icons.

8. 

Confirm with the green check box; the adjustment is 
saved.

Hoop Calibration

The Large, Medium and Small Hoops must be calibrated when they are new to the machine, 
and also after every update. The calibration can be done with any of the three hoops, but 
it needs only be done with one. You will only see the visual for the Medium Hoop regard-
less of the hoop being calibrated. 

Calibration is essential because the variance of the basting box when selected to around the hoop perimeter is only a couple 
millimeters away from the edge of the hoop.

For the most accuracy in calibration, have fabric hooped (with fabric and stabilizer) when calibrating a hoop.

The Thread Away feature causes a swift movement of the hoop after a thread has been cut that pulls the top thread up out 
of the fabric and brings it out of the way so the top-side embroidery project will be perfectly clean with no thread to clip. This 
feature is always active. 

NOTE:

 Thread Away is always active and will engage anytime the thread is cut. Although the jump stitch length cannot be set 

in the machine, the jump stitch length can be changed in Toolbox Embroidery Software. Set it very short (e.g. 3pts) if you wish 
the thread to be cut between shorter jumps.

Thread Away

11

b e r n e t t e   E M B R O I D E R Y   M A C H I N E   W O R K B O O K 

Summary of Contents for Bernette b70

Page 1: ...NA of America Permission granted to copy and distribute in original form only Content may not be altered or used in any other form or under any other branding For b79 and b70 DECO EMBROIDERY MACHINES...

Page 2: ...15 Editing Adding Deleting Designs 16 Centering a Combined Design In the Hoop 17 Check Motif Size 17 Placement Absolute Check 18 Change Thread Color 19 Change Thread Brand 19 Changing To Single Color...

Page 3: ...r bernette machine keep this workbook as a reference guide as you use your machine and explore the creative possibilities it affords Completing the class is just the first step Using the infor mation...

Page 4: ...ble or counter top sturdy enough to support the weight of the machine with out sagging Carefully slide module from left to right into the embroidery module connection 1 of the machine Removing the Mod...

Page 5: ...to Page 28 Reference Embroidery Threads 2 Always thread with the presser foot up This releases tension and seats the thread into the tension disks Setting Up Machine Threading Tips for models with bo...

Page 6: ...Remove the inner ring 4 Place the template 1 in the inner ring so the bernette logo is at the front edge Make sure the cut outs click into place 5 Secure stabilizer to the back of the fabric by lightl...

Page 7: ...aise the needle and the embroidery foot 2 Position the embroidery hoop underneath the embroidery foot The needle should be in the highest position when attaching the hoop to prevent snagging fabric an...

Page 8: ...rview of the motif on the machine See your machine s manual for more information The following embroidery formats can also be read by the machine VP3 VIP PEC HUS DST EXP JEF PES Both the bernette 79 c...

Page 9: ...for CutWork designs Embroidery foot JX is perfect for bulky or fluffy fab rics Puffy Lettering and multilayer quilts Thanks to the spring mechanism the optimum pressure is applied to the embroidered...

Page 10: ...or this exercise leave the bullseye at the First Stitch Grid Off On 1 Touch the Grid on off icon once A green cross appears on the screen denoting the center of the design 2 Touch the Grid icon a seco...

Page 11: ...or the Medium Hoop regard less of the hoop being calibrated Calibration is essential because the variance of the basting box when selected to around the hoop perimeter is only a couple millimeters awa...

Page 12: ...ns on your particular model of embroidery machine as we go through the editing features on the following pages Function Icon Move Motif Mirror Image Left Right Mirror Image Up Down Change Motif Size P...

Page 13: ...opens in the hoop closest to the size of the design 5 Check to make sure the proper foot sole is on the machine Ensure that the Straight Stitch Plate is attached The machine will recognize and displa...

Page 14: ...n Length knob to rotate the design in 1 increments Turning either knob to the right will rotate the design to the right Turning either knob to the left will rotate the design to the left You can also...

Page 15: ...the icons on screen or by dragging and dropping 1 Touch the i in the breadcrumb path select the Move Motif icon 2 Use the icons under the X box or the Upper Multi function knob to move the design to...

Page 16: ...tion knobs or by dragging and dropping Deleting a design using Delete Motif icon 1 Select the daisy design in the Layer Panel 2 Touch the i in the breadcrumb path touch the Delete Motif trashcan icon...

Page 17: ...correct placement 1 Using the same design from the previous page select the bottom most layer to select the entire design 2 Touch the Move Motif icon 3 Touch the Centering icon Alternatively you could...

Page 18: ...screen and the nee dle will move to the location where that stitch would be taken on the hooped fabric To fine tune placement use the Move Motif icon 5 Touch the screen at the bottom of the flower ce...

Page 19: ...s to scroll and find a color 2 Touch the 0 9 Search icon and type in a color number 6 Select the 0 9 Search icon and type 5830 the same green that appears in the flower Touch the color bar that appear...

Page 20: ...con 2 Touch the Single Multi Color Motif icon If the symbol is active outlined in yellow the machine will not stop at the color changes and the entire motif will be stitched with the color threaded in...

Page 21: ...ettings Automatic Cut Thread Cut After Starting Embroidery Turn this feature off 4 Sometime during the stitching process stop the machine and cut the thread to simulate a thread break Follow the steps...

Page 22: ...will automatically appear 2 For today s exercise stop the machine sometime during the stitch out of the design from Page 21 Cut the thread using the Thread Cutter on the machine 3 Touch the Sequence...

Page 23: ...the motif proportion ally up to 20 larger or smaller Although letters added to the screen are mathematically spaced sometimes certain combinations of letters will appear to be too close together or t...

Page 24: ...unction knob to the left or use the icon at the lower part of the screen to bend arc the let ters as shown maximum of 100 NOTE You may need to move the words or change the spacing after bending the le...

Page 25: ...al Embroidery Motif Folder or the USB icon 3 In this exercise select the Embroidery Machine Personal Embroidery Motifs Folder Select one of the lettering motifs 4 In the Delete screen select the green...

Page 26: ...he Alphabets Folder select Alphabet 5 Type the letter B and Confirm 7 Again select the Add Motif icon at the top of the Layer Panel 8 Select the Alphabets Folder select Alphabet 5 Type the letter B Co...

Page 27: ...have a slightly rounded ballpoint tip Ballpoint Embroidery Needles Ballpoint needles are designated by the letters SUK They are shown to have positive results when embroidering with metallic thread D...

Page 28: ...e fragile Specialty Embroidery Thread These threads are more fragile and are most often using as accents rather than for full designs Metallics Acrylics Silk BOBBIN THREAD For best results use a high...

Page 29: ...r activated adhesive versions Available in several widths to fit different hoop sizes Water Soluble Stabilizer Used for backing and topping in single or multiple layers Easily removed with water When...

Page 30: ...nd threads using the brush included with your machine Reference Cleaning And Oiling Oiling the Needle Bar If the needle bar lacks lubrication the needle bar might not move smoothly If the machine is u...

Page 31: ...nction Knob for Adjustment Use Lower Multi function Knob for Adjustment Use Either Multi function Knob for Adjustment Edit Embroidery Motifs Add Motif Information i dialog Move Motif Center Motif in H...

Reviews: