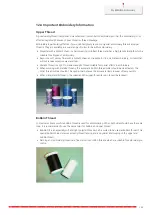


Embroidering Preparation
143
P
> Tap «Move Hoop to the Left».
> Tap «Home».
> Tap «Sewing Mode».
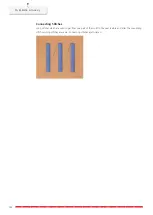
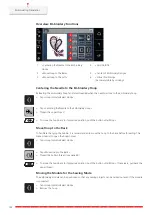
Grid On/Off
When the center of the hoop and the grid are displayed, the embroidery design can be positioned more
exactly.
> Tap «Hoop Indicator/Select Hoop».
> To show the hoop center on the display, tap «Grid On/Off».
> To show the grid lines, tap «Grid On/Off» again.
> To hide the hoop center and the grid lines, tap «Grid On/Off» again.
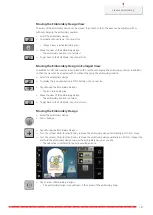
Locating the Center of the Embroidery Design
The embroidery hoop is positioned so that the needle is exactly above the center of the embroidery design or
the motif begin.
> Tap «Hoop Indicator/Select Hoop».
> To position the hoop so that the needle is placed exactly over the center of the embroidery design, tap
«Center of Embroidery Design».
> To position the hoop so that the needle is placed exactly over the motif start, tap «Center of Embroidery
Design» again.
Virtual Positioning of the Embroidery Hoop
The embroidery hoop is automatically moved to the new position as soon as the embroidery design is
repositioned. Therefore, the icon «Virtual Positioning» is activated automatically and outlined in yellow when
an embroidery hoop is attached.
Prerequisite:
•
The hoop is attached.
> Tap «Hoop Indicator/Select Hoop».
> To deactivate the automatic movement of the hoop after repositioning the embroidery design, tap
«Virtual Positioning».
– The «Virtual Positioning» is not yellow-outlined.
> To activate the automatic movement of the hoop after repositioning the embroidery design, tap «Virtual
Positioning» again.
Summary of Contents for 570 QE
Page 1: ...BERNINA 570 QE User Manual...
Page 2: ......


