21
User’s Manual
Infrared Mobile Digital Scouting Camera
SG880MK-8mHD
Item No. 31484
Page 1: ...21 User s Manual Infrared Mobile Digital Scouting Camera SG880MK 8mHD Item No 31484 ...
Page 2: ...28 3 3 Do the Camera Settings 28 3 4 Enter into the TEST Mode 28 3 4 1 Custom Settings 29 3 4 2 Manual Capturing 29 3 4 3 Send MMS 29 3 5 Power on and Enter into the ON Mode 29 3 6 SMS Control 29 3 7 SMS Command List 30 3 8 Power Off 31 4 Advanced Operations 31 4 1 Settings Menu 31 35 4 2 Default Setting 36 4 3 Playback 37 4 3 1 View Photo 37 4 3 2 Delete Photo or Video 37 4 4 Laser Pointer 37 4 5...
Page 3: ...nder sufficient daylight While at night the built in 940nm IR LEDs take clear pictures or videos monochrome It s invisible to game And this model has a new design of PIR and this new PIR is patented There is a 1 5 color LCD display screen on the camera and a sound recorder embedded in the camera A laser pointer is used to help target the photo area of the camera It supports MMS SMS E mail via GSM ...
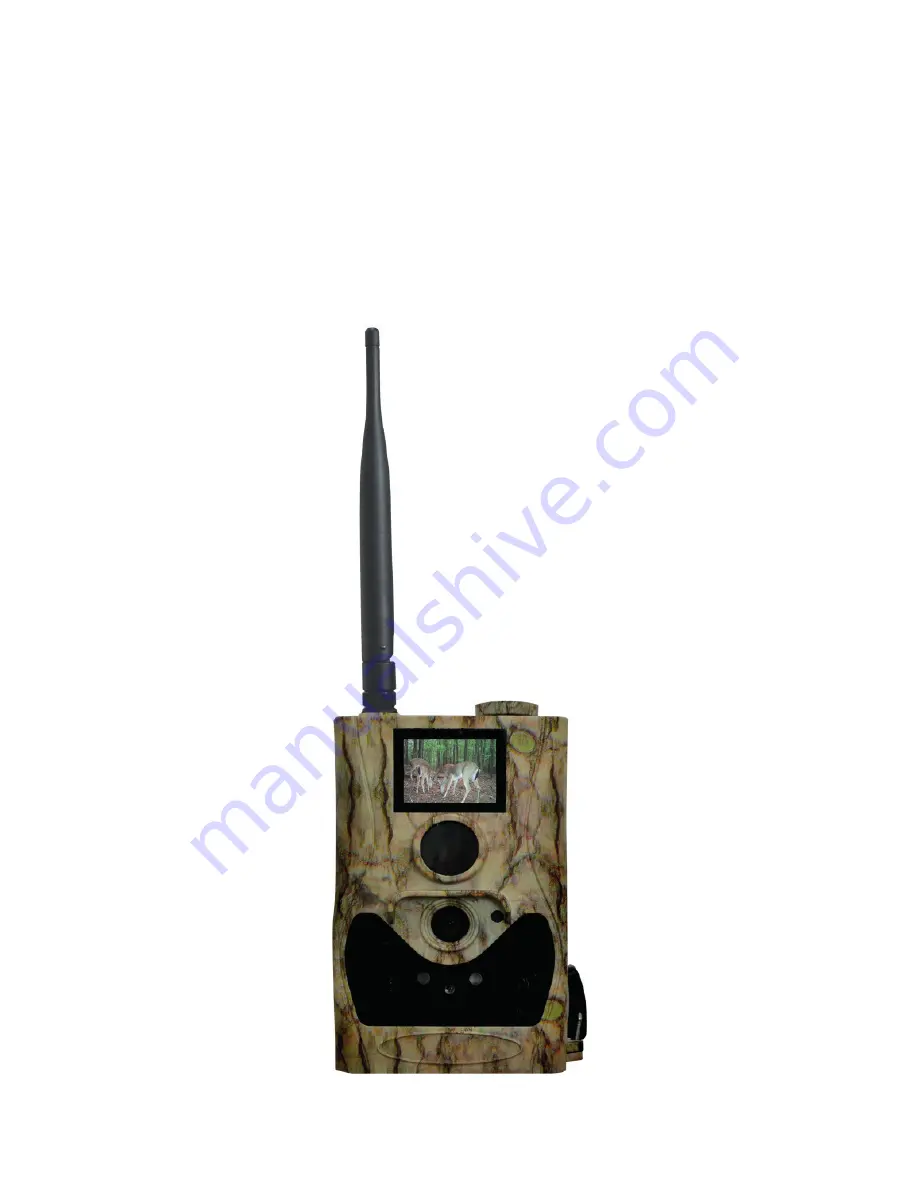
Page 4: ...SIM Card slot 14 USB connector 15 Lock 16 Battery depot 17 Battery depot handle 1 3 Remote Control The remote control is the input device for the ca mera and is primarily used for customer settings and password input This is an infrared type wi reless remote control The maximum remote di stance is 30 feet Fig 1 Diagram of camera functional indicators Fig 2 Remote control ...
Page 5: ... item UP Increase value Make selection OK Select option right Select item down Decrase value Display menus Exit MENU Select option LEFT 1 3 2 Characters When entering digits letters or punctuations into an input column there are some useful characters that can be used by pressing the button continuously 1 _ 0 Press the punctuation for laser pointer Abb 3 Place the remote control in the camera 1 3 ...
Page 6: ...open GPRS service from your service provider It supports four bands 850MHz 900MHz 1800MHz and 1900MHz SIM card Icon There are two SIM card icons which stand for different installation situations means the SIM card is inserted and it works well means the MMS function can t work correctly because of loss of signal or other communication issues There are 4 submenu settings within the MMS GPRS functio...
Page 7: ...e power again if you want to continue to work with the remote Please ensure there is sufficient power when having a firmware upgrade otherwise the upgrade process could be interrupted and the camera may stop functioning properly 3 Quick Start Guide 3 1 Power Supply To supply power for the camera four or eight size AA batteries are nee ded The following batteries with 1 5V output can be used 1 High...
Page 8: ...orrect type Also dispose of used batteries according to the instructions 3 2 Insert the SD card and the SIM card Open the bottom cover Insert SD card and SIM card into the card slot Please note that the SD card is on the write not locked position ot herwise the camera will not function correctly 3 3 Do the Camera Settings Down load the camera set up software BMC_config zip from our web site The sp...
Page 9: ...e ON mode Please note that the images can only be sent and video cannot be sent If the SIM card is not inserted the image cannot be sent as well 3 5 Power on and Enter into the ON Mode Slide the power switch to the ON position to power on the camera and enter into the ON mode Before entering into the ON mode you can ad just the camera towards the target monitoring area by laser pointer After switc...
Page 10: ...11 32 8080 wap cingular account password The example parameters are for the carrier of AT T 3 Set GPRS Parameters s bmctest123 163 com bmc123 25 cmnet smtp 163 com account password 4 Set Normal n 13800138001 13800138002 13800138003 Users Phone 5 Set Receive r bmc1 sina com bmc2 sina com Email Address bmc3 bmc3 sina com 6 Get On Spot Photo t Send MMS to phone t e Send picture to Email by GPRS 7 Che...
Page 11: ...modes 1 OFF mode Power switch is in the OFF position 2 ON mode Power switch is in the ON position 3 TEST mode Power switch is in the TEST position In the above three modes the OFF mode is the specified safe mode when replacing the SD card or batteries and transporting the camera This chapter explains the advanced operations for customizing the ca mera settings The settings can only be customized i...
Page 12: ...gering Video Size Choose the video size 1280x720 or 640x480 Video Length Choose duration of recording video This parameter is effective and can be adjusted only when the device in the video mode under ON mode Its value extends from 1 to 60 seconds with a step of one second The default value is 10 seconds Press LEFT and RIGHT to decrease or increase the value by 1 second Time Lapse Time lapse means...
Page 13: ...perature Higher temperature leads to lower sensitivity Therefore it is suggested to set a higher sensitivity for high temperature environment PIR Interval This parameter indicates how long the PIR Passive Infrared motion sensor will be disabled after each triggering in ON mode During this time the PIR of the device will not react to the motion of human or animals The minimum interval is 0 second i...
Page 14: ...ST mode Daily report and Instant work in ON mode 1 Manual Choose Manual inTest mode Please ensure a SIM card is inserted properly Please note only photos can be sent in TEST mode Video information can t be sent in TEST mode 2 Daily Report Daily Report works only in the ON mode which means that the camera will report the summarized information at the preset time if the preset time is eg 20 00PM on ...
Page 15: ... phone via WAP 2 Email MMS Send the image to Email address via WAP 3 Email GPRS Send the image to Email address via SMTP Use this way the communication cost will be much cheaper in many countries SMS Control SMS Control can enable two way communication function It means if you choose SMS Control as ON this camera can receive and respond to your SMS command Also you can retrieve live pictures any t...
Page 16: ... 2 3 Photos Video Size 1280x720 640x480 Video Length 10 sec 5 60 sec Time Lapse Off 5 55Min 1 8Hour PIRTrigger Normal High Low Off PIR Interval 5 Sec 0 55 Sec 1 60 Min Work Hour Off On 00 00 23 59 MMS Set Enter URL APN IP Port GPRS Set Enter Server Port APN Send Mode Manual Daily Report Instant Off Send to Phone MMS E Mail MMS E Mail GPRS SMS Control Off On Version Enter Firmware IMEI Format SD En...
Page 17: ...te Photo or Video View the image or video which to be deleted select the one you want to delete Press DELETE and LEFT or RIGHT to select all then OK to delete 4 4 Laser Pointer The laser light pointer beam can be turned on as an additional function for pointing to an object or a certain region of interested ROI by pres sing of the remote NOTE Please note that the laser could be harmful to the eyes...
Page 18: ... range The PIR detection angle is just smaller than the field of view FOV angle The advantage of this design is to reduce empty picture rate and capture most if not all motions Fig 7 Detection angle VS F O V angle 73ft with 50 degree 85ft with 55 degree 100ft with 60 degree 120ft with 60 degree Normal Long Range Extra Long Range Super Long Range Ultra Long Range ...
Page 19: ...e new PIR s detection range of SG880M 8mHD can reach to 73ft while MG882K 8mHD with 85ft in good environments Figure 8 shows the compared detection zone bet ween normal PIR and the new patented PIR Fig 8 PIR Detection Range Normal PIR New PIR ...
Page 20: ... C 30 70 C Interval 1s 60 min Photo Burst 1 3 Video Length 1 60s Power Supply 8 AA or 4 AA Stand by Current 0 25 mA 6mAh Day Power Consumption 500 MMS use 8 AA batteries Low Battery Alert LED Indicator Sound Recording Available Mounting Rope Belt Python lock Dimensions 140 x87 x55 mm Operation Humidity 5 90 Security Authentication FCC CE RoHS without battery Berger und Schröter GmbH Voerder Straße...