background image

  11

  Getting to know your monitor
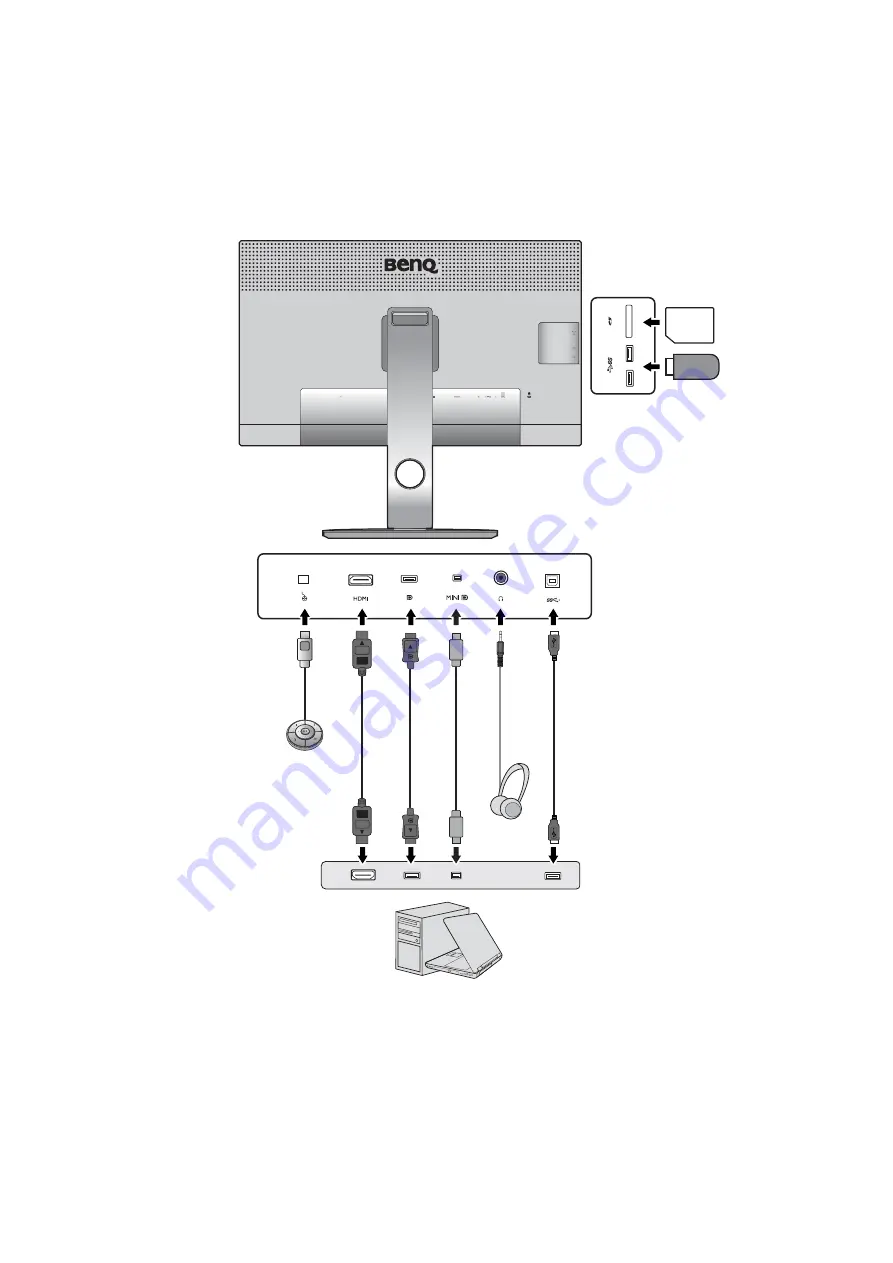
Connections

The following connection illustrations are for your reference only. For cables that are not 
supplied with your product, you can purchase them separately.

For detailed connection methods, see page 

15

 - 

16

.

Speakers / 
Headphone

USB peripherals

SD card 

PC/Notebook

SW320

Summary of Contents for SW271

Page 1: ...SW Series LCD Monitor User Manual...

Page 2: ...may be affected by external factors such as poor cable quality unstable power supply signal interference or poor grounding and not limited to the above mentioned external factors Applicable for flick...

Page 3: ...2 must be used If a remote control is provided RISK OF EXPLOSION IF BATTERY IS REPLACED BY AN INCORRECT TYPE DISPOSE OF USED BATTERIES ACCORDING TO THE INSTRUCTIONS For models with adapter Use only th...

Page 4: ...on They must not be blocked or covered Your monitor should never be placed near or over a radiator or heat sources or in a built in installation unless proper ventilation is provided Do not place heav...

Page 5: ...30 How to upgrade the monitor on an existing computer 31 How to install on Windows 10 system 32 How to install on Windows 8 8 1 system 33 How to install on Windows 7 system 34 How to adjust your moni...

Page 6: ...When unpacking please check you have the following items If any are missing or damaged please contact the place of purchase for a replacement BenQ LCD Monitor For edge to edge models Monitor Stand Mon...

Page 7: ...may differ from product supplied for your region Video Cable DP Optional accessory Video Cable DP to mini DP Video Cable HDMI Audio Cable Optional accessory USB Cable Type C For models with USB Type...

Page 8: ...tents may subject to change without prior notice For cables that are not supplied with your product you can purchase them separately Consider keeping the box and packaging in storage for use in the fu...

Page 9: ...ack view For edge to edge models 1 Control buttons 2 Power button 1 2 1 2 3 Cable management hole 4 Input and output ports vary by model see Input and output ports on page 10 5 Kensington lock slot 6...

Page 10: ...1 AC power input jack 2 Hotkey Puck socket 3 HDMI socket 4 DisplayPort socket 5 Mini DisplayPort socket 6 Headphone jack 7 USB port upstream connecting to the PC 8 USB Type C port SW271 Depending on t...

Page 11: ...lowing connection illustrations are for your reference only For cables that are not supplied with your product you can purchase them separately For detailed connection methods see page 15 16 Speakers...

Page 12: ...SD card PC Notebook SW271 If USB Type C Alternate mode DP Alt mode is enabled USB 2 0 is available from the USB downstream ports If the video input is via HDMI or DP and USB Type C works as upstream p...

Page 13: ...the screen surface 1 Attach the monitor base Please be careful to prevent damage to the monitor Placing the screen surface on an object like a stapler or a mouse will crack the glass or damage the LC...

Page 14: ...check that they have properly engaged Carefully lift the monitor turn it over and place it upright on its stand on a flat even surface You should position the monitor and angle the screen to minimize...

Page 15: ...eration on page 38 Or To Connect the USB Type C Cable Connect the plug of the supplied USB Type C cable to the USB Type C port on the monitor Connect the other end of the cable to the USB Type C port...

Page 16: ...SB devices via other USB ports downstream on the monitor These downstream USB ports transmit data between connected USB devices and the upstream port The USB hubs downstream ports are available when e...

Page 17: ...tlet just yet 8 Organize the cables Route the cables via the cable management hole 9 Connect to and turn on the power Plug the other end of the power cord into a power outlet and turn it on Picture ma...

Page 18: ...re laying the screen face down on a flat clean padded surface Please be careful to prevent damage to the monitor Placing the screen surface on an object like a stapler or a mouse will crack the glass...

Page 19: ...19 How to assemble your monitor hardware Turn the stand counterclockwise until you cannot go further And then detach the base from the stand...

Page 20: ...product supplied for your region Please be careful to prevent damage to the shading hood and the monitor Different pieces of shading hood are well designed and can fit into your monitor properly Do n...

Page 21: ...on plate Lt with the one on plate L2 and attach them together Slide plate Lt to the end as illustrated 5 Attach to the left side of the monitor Align the hooks on the hood plate L2 with the holes on...

Page 22: ...ion process L2 Lt R2 Rt L1 R1 top plate 1 Prepare for the shading hood installation Place the monitor upright on its stand on a flat even surface Make sure the monitor is rotated to the portrait mode...

Page 23: ...plate L2 to the end as illustrated Align the arrow on plate Lt with the one on plate L1 and attach them together Slide plate L1 along with plate L2 to the end as illustrated 5 Attach to the left side...

Page 24: ...play s color by a colorimeter slide to open the cover on the top plate so the colorimeter can be installed Follow the instruction manuals of the colorimeter you purchased and the provided software e g...

Page 25: ...ht as illustrated Excessive force on the display is prohibited Avoid placing hands on the upper or lower part of the height adjustable stand or at the bottom of the monitor as ascending or descending...

Page 26: ...screen orientation Refer to the help document of your operating system for details 2 Fully extend the monitor and tilt it Gently lift the display up and extend it to the maximum extended position Then...

Page 27: ...creen to the desired angle with monitor tilt swivel and height adjustment functions Refer to the product specifications for details 4 Adjust the monitor to the desired viewing angle If your monitor is...

Page 28: ...ve the monitor stand Lay the screen face down on a clean and well padded surface Detach the monitor stand as instructed in step 1 2 in How to detach the stand and the base on page 18 2 Remove the scre...

Page 29: ...ng the monitor to your computer Windows will automatically recognize the new or different hardware and will launch its Found New Hardware wizard Follow the wizard instructions until it asks you to sel...

Page 30: ...launch the Found New Hardware Wizard Follow the prompts until it displays the option to Install Hardware Device Drivers 2 Insert the BenQ LCD Monitor CD ROM into a CD drive on the computer 3 Check Se...

Page 31: ...itor you have connected and letting Windows install the corresponding driver files from the CD You need only steer it in the right direction Windows has an Upgrade Device Driver Wizard to automate the...

Page 32: ...on the computer 7 In the Update Driver Software window select the option Browse my computer for driver software 8 Click Browse and navigate to the following directory d BenQ_LCD Driver where d is the...

Page 33: ...nd then the Properties button 5 Click the Driver tab and the Update Driver button 6 Insert the BenQ LCD Monitor CD ROM into a CD drive on the computer 7 In the Update Driver Software window select the...

Page 34: ...d the Update Driver button 6 Insert the BenQ LCD Monitor CD ROM into a CD drive on the computer 7 In the Update Driver Software window select the option Browse my computer for driver software 8 Click...

Page 35: ...our monitor How to adjust your monitor The control panel No Name Description 1 Control keys Accesses the functions or menu items displayed on the screen right next to each key 2 Power key Turns the po...

Page 36: ...Press and hold for 5 seconds to bring up a list of options select another feature of setup menu by pressing or and confirm with 2 Controller Key 2 Press to switch to sRGB Color Mode Press and hold fo...

Page 37: ...ase adjustment Enters sub menus Returns to the previous menu 6 OK key Activates the hot key menu Selects menu items No Name Description Hotkey Puck is designed for BenQ LCD Monitor exclusively and is...

Page 38: ...left three controls are custom keys and are designated for particular functions 3 Select Menu to access the main menu 4 In the main menu follow the icons next to the control keys to make adjustments...

Page 39: ...he hot key for Brightness To change the default settings see Customizing the hot keys on page 39 Enters sub menus Selects menu items Menu Activates the main menu Returns to the previous menu Exit Exit...

Page 40: ...llowing Apply the standard color setting from Color Adjustment Color Mode Change the display and color settings manually from the related OSD menus Depending on the Color Mode you just set the availab...

Page 41: ...selection in PIP PBP mode for models with PIP PBP function Your monitor scans for the available video sources in the following order HDMI DP mini DP and USB C if all available and displays the first...

Page 42: ...and settings Menu options that are not available will become grayed out And keys that are not available will be disabled and the corresponding OSD icons will disappear For models without certain funct...

Page 43: ...and related items will not appear on the menu 1 Select Menu from the hot key menu 2 Use or to select Display 3 Select to go to a sub menu and then use or to select a menu item 4 Use or to make adjust...

Page 44: ...isplayed without geometric distortion Full Scales the input image to fill the screen Ideal for 16 9 aspect images Aspect The input image is displayed without geometric distortion filling as much of th...

Page 45: ...Select to go to a sub menu and then use or to select a menu item 4 Use or to make adjustments or use to make selection 5 To return to the previous menu select 6 To exit the menu select Item Function...

Page 46: ...ized by the provided calibration software named Palette Master Element and your colorimeter purchased separately Visit the website for software download and more information Palette Master Element How...

Page 47: ...ng one or more of the colors will reduce their respective influence on the color tint of the image e g if you reduce the Blue level the image will gradually take on a yellowish tint If you reduce Gree...

Page 48: ...ed well if this the setting has been adjusted R G B C M Y Black Level Adjusts the luminance of the dark areas in an image 0 10 Save Color Settings Saves a new set of customized color settings Custom M...

Page 49: ...A N A V N A N A N A N A N A N A Calibration 1 N A N A V N A N A N A V V N A Calibration 2 N A N A V N A N A N A V V N A Custom 1 V V V V V V V V V Custom 2 V V V V V V V V V CAD CAM V V V N A N A Adob...

Page 50: ...2 N A N A V N A N A N A V V N A Calibration 3 N A N A V N A N A N A V V N A Custom 1 V V V V V V V V V Custom 2 V V V V V V V V V SW271 Settings Color Mode Brightness Contrast Sharpness Color Temp Ga...

Page 51: ...n use or to select a menu item 4 Use or to make adjustments or use to make selection 5 To return to the previous menu select 6 To exit the menu select Display Color Adjustment PIP PBP System Mode Adob...

Page 52: ...GB sRGB Rec 709 DCI P3 Gamma Adjusts the tone luminance of the inset window in PBP mode 1 6 1 8 2 0 2 2 2 4 2 6 Color Temp Applies a color tint cool or warm to the image of the inset window in PBP mod...

Page 53: ...enu For models without certain functions their settings and related items will not appear on the menu 1 Select Menu from the hot key menu 2 Use or to select System 3 Select to go to a sub menu and the...

Page 54: ...ck Prevents all the monitor settings from being accidentally changed When this function is activated the OSD controls and hotkey operations will be disabled To unlock the OSD controls press and hold a...

Page 55: ...s the gray level response time of the LCD panel ON OFF Auto Power Off Sets the time to power off the monitor automatically in power saving mode OFF 10 min 20 min 30 min Auto Pivot Sets to rotate the O...

Page 56: ...ature or setup menu to be accessed by Controller Key 3 DDC CI Allows the monitor settings to be set through the software on the PC DDC CI short for Display Data Channel Command Interface which was dev...

Page 57: ...57 Navigating the main menu Options for data transfer via USB Type C 3840 x 2160 60Hz USB 2 0 3840 x 2160 30Hz USB 3 1 Refresh rate 60 Hz 30 Hz USB transmission speed 480Mbps 5Gbps...

Page 58: ...ly red green blue or another color Clean the LCD screen Cycle power on off These are pixels that are permanently on or off and is a natural defect that occurs in LCD technology The image has a faulty...

Page 59: ...in flashing white the power management mode is active Press any button on the computer keyboard or move the mouse If that does not help check the signal cable connectors If any pin is bent or broken o...

Page 60: ...hone is connected to the monitor Check whether the headphone jack is properly connected If the external speakers are USB powered check whether the USB connection is OK Increase the volume volume may b...

Reviews: