background image

Operation

43

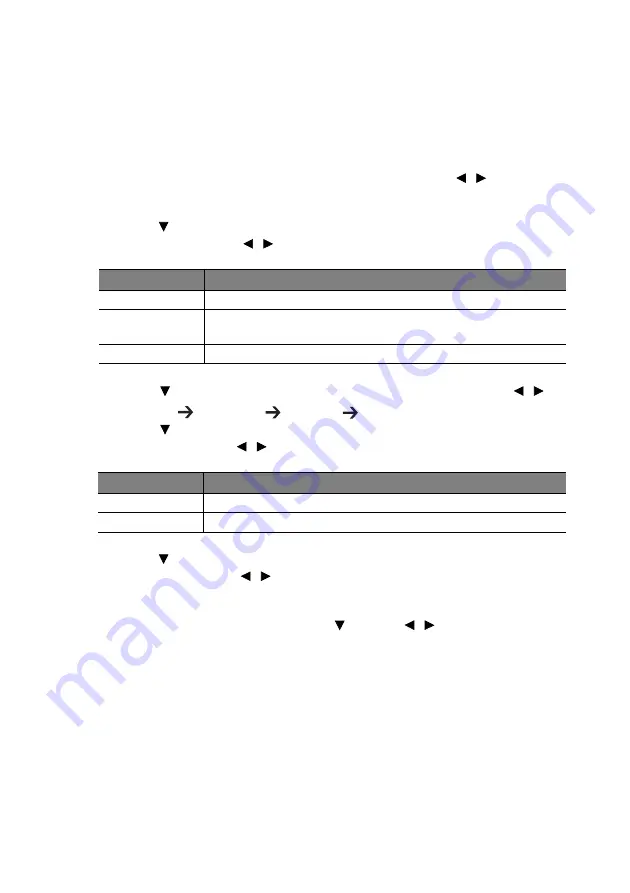
Setting the presentation timer

The presentation timer can indicate the presentation time on the screen to help you achieve 
better time management when giving presentations. Follow these steps to utilize this 
function:

1.

Go to the SYSTEM SETUP: Basic > Presentation Timer menu and press MODE/
ENTER to display the Presentation Timer page.

2.

Highlight Timer period and decide the timer period by pressing 

/

. The length of 

time can be set from 1 to 5 minutes in 1-minute increments and 5 to 240 minutes in 5-
minute increments.

3.

Press  

to 

highlight 

Timer display and choose if you want the timer to show up on 

the screen by press

ing 

/

.

4.

Press  

to 

highlight 

Timer position and set the timer position by pressing 

/

.

Top-Left

Bottom-Left

Top-Right

Bottom-Right

5.

Press  

to 

highlight 

Timer counting direction and select your desired counting 

direction by pressing

/

.

6.

Press  

to 

highlight 

Sound Reminder and decide if you want to activate sound 

reminder by pressing 

/

. If you select On, a double beep sound will be heard at 

the last 30 seconds of counting down/up, and a triple beep sound will be produced 
when the timer is up.

7.

To activate the presentation timer, press 

 and press 

/

 to select On and press 

MODE/ENTER.

8.

A confirmation message displays. Highlight Yes and press MODE/ENTER to confirm. 
You will see the message “Timer is On” displaying on the


screen. The timer starts 

counting at the time the timer is on.

To cancel the timer, perform the following steps:

1.

Go to the 

SYSTEM SETUP: Basic

 > Presentation Timer menu and highlight Off.

Press MODE/ENTER. A confirmation message displays.

2.

Highlight Yes and press MODE/ENTER to confirm. You will see the message “Timer is 
Off!” displaying on the screen.

Remote paging operations

Selection

Description

Always

Displays the timer on screen throughout the presentation time.

Last 1 Min/Last 2 
Min/Last 3 Min 

Displays the timer on screen in the last 1/2/3 minute(s).

Never

Hides the timer throughout the presentation time.

Selection

Description

Count Up

Increases from 0 to the preset time.

Count Down

Decrease from the preset time to 0.

Summary of Contents for MX750

Page 1: ...Welcome MX750 MP780 ST Digital Projector User Manual...

Page 2: ...the image 39 Creating your own startup screen 42 Setting the presentation timer 43 Remote paging operations 43 Hiding the image 44 Freezing the image 44 Utilizing FAQ function 44 Locking control keys...

Page 3: ...qualified service personnel 4 Always open the lens shutter or remove the lens cap when the projector lamp is on 5 In some countries the line voltage is NOT stable This projector is designed to operate...

Page 4: ...lugged 10 Do not place this product on an unstable cart stand or table The product may fall sustaining serious damage 11 Do not attempt to disassemble this projector There are dangerous high voltages...

Page 5: ...s with an ambient temperature above 40 C 104 F Locations where the altitudes are higher than 3000 m 10000 feet 14 Do not block the ventilation holes Do not place this projector on a blanket bedding or...

Page 6: ...l damage to the projector doing so may result in accidents and possible injury 18 Do not place liquids near or on the projector Liquids spilled into the projector may cause it to fail If the projector...

Page 7: ...ctor cool in a shorter time Presentation timer for better control of time during presentations One key auto adjustment to display the best picture quality Digital keystone correction to correct distor...

Page 8: ...essories will be suitable for your region and may differ from those illustrated The warranty card is only supplied in some specific regions Please consult your dealer for detailed information MX750 pr...

Page 9: ...awTM pen holder PointDrawTM pen wrist strap PointDrawTM pen quick start guide Q Draw interactive software 1 Spare lamp kit 2 Ceiling mount kit 3 Soft carry case standard accessory for MX750 4 RS232 ca...

Page 10: ...nput jack 16 HDMI input jack 17 RS 232 control port 18 USB B type jack 19 USB A type jack 20 RJ45 LAN input jack 21 Rear IR remote sensor 22 Rear adjuster foot 23 USB mini B type jack 24 Kensington an...

Page 11: ...Activates panel key lock See Locking control keys on page 45 for details 10 LAMP indicator light Indicates the status of the lamp Lights up or flashes when the lamp has developed a problem See Indicat...

Page 12: ...se a non BenQ brand projector mounting kit there is a safety risk that the projector may fall from the ceiling or wall due to an improper attachment through the use of the wrong gauge or length screws...

Page 13: ...d On Screen Display OSD menu item See Using the menus on page 33 for details 8 Left Starts the FAQ function See Utilizing FAQ function on page 44 for details 9 ZOOM ZOOM Magnifies or reduces the proje...

Page 14: ...T Selects the display aspect ratio See Selecting the aspect ratio on page 37 for details 24 MIC VOL Adjusts the microphone s sound level See for details See Adjusting the microphone s sound level on p...

Page 15: ...teries if necessary and install two AAA batteries observing the battery polarities as indicated in the base of the battery compartment Positive goes to positive and negative goes to negative 3 Refit t...

Page 16: ...ont of the screen This is the most common way to position the projector for quick setup and portability 2 Front Ceiling Select this location with the projector suspended upside down from the ceiling i...

Page 17: ...image to be vertically offset from the horizontal plane of the projector When ceiling mounted this refers to the top edge of the projected image If the projector is positioned further away from the s...

Page 18: ...n size is limited by the physical space available in your room 1 Measure the distance between the projector and where you want to position the screen This is the projection distance 2 Refer to the tab...

Page 19: ...ou determine the exact mounting position so that it best suits your installation location Screen size Distance from screen mm Vertical offset mm Diagonal W mm H mm Min length Average Max length Inch m...

Page 20: ...l it so as to make allowance for this projector s optical characteristics This will help you determine the exact mounting position so that it best suits your installation location Screen size Distance...

Page 21: ...cables may not be included with the projector see Shipping contents on page 8 They are commercially available from electronics stores For detailed connection methods see pages 23 29 1 Audio cable 6 V...

Page 22: ...ments Windows XP Windows Vista Supports USB 2 0 CPU Pentium 1G RAM 512MB RAM Disk 20MB hard driver space Operation System Requirements Minimum Hardware Requirements Windows XP Windows Vista WiFi 54 Mb...

Page 23: ...notebook or desktop computer using USB 1 Take a USB mini B type to USB A type cable and connect one end to the A type jack of the computer 2 Connect the other end of the cable to the MINI B jack on t...

Page 24: ...mbol on the notebook Press FN and the labeled function key simultaneously Refer to your notebook s documentation to find your notebook s key combination Transmission speed and image quality will vary...

Page 25: ...ur monitor is equipped with a DVI input jack take a VGA to DVI A cable and connect the DVI end of the cable to the DVI input jack of the video monitor 3 Connect the other end of the cable to the MONIT...

Page 26: ...ll most likely depend upon the availability of matching terminals on both the projector and the Video source device as described below Terminal name Terminal appearance Reference Picture quality HDMI...

Page 27: ...an HDMI source device 1 Take an HDMI cable and connect one end to the HDMI output jack of the HDMI source device Connect the other end of the cable to the HDMI signal input jack on the projector Once...

Page 28: ...COMPUTER 1 or COMPUTER 2 jack on the projector 3 If you wish to make use of the projector speaker s in your presentations take a suitable audio cable and connect one end of the cable to the audio out...

Page 29: ...VIDEO jack on the projector 3 If you wish to make use of the projector speaker s in your presentations take a suitable audio cable and connect one end of the cable to the audio output jack of the devi...

Page 30: ...rojector The POWER indicator light flashes and stays green when the projector is on The start up procedure takes about 10 20 seconds In the later stage of start up a startup logo is projected If neces...

Page 31: ...the rear adjuster foot to fine tune the horizontal angle To retract the foot hold up the projector while pressing the quick release button then slowly lower the projector Screw the rear adjuster foot...

Page 32: ...djusting the height of the projector you will need to manually correct it following one of these steps Using the remote control Press on the projector or remote control to display the Keystone correct...

Page 33: ...or or remote control to turn the OSD menu on 3 Press to highlight Language and press to select a preferred language 2 Use to highlight the SYSTEM SETUP Basic menu 4 Press MENU EXIT twice on the projec...

Page 34: ...he projector is started 1 Open the OSD menu and go to the SYSTEM SETUP Advanced Security Settings menu Press MODE ENTER The Security Settings page displays 2 Highlight Change Security Settings and pre...

Page 35: ...r the old password If the password is correct another message INPUT NEW PASSWORD displays If the password is incorrect the password error message displays lasting for three seconds and the message INP...

Page 36: ...ENTER Once detected the selected source information will display on the screen for seconds If there is multiple equipment connected to the projector repeat steps 1 2 to search for another signal The b...

Page 37: ...using the projector control panel continue to the following steps 4 Press on the projector repeatedly to magnify the picture to a desired size 5 To navigate the picture press MODE ENTER to switch to...

Page 38: ...The image is projected as its original resolution and resized to fit within the display area For input signals with lower resolutions the projected image will display smaller than if resized to full...

Page 39: ...taken with an sRGB compatible and properly calibrated camera and for viewing PC graphic and drawing applications such as AutoCAD 4 Cinema mode Is appropriate for playing colorful movies video clips fr...

Page 40: ...as of the image appear just as black and that detail in the dark areas is visible Adjusting Contrast The higher the value the greater the contrast Use this to set the peak white level after you have p...

Page 41: ...ment to allow for more accurate color reproduction should you require it Proper color management can only be achieved under controlled and reproducible viewing conditions You will need to use a colori...

Page 42: ...mage immediately 7 Repeat steps 3 to 6 for other color adjustments 8 Make sure you have made all of the desired adjustments 9 Press MENU EXIT to exit and save the settings Creating your own startup sc...

Page 43: ...sound reminder by pressing If you select On a double beep sound will be heard at the last 30 seconds of counting down up and a triple beep sound will be produced when the timer is up 7 To activate th...

Page 44: ...ings Blank Timer menu to let the projector return the image automatically after a period of time when there is no action taken on the blank screen The length of time can be set from 5 to 30 minutes in...

Page 45: ...ntrol to enter the SYSTEM SETUP Basic Panel Key Lock and press to select Off Keys on the remote control are still in use when panel key lock is enabled If you press Power to turn off the projector wit...

Page 46: ...TEM SETUP Advanced menu is highlighted 2 Press to highlight Audio Settings and press MODE ENTER The Audio Settings page displays 3 Highlight Mute and select On Adjusting the sound level To adjust the...

Page 47: ...ets a preferred logo screen to be displayed during projector start up Use to select a screen Controlling the projector through a LAN environment Network Settings allow you to manage the projector from...

Page 48: ...projection For Infrastructure mode connection you need to select the projector s SSID which you want to connect See Displaying image through Q Presenter on page 57 for details 4 Use your computer s wi...

Page 49: ...r computer You can also link to the web page control from Q Presenter Settings Advanced Setting Control projector via web page on page 60 4 Execute the program installation 5 Open Q Presenter search a...

Page 50: ...See Remote control on page 13 for details The Display Setting page allows you to operate the projector as if you were using the OSD menus These functions are some useful menu settings The Picture Sett...

Page 51: ...tion 51 The Information page displays the information and status of this projector The Conference Control page allows you to control computer s display status of all the computers linked to this proje...

Page 52: ...version 6 2 2 9 i These buttons function the same as the ones on the OSD menus or remote control See 2 PICTURE on page 71 and Remote control on page 13 for details The Menu button can also be used to...

Page 53: ...n and the person in charge of it ii You can adjust the Wired LAN settings iii Once set access to the remote network operation on this projector has been password protected iv Once set access to the to...

Page 54: ...jector i Press exit to go back to the Crestron remote network operation page The Admin page allows you to enter Basic Wired LAN Wireless LAN and Mail pages once the password is entered The default pas...

Page 55: ...he Basic page allows you to change the password and select connected persons The number of connected persons may affect the network display performance The Wired LAN page allows you to adjust the Wire...

Page 56: ...Max length for SSID string is 16 bytes Please use a different SSID when more than two projectors are connecting through wireless LAN The Mail page allows you to send alert e mail to your ITS administ...

Page 57: ...Settings on page 47 and Configuring the Wireless LAN Settings on page 48 for details 2 Find the IP address and enter the address of the projector in the address bar of your browser See Controlling the...

Page 58: ...the image on projector iv You can click to disconnect all connected projectors The Special Feature page allows you to have some advanced functions to manage the display image on your projector i Full...

Page 59: ...on If the Remote Desktop function is activated you can change the Name and Password If it isn t activated the Name and Password will be gray out ii You can set the name and password of the connected c...

Page 60: ...nsmission performance was determined by the status of network usage at that time viii You can adjust the capture rate The network bandwidth may also affect the performance ix You can select whether to...

Page 61: ...F TIFF PNG and BMP formats can be displayed for the file size smaller than WXGA 1280 x 800 only If a folder consists of more than 200 photos only the first 200 photos can be displayed Preparation To v...

Page 62: ...pen folder Enter scroll through thumbnails four arrow keys return to a previous page Auto exit USB Reader Exit change to a different page go back to the first page of that folder Back start slide show...

Page 63: ...iii Press OK to save the settings iv Press Cancel to ignore the change rotate the image by 90 degree clockwise counterclockwise Rotation is temporary the image returns to its original orientation when...

Page 64: ...nd number 0 9 Password must be 6 digits and limit the range from 1 4 If there are lot of audience is watching the display while the user is entering the password the number will be transferred to up l...

Page 65: ...ER 5 Enter the Account and Password the same as step 1 6 Highlight Connect and press MODE ENTER to connect the selected PC 7 Connect USB keyboard or mouse to control the host PC s desktop through the...

Page 66: ...ied service personnel The lithium battery is only rechargeable and not user replaceable Not user serviceable 2 Connect the projector and your computer with the supplied USB B type to A type cable If a...

Page 67: ...ke a remote control use in whichever position is most comfortable If the PointDrawTM pen is far away from the screen be sure to press the left mouse button to click and drag Avoid shadows The PointDra...

Page 68: ...dier when clicking If the mouse pointer is in the wrong place on the screen or the mouse pointer s movement is restricted to only part of the screen make sure your projector is displaying the computer...

Page 69: ...t flashes orange the projection lamp shuts down and the fans will continue to run to cool down the projector To protect the lamp the projector will not respond to any commands during the cooling proce...

Page 70: ...Operation 70 Actual lamp lives may vary due to different environmental conditions and usage...

Page 71: ...to Keystone On Off Keystone Position Phase H Size Digital Zoom 3D Sync On Off 3D Sync Invert Disable Invert 2 PICTURE Picture Mode Dynamic Presentation sRGB Cinema User 1 User 2 Reference Mode Dynamic...

Page 72: ...display time 5 sec 10 sec 15 sec 20 sec 25 sec 30 sec Menu position Center Top left Top right Bottom right Bottom left Reminder Message On Off Operation Settings Direct Power On On Off Auto Power Off...

Page 73: ...ange Security Settings Power on Lock Splash Sscreen On Lock Baud Rate 2400 4800 9600 14400 19200 38400 57600 115200 Test Pattern On Off Closed Caption Closed Caption Enable On Off Caption Version CC1...

Page 74: ...valid signal If there is no equipment connected to the projector or no signal detected limited menu items are accessible 6 INFORMATI ON FAQ Image and Installation FAQ Features and Service Current Syst...

Page 75: ...e Keystone Corrects any keystoning of the image See Correcting keystone on page 32 for details Position Displays the position adjustment page To move the projected image use the directional arrow keys...

Page 76: ...When the input signal is PC 120Hz 3D sync will be enabled automatically For a video type signal When the content being projected is made with 3D technology selecting On will present the 3D images When...

Page 77: ...ween dark and light in the image See Adjusting Contrast on page 40 for details This function is only available when User 1 or User 2 is selected Color Adjusts the color saturation level the amount of...

Page 78: ...40 for details This function is only available when User 1 2 is selected 3D Color Management See 3D Color Management on page 41 for details This function is only available when User 1 2 is selected Sa...

Page 79: ...ng a location on page 16 for details Menu Settings Menu display time Sets the length of time the OSD will remain active after your last key press The range is from 5 to 30 seconds in 5 second incremen...

Page 80: ...round Color Allows you to select which background color will display when no signal is input into the projector Four options are available BenQ logo Black Blue or Purple Splash Screen Allows you to se...

Page 81: ...wer on off ring tone Lamp Settings Lamp Mode See Setting Lamp Mode as Economic on page 85 for details Reset lamp timer See Resetting the lamp timer on page 89 for details Equivalent lamp hour See Gett...

Page 82: ...microphone can be used even in standby mode Monitor Out Selecting On enables the function The projector can output a VGA signal when it is in standby mode and the COMPUTER 1 and MONITOR OUT jacks are...

Page 83: ...m Status Source Shows the current signal source Picture Mode Shows the selected mode in the PICTURE menu Resolution Shows the native resolution of the input signal Color System Shows input system form...

Page 84: ...lens with abrasive materials Cleaning the projector case Before you clean the case turn the projector off using the proper shutdown procedure as described in Shutting down the projector on page 69 an...

Page 85: ...also get the lamp hour information on the INFORMATION menu Extending lamp life The projection lamp is a consumable item To keep the lamp life as long as possible you can do the following settings via...

Page 86: ...follow the actual on screen instructions to prepare and replace the lamp Status Message Install a new lamp for optimal performance If the projector is normally run with Economic selected see Getting...

Page 87: ...lacing the lamp To reduce the risk of injuries to fingers and damage to internal components use caution when removing lamp glass that has shattered into sharp pieces To reduce the risk of injuries to...

Page 88: ...t stands up Use the handle to slowly pull the lamp out of the projector Pulling it too quickly may cause the lamp to break and scatter broken glass in the projector Do not place the lamp in locations...

Page 89: ...t to reset the lamp timer Highlight Reset and press MODE ENTER The lamp time will be reset to 0 Do not reset if the lamp is not new or replaced as this could cause damage 7 Tighten the screws that sec...

Page 90: ...try to re start the projector it will shutdown again Please contact your dealer for assistance Lamp events Orange Flashing Off Red The projector has shutdown automatically If you try to re start the...

Page 91: ...ignal device Check the connection The input signal has not been correctly selected Select the correct input signal with the SOURCE key on the projector or remote control The lens cover is still closed...

Page 92: ...o jack x 1 Control RS 232 serial control 9 pin x 1 LAN controk RJ45 x 1 wired USB A type x 2 wireless Screen control 12V trigger x 1 0 5 A USB B type x 1 Supports firmware upgrade Input terminals Comp...

Page 93: ...ensions 329 mm W x 137 2 mm H x 241 9 mm D Ceiling mount installation 329 241 9 137 2 62 5 77 4 75 0 221 0 100 00 116 00 82 50 107 7 328 0 163 7 62 5 115 1 129 1 100 0 146 0 Ceiling mount screws M4 x...

Page 94: ...997 94 500 XGA_85 1024 x 576 35 820 60 0 46 996 Netbook_1 1024 x 600 37 5 60 0 45 000 Netbook_2 1024 x 600 41 467 64 995 51 419 Netbook_3 1280 x 800 49 702 59 810 83 500 WXGA_60 62 795 74 934 106 500...

Page 95: ...9 78 750 XGA_75 68 677 84 997 94 500 XGA_85 1280 x 800 49 702 59 810 83 500 WXGA_60 62 795 74 934 106 500 WXGA_75 71 554 84 880 122 500 WXGA_85 1280 x 1024 63 981 60 020 108 000 SXGA_60 79 976 75 025...

Page 96: ...480p 525p 60Hz 31 47 59 94 576i 625i 50Hz 15 63 50 00 576p 625p 50Hz 31 25 50 00 720p 750p 60Hz 45 00 60 00 720p 750p 50Hz 37 50 50 00 1080i 1125i 60Hz 33 75 60 00 1080i 1125i 50Hz 28 13 50 00 1080p 6...

Page 97: ...d 35 C altitude lower than 4920 feet and avoiding to operate the projector in a dusty environment This warranty gives you specific legal rights and you may have other rights which vary from country to...

Page 98: ...num rique de la classe B est conforme la norme NMB 003 du Canada EEC statement for European users This device complies with the requirements set out in the Council Directives on the Approximation of t...

Page 99: ...selectable color controls such as color temperature selections Monitor 5800K 6500K and 9300K Projector 5500K 6500K 7500K and 9300K with a wide range of contrast levels BenQ s multimedia monitors and p...

Reviews: