background image

Connection

23

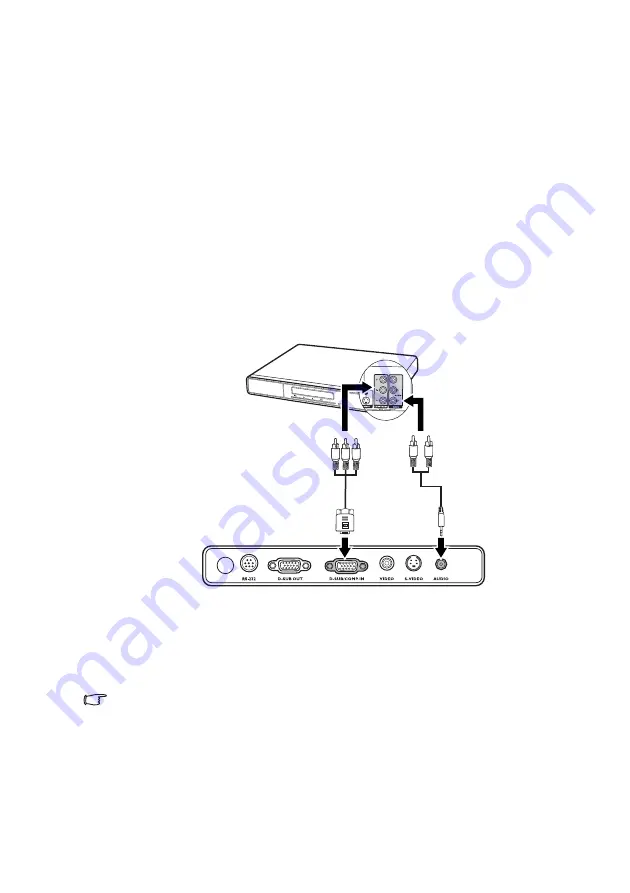
Connecting a Component Video source device

Examine your Video source device to determine if it has a set of unused Component Video 
output sockets available: 

If so, you can continue with this procedure.

If not, you will need to reassess which method you can use to connect to the device.

To connect the projector to a Component Video source device:

1.

Take a Component Video to VGA (D-Sub) adaptor cable and connect the end with 3 
RCA type connectors to the Component Video output sockets of the Video source 
device. Match the color of the plugs to the color of the sockets; green to green, blue to 
blue; and red to red.

2.

Connect the other end of the Component Video to VGA (D-Sub) adaptor cable (with 
a D-Sub type connector) to the D-SUB/COMP IN socket on the projector.

3.

If you wish to make use of the projector (mixed mono) speaker, take a suitable audio 
cable and connect one end of the cable to the audio output socket of the computer, 
and the other end to the Audio socket of the projector.

The final connection path should be like that shown in the following diagram:

If you connect the projector to a High Definition TV (HDTV) tuner, the following standards 
are supported:

The projector is only capable of playing mixed mono audio, even if a stereo audio input is 
connected. See 

"Connecting Audio" on page 22

 for details.

Component Video is the only video output that delivers native 16:9 aspect ratio picture.

If the selected video image is not displayed after the projector is turned on and the correct 
video source has been selected, check that the Video source device is turned on and 
operating correctly. Also check that the signal cables have been connected correctly.

480i

480p

576i

576p

720p (50/ 60 Hz)

1080i (50/ 60 Hz)

Audio cables

A/V


device

Component Video to 
VGA (D-Sub) adaptor 
cable 

Summary of Contents for Mainstream Series

Page 1: ...Welcome MP612 MP612c MP622 MP622c Digital Projector Mainstream Series User Manual...

Page 2: ...tor for a given screen size 18 How to determine the recommended screen size for a given distance 18 Connection 20 Connecting a computer or monitor 20 Connecting a computer 20 Connecting a monitor 21 C...

Page 3: ...Freezing the image 38 Utilizing FAQ function 39 Operating in a high altitude environment 39 Personalizing the projector menu display 40 Shutting down the projector 40 Menu operation 41 Menu system 41...

Page 4: ...Table of contents 4 Specifications 59 Projector specifications 59 Dimensions 60 Timing chart 61 Warranty and Copyright information 62 Regulation statements 63...

Page 5: ...o qualified service personnel 4 Always open the lens shutter or remove the lens cap when the projector lamp is on 5 In some countries the line voltage is NOT stable This projector is designed to opera...

Page 6: ...lace the lamp assembly or any electronic components unless the projector is unplugged 10 Do not place this product on an unstable cart stand or table The product may fall sustaining serious damage 11...

Page 7: ...s are higher than 3000 m 10000 feet 13 Do not block the ventilation holes Do not place this projector on a blanket bedding or any other soft surface Do not cover this projector with a cloth or any oth...

Page 8: ...damage to person and property If you intend to mount your projector on the ceiling we strongly recommend that you use a proper fitting BenQ projector ceiling mount kit and that you ensure it is secure...

Page 9: ...l keystone correction to correct distorted images Adjustable color balance control for data video display High brightness projection lamp Ability to display 16 7 million colors Multi language On Scree...

Page 10: ...dard accessories The supplied accessories will be suitable for your region and may differ from those illustrated The warranty card and safety manual are only supplied in some specific regions Please c...

Page 11: ...ocus ring and Zoom ring 7 Front IR remote sensor 8 Projection lens 1 2 3 4 5 6 7 8 9 AC power cord inlet 10 Rear IR remote sensor 11 RS232 control port 12 RGB signal output socket 13 RGB PC Component...

Page 12: ...off See Start up on page 26 and Shutting down the projector on page 40 for details 6 BLANK Used to hide the screen image To restore the image press any button on the projector or remote control See H...

Page 13: ...matically determines the best picture timings for the displayed image See Auto adjusting the image on page 30 for details 13 SOURCE Sequentially selects the input signal D Sub Comp Component Video Vid...

Page 14: ...page 31 for details 8 AUTO Automatically determines the best picture timings for the displayed image See Auto adjusting the image on page 30 for details 9 Right Activates panel key lock See Panel Key...

Page 15: ...uctions Push and hold the locking arm whilst pulling out the battery holder 2 Insert the new battery in the holder Note the positive polarity should face outward 3 Push the holder into the remote cont...

Page 16: ...p and portability 2 Front Ceiling Select this location with the projector suspended upside down from the ceiling in front of the screen Purchase the BenQ Projector Ceiling Mounting Kit from your deale...

Page 17: ...e screen This prevents image distortion caused by angled projections or projecting onto angled surfaces The modern digital projector does not project directly forward like older style reel to reel fil...

Page 18: ...to know what screen size will fit in your room The maximum screen size is limited by the physical space available in your room 1 Measure the distance between the projector and where you want to posit...

Page 19: ...from Screen in mm Vertical Offset in mm Feet Inches mm Min length with max zoom Average Max length with min zoom 4 48 1219 1778 1867 1956 73 1500 2187 2297 2406 90 5 60 1524 2222 2333 2444 91 6 72 18...

Page 20: ...Sub output socket of the computer 2 Connect the other end of the VGA cable to the D SUB COMP IN signal input socket on the projector 3 If you wish to make use of the projector mixed mono speaker take...

Page 21: ...r to a computer as described in Connecting a computer on page 20 2 Take a suitable VGA cable only one supplied and connect one end of the cable to the D Sub input socket of the video monitor 3 Connect...

Page 22: ...r Video source device you should elect to use the S Video option See Connecting an S Video source device on page 24 for how to connect the projector to an S Video device Least video quality Composite...

Page 23: ...use of the projector mixed mono speaker take a suitable audio cable and connect one end of the cable to the audio output socket of the computer and the other end to the Audio socket of the projector...

Page 24: ...ram The projector is only capable of playing mixed mono audio even if a stereo audio input is connected See Connecting Audio on page 22 for details If the selected video image is not displayed after t...

Page 25: ...n the projector The final connection path should be like that shown in the following diagram The projector is only capable of playing mixed mono audio even if a stereo audio input is connected See Con...

Page 26: ...g fan for approximately 90 seconds before energizing the lamp 4 If you are prompted for a password press the arrow buttons to enter a six digit password See Utilizing the power on lock function on pag...

Page 27: ...o the password you desire to set press the arrow buttons to enter six digits for the password Once the password is set the OSD menu returns to the Security Settings page IMPORTANT The digits being inp...

Page 28: ...available to you should you ever forget it Password __ __ __ __ __ __ Keep this manual in a safe place 5 Confirm the new password by re entering the new password 6 You have successfully assigned a new...

Page 29: ...esolutions will be scaled by the projector depending upon the aspect ratio setting which may cause some image distortion or loss of picture clarity See Selecting the aspect ratio on page 32 for detail...

Page 30: ...e projector Screw the rear adjuster foot in a reverse direction If the projector is not placed on a flat surface or the screen and the projector are not perpendicular to each other the projected image...

Page 31: ...gnifying and searching for details on the projected picture If you need to find the details on the projected picture magnify the picture Use the direction arrow keys for navigating the picture Using t...

Page 32: ...ideo signal and your display requirements There are four aspect ratios available In the pictures below the black portions are inactive areas and the white portions are active areas 1 Auto Scales an im...

Page 33: ...rated camera and for viewing PC graphic and drawing applications such as AutoCAD 4 Cinema Mode Is appropriate for playing colorful movies video clips from digital cameras or DVs through the PC input f...

Page 34: ...surface There are several precalibrated colors to choose from Light Yellow Pink Light Green Blue and Blackboard Fine tuning the image quality in user modes According to the detected signal type there...

Page 35: ...These tools are not provided with the projector however your projector supplier should be able to provide you with suitable guidance or even an experienced professional installer The Color Management...

Page 36: ...entations Follow these steps to utilize this function 1 Press Timer Set up on the remote control or go to the SYSTEM SETUP Basic Presentation Timer menu and press Mode enter to display the Presentatio...

Page 37: ...ing at the time the timer is on To cancel the timer perform the following steps 1 Enter the SYSTEM SETUP Basic Presentation Timer menu and select Off Press Mode enter to confirm 2 A confirmation messa...

Page 38: ...functions except POWER 1 Press Right on the projector or remote control or go to SYSTEM SETUP Basic Panel Key Lock and select On by pressing Left Right on the projector or remote control 2 A confirma...

Page 39: ...altitude is between 0 m and 1500 m and temperature is between 0 C and 35 C The projector will be over cooled if you turn the mode on under such condition To activate the High Altitude Mode go to SYSTE...

Page 40: ...screen Shutting down the projector 1 Press Power and a confirmation message will display prompting you If you don t respond in a few seconds the message will disappear 2 Press Power a second time The...

Page 41: ...ne Position Phase H Size Digital Zoom PICTURE Picture Mode PC source Dynamic Presentation sRGB Cinema User 1 User 2 Video source Dynamic Standard Cinema User 1 User 2 Reference Mode PC source Dynamic...

Page 42: ...min Blank Timer Disable 5 min 10 min 15 min 20 min 25 min 30 min Panel Key Lock On Off Timer Controller Disable 30 min 1 hr 2 hr 3 hr 4 hr 8 hr 12 hr Splash Screen Black Blue BenQ SYSTEM SETUP Advance...

Page 43: ...least one valid signal If there is no equipment connected to the projector or no signal detected limited menu items are accessible Information FAQ Image and Installation FAQ Features and Service Curre...

Page 44: ...select Keystone 5 Based on the image shape displayed on the screen press the keystone buttons Up Down to adjust the image to a rectangular or square one 6 Press Menu exit on the projector or remote co...

Page 45: ...d image use the directional arrow buttons The values shown on the lower position of the page change with every button press you made until they reach their maximum or minimum Phase depends on the sele...

Page 46: ...trast on page 34 for details Color 0 Adjusts the color saturation level the amount of each color in a video image Lower setting produces less saturated colors setting to the minimum value makes the im...

Page 47: ...ting direction Count down Sets the timer counting direction Timer audible reminder Off Sets whether to activate sound reminder when the time is up Language Sets the language for the On Screen Display...

Page 48: ...lue between 30 minutes and 12 hours Panel Key Lock Disable Disables or enables all panel key functions except POWER on the projector and buttons on the remote control See Locking control keys on page...

Page 49: ...current password before changing to a new one See Utilizing the power on lock function on page 27 for details Power on lock Off Limits use of the projector to only those who know the correct password...

Page 50: ...ON DESCRIPTION FAQ Image and Installation Displays possible solutions to problems you may encounter FAQ Features and Service Current System Status Source Shows the current signal source Picture mode S...

Page 51: ...ibed in Shutting down the projector on page 40 and unplug the power cord To remove dirt or dust wipe the case with a soft lint free cloth To remove stubborn dirt or stains moisten a soft cloth with wa...

Page 52: ...ction in the projector and in some instances the lamp may explode The Lamp indicator light and Temperature warning light will light up if the lamp becomes too hot Turn the power off and let the projec...

Page 53: ...ctor is suspended upside down from the ceiling make sure that no one is underneath the lamp socket to avoid any possible injury or damage to the human eyes caused by fractured lamp 1 Turn the power of...

Page 54: ...n the projector Do not place the lamp in locations where water might splash on it children can reach it or near flammable materials Do not insert your hands into the projector after the lamp is remove...

Page 55: ...is not new or replaced as this could cause damage Temperature information When the Temperature warning light is on it is warning you of the following possible problems 1 The internal temperature is to...

Page 56: ...shut down without the normal cooling down process Or 2 The projector needs to cool for 90 seconds after the power is turned off The projector has shutdown automatically If you try to re start the proj...

Page 57: ...Temp Lamp Thermal events The projector has shutdown automatically If you try to re start the projector it will shutdown again Please contact your dealer for assistance R R R R G R O R R R R R G R R O...

Page 58: ...ce device Check the connection The input signal has not been correctly selected Select the correct input signal with the Source key on the projector or remote control The lens cover is still closed Op...

Page 59: ...85W Max Mechanical Dimensions 239 mm W x 106 3 mm H x 251 mm D Weight 5 51 lbs 2 5 Kg Input terminal Computer input RGB input D sub 15 pin female x 1 Video signal input S VIDEO Mini DIN 4 pin port x 1...

Page 60: ...Specifications 60 Dimensions 239 mm W x 106 3 mm H x 251 mm D Unit mm 239 251 106 3 64 5 66 3...

Page 61: ...60 004 65 000 XGA_60 56 476 70 069 75 000 XGA_70 60 023 75 029 78 750 XGA_75 68 667 84 997 94 500 XGA_85 1280 x 768 47 77 60 09 80 768 SXGA_60 1280 x 800 49 65 59 96 83 458 SXGA_60 1280 x 1024 63 981...

Page 62: ...nty gives you specific legal rights and you may have other rights which vary from country to country For other information please visit www BenQ com Copyright Copyright 2007 by BenQ Corporation All ri...

Page 63: ...hich the receiver is connected Consult the dealer or an experienced radio TV technician for help EEC statement This machine was tested against the 89 336 EEC European Economic Community for EMC Electr...

Reviews: