background image

Operation

28

Securing the projector

Using a security cable lock

The projector has to be installed in a safe place to prevent theft. Otherwise, purchase 

a lock, such as the Kensington lock, to secure the projector. You can locate a 

Kensington lock slot on the rear side of the projector. See item 24 on page 

8

 fo

details.
A Kensington security cable lock is usually a combination of key(s) and the lock. Refer 

to the lock's documentation for finding out how to use it.

Utilizing the password function

For security purposes and to help prevent unauthorized use, the projector includes an 

option for setting up password security. The password can be set through the On-

Screen Display (OSD) menu.

WARNING: You will be inconvenienced if you activate the power-on lock 
functionality and subsequently forget the password. Print out this manual (if 
necessary) and write the password you used in this manual, and keep the manual in 
a safe place for later recall.

Setting a password

Once a password has been set, the projector cannot be used unless the correct 
password is entered every time the projector is started.

1.

Open the OSD menu and go to the 

SYSTEM SETUP: Advanced

 > 

Security 

Settings

 menu. Press 

MODE/ENTER

.

2.

Press   to select 

Change Security Settings

 and press 

MODE/ENTER

.

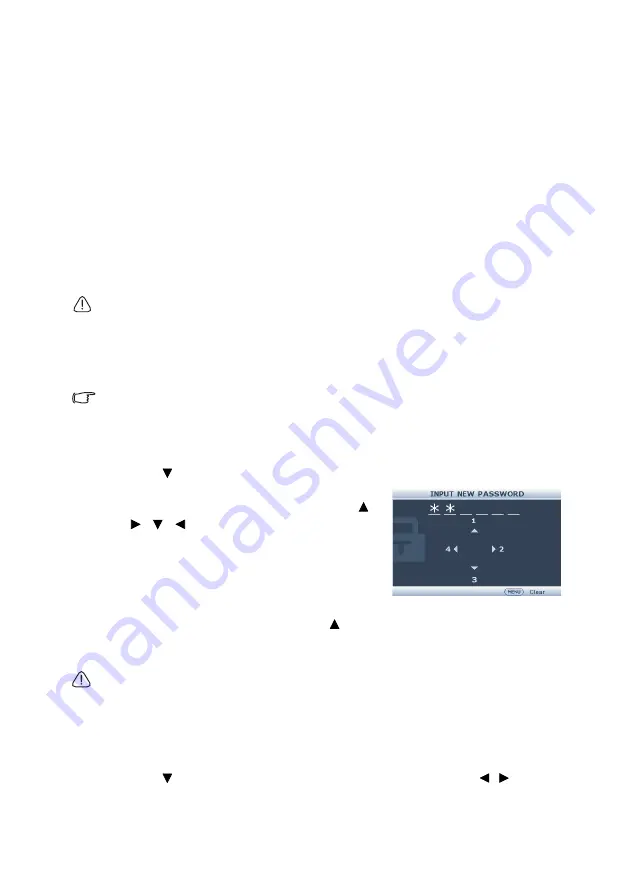
3.

Enter the new or current password. As 
pictured to the right, the four arrow keys ( , 

,  ,  ) respectively represent 4 digits (1, 

2, 3, 4). According to the password you 
desire to set, press the arrow keys to enter 
six digits for the password. 
If the function is used for the first time, enter 
the default password (1, 1, 1, 1, 1, 1) of the 
projector by pressing the arrow key   six times.

4.

Confirm the new password by re-entering the new password. Once the 
password is set, the OSD menu returns to the 

Security Settings

 page.

IMPORTANT: The digits being input will display as asterisks on-screen. Write your 
selected password down here in this manual in advance or right after the password 
is entered so that it is available to you should you ever forget it.

Password: __ __ __ __ __ __

Keep this manual in a safe place.

5.

Press   to select 

Power On Lock

 and select 

On

 by pressing 

/ .

6.

To leave the OSD menu, press 

MENU/EXIT.

Summary of Contents for LH890USTD

Page 1: ...Digital Projector User Manual LX890USTD LW890USTD LH890USTD V1 01 ...

Page 2: ...ing for details 31 Selecting the aspect ratio 31 Optimizing the image 33 Setting the presentation timer 37 Hiding the image 38 Freezing the image 38 Operating in a high altitude environment 38 Adjusting the sound 39 Setting Auto Power Off 39 Personalizing the projector menu display 40 Select the Light Mode 40 Use Teaching Template 41 Controlling the projector through a LAN environment 42 Upgrading...

Page 3: ...urn off the light source use the blank function 8 Do not operate light sources beyond the rated light source life 9 Do not place this product on an unstable cart stand or table The product may fall sustaining serious damage 10 Do not attempt to disassemble this projector There are dangerous high voltages inside which may cause death if you should come into contact with live parts Under no circumst...

Page 4: ...urces and light source systems this product is Risk Group 2 IEC 62471 5 2015 2 Possibly hazardous optical radiation emitted from this product 3 Do not stare at operating light source May be harmful to the eyes 4 As with any bright source do not stare into the direct beam The projector s light source unit uses a laser Laser Caution For China and other regions This product belongs to CLASS 1 laser p...

Page 5: ...e projected image Equipped with HDMI MHL connection supporting HDCP Dimming Mode starts your dynamic power saving Wall color correction allowing projection on surfaces of several predefined colors Quick auto search speeding up the signal detecting process 3D color management allowing color adjusents to your liking Presentation timer for better control of time during presentations One key auto adju...

Page 6: ...ssories The supplied accessories will be suitable for your region and may differ from those illustrated The warranty card is only supplied in some specific regions Please consult your dealer for detailed information Projector with the projector mounting plate dust filter Wall mount kit user manual Remote control batteries Power cord VGA cable Quick start guide User manual CD Warranty card ...

Page 7: ...Introduction 7 Optional accessories 1 Wireless dongle QCast QP01 QCastMirror QP20 InstaShow WDC10 2 3D glasses 3 PointWrite kit PW40U 4 Spare dust filter ...

Page 8: ...t 10 USB type A 1 5A jack 11 Audio input jack 12 Audio output jack 13 Audio L R input jack 14 S Video input jack 15 Video input jack 16 RGB PC Component video YPbPr YCbCr signal input jack 17 RGB signal output jack 18 RS232 control port 19 HDMI 1 input jack 20 HDMI 2 MHL input jack 21 PointWrite port PointWrite kit is required 22 RJ 45 LAN input jack 23 USB Mini B jack 24 Kensington anti theft loc...

Page 9: ...ns on the On Screen Display OSD menu EXIT Goes back to previous OSD menu exits and saves menu settings 2 Decreases the projector volume 3 Power Toggles the projector between standby mode and on 4 MODE Selects an available picture setup mode ENTER Activates the selected On Screen Display OSD menu item 5 Eco Blank Used to hide the screen picture 6 Auto Automatically determines the best picture timin...

Page 10: ... as directional arrows to select the desired menu items and to make adjusents 6 MODE Selects an available picture setup mode ENTER Activates the selected On Screen Display OSD menu item 7 Eco Blank Used to hide the screen picture 8 VOLUME Adjusts the projector volume 9 QUICK INSTALL A menu shortcut that includes Test Pattern Projector Installation 2D Keystone and Corner Fit 10 Freeze Freezes the p...

Page 11: ...ay aspect ratio 24 LAMP MODE Displays the light mode selection bar Normal Economic Dimming Operating the laser pointer The Laser Pointer is a presentation aid for professionals It emits red colored light when you press it and the indicator lights up red The laser beam is visible It is necessary to press and hold LASER for continuous output Do not look into the laser light window or shine the laser...

Page 12: ...endicular to the projector s IR remote control sensor to function correctly The distance between the remote control and the sensor should not exceed 8 meters 26 feet Make sure that there are no obstacles between the remote control and the IR sensor on the projector that might obstruct the infra red beam Operating the projector from the front A p p r o x 3 0 ...

Page 13: ... goes to negative 3 Refit the cover by aligning it with the base and sliding it back down into position Stop when it clicks into place Avoid excessive heat and humidity There may be battery damage if the battery is incorrectly replaced Replace only with the same or equivalent type recommended by the battery manufacturer Dispose of the used battery according to the battery manufacturer s instructio...

Page 14: ...projector suspended upside down from the ceiling in front of the screen Use BenQ Projector Wall Mounting Kit come with the box to mount your projector on the wall Set Front Ceiling in the SYSTEM SETUP Basic Projector Installation menu after you turn the projector on 2 Rear Ceiling Select this location with the projector suspended upside down from the ceiling behind the screen Note that a special r...

Page 15: ... also indicated on the scale of the wall mount Projection distance a is measured from the projector rear side to the projection surface Vertical offset V is measured from the bottom edge of the wall plate to the top edge of screen V M W F h X a D 30 mm Scale value D Center Plate height 260 mm With cover 269 mm Ceiling height H 30mm Plate height V h F Thickness of the screen Image center ...

Page 16: ...n screen X is 30 mm Screen size Minimum Ceiling height Vertical offset Installation distance D Diagonal M Height h Width W H a V Xb 0 mm D a Xc 30 mm D a 30 mm Inch mm mm mm mm mm mm mm 73 1854 1113 1483 2359 185 4 118 148 78 1981 1189 1585 2449 198 9 150 180 83 2108 1265 1687 2538 212 3 182 212 88 2235 1341 1788 2628 225 8 214 244 93 2362 1417 1890 2718 239 3 246 276 98 2489 1494 1991 2807 252 7 ...

Page 17: ... as to make allowance for this projector s optical characteristics This will help you determine the exact mounting position so that it best suits your installation location Screen size Minimum Ceiling height Vertical offset Installation distance D Diagonal M Height h Width W H a V Xb 0 mm D a Xc 30 mm D a 30 mm Inch mm mm mm mm mm mm mm 80 2032 1077 1723 2288 150 85 115 85 2159 1144 1831 2365 160 ...

Page 18: ...erform the secondary role of restraining the projector should its attachment to the mounting bracket become loose Ask your dealer to install the projector for you Installing the projector on your own may cause it to fall and result in injury Take necessary procedures to prevent the projector from falling off such as during an earthquake The warranty doesn t cover any product damage caused by mount...

Page 19: ... to adjust screen alignment and image position 3 Adjust The Forward Backward Slide to reduce enlarge the image A B A B A B A B A B A B Adjustment buttons Adjustment buttons Adjustment buttons Adjustment directions Adjustment directions Adjustment directions A B A B A B d Adjustment directions ...

Page 20: ... firmly inserted 2 9 3 1 4 5 8 8 1 9 7 6 3 3 10 10 11 Smart device PointWrite kit Speakers A V device Monitor Notebook or desktop computer 1 VGA cable 2 VGA to DVI A cable 3 Audio cable 4 S Video cable 5 Video cable 6 Audio L R cable 7 Component Video to VGA D Sub adapter cable 8 HDMI cable 9 USB cable 10 HDMI dongle QCast QCast Mirror etc 11 USB cable A to micro B type connect to HDMI dongle for ...

Page 21: ...is connection method when the projector is in standby mode make sure the MONITOR OUT function is turned on in the SYSTEM SETUP Advanced Standby Settings menu See Standby Settings on page 61 for details Connecting Video source devices You need only connect the projector to a Video source device using just one of the above connecting methods however each provides a different level of video quality T...

Page 22: ...eck that the Video source device is turned on and operating correctly Also check that the signal cables have been connected correctly Connecting smart device The projector can project the content directly from a smart device by using a wireless dongle HDMI wireless dongle e g BenQ QCastMirror QCast Connect the dongle to HDMI and USB TYPE A ports on the projector and switch the input signal to HDMI...

Page 23: ...r on the projector or ON on the remote control to start the projector The POWER indicator light flashes and stays green when the projector is on The start up procedure takes about 10 20 seconds In the later stage of start up a startup logo is projected If necessary Use the focus ring to adjust the image clearness If the projector is still hot from previous activity it will run the cooling fan for ...

Page 24: ...ng while AUTO is functioning This function is only available when PC signal analog RGB is selected Fine tuning the image clarity Sharpen the image by rotating the focus ring If the projector is not placed on a flat surface or the screen and the projector are not perpendicular to each other the projected image becomes trapezoidal To correct this situation see Correcting 2D keystone on page 24 for d...

Page 25: ...stone and press MODE ENTER 3 Press to adjust the keystone values Using the QUICK INSTALL key 1 Press QUICK INSTALL on the remote control 2 Press to select 2D Keystone and press MODE ENTER 3 Press to adjust the keystone values Adjusting Corner Fit Manually adjust four corners of the image by setting the horizontal and vertical values Using the OSD menu 1 Select Corner Fit in the DISPLAY menu and pr...

Page 26: ...cal values from 0 to 60 4 Press to adjust horizontal values from 0 to 60 Using the QUICK INSTALL key 1 Press QUICK INSTALL on the remote control 2 Press to select Corner Fit and press MODE ENTER 3 Follow the steps 2 4 in the above section ...

Page 27: ... the projector or remote control to turn the OSD menu on 3 Press to select Background Color and press to select a background color 2 Use to select the SYSTEM SETUP Basic menu 4 Press MENU EXIT twice on the projector or remote control to leave and save the settings The first press leads you back to the main menu and the second press closes the OSD menu Current input Main menu icon Main menu Sub men...

Page 28: ...ssword has been set the projector cannot be used unless the correct password is entered every time the projector is started 1 Open the OSD menu and go to the SYSTEM SETUP Advanced Security Settings menu Press MODE ENTER 2 Press to select Change Security Settings and press MODE ENTER 3 Enter the new or current password As pictured to the right the four arrow keys respectively represent 4 digits 1 2...

Page 29: ...r to decode the number You may be required to provide proof of purchase documentation to verify that you are an authorized user of the projector Changing the password 1 Open the OSD menu and go to the SYSTEM SETUP Advanced Security Settings 2 Select Change Password and press MODE ENTER The message INPUT CURRENT PASSWORD displays 3 Enter the old password If the password is correct another message I...

Page 30: ...projector can be connected to multiple devices at the same time However it can only display one full screen at a time When starting up the projector automatically searches for the available signals Be sure the Quick Auto Search function in the SOURCE menu is On which is the default of this projector if you want the projector to automatically search for the signals You can also manually cycle throu...

Page 31: ...functionality and press AUTO to restore the picture to its original size You can also press repeatedly until it is restored to the original size The picture can only be navigated after the picture is magnified You can further magnify the picture while searching for details Selecting the aspect ratio The aspect ratio is the ratio of the image width to the image height With the advent of digital sig...

Page 32: ...image so that it is displayed in the center of the screen with a 4 3 aspect ratio 4 16 9 Scales an image so that it is displayed in the center of the screen with a 16 9 aspect ratio 5 16 10 Scales an image so that it is displayed in the center of the screen with a 16 10 aspect ratio 6 16 6 Scales an image so that it is displayed in the center of the screen with a 16 6 aspect ratio Only available o...

Page 33: ...urity of RGB colors to provide true to life images regardless of brightness setting It is most suitable for viewing photos taken with an sRGB compatible and properly calibrated camera and for viewing PC graphic and drawing applications such as AutoCAD 5 Cinema mode Is appropriate for playing colorful movies video clips from digital cameras or DVs through the PC input for best viewing in a blackene...

Page 34: ...htness The higher the value the brighter the image And the lower the setting the darker the image Adjust this control so the black areas of the image appear just as black and that detail in the dark areas is visible Adjusting Contrast The higher the value the greater the contrast Use this to set the peak white level after you have previously adjusted the Brightness setting to suit your selected in...

Page 35: ... Tuning page displays 3 Press to select the item you want to change and adjust the values by pressing R Gain G Gain B Gain Adjusts the contrast levels of Red Green and Blue R Offset G Offset B Offset Adjusts the brightness levels of Red Green and Blue 4 Press MENU EXIT to exit and save the settings 3D Color Management In most installation situations color management will not be necessary such as i...

Page 36: ...turation and adjust its values to your preference by pressing Every adjusent made will reflect to the image immediately For example if you select Red and set its value at 0 only the saturation of pure red will be affected Saturation is the amount of that color in a video picture Lower settings produce less saturated colors a setting of 0 removes that color from the image entirely If the saturation...

Page 37: ...ress to select Sound reminder and decide if you want to activate sound reminder by pressing If you select On a double beep sound will be heard at the last 30 seconds of counting down up and a triple beep sound will be produced when the timer is up 7 To activate the presentation timer press and press to select On and press MODE ENTER 8 A confirmation message displays Select Yes and press MODE ENTER...

Page 38: ... can press any key on the projector or remote control to restore the picture Freezing the image Press FREEZE on the remote control to freeze the image The word FREEZE will display in the screen To release the function press any key on the projector or remote control Even if an image is frozen on the screen the pictures are running on the video or other device If the connected devices have active a...

Page 39: ... Advanced menu is selected 2 Press to select Audio Settings and press MODE ENTER The Audio Settings page displays 3 Select Mute and select On Adjusting the sound level To adjust the sound level press VOLUME on the remote control or on the projector or 1 Repeat steps 1 2 above 2 Select Volume and select a desired sound level Turning off the Power on off ring tone To turn off the ring tone 1 Repeat ...

Page 40: ...r to display reminder messages on screen Use to select your desired setting Splash Screen in the SYSTEM SETUP Basic menu sets a preferred logo screen to be displayed during projector start up Use to select a screen Select the Light Mode Using the remote control Press LAMP MODE and the light mode selection bar appears Use to select Normal Economic Dimming Using the OSD menu 1 Press MENU EXIT and th...

Page 41: ...ou can use build in template by OSD Open the OSD menu and go to the DISPLAY Teaching Template Choose Blackboard Whiteboard Off Letter Formation Worksheet Coordinate Chart The Teaching Template displays Teaching Template Whiteboard Blackboard Letter Formation Worksheet Coordinate Chart ...

Page 42: ...s to select Wired LAN and press MODE ENTER The Wired LAN page is displayed 5 Press to select DHCP and press to select On 6 Please wait for around 15 20 seconds and then re enter the Wired LAN page 7 The IP Address Subnet Mask Default Gateway and DNS Server settings will be displayed Note down the IP address displayed in the IP Address row If the IP Address still does not display contact your ITS a...

Page 43: ...owser Once you have the correct IP address for the projector and the projector is on or in standby mode you can use any computer that is on the same local area network to control the projector 1 Enter the address of the projector in the address bar of your browser and click Go 2 The remote network operation page opens This page Crestron eControl allows you to operate the projector as if you were u...

Page 44: ...or has been password protected 4 Once set access to the tools page has been password protected 5 Press Exit to go back to the remote network operation page After making the adjustments press the Send button and the data will be saved in the projector Please pay attention to the limitation of input length including space and other punctuation keys in the list blow 2 Menu Auto PC Blank Input See Rem...

Page 45: ...tron Control IP Address 15 IP ID 4 Port 5 Projector Projector Name 22 Location 22 Assigned To N A Network Configuration DHCP Enabled 15 IP Address 15 Subnet Mask 15 Default Gateway 15 DNS Server N A User Password Enabled N A New Password 15 Confirm 15 Admin Password Enabled N A New Password 15 Confirm 15 Press Exit to go back to the remote network operation page ...

Page 46: ...e and centralized upgrade the BenQ network projector on a host computer The key features of the BenQ Easy Firmware Updater include Search for projectors in the different subnet Support multiple projectors firmware upgrade at the same time up to 255 For more information about the tool please contact BenQ service ...

Page 47: ...ector Make sure the PointWrite camera is installed properly before you active interactive function Use the USB cable to connect the projector to PC Plug the USB mini B end into the projector and plug the USB type A end into PC Check Device Manager from your computer to make sure that PointWrite device is recognized by your computer When finishing the PointWrite Module Installation please refer to ...

Page 48: ... the light the projector will not respond to any commands during the cooling process 3 Once the cooling process finishes the POWER indicator light is a steady orange and fans stop 4 Disconnect the power cord from the power putlet if the projector will not be used in an extended period of time If the projector is not properly shut down to protect the light when you attempt to re start the projector...

Page 49: ... 6 2D Keystone Corner Fit Position Phase H Size Digital Zoom Digital Shrink 3D 3D mode Auto Top Bottom Frame Sequential Frame Packing Side by Side Off 3D Sync Invert Disable Invert Save 3D Settings 3D Settings 1 Yes No 3D Settings 2 Yes No 3D Settings 3 Yes No Apply 3D Settings 3D Settings 1 Yes No 3D Settings 2 Yes No 3D Settings 3 Yes No Off Teaching Template Blackboard Off Letter Formation Work...

Page 50: ...rast Color Tint Sharpness Brilliant Color On Off Color Temperature Cool Normal Warm Color Temperature Fine Tuning R Gain G Gain B Gain R Offset G Offset B Offset 3D Color Management Primary Color R G B C M Y Hue Saturation Gain Reset Picture Settings Current All Cancel Sub menu Sub menu item Options Quick Auto Search On Off HDMI Format Auto RGB Full RGB Limited YUV Full YUV Limited HDMI Equalizer ...

Page 51: ...ing Menu Settings Menu Display Time 5 secs 10 secs 20 secs 30 secs Always Menu Position Center Top Left Top Right Bottom Right Bottom Left Reminder Message On Off Operation Settings Direct Power On On Off Signal Power On Computer On Off HDMI On Off Auto Power Off Disable 3 min 10 min 15 min 20 min 25 min 30 min Blank Timer Disable 5 min 10 min 15 min 20 min 25 min 30 min Sleep Timer Disable 30 min...

Page 52: ...conomic Dimming Light Usage Time Light Usage Time Normal Economic Dimming Security Settings Change Password Change Security Power On Lock Baud Rate 9600 14400 19200 38400 57600 115200 Test Pattern On Off Closed Caption Closed Caption Enable On Off Caption Version CC1 CC2 CC3 CC4 Standby Settings Network Enable network standby mode On Off Switch to normal standby mode Off 20 min 1 hr 3 hr 6 hr Moni...

Page 53: ... menu items are accessible Network Settings Wired LAN Status Connect Disconnect DHCP On Off IP Address Subnet Mask Default Gateway DNS Server Apply AMX Device Discovery On Off Mac Address Reset All Settings Reset Cancel Sub menu Sub menu item Options Current System Status Native Resolution Source Picture Mode Light Mode Resolution 3D Format Color System Light Usage Time Filter Usage Time Firmware ...

Page 54: ...al values See Adjusting Corner Fit on page 25 for details Position Displays the position adjusent page To move the projected image use the directional arrow keys The values shown on the lower position of the page change with every key press you made until they reach their maximum or minimum This function is only available when a PC signal analog RGB is selected Phase Adjusts the clock phase to red...

Page 55: ...and the projector automatically chooses an appropriate 3D format when detecting 3D contents If the projector cannot recognize the 3D format press to choose a 3D mode 3D Sync Invert When you discover the inversion of the image depth enable this function to correct the problem Save 3D Settings Save current 3D settings Apply 3D Settings Apply saved 3D settings Teaching Templatee Provides some templat...

Page 56: ...ween dark and light in the image See Adjusting Contrast on page 34 for details Color Adjusts the color saturation level the amount of each color in a video image See Adjusting Color on page 34 for details This function is only available when a Video S Video or YPbPr signal is selected Tint Adjusts the red and green color tones of the image See Adjusting Tint on page 34 for details This function is...

Page 57: ... Picture Mode settings to default values FUNCTION DESCRIPTION Quick Auto Search See Switching input signal on page 30 for details HDMI Format Selects a suitable color format to optimize display quality Auto Automatically selects a suitable color space and gray level for the incoming HDMI signal RGB Full Utilizes the Full range RGB 0 255 RGB Limited Utilizes the Limited range RGB 16 235 YUV Full Ut...

Page 58: ...ing direction Sound Reminder Sets a sound reminder if timer is up On Turns on the presentation timer Off Turns off the presentation timer Language Sets the language for the On Screen Display OSD menus Projector Installation The projector can be installed on a ceiling or behind a screen or with one or more mirrors See Choosing a location on page 14 for details Menu Settings Menu Display Time Sets t...

Page 59: ...Blank feature is activated once elapsed the image will return to the screen See Hiding the image on page 38 for details Sleep Timer Sets the auto shutdown timer The timer can be set to a value between 30 minutes and 12 hours Reset Filter Timer Resets the filter timer if a new filter is replaced Panel Key Lock Disables or enables all panel key functions except Power on the projector and keys on the...

Page 60: ...ing tone Light Settings Light Mode See Select the Light Mode on page 40 for details Light Usage Time Shows equivalent light hour of used time Security Settings Change Password You will be asked to enter the current password before changing to a new one Change Security Settings Input current password to activate Power On Lock function Power On Lock See Securing the projector on page 28 for details ...

Page 61: ...de Allows the projector to disable the network function after a set period of time after it enters standby mode For instance if 20 min is selected the projector is able to provide the network function for 20 minutes after it enters standby mode When 20 minutes is up the projector enters normal standby mode This function is only available when Enable Network Standby Mode is On Monitor Out Selecting...

Page 62: ...jector can be detected by AMX controller Mac Address Displays the Mac Address for this projector Reset All Settings Returns all settings to the factory preset values The following settings will still remain 2D Keystone Corner Fit Digital Shrink Projector Installation Filter Usage Time High Altitude Mode Fan Speed Mode Light Usage Time Security Settings Baud Rate Network Settings ...

Page 63: ... mode in the PICTURE menu Light Mode Shows the current light mode Resolution Shows the native resolution of the input signal 3D Format Shows the current 3D mode Color System Shows input system format RGB or YUV Light Usage Time Displays the number of hours the light has been used Filter Usage Time Displays the number of hours the filter has been used Firmware Version Shows firmware version ...

Page 64: ...ith abrasive materials Cleaning the projector case Before you clean the case turn the projector off using the proper shutdown procedure as described in Shutting down the projector on page 48 and unplug the power cord To remove dirt or dust wipe the case with a soft lint free cloth To remove stubborn dirt or stains moisten a soft cloth with water and a neutral pH detergent Then wipe the case Never ...

Page 65: ...is suspended upside down or is not easily accessible pay special attention to your personal safety when replacing the dust filter 1 Have the following items ready A suitable cross head phillips type screwdriver Spare dust filter available from your dealer 2 Locate the dust filter cover on the side of the projector and loosen the four screws using the screwdriver Keep the screws in a safe place for...

Page 66: ...D menu Go to SYSTEM SETUP Basic menu Operation Settings and press MODE ENTER The Operation Settings page appears Highlight Reset Filter Timer and press MODE ENTER A warning message is displayed asking if you want to reset the filter timer Highlight Reset and press MODE ENTER The filter time will be reset to 0 Do not reset if the filter is not new or replaced as this could cause damage ...

Page 67: ...f Off Orange Flashing Light is not lit up Thermal error messages Red Red Off Fan 1 error the actual fan speed is outside the desired Red Red Flashing Off Fan 2 error the actual fan speed is outside the desired Red Green Off Fan 3 error the actual fan speed is outside the desired Red Green Flashing Off Fan 4 error the actual fan speed is outside the desired Red Flashing Red Off Fan 5 error the actu...

Page 68: ... projector is not correctly connected to the input signal device Check the connection The input signal has not been correctly selected Select the correct input signal with the SOURCE key on the projector or remote control Cause Remedy The projection lens is not correctly focused Adjust the focus of the lens using the focus ring The projector and the screen are not aligned properly Adjust the proje...

Page 69: ...232 serial control 9 pin x 1 LAN control RJ45 x 1 IR receiver x 1 Input terminals Computer input RGB input D Sub 15 pin female x 1 Video signal input S VIDEO Mini DIN 4 pin port x 1 VIDEO RCA jack x 1 SD HDTV signal input Analog Component RCA jack x 3 through RGB input Digital HDMI x 2 1 for MHL input Audio signal input PC audio jack x 1 RCA audio jack L R x 2 USB type A x 1 Supports 1 5A charger ...

Page 70: ...ion diagram Wall mount screw M4 Max L 25 mm Min L 20 mm Unit mm 399 3 520 2 164 5 144 0 30 0 30 0 445 0 406 4 313 0 218 0 155 5 85 0 232 0 38 0 264 0 75 0 75 0 164 5 145 4 399 4 532 0 140 0 251 0 399 3 520 2 174 7 164 5 125 0 22 76 77 384 3 90 6 357 140 1 184 3 217 55 3 Wall Mount Plate ...

Page 71: ... 069 56 476 75 000 XGA_75 75 029 60 023 78 750 XGA_85 84 997 68 667 94 500 XGA_120 Reduce Blanking 119 989 97 551 115 5 1152 x 864 1152 x 864_75 75 67 5 108 1024 x 576 BenQ Notebook Timing 60 35 82 46 966 1024 x 600 BenQ Notebook Timing 64 995 41 467 51 419 1280 x 720 1280 x 720_60 60 45 74 250 1280 x 768 1280 x 768_60 59 87 47 776 79 5 1280 x 800 WXGA_60 59 81 49 702 83 500 WXGA_75 74 934 62 795 ...

Page 72: ...nt ial 3D top bott om 3D side by side 640 x 480 VGA_60 59 94 31 469 25 175 VGA_72 72 809 37 861 31 500 VGA_75 75 37 5 31 500 VGA_85 85 008 43 269 36 000 720 x 400 720 x 400_70 70 087 31 469 28 3221 800 x 600 SVGA_60 60 317 37 879 40 000 SVGA_72 72 188 48 077 50 000 SVGA_75 75 46 875 49 500 SVGA_85 85 061 53 674 56 250 SVGA_120 Reduce Blanking 119 854 77 425 83 000 1024 x 768 XGA_60 60 004 48 363 6...

Page 73: ...GA _6 0 59 887 55 935 106 500 1400 x 1050 SXGA _60 59 978 65 317 121 750 1600 x 1200 UXGA 60 75 162 000 1680 x 1050 1680 x 1050_60 59 954 65 29 146 25 640 x 480 67Hz MAC13 66 667 35 30 240 832 x 624 75Hz MAC16 74 546 49 722 57 280 1024 x 768 75Hz MAC19 75 02 60 241 80 000 1152 x 870 75Hz MAC21 75 06 68 68 100 000 1920 x 1080 1920 x 1080_60 Reduce Blanking 67 5 60 148 5 1920 x 1200 1920 x 1200_60 R...

Page 74: ...0 3 58 PAL 15 63 50 4 43 SECAM 15 63 50 4 25 or 4 41 PAL M 15 73 60 3 58 PAL N 15 63 50 3 58 PAL 60 15 73 60 4 43 NTSC4 43 15 73 60 4 43 Timing Resolution Horizontal Frequency KHz Vertical Frequency Hz Pixel Frequency MHz 3D Field Sequential 480i 720 x 480 15 73 59 94 13 5 480p 720 x 480 31 47 59 94 27 576i 720 x 576 15 63 50 13 5 576p 720 x 576 31 25 50 27 720 50p 1280 x 720 37 5 50 74 25 720 60p...

Page 75: ... the projector in a dusty environment This warranty gives you specific legal rights and you may have other rights which vary from country to country For other information please visit www BenQ com Copyright Copyright 2018 by BenQ Corporation All rights reserved No part of this publication may be reproduced transmitted transcribed stored in a retrieval system or translated into any language or comp...

Reviews: