background image

Working with Android OS

55

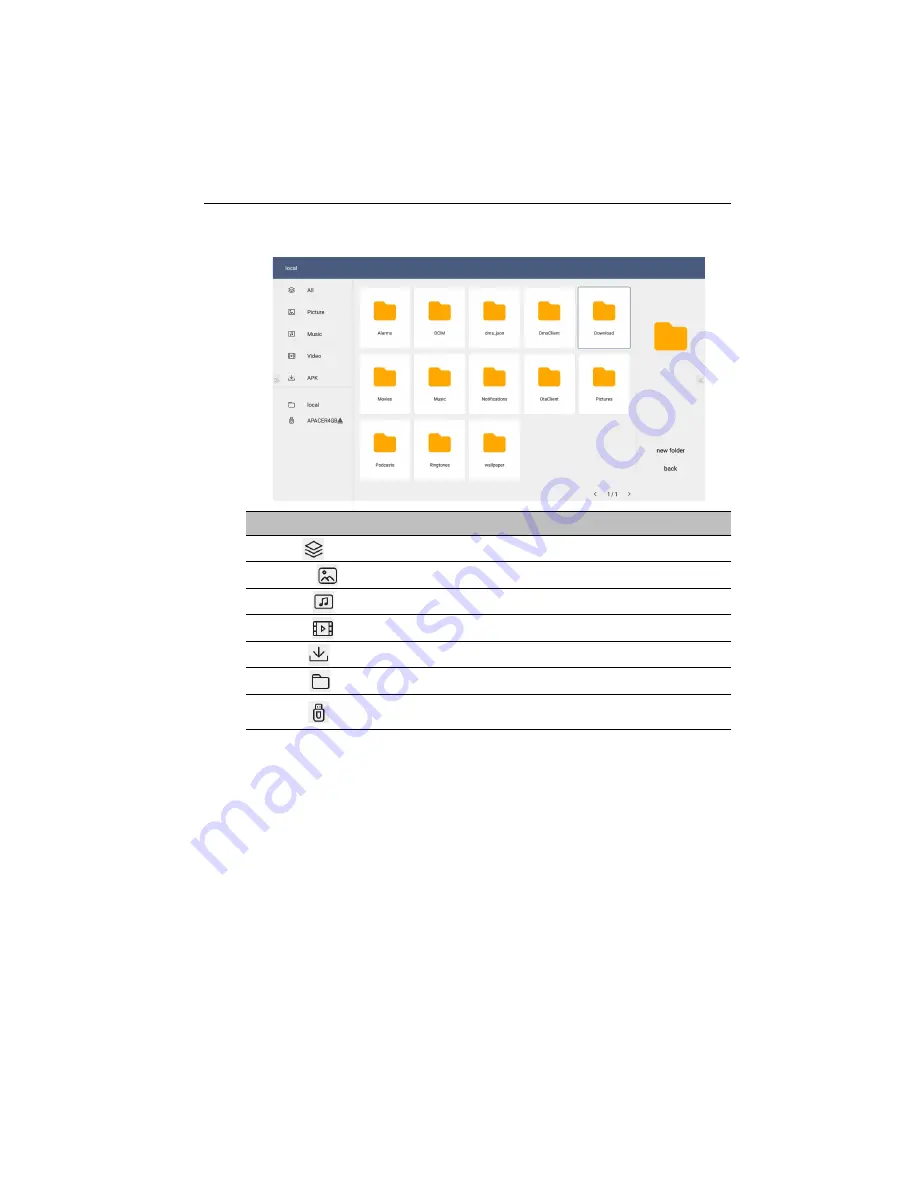
File

File

 allows you to manage and play


your photos, music, or video files.

Select the file you want to play and the media player will automatically launch. The 

following sections describe how to use the media player to play picture, music or video 

files on the display.

Function

Description

All


(

)

Lists all files.

Picture


(

)

Lists image files.

Music


(

)

Lists audio files.

Video


(

)

Lists video files.

APK


(

)

Lists app installation files.

local


(

)

Accesses the internal storage of the display.

USB


(

)

Accesses USB drives inserted into one of the USB ports at the rear 
panel of the display.

Summary of Contents for IL4301

Page 1: ...IL4301 IL5501 Interactive Flat Panel User Manual ...

Page 2: ...The terms HDMI and HDMI High Definition Multimedia Interface and the HDMI Logo are trademarks or registered trademarks of HDMI Licensing Administrator Inc in the United States and other countries Copyright Copyright 2021 BenQ Corporation All rights reserved No part of this publication may be reproduced transmitted transcribed stored in a retrieval system or translated into any language or computer...

Page 3: ...ual and related document www BenQ com Business SUPPORT Downloads model name User Manual EU only Dismantled information Available on the user manual download page This document is provided based on Regulation EU 2019 2021 to repair or recycle your product Always contact the local customer service for servicing within the warranty period If you wish to repair an out of warranty product you are recom...

Page 4: ...s of the display and their functions 13 Rear panel 13 Input output terminals 14 Remote control 17 Using the remote control 19 Connection 21 Connecting the VGA input 21 Connecting the digital inputs 22 Connecting the touch module 23 Connecting the video output 24 Connecting to serial port 25 Connecting power 26 Basic operations 27 Turning the display on or off 27 Initial setup 28 OSD Setting 28 Swi...

Page 5: ... Settings menu 38 Android system interface 51 Main screen 51 All Apps 53 Product information 66 Specifications 66 Dimensions IL4301 68 Dimensions IL5501 69 Supported input signal resolution 70 Troubleshooting 71 Accessibility Requirements for Rehabilitation Act of 1973 Section 508 74 10 1 21 ...

Page 6: ...y Using wrong or unsuitable accessories may cause the display to fall and result in serious personal injuries Make sure that the surface and fixing points are strong enough to sustain the weight of the display To reduce the risk of electric shock do not remove covers No user serviceable parts inside Refer servicing to qualified service personnel To prevent personal injuries mounting the display or...

Page 7: ...nufacturer or sold with the apparatus When a cart is used use caution when moving the cart apparatus combination to avoid injury from tip over 13 Unplug this apparatus during lightning storms or when unused for long periods of time 14 Refer all servicing to qualified service personnel Servicing is required when the apparatus has been damaged in any way such as power supply cord or plug is damaged ...

Page 8: ... the operation of the display This condensation will usually disappear after around 2 hours of normal operation RE series does not offer image retention function for more information please refer to installation guide If a still image is required for a display it is recommended to enable Pixel shift RE series does not support portrait use portrait use may cause display damage BenQ warranty will no...

Page 9: ...Bringing Enjoyment N Quality to Life corporate vision with the ultimate goal to achieve a low carbon society Besides meeting international regulatory requirement and standards pertaining to environmental management BenQ has spared no efforts in pushing our initiatives further to incorporate life cycle design in the aspects of material selection manufacturing packaging transportation using and disp...

Page 10: ... 1 IR extender cable x 1 Remote control AAA battery x 2 Quick start guide The type of power cord supplied may differ from that illustrated depending on your region of purchase Before discarding the package check that you haven t left any accessories inside the box Dispose of packaging materials wisely You can recycle the cardboard carton Consider storing the package if possible for future transpor...

Page 11: ...isplay on a wall 1 Place a clean dry and lint free cloth on a flat horizontal and object free surface Make sure that the size of the cloth is larger than the display 2 Gently lay the display on the cloth with the LCD screen facing down 3 Remove the desktop stands from the display if installed 4 Identify the wall mounting screw holes on the back of the display as shown in the illustration 5 Install...

Page 12: ...se as illustrated ensuring that the IR sensor of the display is orientated rightward from the front of the display To maintain proper ventilation keep at least 10 mm of clear space from the back cover of the display to the wall Please consult a professional technician for wall mount installations The manufacturer accepts no liability for installations not performed by a professional technician 10m...

Page 13: ... the display and their functions Rear panel IL4301 IL5501 1 2 3 4 5 6 7 9 10 8 1 2 3 4 5 6 7 9 10 8 No Name Description Input Opens the input source menu Confirms a selection in the OSD menu Left Decreases the volume Scrolls leftward in the OSD menu 1 2 ...

Page 14: ...t source menu Menu Opens closes the OSD menu Power Turns the display on off Power Switch Turns on off the power supplied from the AC IN port AC IN port Connects to a power outlet through the supplied power cord Remote Control Sensor Power Status Indicator Receives signals from the remote control Indicates the operating status of the display No Name Description 3 4 5 6 7 8 9 10 1 2 3 4 5 6 7 8 14 1...

Page 15: ... external computer s USB port needs to be connected to the corresponding touch port Once the driver is installed the external computer can be controlled via touch gestures on the display the touch function is enabled for the VGA and HDMI channels by default USB1 Connects with USB devices such as keyboards point devices or flash drives USB2 Connects with USB devices such as keyboards point devices ...

Page 16: ...le Supports 10 100 Mbps transmission speed LAN1 Connects with a local network using a standard Ethernet cable Supports 10 100 Mbps transmission speed OPS Slot Supports installation of an OPS Open Pluggable Specification device No Name Description 11 12 13 14 15 16 USB2 0 5V 500mA USB3 0 5V 1 0A OPS 18V 5A Direct Current DC Alternating Current AC The maximum length for the cables to be used with th...

Page 17: ...to the different mode under non Android system Mode Full 4 3 Film Subtitle PC mode MULTI MEDIA buttons The buttons are used to operate the media functions under Multi Media APP Numeric buttons 0 9 Press to enter numbers SCREEN SHOT Capture the printed screen and save to the USB drive CHLIST Delete a character view program list Note It is only working on some specific regions MUTE Turn on off the s...

Page 18: ...the screen the screen will turn black when the OSD menu is off Press again to resume MENU Activate the OSD menu FREEZE Freeze the screen OK Confirm the selected options or save changes CURSOR KEYS Scroll through settings and options in the OSD menu BACK Press this key to return to previous page HOME Show the main screen of Android system 2 3 1 7 8 9 12 16 14 18 22 21 23 5 6 4 10 13 11 17 15 19 24 ...

Page 19: ...rt ment cover 2 Insert the supplied batteries ensuring that the positive and negative marked battery terminals match the and marks in the battery compartment The supplied batteries are provided for your convenience so that you can operate the display straight away You should replace them as soon as possible 3 Refit the battery compartment cover ...

Page 20: ...the remote control at the sensor at the display s bottom left side within a distance of less than 5m and a horizontal and vertical angle of less than 30 degrees Do not let the remote control become wet or place it in humid environments like bathrooms If the display s remote control sensor window is exposed to direct sunlight or strong light the remote control may not operate properly In this situa...

Page 21: ... the VGA output jack on a computer using a D Sub 15 pin cable 2 Connect the computer s audio output jack to the PC AUDIO jack on the display with a suitable audio cable 3 Press INPUT on the remote control and then select VGA from the input source menu D Sub 15 pin cable Audio cable Computer ...

Page 22: ...hen select HDMI1 or HDMI2 from the input source menu To use the DP interface 1 Connect the DP jack on the display to the DP output jack on a computer or external A V device using a DP cable 2 Press INPUT on the remote control and then select DP from the input source menu The applicable cable is not supplied and should be purchased separately The display provides a selection for the dual monitor mo...

Page 23: ...ding cables 2 Press INPUT on the remote control and then select the interface through which the display is connected to a computer Avoid blocking the touch screen frame where sensors are located when initiating the touch module It is highly recommended that you connect the display to the PC or laptop directly Avoid connecting the display to a face plate device which may cause failures in touch ope...

Page 24: ...isplay to duplicate the video from the input source 1 Connect the HDMI OUT jack on the display to the HDMI jack of the second display using an HDMI cable 2 Plug in power cord and switch power on 3 Press Power on the remote control to turn on the display HDMI OUT Display ...

Page 25: ... is not supplied and should be purchased separately This connection is applicable to straight through RS232 cable only After using serial port line to connect central control equipment and machine certain function of the machine can be controlled via central control equipment such as machine on off and adjustment of sound volume etc RS232 cable Computer ...

Page 26: ...used in your region Only use an appropriate power cord for your region Never use a power cord which appears damaged or frayed or change the plug type on the power cord Be aware of the power loading when you use extension cords or multiple outlet power boards There are no user serviceable parts in this display Never unscrew or remove any covers There are dangerous voltages inside the display Turn o...

Page 27: ...g the latch for the IR sensor Not pulling down the IR sensor due to cosmetic purposes will not affect the performance of the IR sensor To turn on the display press Power on the rear panel or on the remote control To turn off the display press Power on the rear panel or on the remote control The system will automatically enter standby mode Power Switch Power Switch IL4301 IL5501 IR Sensor Power But...

Page 28: ...language date and time and network Or your can skip some of these steps and complete the setup later OSD Setting Use one of the following methods to enter the OSD menu Press MENU on the remote control Press the menu button on the rear panel Refer to Menu operations on page 38 for more information Switching input signals To select an input signal do either one of the following Press MENU on the rem...

Page 29: ...tware partner software download html Then enter the serial number can be found on the sticker attached on the back of the display and click OK to access the Software download page Setting up the Internet connection Your display must be connected to a network to conduct OTA updates or surf the Internet Network setting On the home screen go to Setting System About Status If there is no IP address sh...

Page 30: ...tically switch to ON A list of available networks will show on the screen 3 Touch the network s name to connect to the network The password is needed if it is your first time to use the network Key in the password and press Connect The device is now connected to the WLAN If you are connecting to a secured wireless network enter the password for the wireless network access when prompted and tap Con...

Page 31: ...r To manually update the software 1 Go to System About 2 Select one of the following options to update the software If you want the system to search for the latest software and automatically start the update process select Update system If you want to install the update software stored on a USB drive select USB update Software update process may take some time to complete During the update process...

Page 32: ...ust the audio volume level do either one of the following Press VOL VOL on the remote control to adjust the volume Press on the control panel of the display Go to Setting General to adjust the volume Refer to General settings on page 39 for more information ...

Page 33: ...list of gestures you can use on the touch screen Ensure that you have installed the USB cable on the display to a computer Windows is a registered trademark of Microsoft Corporation in the United States and other countries OS functions Gesture actions For Windows XP Windows 7 Windows 8 and Windows 10 Click Tap the screen once Double click Tap the screen twice Right click 1 Press on the target 2 Ho...

Page 34: ...er Flick in a desired direction Multi touch functions For Windows 7 Home Premium Professional Enterprise and Ultimate versions Right click 1 Press on the target 2 Tap the screen with another finger 3 Release the second finger Scrolling Drag one or two fingers up or down Zoom Move two fingers apart or toward each other OS functions Gesture actions or ...

Page 35: ...e S3 Press and hold for 4 seconds OS functions Gesture actions Gesture Description For Windows 8 Press and hold to learn This touch interaction causes detailed information or teaching visuals for example a tooltip or context menu to be displayed without a commitment to an action Anything displayed this way should not prevent users from panning if they begin sliding their finger Tap for primary act...

Page 36: ...o the panning direction selects objects in a list or grid ListView and GridLayout controls Display the AppBar with relevant commands when objects are selected Pinch and stretch to zoom While the pinch and stretch gestures are commonly used for resizing they also enable jumping to the beginning end or anywhere within content with Semantic Zoom A SemanticZoom control provides a zoomed out view for s...

Page 37: ...ll amount of alcohol to clean the infrared plastic filter To avoid damage to the screen never use any type of abrasive materials to wipe the screen Use a neutral detergent to clean the touch screen Avoid using detergents with erosive substance such as banana oil or ammonia Moisten a clean soft lint free cloth with a neutral detergent and then clean the touch screen Do not spray a detergent on the ...

Page 38: ...ress MENU on the remote control or the menu button on the rear panel to open the OSD menu Press on the remote control and press OK to confirm or directly click a desired input source Press on the remote control or click a blank area outside the menu to exit the menu ...

Page 39: ...dio and Picture settings Audio audio Use the volume bar to adjust the volume for the display Swipe to enable or disable Mute Go to More to enter the Audio menu Picture Use the brightness bar to adjust the brightness for the display Go to More to enter the Picture menu ...

Page 40: ...tly click an item Press on the remote control or click a blank area outside the menu to exit the menu Menu Description Balance Adjusts the sound balance of the audio output 0 to 100 Sound mode Switches between preset sound modes that best suit your environment Standard Movie Class Meeting Custom ...

Page 41: ...ption Picture Mode Switches between preset picture modes that best suit the type of images shown on the screen Standard Bright Soft Custom Brightness Adjusts the brightness of the display 0 to 50 Contrast Adjusts the contrast of the display 0 to 50 Color temperature Adjusts the color temperature of the display Cool Normal Warm Image noise reduction Reduces image noise caused by different media pla...

Page 42: ...ation Custom source name Allows you to set unique names for each input source Apps Accesses all the applications installed in the display Storage Allows you to manage the display s storage Advanced settings Accesses more device settings Refer to Advanced settings on page 44 for more information Screen Allows you to adjust the display s image settings Refer to Screen settings on page 45 for more in...

Page 43: ... a specified period of time Off 1 5 10 20 30 40 50 min 1 2 3 4 hr HDMI CEC Enables Disables the HDMI CEC function HDMI output resolution Configures the resolution of the HDMI output 1920 x 1080 3840 x 2160 HDMI out Enables Disables the HDMI out function On Off Orientation Sets the orientation of the display Landscape Portrait Channel auto switch Allows the display to automatically detect the avail...

Page 44: ... Shifts the image shown on the screen to prevent image burn in on the display On Off DCR Enables Disables DCR Dynamic Contrast Ratio On Off USB auto play Allows the display to play the multimedia content stored on a USB flash drive conntected to one of the display s USB ports On Off When USB auto play is enabled a notification message will appear when you insert a USB flash drive into one of the d...

Page 45: ...buttons on the remote control VOL To unlock the keypad press the following sequence of buttons on the remote control VOL For image retention please see Notes on the LCD panel of this display on page 7 for more information Menu Description Aspect Ratio Adjusts the aspect ratio of the display 16 9 PTP Auto Menu Description H Position Adjusts the horizontal position of the video from the VGA input so...

Page 46: ...ke on LAN Close Power off reminder and Add task Refer to Startup Shutdown on page 49 for more information USB cloning Allows you to import or export the display settings The exported display settings will be saved in db format and put under the path USB1 Settings db Certificates Displays trusted credentials It also allows you to install and delete credentials Factory data reset Resets all custom s...

Page 47: ...Menu operations 47 Proxy setting 1 Go to Network Ethernet 2 Press Proxy to go to the proxy setting 3 Select the one of the options based on your requirements None Removes the proxy setting ...

Page 48: ...Menu operations 48 Manual Allows you manually configure all setting options for proxy Proxy Auto Config Allows you to input PAC URL ...

Page 49: ...Menu operations 49 Startup Shutdown Go to System Startup Shutdown For Startup source you can choose Last channel or other sources ...

Page 50: ...0 For OPS Power option you can choose Startup only through OPS startup option or Startup through any channel For Close Power off reminder you can set on or off time Schedules can be made by choosing the days of the week ...

Page 51: ... the display is turned on You can press on the remote control to open the Android main screen Alternatively press menu button on the rear panel to open the OSD menu and then select ANDROID to open the Android main screen Icon Function Description X Sign Serves as a digital content management system that provides multiple templates and remote scheduling through the Internet Refer to X Sign on page ...

Page 52: ...ndroid main interface to access the side tool bar Helps Helps allows you to access the user manual of the display When the Helps screen appears scan the QR code to view the user manual Icon Function Description Home Returns to the Android main screen Back Returns to the previous screen ...

Page 53: ... collaborative meetings InstaShare is not pre installed You need to download InstaShare via BenQ Suggest Refer to File on page 55 for more information BenQ Suggest Allows you to download recommended apps Refer to BenQ Suggest on page 62 for more information WPS Office Allows you to read PDF files or edit files created in Microsoft Office PowerPoint or Excel Refer to WPS Office on page 63 for more ...

Page 54: ...cess to instant or scheduled group meetings with any other TeamViewer Meeting users Firefox Allows you to view websites TeamViewer QuickSupport Allows technicians to provide remote technical assistance Settings Allows you to manage network and other device settings Shortcut Allows you to set up shortcut for apps X Sign Designer can be downloaded from BenQ website Please refer to the postcard in th...

Page 55: ...ing sections describe how to use the media player to play picture music or video files on the display Function Description All Lists all files Picture Lists image files Music Lists audio files Video Lists video files APK Lists app installation files local Accesses the internal storage of the display USB Accesses USB drives inserted into one of the USB ports at the rear panel of the display ...

Page 56: ...t Icon Description Plays the previous image file Plays Pauses the current playback Plays the next image file Magnifies the current image Shrinks the current image Rotates the current image counter clockwise Rotates the current image clockwise Displays file information Sets the current image as wallpaper Image Resolution JPEG 3840x2160 PNG BMP ...

Page 57: ...udio file Plays Pauses the current audio file Plays the next audio file Sets the play sequence as play in order repeat the current audio or play randomly Displays the content of the playlist Displays file information Audio Codec Sampling Rate Bit Rate MPEG 1 2 2 5 Layer 3 8 KHz 48 KHz 8 Kbps 320 Kbps MPEG 1 2 Layer 1 16 KHz 48 KHz 32 Kbps 448 Kbps MPEG 1 2 Layer 2 16 KHz 48 KHz 8 Kbps 384 Kbps AAC...

Page 58: ...o file Rewinds the video Plays Pauses the current video file Fast forwards the video Plays the next video file Plays the next audio file Displays the content of the playlist Displays file information Opens the setting menu and allows you to configure the play settings for the video file Allows you to loop a specified part of the video Adjusts the video volume ...

Page 59: ...9 Supported video format Video Codec Resolution Bit Rate MPEG 1 2 1080P 30 fps 30 Mbps MPEG 4 1080P 30 fps 40 Mbps H 263 1080P 30 fps 40 Mbps H 264 4k2k 60 fps 135 Mbps H 265 4k2k 60 fps 100 Mbps VP8 1920 x 1080 30 fps 50 Mbps ...

Page 60: ...5 Enter the connect code shown on the upper right corner of the display or you can also find the connect code in Setting 6 Once the mobile device has successfully connected to the display a confirmation message will appear on the display Select Allow on the display to confirm the connection 7 Once connected you can Mirror the display s screen on your mobile device by tapping Screen Mirroring on yo...

Page 61: ...ng with Android OS 61 You can also select Setting in the lower right corner of the display to modify the settings for InstaShare such as the InstaShare ID name connect code or mirroring confirmation message ...

Page 62: ...t is launched you can select the category on the left panel to browse the suggested apps Select an app from the selected category to view the basic description of the app Function Description Search Searches for an app Tools Lists the available apps SelfUpdate Allows you to update the BenQ Suggest app ...

Page 63: ...ither the display s internal memory an external storage device or cloud storage 2 Select the function menu on the top panel to access the file format s various functions Function Description Open Allows you to browse and open a file Share Allows you to share your files through email or other sharing applications Manage Allows you to edit or manage the document The description is for a PowerPoint f...

Page 64: ...o Transitions Allows you to apply or adjust the timing of a transition Pen Allows you to write draw paint or sketch Play Allows you to Select to start a slideshow Save As Allows you to save the presentation file on either the display s internal memory an external storage device or cloud storage Undo Allows you to undo an action Redo Allows you to redo the last action Close Allows you to close the ...

Page 65: ...Supported Office versions 97 2000 XP 2003 2007 2010 Supported Office software formats Office Software Supported File Formats Word wps wpt doc docx dot dotx txt log irc c cpp h asm s java asp bat bas prg cmd Excel et ett xls xlsx xlt xltx csv xlsm xltm PowerPoint ppt pptx ...

Page 66: ...l pitch mm IL4301 0 245 H x 0 245 V IL5501 0 315 H x 0 315 V Response time ms typ IL4301 8 IL5501 9 Panel Bit 8 or 10 10 bit Touch Touch technology Infrared Touch Touch resolution 32768 x 32768 USB Touch Port x 1 USB type B Input Video VGA x1 HDMI x2 2 0 DP x1 1 2 Audio PC Audio Input x1 3 5mm USB Type A USB 2 0 x2 Type B USB touch x1 Control Yes OPS Slot x1 Output Audio Line out 3 5mm x 1 Video H...

Page 67: ...I HDCP O DP HDCP O CEC control O Firmware update USB OTA RTC function O Specifications and functions are subject to change without notice Item IL4301 IL5501 System System Memory 3GB Storage 32GB OS Android 8 0 This Android 8 0 operating system is not standard Android so access to Google PlayTM is not available APK cannot be installed in the default location unless given permission by the managemen...

Page 68: ...Product information 68 Dimensions IL4301 Unit mm ...

Page 69: ...Product information 69 Dimensions IL5501 Unit mm ...

Page 70: ...4 x 768 60Hz 1280 x 720 60Hz 1280 x 960 60Hz 1360 x 768 60Hz 1366 x 768 60Hz 1600 x 900 60Hz 1680 x 1050 60Hz 1920 x 1080 30Hz 1920 x 1080 50Hz 1920 x 1080 60Hz 3840 x 2160 30Hz 3840 x 2160 50Hz 3840 x 2160 60Hz 480i 60Hz 480p 60Hz 576i 50Hz 576p 50Hz 720p 50Hz 720p 60Hz 1080i 50Hz 1080i 60Hz 1080p 50Hz 1080p 60Hz supported Vacant not supported ...

Page 71: ...isplay automatically optimize the display of computer image If the result of the Auto function is not satisfactory use the Phase H Position and V Position functions to manually adjust the image The control panel buttons do not work Have you locked the control panel buttons Unlock the buttons and try again The remote control does not work Have you locked the remote control function Unlock the funct...

Page 72: ... position in menu Touch function invalid Check whether touch driver is installed and started Check whether the size of article touched is comparable with finger Touch positioning not correct Check whether driver is properly installed and make correction Check whether touch pen is facing the screen No picture and no sound Check whether the machine is started state Check whether signal wire is well ...

Page 73: ...Troubleshooting 73 VGA output without sound Check whether connect external device with headphone cable Problem Solution ...

Page 74: ...ailable by using the On Screen Display OSD controls on the products BenQ s displays include user selectable color controls such as color temperature selections IFP 5500K 9300K 12000K DS 6500K 9300K 12000K with a wide range of contrast levels BenQ s multimedia displays usually have one or two speakers for audio performance which allow users including hearing impaired to interact with the computer s...

Reviews: