


9
Kula AV
Installation Manual
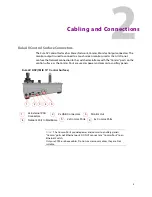
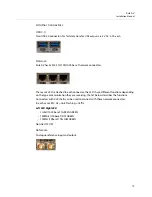
Connecting the Control Surface to the MAV-AUD-FADER Module
Below is a diagram showing how to connect a Kula AV control surface to the MAV-AUD-
FADER.
Note:
Notice that there is an Input and Output
socket. Use the input socket only.
The loop-through cannot be used!
Connect the Ethernet cable to the
Comms port on the control surface
Connect the Ethernet cable
to the “Input” port
MAV-AUD-FADER (under side)
MAV-AUD-FADER
Kula AV Control Surface
Supplied Ethernet Cable
Sticker on underside
of the MAV-AUD-FADER


