background image

BeautifyW

orldwide.com

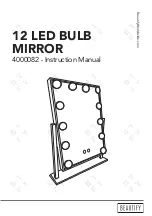
12 LED BULB 

MIRROR

4000082 - Instruction Manual

Summary of Contents for 4000082

Page 1: ...BeautifyWorldwide com 12 LED BULB MIRROR 4000082 Instruction Manual...

Page 2: ...Safety Instructions 1 Contents Switching On 2 Warm Light Cold Light 3 Warranty 4 CONTENTS...

Page 3: ...there are no missing or defective parts Never use defective parts Keep away from sources of ignition Keep away from damp or humid areas Do not immerse in water for any reason CAUTION Do not use any ha...

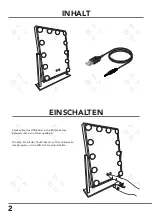
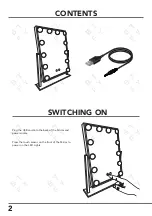
Page 4: ...CONTENTS Plug the USB cord into the back of the Mirror and power source Press the touch sensor on the front of the Mirror to power on the LED Lights SWITCHING ON 2...

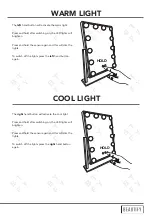
Page 5: ...this will dim the lights To switch off the lights press the left hand button again HOLD The right hand button will activate the cool light Press and hold after switching on the LED lights will brighte...

Page 6: ...oof of the purchase date The warranty only applies if the product is used solely in the manner indicated in the Warnings page of this manual and all other instructions have been followed accurately An...

Page 7: ...USER NOTES...

Page 8: ...Consignes de s curit 1 Dans la bo te Allumer 2 Lumi re chaude Lumi re froide 3 Garantie 4 SOMMAIRE...

Page 9: ...vous assurer qu aucune pi ce ne manque ou n est d fectueuse N utilisez jamais de pi ces d fectueuses Tenez loign de toutes sources d ignition Tenez loign des zones humides N immergez jamais dans l ea...

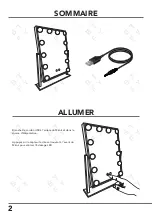
Page 10: ...SOMMAIRE Branchez le cordon USB l arri re du Miroir et dans la source d alimentation Appuyez sur le capteur tactile se trouvant l avant du Miroir pour allumer l clairage LED ALLUMER 2...

Page 11: ...ci att nuera l clairage Pour teindre appuyez de nouveau sur le bouton de gauche HOLD Le bouton de droite activera la lumi re froide Appuyez et restez appuy apr s avoir allum les ampoules LED s illumin...

Page 12: ...une preuve d achat re u ou attestation pour prouver la date de l achat La garantie ne s applique que si le produit a t utilis de la mani re indiqu e dans la section de la page des avertissements de ce...

Page 13: ...NOTES DE L UTILISATEUR...

Page 14: ...Sicherheitshinweise 1 Inhalt Einschalten 2 Warmes Licht K hles Licht 3 Garantie 4 INHALT...

Page 15: ...kt sind Verwenden Sie niemals defekte Teile Halten Sie den Spiegel fern von Z ndquellen Halten Sie ihn fern von feuchten Bereichen Tauchen Sie ihn aus keinem Grund in Wasser VORSICHT Verwenden Sie kei...

Page 16: ...NHALT Stecken Sie das USB Kabel in die R ckseite des Spiegels und in die Stromquelle ein Dr cken Sie auf den Touch Sensor auf der Vorderseite des Spiegels um die LED Lichter einzuschalten EINSCHALTEN...

Page 17: ...wird dunkler Um die Lichter auszuschalten dr cken Sie den linken Handknopf erneut HOLD Der rechte Handknopf aktiviert das k hle Licht Dr cken und halten Sie ihn nach dem Einschalten und die LED wird h...

Page 18: ...nkaufdatums auf Die Garantie gilt nur wenn das Produkt nur wie in dieser Anleitung beschrieben verwendet wurde und wenn alle Anweisungen befolgt wurden Jeglicher Missbrauch des Produkts oder der Art u...

Page 19: ...NOTIZEN...

Page 20: ...Instrucciones de Seguridad 1 Contenido Encendido 2 Luz C lida Luz Fr a 3 Garant a 4 CONTENIDO...

Page 21: ...que no faltan piezas ni que haya piezas defectuosas Nunca usad piezas defectuosas Mantened alejado de fuentes de ignici n Mantened alejado de reas h medas o h medas No sumergid en agua por ning n moti...

Page 22: ...CONTENIDO Enchufad el cable USB en la parte posterior del Espe jo y la fuente de alimentaci n Presionad el sensor t ctil en la parte delantera del espejo para encender las luces LED ENCENDIDO 2...

Page 23: ...y esto atenuar las luces Para apagar las luces presione el bot n de la mano izquierda nuevamente HOLD El bot n de la derecha activar la luz fr a Presione y mantenga presionado despu s de encender las...

Page 24: ...comprobante de recibo de compra o extracto como prueba de la fecha de compra La garant a solo se aplica si el producto se utiliza nicamente de la manera indicada en la p gina de Advertencias de este m...

Page 25: ...NOTAS DE USUARIO...

Page 26: ...Istruzioni di sicurezza 1 Componenti Accensione 2 Luce calda Luce fredda 3 Garanzia 4 INDICE...

Page 27: ...e per accertarsi che non ci siano parti mancanti o difettose Non usare mai parti difettose Tenere lontano da fonti di ignizione Tenere lontano da aree bagnate o umide Non immergere per alcun motivo in...

Page 28: ...COMPONENTI Inserire il cavo USB sul retro dello Specchio e alla fonte di alimentazione Premere il sensore touch sulla parte anteriore dello Specchio per accendere le luci a LED ACCENSIONE 2...

Page 29: ...da affievolire le luci Per spegnere le luci premere di nuovo sul pulsante a sinistra HOLD Il pulsante a destra attiver la luce fredda Premere e mantenere premuto dopo l accensione le spie a LED si ill...

Page 30: ...a ricevuta del pagamento quale prova della data d acquisto La garanzia si applica solo se il prodotto viene utilizzato esclusivamente come indicato nella pagina delle Avvertenze e se tutte le altre in...

Page 31: ...NOTE DELL UTENTE...
Page 32: ...ara DOMU Brands Ltd M24 2RW Vielen Dank dass Sie den Spiegel mit 12 LED Birnen gekauft haben Beautify ist eine registrierte Handelsmarke von DOMU Brands Ltd Hergestellt in China f r DOMU Brands Ltd BL...

Reviews: