background image

©BEA

 | Original Instructions

75.5929.01 LZR-SIGMA 20210630 


Page 11 of 17

SETUP

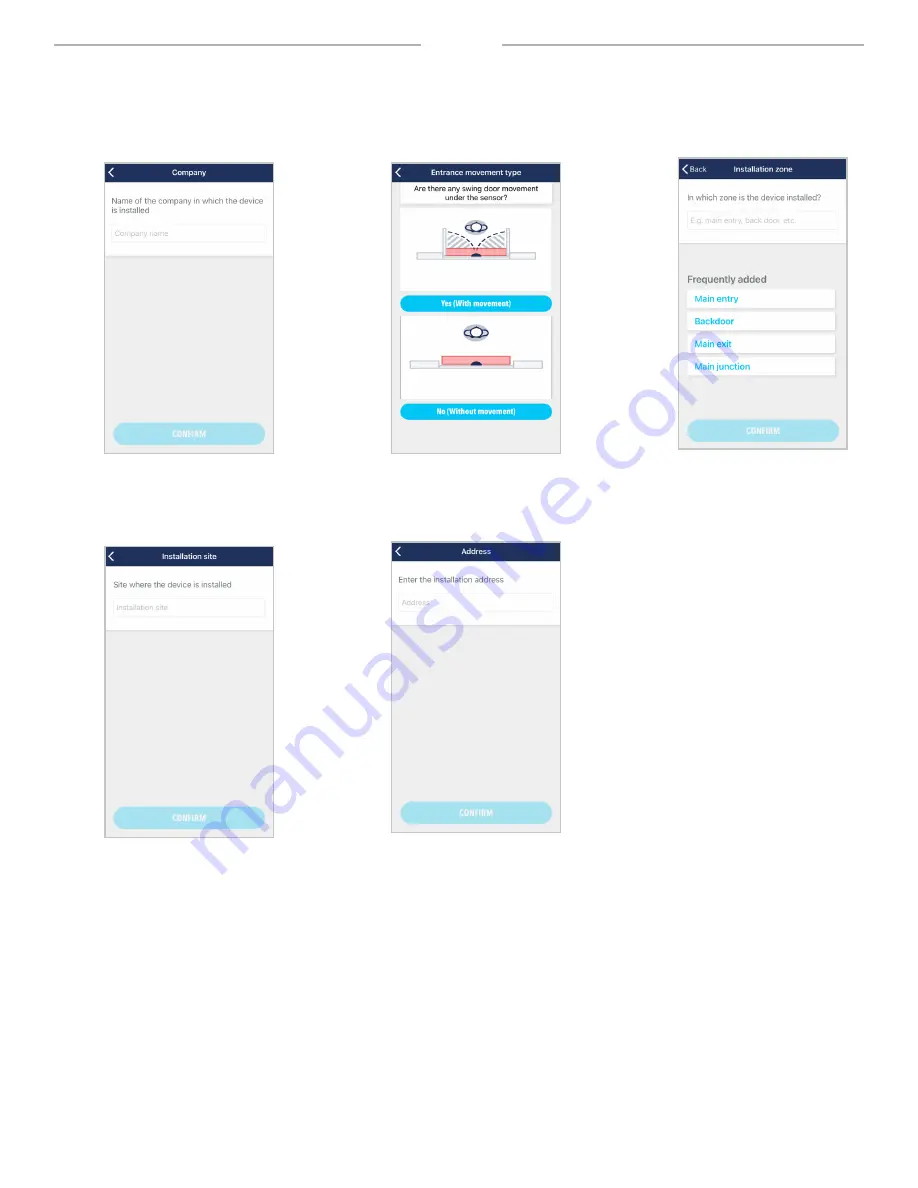
Before beginning the setup process, you must enter data about the sensor you will be programming.  
Log in to the LZR-SIGMA mobile app and follow instructions.

Enter the full name of the 

company where the sensor is 

being installed.

Choose if the sensor is installed 

above an area where there will be 

swing door movement.

Enter a unique description of the 

entryway or choose from a list of 

frequently used descriptions.

Identify the site (usually a store 

number or location name).

Begin typing the address and a list will 

autopopulate with locations.  Choose 

from an option within the list.

Summary of Contents for LZR SIGMA

Page 1: ...s 2 LED indications 3 Technical specifications 3 HOW IT WORKS 4 How to connect power 4 How to connect network 4 INSTALLATION 5 Installation preparation 5 Installation location tips 7 Mounting options 9 Before you begin 9 Mounting 10 SETUP 11 ADDITIONAL FEATURES 14 INSTALLATION VERIFICATION 15 TROUBLESHOOTING 16 APPENDIX SENSOR LOG 17 CONTENTS ...

Page 2: ...side of box When installing multiple sensors at one site It is considered best practice to log each sensor and its location Please use the log chart Appendix by adhering the extra sticker loose in box in the appropriate space and log the site location drill screwdriver Phillips head wire cutters optional LZR SIGMA app power see page 4 for power options Information Color LZR SIGMA IP 192 169 1 2 us...

Page 3: ...R Wavelength 905 nm average output power 0 05 mW Class 1 EN 60825 Device dimensions 7 87 in L x 5 59 in W x 2 40 in H elliptical if mounted with recessed accessory visible height 37 mm invisible height 65 mm Temperature range 13 131 F if powered storage temperature 31 158 F Humidity 0 95 non condensing Power 24 VDC 10 External DC power or PoE IEEE802 3af Power consumption Max 12 W Peak Average 6 W...

Page 4: ... continuously For instance if you want to ensure that your sensor is installed appropriately for optimal performance you can access the Sensorio portal sensorio com to schedule and review counting proofs recorded by the camera The camera was purposely designed to record low resolution video to preserve anonymity and can be masked entirely for applications in sensitive areas HOW TO CONNECT POWER HO...

Page 5: ...maximum available height it can be narrowed using the LZR SIGMA mobile app MINIMUM HEIGHT To understand your minimum installation height no lower than 8 ft you must first know the width of your desired detection area Once the desired coverage is identified check the chart below to reveal your minimum installation height You can also visit www meetsigma io sizer to use the LZR SIGMA sizer tool to c...

Page 6: ... Wide view of the immediate environment to show the flow of traffic and any objects that could affect the flow See Figure 1 Angles to show depth of any obstructions above the entryway e g air curtains door hardware See Figure 2 Once you have all of your pictures please email BEA at sigmasupport beasensors com to request a guided installation In your email please include a detailed description of t...

Page 7: ... than what is intended Sensor directionality Observe the A and B markings on the sensor When wall mounting or ceiling mounting near a wall direction A must be pointing away from the wall Proximity to door The sensor should always be center mounted above the desired detection zone exception See Swing Doors section and as close to the entryway as possible while avoiding obstructions ideally no more ...

Page 8: ...oser When possible install SIGMA on the closing side in the middle outside the swing path option 1 When that is not possible you can install SIGMA on the opening side Make sure you place it right above the leading edge option 2 Double leaf Install SIGMA in the center Preferred side is the closing side outside the swing path option 1 Single leaf with door closer If a door closer is obstructing the ...

Page 9: ...to a wall See following page for mounting instructions WALL SURFACE MOUNT CEILING RECESSED MOUNT CEILING WALL MOUNT The Mini Bracket 10MINIBRACKET can also be used in applications that will require the sensor to extend from the wall to avoid obstructions See User s Guide 75 5799 for more information BEA highly recommends downloading the LZR SIGMA mobile app and registering your account before you ...

Page 10: ...h the base 3 Remove the counting head by unclipping it Caution Do not open the counting head as it may result in hazardous radiation exposure Scan me to start X0006F 8 Connect the cable to the counting head Clip the counting head to the base and close SIGMA CLICK CLICK CLASS 1 LASER PRODUCT 7 Or use BEA s wall mounting accessory to secure to the wall 1 Open SIGMA 2 Determine directionality see pag...

Page 11: ...ctions Enter the full name of the company where the sensor is being installed Choose if the sensor is installed above an area where there will be swing door movement Enter a unique description of the entryway or choose from a list of frequently used descriptions Identify the site usually a store number or location name Begin typing the address and a list will autopopulate with locations Choose fro...

Page 12: ...arning the height and will set left and right limits according to the maximum allowed width based on mounting height You may manually adjust left and right limits by simply clicking the edit button beside the given dimension Verify that the learned height is accurate If not see Troubleshooting MANUAL ADJUSTMENT preferred Measure the width of the entryway and increase or decrease limit accordingly ...

Page 13: ...the sensor They are for troubleshooting and data collection purposes only Choose the application type from the list Choose the environment type from the list Choose the entrance type from the list H12345 Once setup is complete perform a manual counting proof to verify that your sensor setup is satisfactory See next page for information on counting proofs ...

Page 14: ...tion regarding the network that the sensor is connected to CAUTION These settings should only be modified by the site network administrator Choosing SET COUNTING AREA will guide you through the laser field setup See page 12 for full run through of screens Choosing COUNTING PROOF will allow you to perform a manual check to verify that the device is counting properly and that setup was successful Ch...

Page 15: ...against the sensor counted number and determine if obstructions are affecting sensor performance or if the sensor mounting orientation is incorrect see page 6 Sensor Directionality 1 3 2 4 2 Perform another manual counting proof and walk at an angle through the detection zone entering on the edges of the detection zone Review proof and determine if limits need widened BEA recommends widening by 6 ...

Page 16: ...ht to within recommended limits 8 18 ft If not possible higher mounting heights are acceptable but beware that people less than 4 feet tall may not be counted Inaccurate counts multiple symptoms could be present Sensor mounted above the maximum height limit Lower the mounting height to within recommended limits 8 18 ft If not possible higher mounting heights are acceptable but beware that people l...

Page 17: ...multiple sensors at one site It is considered best practice to log each sensor and its location Please use the log chart below by adhering the extra sticker loose in box in the appropriate space and log the site location QR code Site location QR code Site location QR code Site location QR code Site location ...

Reviews: